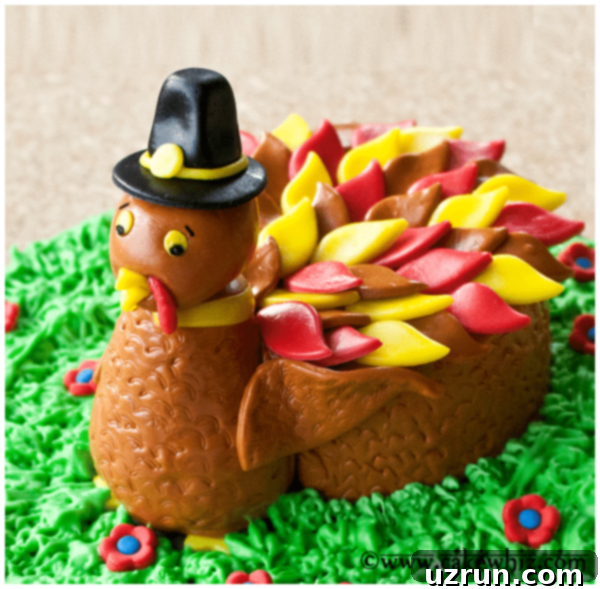
Homemade Thanksgiving Turkey Cake: A Festive Pumpkin Spice Showstopper
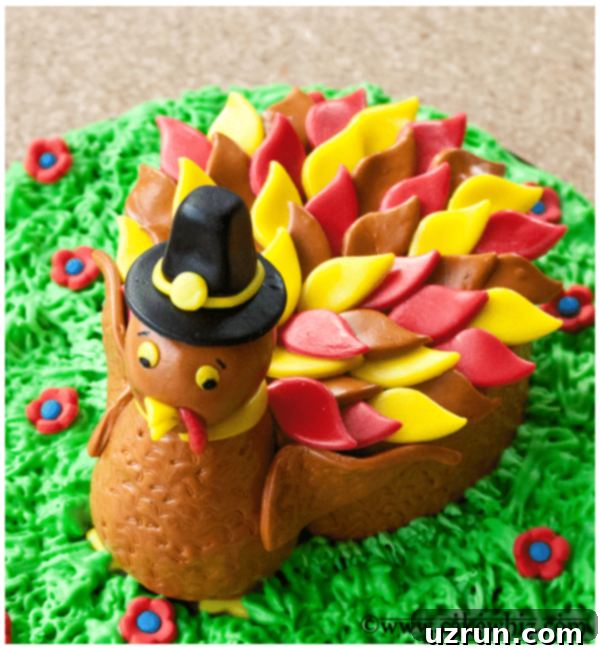
Prepare to impress your guests this holiday season with a truly unique and delightful creation: a homemade turkey cake! This isn’t just any dessert; it’s a showstopping centerpiece, bursting with warm pumpkin flavor and intricately decorated with smooth fondant and delicious icing. Whether you’re hosting a grand Thanksgiving feast or simply looking for a fun and memorable fall treat, this festive turkey cake is guaranteed to bring smiles and compliments to your table.
While Thanksgiving may not be a traditional part of every culture, the beautiful sentiment behind this day resonates universally: gathering with loved ones and reflecting on all the blessings in our lives. In our fast-paced world, it’s easy to overlook the simple joys and abundance we experience. Taking a moment to express gratitude is a truly enriching practice. What better way to embody this spirit of thankfulness and joy than with a whimsical, celebratory cake that pays homage to the holiday’s iconic symbol?
To further embrace the delightful turkey theme and add more festive fun to your holiday baking, be sure to explore my other creative tutorials. You can perfect your cake with an adorable Homemade Turkey Topper. For smaller, kid-friendly treats, try these incredibly Easy Oreo Turkey Cookies or these charming Turkey Cupcakes. All these projects are designed to be simple enough to make with children, adding an extra layer of enjoyment to your family’s holiday preparations!
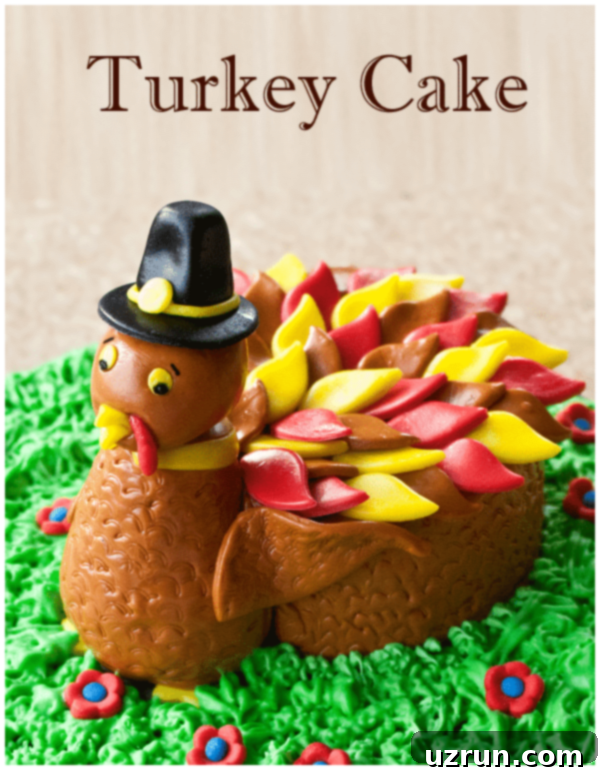
Table of contents
- How To Make Easy Turkey Cake Recipe From Scratch?
- Delicious Variations for Your Fall Turkey Cake
- Expert Tips And Techniques For Decorating Your Thanksgiving Cake
- Proper Storage of Your Decorated Turkey Cake
- More Festive Thanksgiving Desserts to Enjoy
How To Make Easy Turkey Cake Recipe From Scratch?
Creating this festive Thanksgiving turkey cake is an enjoyable process, and with these straightforward steps, you’ll have a delightful dessert ready to impress. The key is careful preparation and allowing each component to set properly.
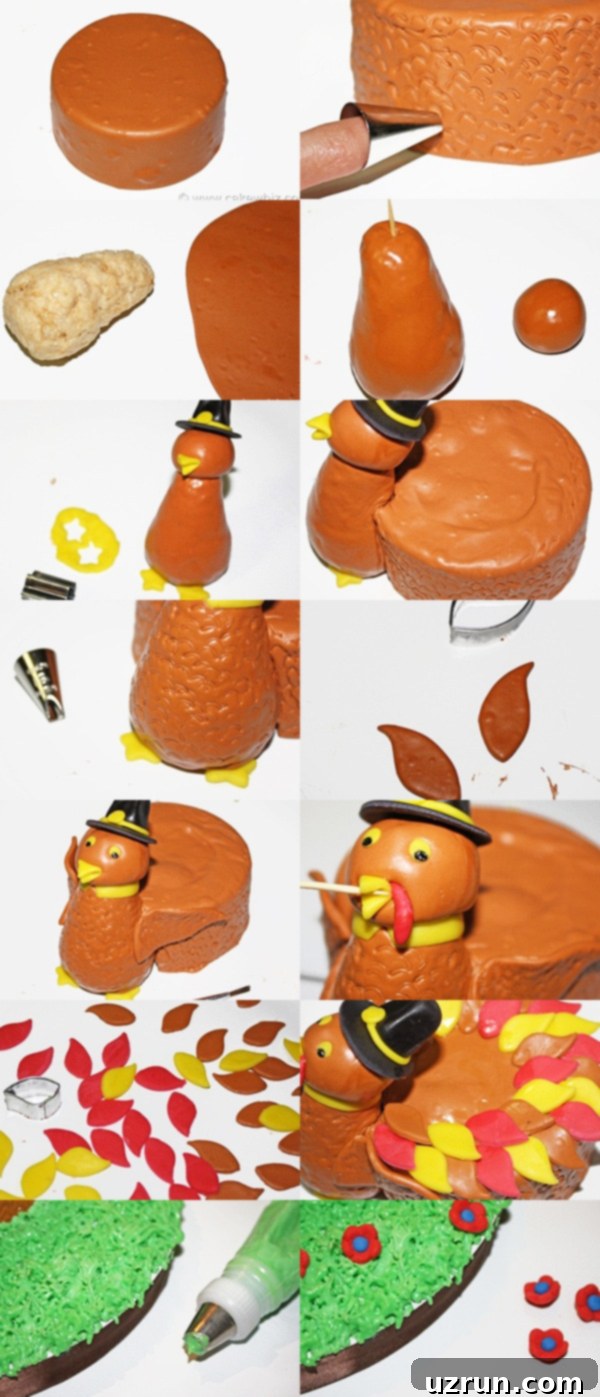
- Bake Cakes: Begin by baking your pumpkin-flavored cake layers according to your chosen recipe (or follow the linked recipe). Ensure they are fully cooked through and then remove them from their pans to cool completely on a wire rack. This step is crucial; attempting to frost or assemble warm cakes will lead to a melted, messy disaster. Patience here ensures a stable foundation for your turkey masterpiece.
- Assemble Cake: Once your cakes are thoroughly cooled, it’s time for assembly. First, use a serrated knife to level off any domes, creating flat, even layers. This ensures a stable and professional-looking cake. Next, fill the layers with your chosen pumpkin butter or filling, then stack them carefully. Finally, give the entire cake a generous crumb coat, followed by a smooth final layer of frosting. This prepares the surface for the fondant.
- Cover in Brown Fondant: Roll out your brown marshmallow fondant evenly. Carefully drape it over your frosted cake, smoothing it gently to remove any air bubbles or wrinkles. Once the cake is fully covered, use a sharp knife or pizza cutter to trim the excess fondant around the base, creating a neat finish. This brown layer forms the body of your turkey.
- Add Feather Indentations: To give the turkey’s body a textured, feathery appearance, use a grass decorating tip (like Wilton tip #233). Gently press the tip randomly onto the sides of the fondant-covered cake. This creates tiny, subtle indentations that mimic the natural look of feathers, adding depth and detail to your design.
- Make Turkey Torso and Face: For the turkey’s main body and head, mold rice krispie treats into a pear shape (for the torso) and a small ball (for the head). These shapes will provide a lightweight and sturdy base. Cover both the pear-shaped torso and the ball-shaped head with additional brown fondant, smoothing it carefully.
- Attach to the Front of Cake: Gently attach the fondant-covered rice krispie torso to the front of your main cake. You may need to scoop out a small portion of the main cake’s side to create a snug fit, using a little icing or corn syrup to secure it. Then, use a toothpick to attach the fondant-covered rice krispie head to the top of the torso, ensuring it’s firmly in place.
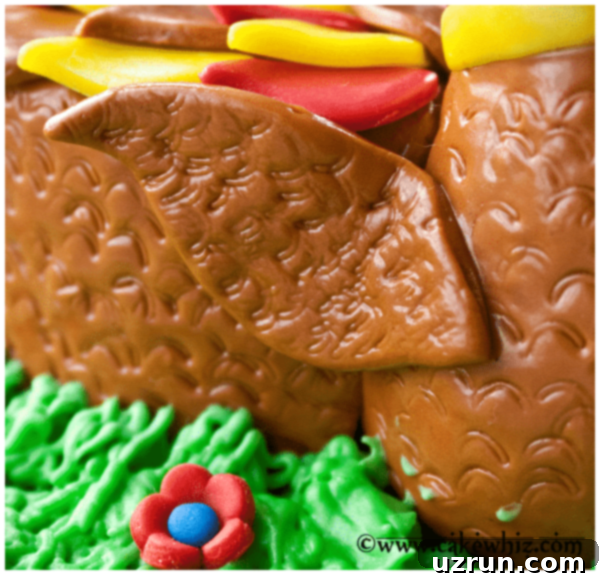
- Craft Wings: Roll out yellow, red, and brown fondant. Using a leaf cutter, cut out two medium-sized leaves for the wings. Further enhance their feathery look by pressing the grass decorating tip (Wilton tip #233) onto them, creating subtle textures.
- Stick Wings on Top: Carefully attach the prepared fondant wings to the sides of the turkey’s torso, just where the torso meets the main cake. A light brush of corn syrup or water on the back of the wings will act as an edible glue, helping them adhere securely and maintain their position.
- Pipe Green Grass: To create a natural-looking base for your turkey, fill a piping bag fitted with a grass tip (Wilton Tip #233) with green buttercream icing. Pipe small, upward strokes around the entire base of the cake, forming a lush, grassy effect that elevates the overall presentation.
- Steam Cake: For a professional, polished finish, gently steam the entire decorated cake. Steaming helps to smooth out any minor imperfections, gives the fondant a lovely sheen, and, most importantly, helps all the fondant pieces adhere more firmly, ensuring your beautiful turkey cake stays perfectly intact.
Delicious Variations for Your Fall Turkey Cake
While the pumpkin-flavored turkey cake is a delightful choice, there are many ways to customize your fall dessert to suit different tastes and occasions. Here are some creative variations to inspire your next baking project, ensuring your Thanksgiving cake is truly unique:
Try different cake flavors: If pumpkin isn’t your preference, or if you simply want to offer a variety, consider other wonderful fall-themed cake bases. A Moist Carrot Cake offers classic spice and a tender crumb, while an Apple Pie Cake brings comforting fruit flavors. For a unique aromatic twist, an Easy Spice Cake {Chai Tea Cake} can add a sophisticated touch, and an Old Fashioned Applesauce Cake is always a beloved, wholesome choice for the season.
Pair with another filling: The filling can significantly enhance the cake’s overall flavor profile. Instead of pumpkin butter, you might opt for a rich Homemade Apple Pie Filling for a fruit-forward treat, or a deeply spiced Crockpot Apple Butter. For a luxurious and indulgent touch, a gooey Homemade Caramel Sauce makes an excellent choice, adding a sweet, buttery contrast.
Try another frosting flavor: The frosting is another canvas for creativity. Instead of traditional buttercream, explore options like a luscious Caramel Frosting {3 Ingredients}, which offers a rich, sweet complement to fall flavors. An Easy Maple Frosting {4 Ingredients} provides a distinct autumnal sweetness, while a fluffy Marshmallow Frosting Recipe adds a delightful lightness and unique texture.
Add Fall themed candles: If you’re celebrating a fall birthday or just want to add extra festivity, incorporate candles in warm, autumnal hues. Red, orange, or yellow candles can perfectly match the vibrant colors of your turkey cake and the fall season, making it even more celebratory and visually appealing.
Add chocolate trees: For an enchanting woodland scene around your turkey, consider adding delicate chocolate trees around the base of the cake. You can use a guide such as this Fall Tree Cake to learn how to create edible chocolate tree decorations, adding a charming, rustic touch that completes the fall theme.
Incorporate real fall foliage elements: While edible decorations are fantastic, you can also consider placing cleaned, food-safe fall leaves around the cake base (on the serving platter, not directly on the cake) for a truly organic and autumnal display. Just ensure they are thoroughly washed and not treated with any chemicals.
Personalize with edible glitter or dusts: For a touch of sparkle and magic, lightly brush edible gold or bronze glitter/dust onto the fondant feathers or other decorative elements. This subtle shimmer can make your turkey cake even more enchanting and special.
Expert Tips And Techniques For Decorating Your Thanksgiving Cake
Achieving a professional-looking and delicious turkey cake is much easier with a few insider tips and techniques. These insights will help you streamline the process, save time, and ensure your Thanksgiving cake is a resounding success.
- You can buy store-bought fondant flowers: To significantly save time and effort, especially if you’re new to intricate decorating, don’t hesitate to purchase pre-made fondant flowers. They come in a wide variety of colors and styles, allowing you to easily add beautiful floral accents without the fuss. Alternatively, if you enjoy crafting your own, explore making my Homemade Royal Icing Flowers, delicate Easy Fondant Daisies, elegant Easy Ribbon Roses, charming Easy Wafer Paper Flowers, or these vibrant Fondant Flowers.
- Use store-bought fondant: If your schedule is tight or if you prefer convenience, using good quality store-bought fondant is a fantastic shortcut. It eliminates the need for preparing fondant from scratch, allowing you to jump straight into the fun part of decorating. Ensure you knead it well before use to make it pliable.
- Where to buy Wilton decorating tips? Wilton decorating tips are essential tools for many cake designs, including the grass tip used in this turkey cake. You can find them readily available online at Wilton’s official site, or at popular craft and party supply stores such as Party City, Hobby Lobby, and Michaels. Many large retailers like Wal-Mart also carry a selection of these useful tips.
- Cool cakes completely before icing: This cannot be stressed enough. Cakes must be completely cool to the touch – ideally chilled in the refrigerator for a short period – before you apply any frosting or fondant. If the cake is even slightly warm, the icing will melt, slide, and create an uneven, messy surface, making decoration nearly impossible.
- Level cakes for stability: For a neat and stable tiered or layered cake, it’s crucial to level your cake layers. Use a serrated knife or a cake leveling tool to carefully slice off any domed tops, making each layer perfectly flat. This ensures that your stacked cake will be even, stable, and less likely to lean or collapse.
- How to save time? Prepare elements in advance: Being organized is key to successful cake decorating. Many components of this turkey cake can be made days or even a week in advance. For example, the fondant hat, feet, and individual leaf feathers can be cut out, shaped, and allowed to dry. This not only saves you significant time on the day of assembly but also allows the fondant pieces to harden slightly, making them easier to handle and ensuring they hold their shape perfectly when attached to the cake.
- How to attach fondant pieces? Use minimal moisture: To securely attach smaller fondant pieces, such as facial features or individual feathers, brush a very tiny amount of water or corn syrup onto the back of the piece or directly onto the area where you intend to place it. Remember, a little goes a long way; too much liquid can make the fondant soggy or cause it to slide.
- How to trim excess fondant? Precision is key: After draping fondant over your cake, you’ll inevitably have excess around the base. For a clean, sharp finish, use a pizza cutter or a very sharp, thin knife to carefully trim away this excess. Work slowly and steadily around the cake, ensuring your cut is as close to the cake board as possible for a professional edge.
- Work in a cool environment: Fondant can become soft and sticky in warm or humid conditions. If possible, work in a cool, dry room to prevent your fondant from melting, tearing, or losing its shape while you’re decorating. If your hands get warm, wash them and dry them thoroughly or run them under cold water to cool them down.
- Knead fondant properly: Before rolling out any fondant, knead it thoroughly until it’s smooth and pliable. This warms it up, makes it easier to work with, and prevents cracking when you roll it thin. If it feels too stiff, you can microwave it for a few seconds on low power to soften it.
Proper Storage of Your Decorated Turkey Cake
To ensure your beautifully decorated turkey cake remains fresh and visually appealing, proper storage is essential. Here’s how to best store your masterpiece:
- Refrigerate: For optimal freshness and to maintain its structure, store your decorated turkey cake in a sealed, airtight container in the refrigerator for up to 3 days. While refrigeration helps preserve the cake’s taste and prevents spoilage, it’s important to note that fondant decorations can become slightly sticky due to condensation. If possible, remove the cake from the fridge about 30 minutes to an hour before serving to allow it to come closer to room temperature, which often enhances its flavor and texture.
- Freezing is not recommended: It is generally not advisable to freeze a fondant-decorated cake. When a frozen cake thaws, the condensation that forms on its surface will inevitably make the fondant decorations very sticky and potentially runny, compromising their appearance and texture. For this reason, it’s best to enjoy your festive turkey cake fresh or within the recommended refrigerated period.
More Festive Thanksgiving Desserts to Enjoy
Beyond the impressive turkey cake, there are many other delightful treats perfect for your Thanksgiving celebration. Explore these additional recipes to complete your holiday dessert spread:
- Homemade Acorn Cookies: Adorable and delicious, these cookies are a charming addition to any fall table.
- Homemade Chocolate Leaves: Edible and elegant, these are perfect for garnishing cakes, cupcakes, or serving on their own.
- Easy Fall Cookies (Leaf Cookies): Simple to make and beautiful to behold, these sugar cookies capture the essence of autumn.
- Pumpkin Chocolate Chip Cookies {With Cake Mix}: A quick and easy way to get soft, chewy pumpkin cookies with a hint of chocolate.
- Easy Apple Crisp {1 Hour Only}: A classic comforting dessert, ready in no time, perfect for a warm, spiced treat.
Recipe
Turkey Cake (Thanksgiving Cake)
Abeer Rizvi
Pin Recipe
Want to Save This Recipe?
Enter your email & I’ll send it to your inbox. Plus, get great new recipes from me every week!
By submitting this form, you consent to receive emails from CakeWhiz
Ingredients
- 2 Pumpkin cake Round, Dimensions: 8×2 inches each. Ensure cakes are completely cooled before assembly.
- ¼ cup Pumpkin butter For a rich, spiced filling between cake layers.
- 3 cups Brown sugar frosting For coating the cake before fondant.
- Marshmallow fondant Colors: Brown, red, yellow, black. Approximately 1.5-2 lbs of brown fondant for cake body and torso, smaller amounts for other colors.
- 1 batch Rice krispie treats For shaping the turkey’s torso and head, ensures a lightweight structure.
- 2 tablespoons Corn syrup Used as edible glue to attach fondant pieces.
- 1 cup Buttercream icing Tinted green, for piping the grass around the base.
Instructions
-
Begin by baking your pumpkin cake layers according to your chosen recipe (or follow the linked recipe). Once baked, remove them from the oven and let them cool completely on a wire rack. This is a crucial step to prevent frosting from melting.
-
While the cakes are baking and cooling, take this time to prepare your brown sugar frosting and gather all necessary fondant colors and tools.
-
Once your cake layers are completely cool, use a serrated knife or a cake leveler to carefully slice off any domed tops, ensuring both layers are perfectly flat and even for stable stacking.
-
Place one leveled cake layer onto your chosen round serving dish or cake board. This will be the base of your turkey cake.
-
Evenly spread a layer of pumpkin butter over the top surface of the first cake layer. This adds a delicious, moist filling.
-
Carefully place the second leveled cake layer directly on top of the pumpkin butter, aligning it precisely with the bottom layer.
-
Apply a thin crumb coat of brown sugar frosting to the entire cake, chilling briefly, then apply a final, smooth layer of frosting. This creates a clean canvas for the fondant.
-
Roll out a large piece of brown marshmallow fondant on a lightly powdered sugar surface until it’s thin enough to cover your cake. Carefully lift and drape the fondant over the smoothly iced cake.
-
Gently smooth the fondant over the cake, pressing out any air bubbles, and then use a pizza cutter or very sharp knife to trim away all excess fondant neatly from around the base.
-
Take your grass decorating tip (Wilton tip #233) and randomly press it onto the sides of your brown fondant-covered cake. This technique will create numerous tiny indentations, giving the turkey’s body a textured, feathery effect.
-
Using your hands, shape a portion of rice krispie treats into a distinct pear shape; this will form the turkey’s torso. Cover this pear shape entirely with brown fondant, smoothing it carefully to create the main body of the turkey.
-
Insert a sturdy toothpick into the top, narrower end of the fondant-covered rice krispie torso. This will help secure the head.
-
Form a smaller ball from rice krispie treats and cover it with brown fondant to create the turkey’s head or face.
-
Gently push the fondant-covered rice krispie head onto the exposed toothpick protruding from the torso. For added security, you can dab a small amount of water or corn syrup before attaching.
-
Now, begin adding the turkey’s distinctive features. Create a small hat from black fondant, a triangular yellow beak, a yellow collar, and yellow feet using a star-shaped cutter. Adhere these pieces by lightly brushing a very small amount of water or corn syrup onto their backs.
-
Tip: To significantly reduce stress on decorating day, prepare the fondant hat and feet in advance. Making them a week earlier allows them to firm up, making them easier to handle and attach.
-
To attach the turkey’s torso to the main cake, carefully scoop out approximately a 1-inch deep section from the side of your cake. Gently push the rice krispie torso into this opening, securing it with a bit of frosting to hold the two pieces together. Don’t worry if the fondant on the main cake gets a little messy; this area will soon be concealed by feathers.
-
Re-use your Wilton tip #233 (grass tip) to create similar feather indentations on the fondant covering the rice krispie torso. This ensures a consistent feathery texture across the entire turkey body.
-
For the wings, roll out brown fondant and use a medium-sized leaf cutter to create two distinct leaf shapes. Enhance these by pressing the Wilton tip #233 onto them to give them a textured, feathery appearance.
-
Brush a small amount of water or corn syrup on the back of the prepared fondant wings. Carefully stick them onto the sides of the rice krispie torso, positioned as if the turkey is proudly displaying them.
-
To create the eyes, roll two small balls of yellow fondant, then flatten them gently with your finger. Use an edible black marker to draw pupils in the center of each. Attach these eyes to the turkey’s face with a dab of water. Next, roll a piece of red fondant into a thin sausage shape and push it onto the side of the beak, using a toothpick to secure it and form the wattle.
-
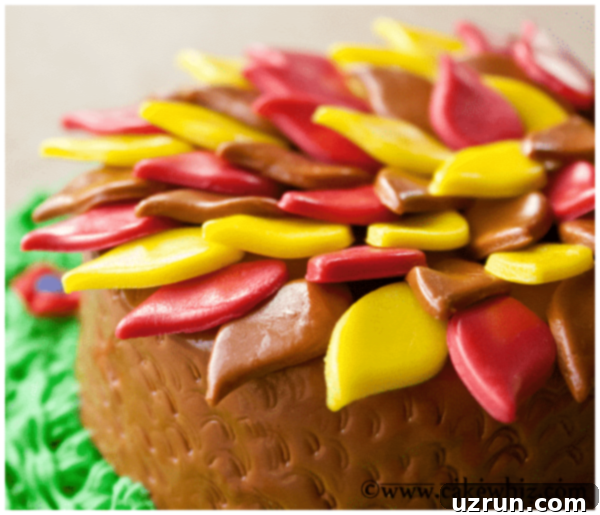
Roll out red, yellow, and brown fondant separately. Use a small leaf cutter to cut out numerous small leaves in these autumnal colors. Lay them flat and allow them to dry slightly; this will help them firm up and hold their shape better when attached. These will form the colorful tail feathers of your turkey.
-
Tip: Maximize your time efficiency by preparing a large batch of these fondant leaves (feathers) well in advance. Drying them beforehand ensures they harden slightly, making them much easier to stick onto the cake without losing their shape, resulting in a more polished look.
-
Starting from the outer edge of the main cake’s top surface, brush a small amount of water or corn syrup, then begin attaching your prepared fondant feathers. Overlap them slightly to create a fuller, natural-looking tail.
-
Continue working inwards, brushing water or corn syrup and sticking more feathers, layer by layer. Repeat this process until the entire top of the cake is fully covered, creating a magnificent, fanned turkey tail.
-
Fill a piping bag fitted with the grass tip (Wilton Tip #233) with your green buttercream icing. Pipe a lush layer of green grass all around the base of the cake, creating a vibrant, natural setting for your turkey.
-
As a final decorative touch, place a few small fondant flowers (either homemade or store-bought) randomly amongst the piped green grass, adding a charming pop of color.
-
Finally, to give your turkey cake a professional, polished finish and ensure all the fondant elements are securely adhered, gently steam the entire cake. Steaming also imparts a beautiful, subtle sheen. Your stunning homemade turkey cake is now complete and ready to be enjoyed!
Notes
- For the best results and a smooth decorating experience, make sure to read all the detailed tips and techniques provided above before you begin.
- Leftovers of your delicious turkey cake can be stored in a sealed, airtight container in the refrigerator for up to 3 days. Be aware that fondant decorations might become slightly sticky due to moisture in the fridge.
Nutrition
An automated tool is used to calculate the nutritional information. As such, I cannot guarantee the accuracy of the nutritional information provided for any recipe on this site.
