Easy & Fun Thanksgiving Turkey Cupcakes: The Ultimate Festive Dessert Recipe for Kids & Adults
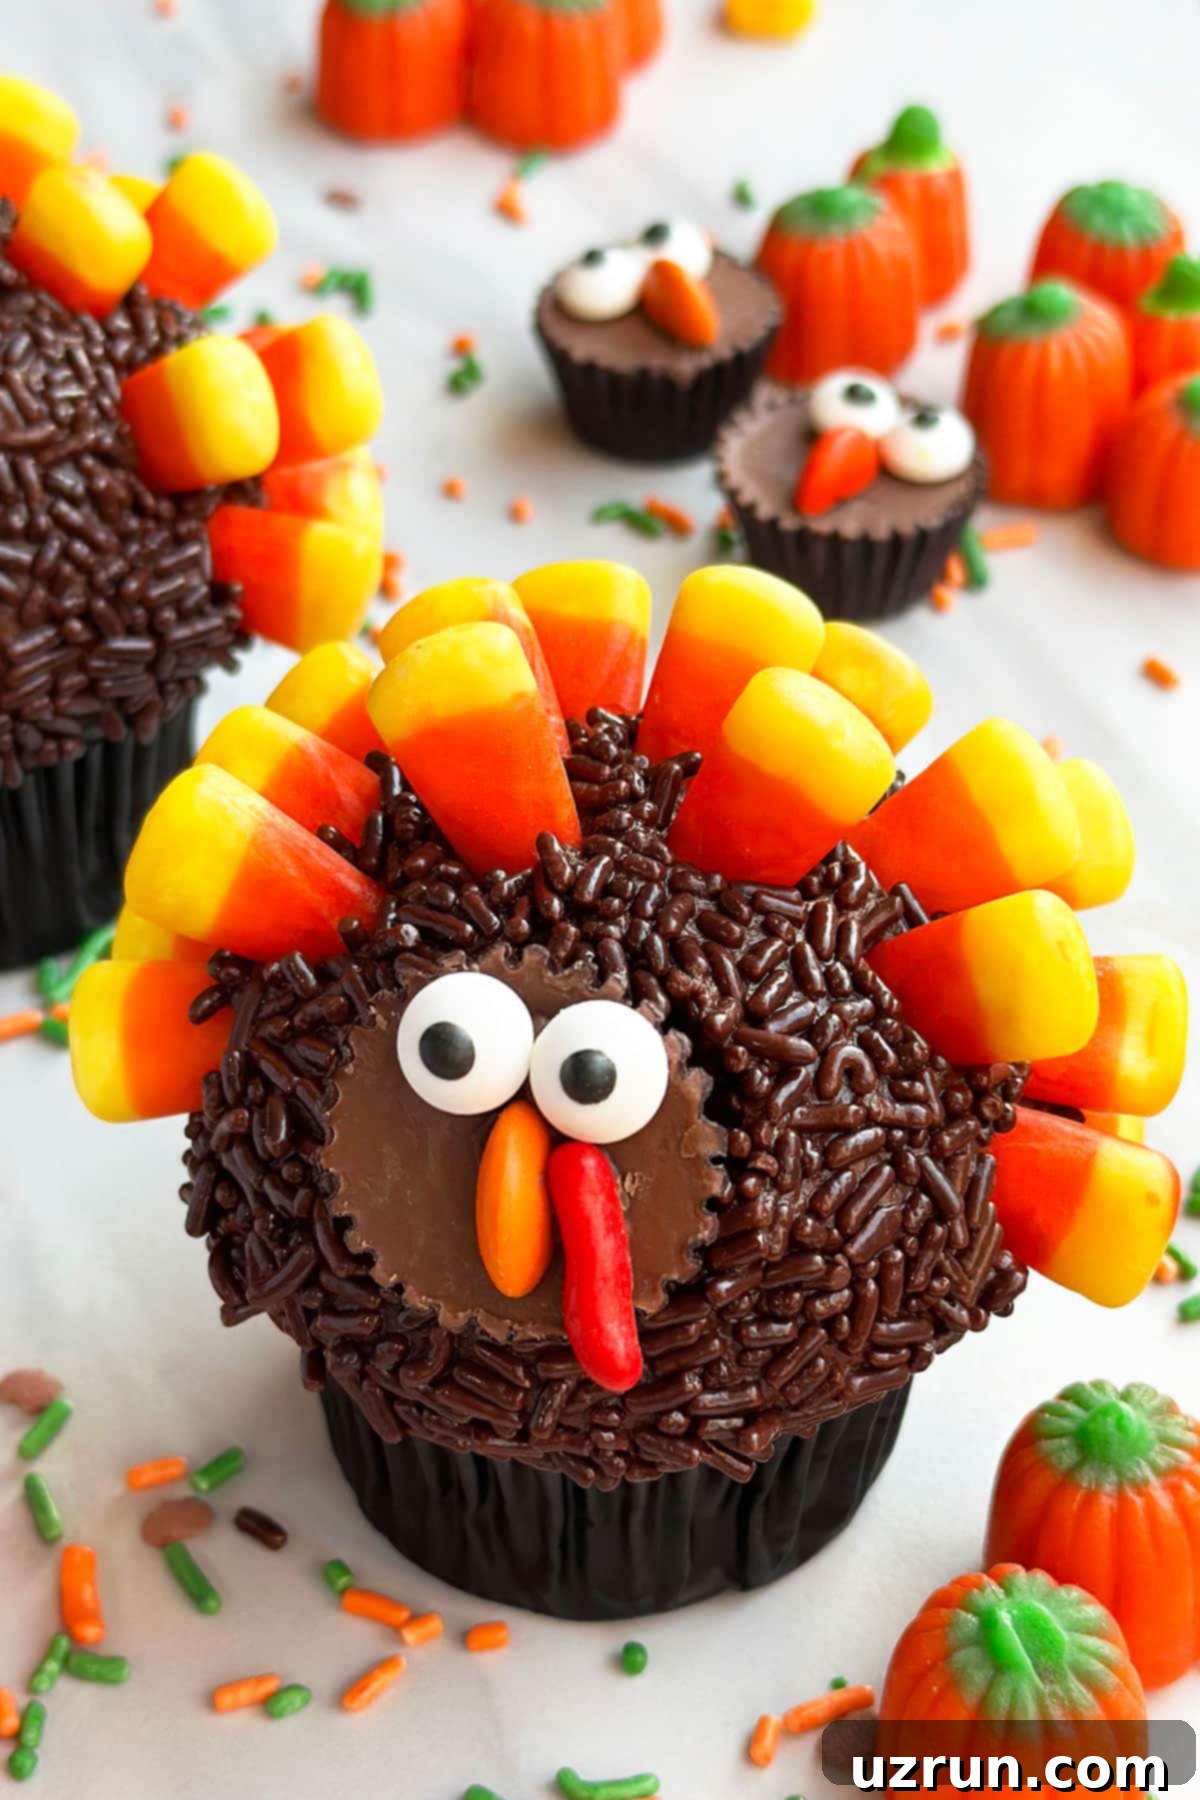
Get ready to delight your guests with these quick and easy Thanksgiving Turkey Cupcakes! Made from scratch or with a convenient box mix, these festive treats are adorned with rich chocolate icing, colorful sprinkles, classic candy corns, and adorable mini peanut butter cups. They’re not just a dessert; they’re an experience, perfect for adding a touch of playful charm to your holiday table and bringing smiles to faces of all ages.
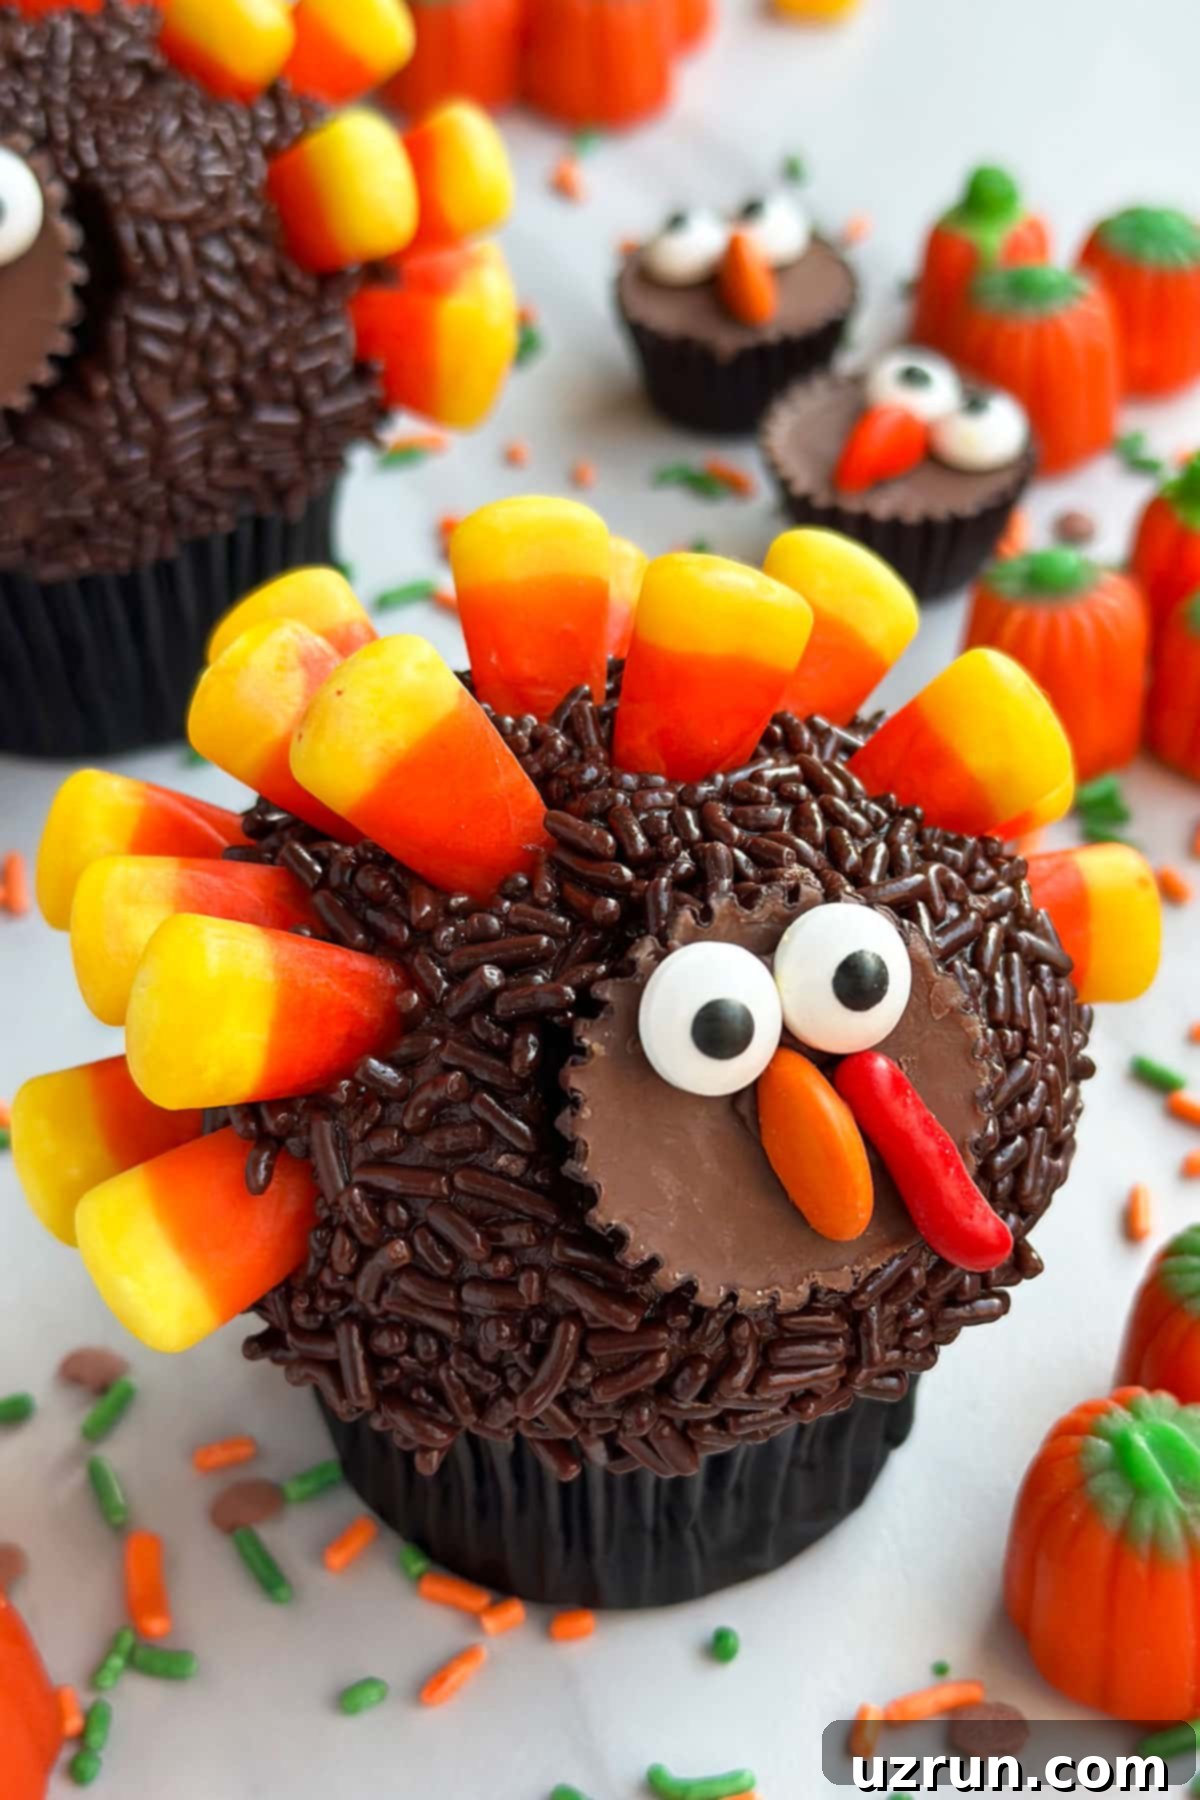
Thanksgiving is truly a magical time of year, celebrated with heartfelt gatherings, gratitude, and, of course, an abundance of delicious food. While the turkey takes center stage on the dinner plate, these charming turkey-themed cupcakes are guaranteed to be the star of your dessert spread! Both adults and children will adore these whimsical creations, making them an instant hit at any holiday get-together. Beyond just their adorable appearance, they are incredibly fun to make, offering a delightful activity for the whole family. If you’re looking for more creative Thanksgiving dessert ideas, don’t forget to explore these other fantastic “turkey” treats: Oreo Turkey Cookies, a show-stopping Turkey Cake, and an impressive Turkey Topper. These delightful options are also perfect for a fun, meatless “turkey” dinner, adding a sweet twist to your holiday traditions.
Table of Contents
- Why You’ll Love These Turkey Cupcakes
- Key Ingredients for Decorated Thanksgiving Cupcakes
- Creative Variations and Substitutions
- How to Make Easy Chocolate Turkey Cupcakes with Candy Corn
- Expert Tips and Decorating Techniques
- Recipe FAQs
- Storage and Make-Ahead Tips
- More Thanksgiving Desserts For Kids
Why You’ll Love These Turkey Cupcakes
These adorable turkey cupcakes aren’t just another dessert; they’re a celebration in every bite! Here’s why they’re sure to become a staple at your Thanksgiving feast:
- Kid-Friendly Fun: The decorating process is incredibly simple and engaging, making it a perfect activity for children. Let them help create their own turkey masterpieces!
- Crowd-Pleaser: Their charming appearance and delicious flavors appeal to both young and old, ensuring they disappear quickly from the dessert table.
- Customizable: With a variety of ingredient substitutions and flavor changes possible, you can easily adapt this recipe to suit dietary needs or personal preferences.
- Quick & Easy: Whether you bake from scratch or use a convenient box mix, the decorating steps are straightforward and require minimal time, perfect for busy holiday preparations.
- Festive & Unique: Move beyond traditional pies! These cupcakes offer a novel and eye-catching dessert that perfectly captures the spirit of Thanksgiving.
- No Special Skills Required: You don’t need to be a professional baker or decorator to achieve stunning results. Simple piping and candy placement are all it takes.
Key Ingredients for Decorated Thanksgiving Cupcakes
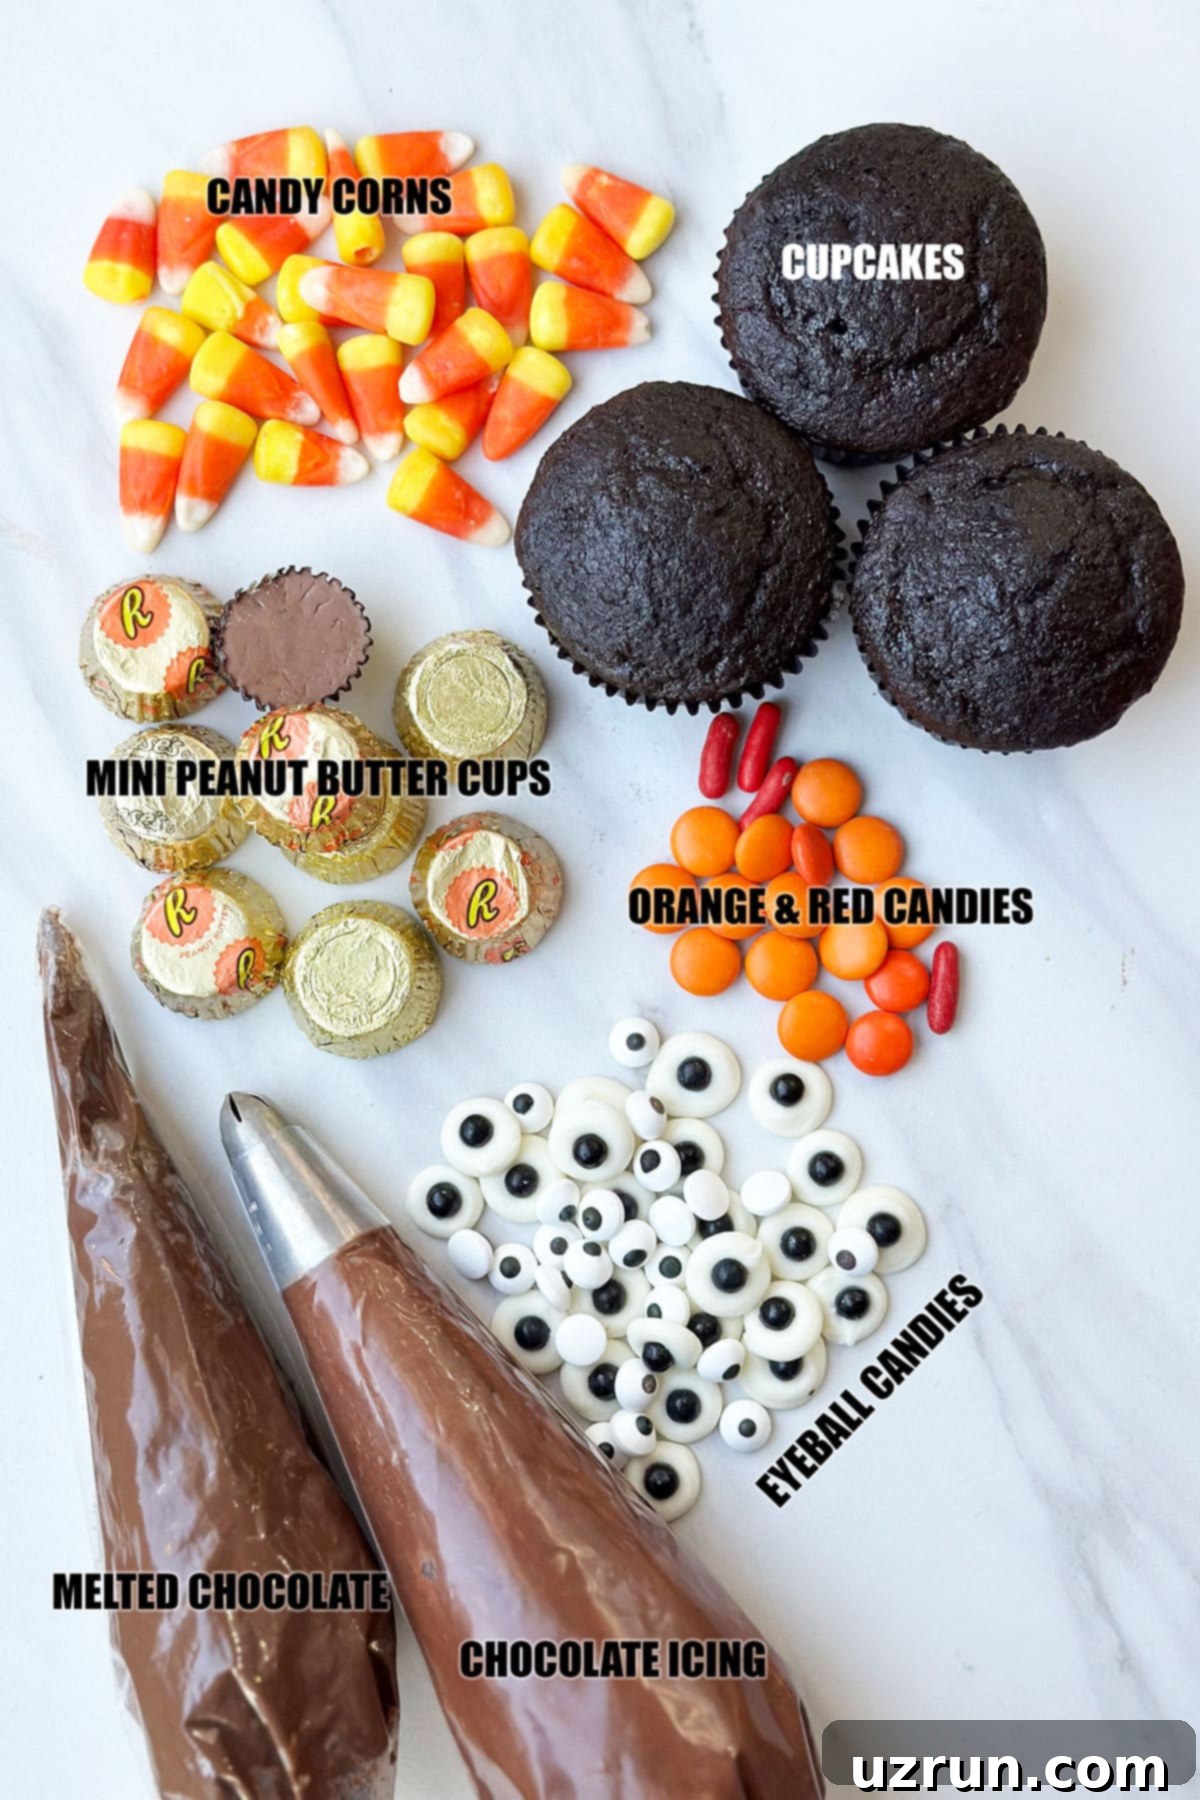
Crafting these festive turkey cupcakes relies on a few key ingredients, each playing a crucial role in both taste and visual appeal. Here’s what you’ll need to gather:
- Candy Corn: An iconic Halloween and Fall candy, candy corn is surprisingly perfect for creating the turkey’s vibrant “feathers.” While some might be divided on its taste, its distinct shape and color are indispensable for this design. You’ll want plenty of these to create a full, fluffy tail.
- Cupcakes: The foundation of our turkeys! You can opt for a truly homemade batch of your favorite chocolate or vanilla cupcakes for that personal touch, or take the quick and easy route with a high-quality box mix. The most important thing is that they are baked and completely cooled before decorating. Chocolate cupcakes provide an excellent base that blends seamlessly with the chocolate frosting and sprinkles, enhancing the “turkey” aesthetic.
- Mini Peanut Butter Cups: These are the secret to creating the turkey’s adorable head. It’s absolutely crucial to use the *mini* version, not the regular size. The smaller size ensures the turkey’s face remains cute and proportionate to the cupcake, preventing it from looking too large or unwieldy. Gently unwrap them, but keep the paper liner for easier handling.
- Orange and Red Candies: These colorful candies will form the turkey’s beak and wattle. While orange M&Ms or Reese’s Pieces work wonderfully for the beak, for the red wattle, consider longer, thinner candies like red licorice ropes or thin red gummy worms. Don’t be afraid to get creative with your candy choices here to personalize your turkeys!
- Eyeball Candies: These little edible eyeballs bring your turkeys to life with a playful, cartoonish charm. They’re often available during the Halloween season, but you can usually find them year-round in the special baking aisle of most grocery stores or online. If you can’t find them, small white chocolate chips with a dot of black icing can serve as a substitute.
- Melted Chocolate: This acts as the essential “glue” to affix all the facial features onto the peanut butter cup. Semi-sweet or milk chocolate works best here, as its color will blend subtly with the chocolate frosting. While white chocolate can be used, it might stand out more. Ensure it’s melted smoothly for easy application.
- Chocolate Frosting: A generous amount of rich chocolate frosting is key for creating the plump body of the turkey and ensuring all the sprinkles adhere beautifully. Using a piping bag will give you the best control for creating a smooth, domed surface, which is ideal for coating with sprinkles and attaching the head and feathers. Don’t skimp on the frosting – it’s crucial for achieving that authentic, full-bodied turkey look!
Creative Variations and Substitutions
One of the best things about these turkey cupcakes is how easily they can be customized to suit your taste, preferences, or what you have on hand. Don’t be afraid to experiment and make them uniquely yours!
- Substitute Candy Corns for Feathers: If candy corn isn’t your favorite, or you simply want to try something different, there are many fun alternatives for the turkey’s tail feathers. Consider using small pretzel sticks for a rustic look, vibrant orange and yellow M&Ms for a more uniform and colorful tail, or Reese’s Pieces for a subtle peanut butter flavor hint. You could even use colorful sprinkles in various fall hues or small, leaf-shaped candies to create a different kind of feathered effect.
- Explore Other Frosting Options: While a classic chocolate buttercream provides a rich flavor and ideal color, the possibilities are endless for your frosting base.
- Darker Shades: For deep chocolate flavor, try German Chocolate Cake Frosting or a luscious Chocolate Ganache Frosting. A Chocolate Cream Cheese Frosting offers a tangier, richer profile.
- Lighter Tones: If you prefer a lighter brown or tan turkey, opt for a delicious Brown Sugar Frosting, a decadent Caramel Frosting, a nutty Peanut Butter Frosting (which pairs wonderfully with the peanut butter cup head!), or an aromatic Maple Frosting for a true taste of autumn.
- Change Cupcake Flavors: While chocolate cupcakes are a fantastic choice for their color and universal appeal, don’t limit yourself!
- Classic & Versatile: Vanilla cupcakes offer a lighter canvas, especially if you plan to use a lighter-colored frosting.
- Festive & Fun: Red velvet cupcakes can add a pop of color inside, especially appealing to those who love this classic flavor.
- Seasonal Flair: Consider pumpkin spice or apple cider cupcakes for an even deeper autumnal theme. Ensure the flavor complements your chosen frosting and decorations.
- Switch Up the Sprinkles: The sprinkles form the textured body of your turkey, so feel free to get creative!
- Traditional: Brown sprinkles give the most realistic turkey texture.
- Playful: Use different shapes and sizes – jimmie sprinkles, nonpareils, or even a mix of fall-themed sprinkles.
- Vibrant: Why not make a “rainbow turkey” with multi-colored sprinkles, or choose specific colors to match a party theme?
- Add a Delicious Filling: For an extra special surprise, fill the center of your baked and cooled cupcakes before frosting! Use a cupcake corer or a small knife to create a hole in the center, then pipe in your favorite filling.
- Sweet Sauces: A gooey Caramel Sauce or rich Dulce De Leche are decadent choices.
- Light & Fluffy: Whipped Cream or Marshmallow Frosting (or even store-bought marshmallow cream) adds a delightful lightness.
- Crunch & Color: For a fun texture, fill with small candies of your choice or even more sprinkles!
How to Make Easy Chocolate Turkey Cupcakes with Candy Corn
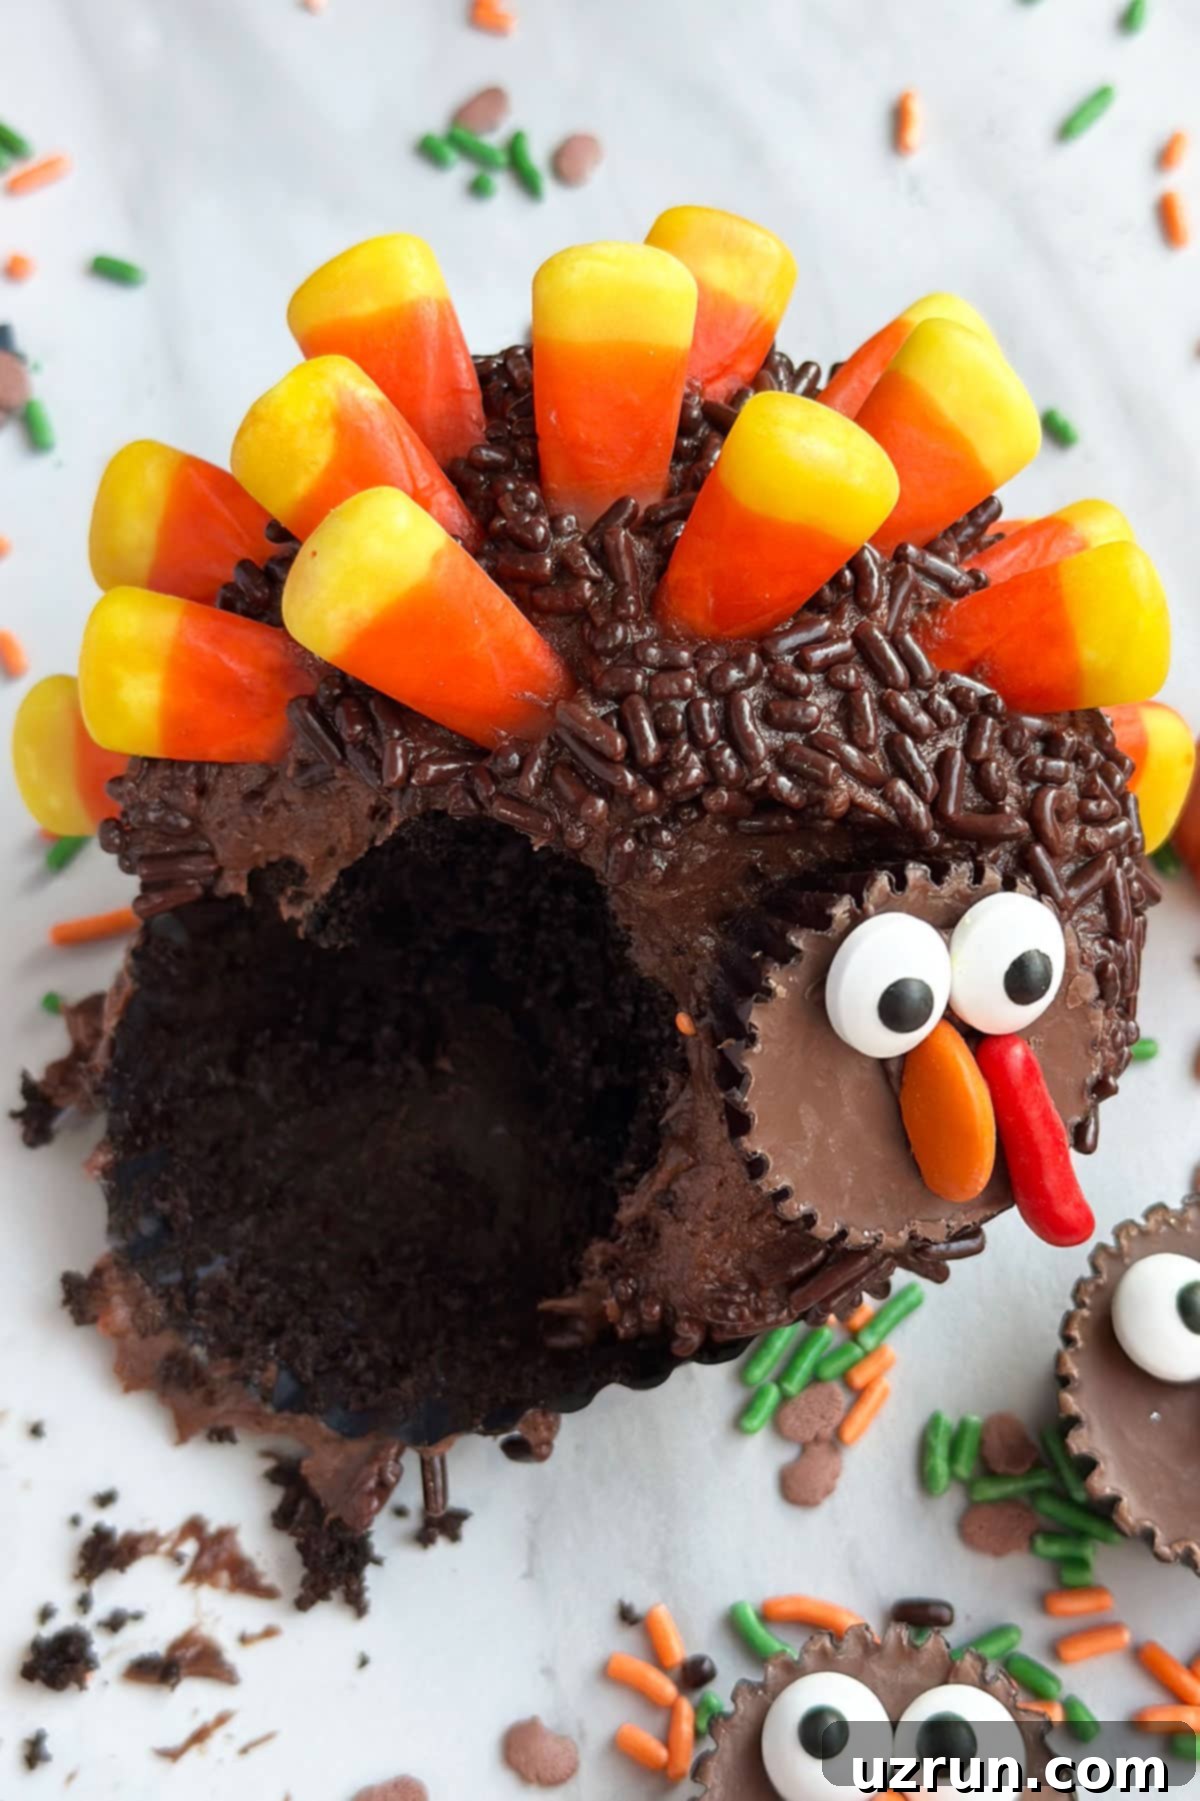
Creating these festive Thanksgiving turkey cupcakes is a straightforward and enjoyable process. Follow these simple steps to bring your adorable edible turkeys to life:
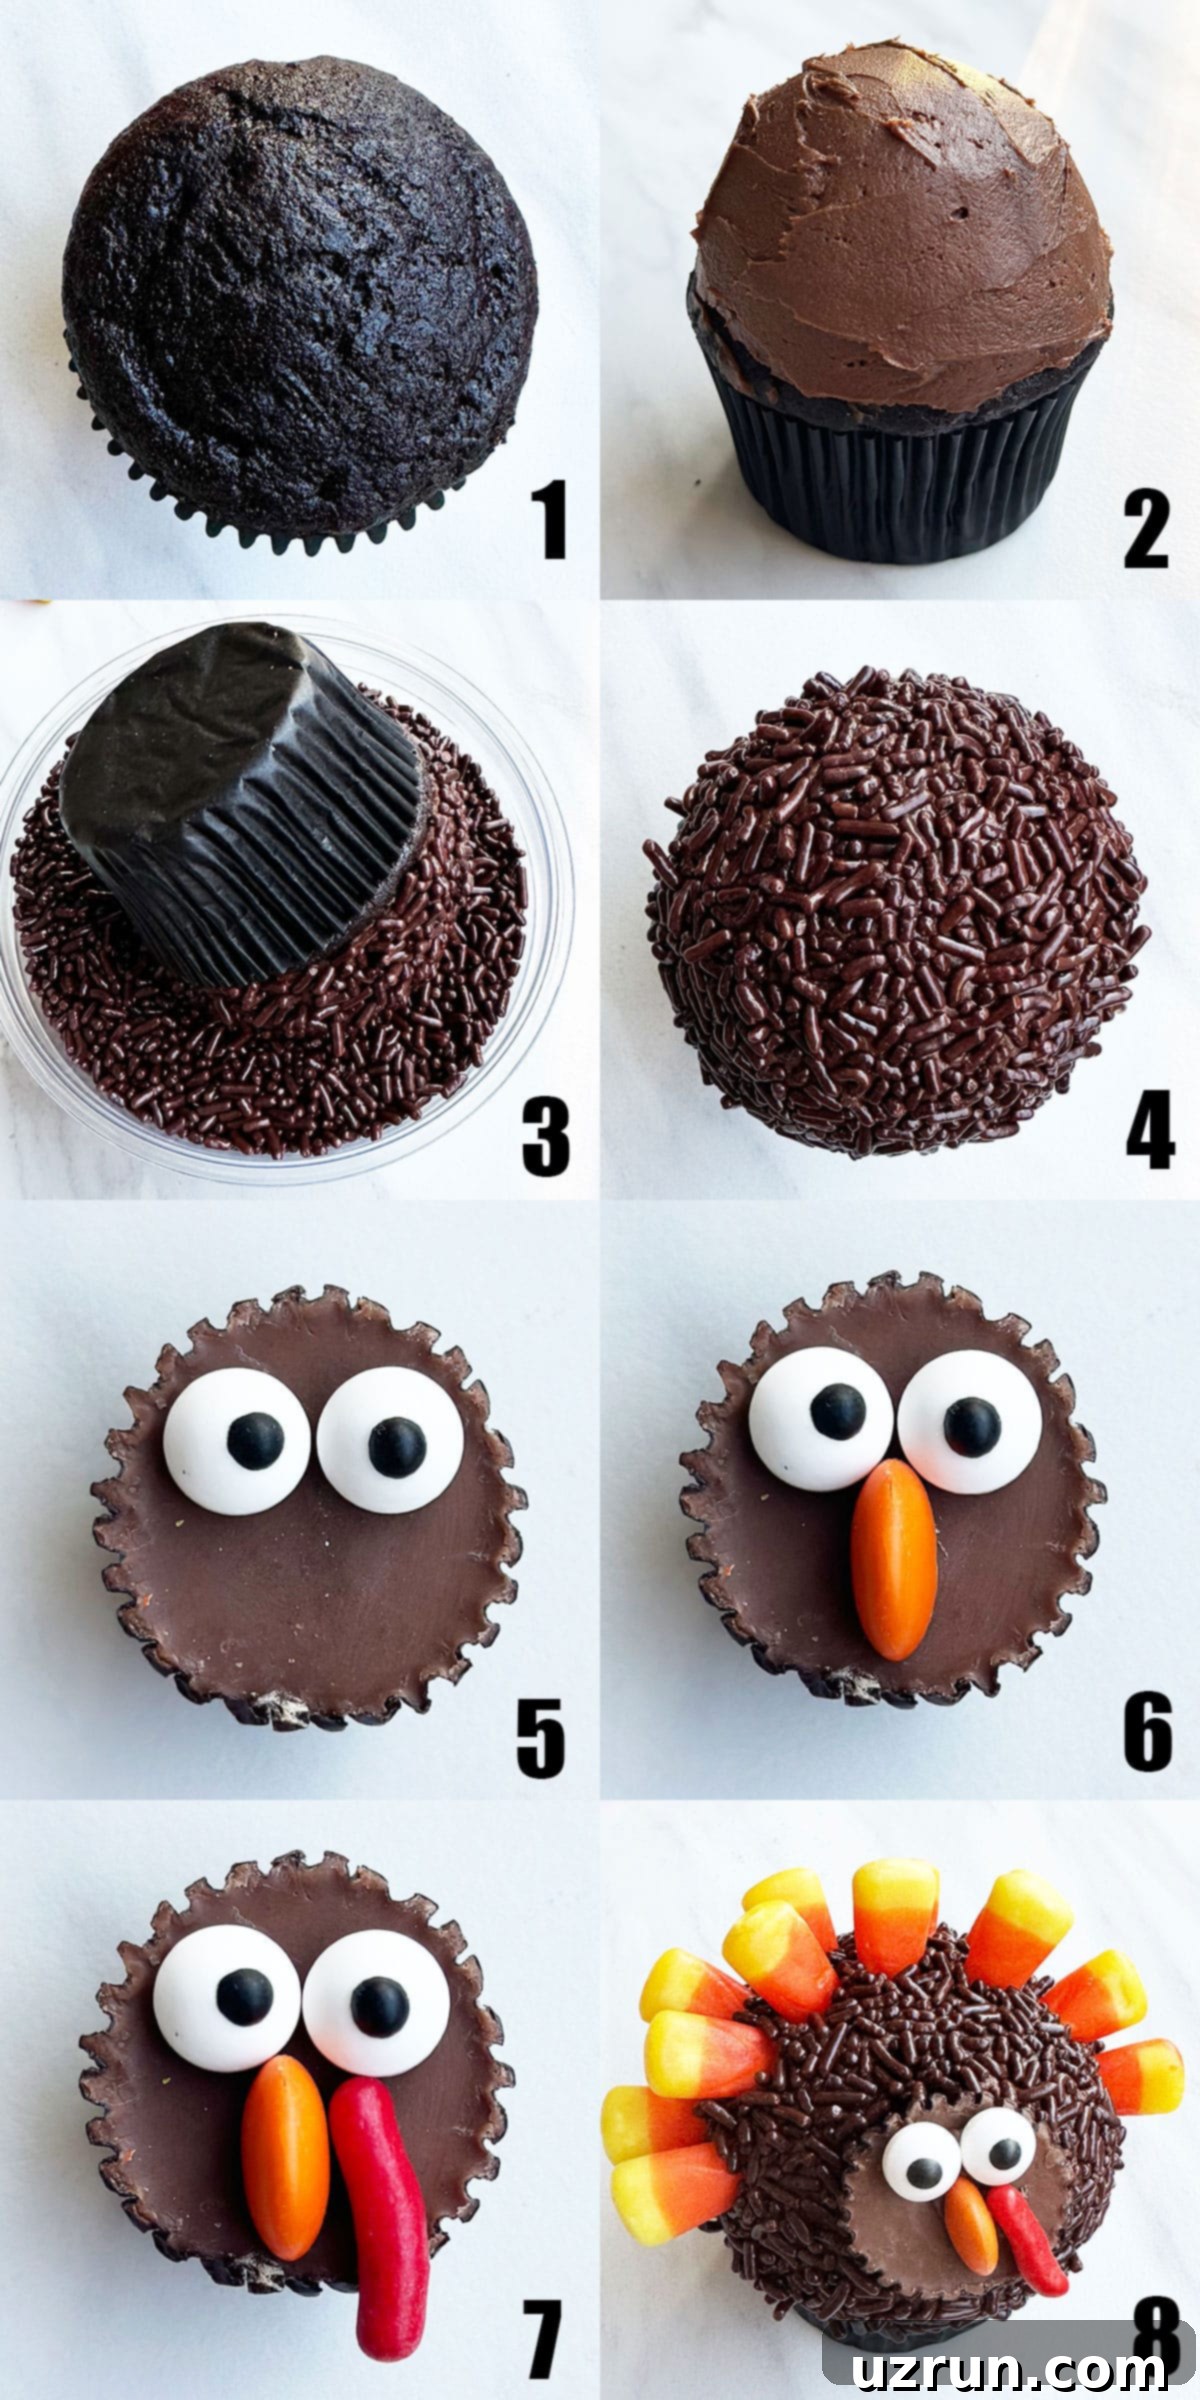
- Bake and Cool Cupcakes: Start by baking your favorite batch of chocolate cupcakes (or any flavor you prefer). Whether you use a homemade recipe or a convenient box mix, ensure they are completely cooled to room temperature before you begin decorating. This is a critical step; warm cupcakes will cause your frosting to melt and slide off, creating a messy situation.
- Pipe Chocolate Icing: Prepare a piping bag fitted with your desired tip (a large round tip or star tip works well, or simply snip the end off the bag). Fill it generously with your chocolate frosting. Pipe a beautiful swirl or a generous mound of frosting on top of each cooled cupcake. Aim for a nice, thick layer that will act as the turkey’s body.
- Smooth and Coat with Sprinkles: Using a small offset spatula or the back of a spoon, gently smooth the piped frosting into a neat dome shape. This rounded surface provides the perfect base for the sprinkles. Next, fill a shallow bowl with chocolate sprinkles. Carefully invert each frosted cupcake, frosting-side down, into the bowl of sprinkles. Gently roll and press the cupcake to ensure it’s completely coated, creating a fuzzy, feathered “body” for your turkey. The frosting should still be soft enough for the sprinkles to adhere.
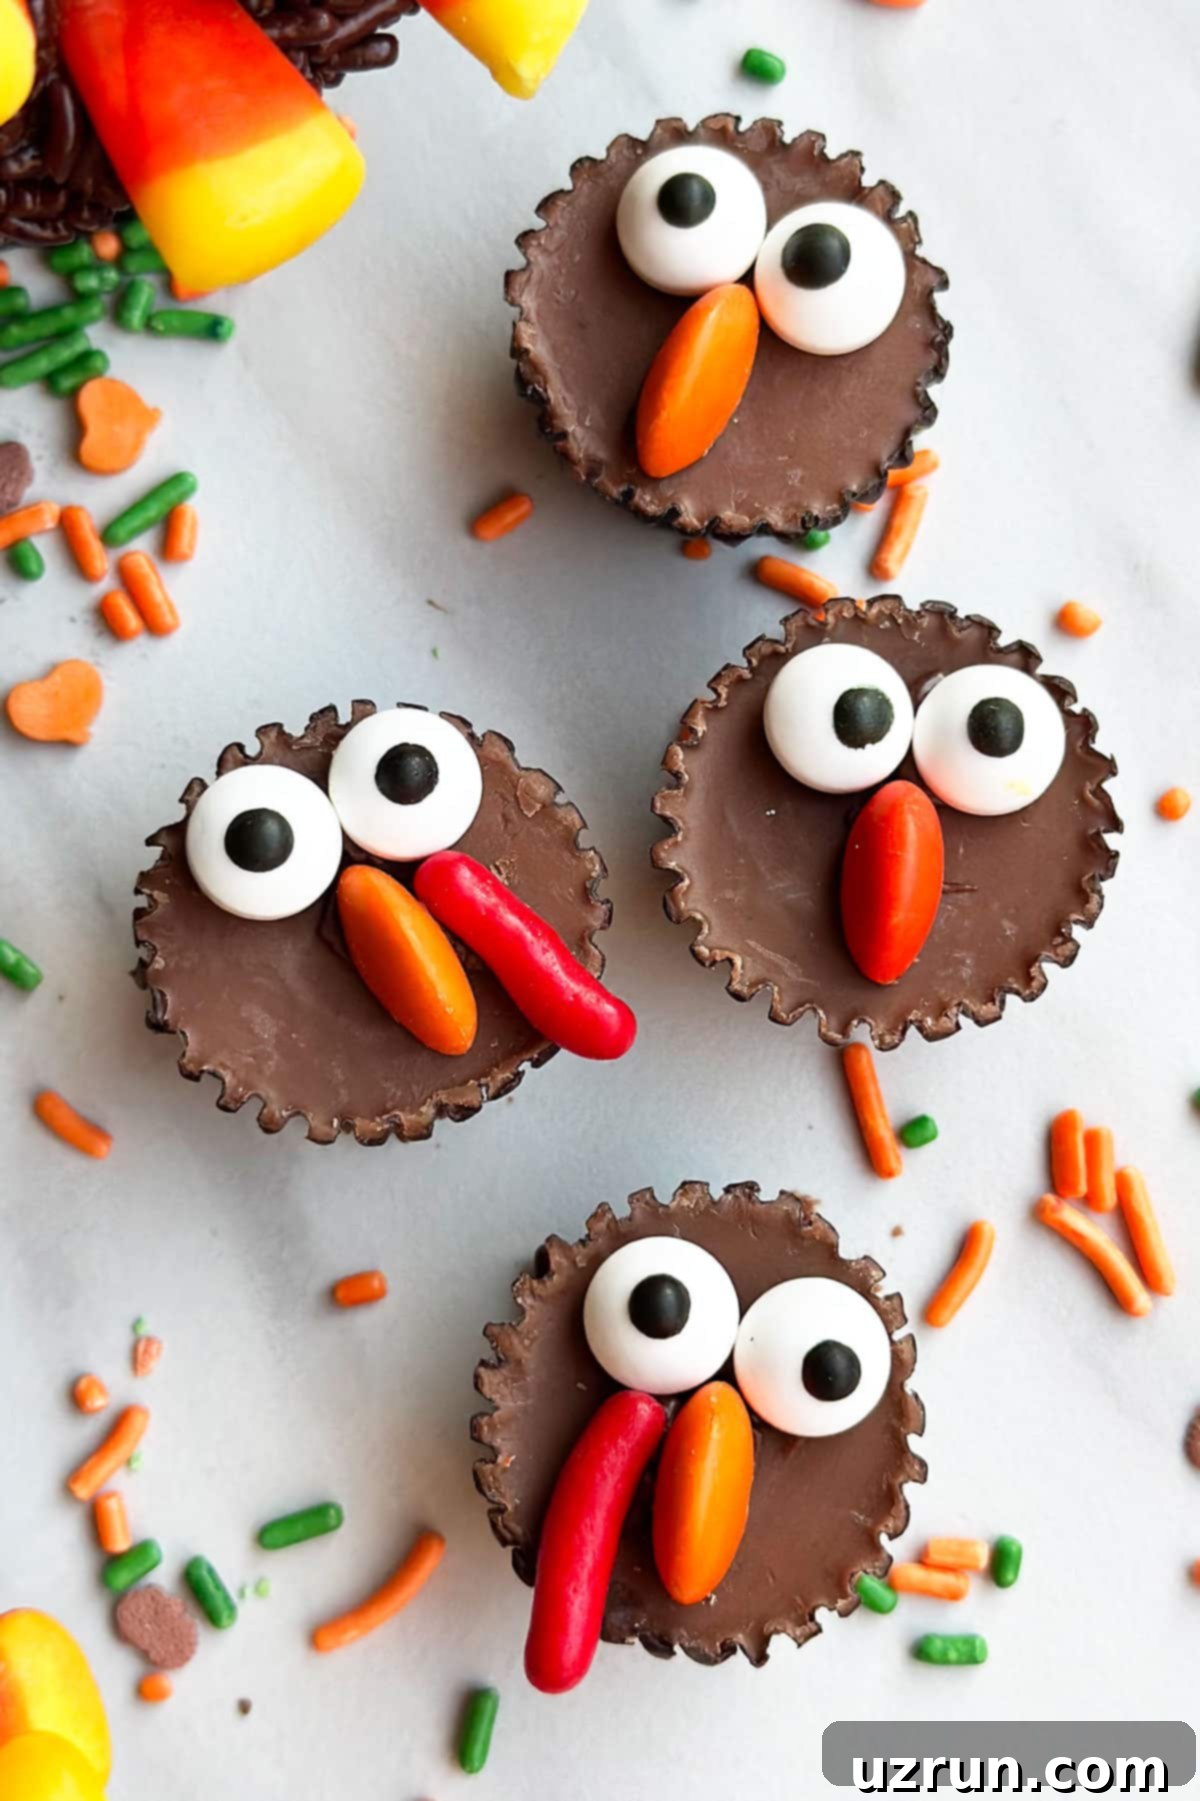
- Create the Turkey Face: Take a mini peanut butter cup (unwrapped). Using a small amount of melted chocolate as edible glue, attach two eyeball candies near the top for the eyes. Below them, firmly press an orange M&M or small orange candy on its side, halfway into the peanut butter cup, to form the beak. If desired, add a small, long red candy (like a piece of licorice) next to the beak for the wattle.
- Attach the Turkey Face: Once the face is assembled on the peanut butter cup, use a dab of chocolate frosting or melted chocolate on the back of the peanut butter cup to firmly attach it to the side of the sprinkle-coated cupcake. Position it so the turkey’s head is looking slightly forward.
- Add Candy Corn Feathers: Finally, take your candy corns and carefully push them into the frosting around the opposite side of the cupcake from the turkey’s head. Arrange them in a fanned-out pattern, creating the vibrant, multi-colored tail feathers. You can use varying numbers of candy corns per cupcake to give each turkey a unique look. Once all the elements are in place, your delightful turkey cupcakes are ready to be admired and enjoyed!
Expert Tips and Decorating Techniques
Achieving perfectly adorable turkey cupcakes is easier than you think, especially with a few insider tips and clever techniques. Follow these guidelines to ensure your festive treats are a soaring success!
- The Red “Wattle” is Optional but Charming: The small red piece of candy hanging from the turkey’s face, known as the wattle, adds an extra touch of realism and cuteness. If you can’t find a long red candy like a thin licorice rope or a slender red gummy worm, don’t worry – your turkey will still be adorable without it! If you do include it, simply attach it with a tiny dab of melted chocolate.
- Create a Smooth Dome with a Spatula: After piping your chocolate frosting onto the cooled cupcake, use a small offset spatula or the back of a butter knife to gently smooth out the frosting. This helps to create a uniform, slightly domed surface, which is ideal for an even sprinkle coating and makes the turkey look plump and inviting.
- Easy Sprinkle Coverage with the Dipping Method: Forget trying to carefully place sprinkles by hand! The easiest and most effective way to coat your cupcakes is to pour a generous amount of chocolate sprinkles into a small, shallow bowl. Immediately after smoothing your frosting (while it’s still “wet” and soft), gently turn the cupcake upside down and dip it into the bowl, pressing lightly. Roll it around to ensure the entire dome is completely covered. If the frosting dries even slightly, the sprinkles won’t stick, so work quickly after frosting each cupcake.
- Always Use Mini Peanut Butter Cups: This cannot be stressed enough! The mini size is absolutely essential for creating a proportionate and cute turkey face. Larger, regular-sized peanut butter cups will overwhelm the cupcake, making the turkey look awkward rather than endearing.
- Melted Chocolate is Your Best Friend for Adhesion: To ensure all the small candies for the turkey’s face – the eyeballs, beak, and wattle – stay firmly in place on the peanut butter cup, use a tiny amount of melted chocolate as your adhesive. A toothpick or a small brush works well for precise application. This creates a strong bond that frosting alone might not achieve for smaller pieces.
- Don’t Skimp on the Frosting: A generous layer of frosting is vital for two reasons: it creates the plump body of the turkey, and it provides enough sticky surface for all the sprinkles and candies to adhere properly. If you use too little frosting, your turkey might look sparse and the decorations may fall off. A piping bag makes it easiest to apply a substantial, even layer.
- Ensure Cupcakes are Completely Cool: This is a golden rule for all cupcake decorating. Attempting to frost or decorate warm cupcakes will inevitably lead to melted, sliding frosting and a messy result. Patience is key!
- Perfect the Beak Placement: When attaching the orange M&M or candy for the beak, press it into the mini peanut butter cup on its side, making sure it goes about halfway into the candy. This technique creates a more realistic and defined beak shape, rather than just a flat nose, giving your turkey more character.
- Assemble Faces in Batches for Efficiency: To save time and avoid continuously reheating melted chocolate, prepare all the turkey faces (eyeballs, beak, wattle) on the mini peanut butter cups at once. Lay them out on a sheet of parchment paper, let the melted chocolate set, and then they’ll be ready to attach to the cupcakes in one go.
- Remove All Candy Wrappers First: Before you start decorating, take a few minutes to unwrap all your mini peanut butter cups and other candies. Having everything ready and accessible will make the decorating process much smoother and more enjoyable, especially if you have little helpers!
- Make it a Family Activity: These cupcakes are perfect for getting kids involved in holiday preparations. Let them help with unwrapping candies, coating cupcakes in sprinkles, or even placing the candy corn feathers (under supervision for smaller children). It’s a fun way to create lasting Thanksgiving memories.
- Consider a Decorating Station: Set up a dedicated area with all your ingredients, tools, and a clean workspace. This helps keep things organized and makes the decorating process flow seamlessly.
Recipe FAQs
No problem at all! You can easily substitute candy corn with other fun alternatives for the turkey’s feathers. Great options include small pretzel sticks for a rustic look, vibrant orange and yellow Reese’s Pieces, or M&M candies for a uniform and colorful tail. You could even use other fall-colored sprinkles or tiny leaf-shaped candies to create a beautiful feathered effect.
The charming red wattle is made using a small piece of a long red candy. Red licorice ropes or thin red gummy worms are perfect for this. Simply cut a small segment and attach it to the side of the orange candy beak on the mini peanut butter cup with a tiny dot of melted chocolate.
Absolutely! Using store-bought, unfrosted cupcakes is a fantastic shortcut, especially during busy holiday seasons. Just make sure they are plain (chocolate or vanilla work best) and completely cool. You can then proceed directly to the frosting and decorating steps outlined in the recipe.
For the best results, it’s ideal to decorate these cupcakes within 1-2 days of serving. The cupcakes themselves can be baked 1-2 days in advance and stored in an airtight container. The frosting can be made 3-4 days ahead and stored in the fridge. You can even pre-assemble the turkey faces (peanut butter cups with eyes, beak, and wattle) a few days prior and store them in an airtight container at room temperature until ready to use.
The consistency of your frosting is key for smooth piping and proper adherence of sprinkles. If your frosting is too soft (e.g., from being too warm), chill it in the refrigerator for 15-30 minutes, stirring occasionally, until it reaches a firmer but still pliable consistency. If it’s too hard (e.g., from being too cold), let it sit at room temperature for a while or beat it with an electric mixer for a minute or two until it softens to the desired consistency.
Storage and Make-Ahead Tips
Proper storage is essential to keep your festive turkey cupcakes fresh and delicious. Here’s how to store them effectively, along with some make-ahead suggestions to ease your holiday preparations:
- Room Temperature: If your environment is cool and dry, decorated cupcakes can be stored in an airtight container at room temperature for 1-2 days. However, due to the candy decorations, they are best enjoyed sooner rather than later to prevent candies from becoming sticky or hard.
- Refrigeration: For longer storage, place the decorated cupcakes in an airtight container in the refrigerator for up to 3 days. Be aware that refrigeration can sometimes alter the texture of cupcakes slightly, making them a bit firmer. Let them come to room temperature for about 15-30 minutes before serving for the best taste and texture.
- Freezer (Unfrosted & Frosting):
- Unfrosted Cupcakes: Baked and cooled unfrosted cupcakes freeze exceptionally well. Wrap them individually in plastic wrap, then place them in an airtight freezer-safe container or bag for up to 2-3 months. Thaw them at room temperature before frosting.
- Frosting: Most buttercreams can be frozen in an airtight container for up to 1 month. Thaw in the refrigerator overnight, then re-whip with an electric mixer until light and fluffy before piping.
- Decorations: The mini peanut butter cups and candy corn do not require refrigeration and can be stored in their original packaging or airtight containers at room temperature.
- Make-Ahead Strategy: To streamline your holiday baking, consider making the cupcakes and frosting a day or two in advance. Store them separately as described above. On the day of your event, simply thaw (if frozen), frost, and then proceed with the fun decorating steps. You can also assemble the turkey faces on the mini peanut butter cups a day ahead of time. This approach significantly reduces last-minute stress and makes decorating a breeze.
More Thanksgiving Desserts For Kids
Looking for more kid-friendly treats to complete your Thanksgiving dessert table? These recipes are sure to be a hit and add extra festive fun:
- Easy Acorn Cookies (With Nutter Butter)
- Easy Fall Cookies (Leaf Cookies)
- Chocolate Tree Cake (Fall or Thanksgiving)
- How to Make Chocolate Leaves (With Mint)
Recipe
Easy Turkey Cupcakes
Abeer Rizvi
Pin Recipe
Want to Save This Recipe?
Enter your email & I’ll send it to your inbox. Plus, get great new recipes from me every week!
By submitting this form, you consent to receive emails from CakeWhiz
Ingredients
- 24 Chocolate cupcakes (homemade or store-bought, cooled)
- 4 cups Chocolate buttercream icing
- 2 cups Chocolate sprinkles
- 24 Mini Reese’s peanut butter cups (unwrapped, keep candy liner for easy handling)
- 1 cup Melted chocolate (for “glue”)
- 48 Eyeball candies
- 24 Orange M&M candies (for the beak)
- 24 Long red candies (Optional, for the dangling red wattle. Can use red licorice or thin red gummies too.)
- 2 cups Candy corns (for feathers)
Instructions
-
Prepare Cupcakes: Bake your preferred chocolate cupcakes according to recipe or box mix instructions. Allow them to cool completely on a wire rack before proceeding. Warm cupcakes will cause the frosting to melt.
-
Frost Cupcakes: Fill a piping bag with chocolate buttercream icing. Pipe a generous swirl or mound of icing on top of each cooled cupcake.
-
Shape Frosting: Use a small offset spatula or the back of a butter knife to gently smooth the piped frosting into a neat, rounded dome shape on each cupcake.
-
Add Sprinkles: Pour chocolate sprinkles into a shallow bowl. Immediately after smoothing the frosting, carefully invert each cupcake (frosting-side down) into the sprinkles. Gently roll and press to ensure the frosting is completely coated, creating the turkey’s body.
-
Assemble Turkey Faces: Take a mini Reese’s peanut butter cup. Use a small amount of melted chocolate to stick two eyeball candies on the top. Press an orange M&M or small orange candy on its side, halfway into the peanut butter cup, for the beak. If using, attach a long red candy next to the beak with melted chocolate for the wattle. Repeat for all cupcakes.
-
Attach Faces: Once the faces are assembled, use a dab of chocolate frosting or melted chocolate on the back of each peanut butter cup to firmly attach it to the side of a sprinkle-coated cupcake.
-
Add Feathers: Carefully push candy corns all around the opposite side of the cupcake (from the turkey’s head) into the frosting, arranging them to look like fanned-out tail feathers. Serve and enjoy your adorable Easy Turkey Cupcakes!
Notes
- Leftovers can be stored in a covered box at room temperature for 1-2 days or in the refrigerator for up to 3 days. Let them come to room temperature before serving for best flavor and texture.
- Always ensure cupcakes are completely cool before icing and decorating to prevent the frosting from melting.
- Using mini peanut butter cups is crucial for a proportionate and cute turkey face. Larger cups will look too big.
- The red “wattle” is an optional charming detail. If you can’t find suitable long red candy, your turkeys will still be delightful without it.
- For more detailed advice on techniques and creative ideas, please scroll up and read the “Expert Tips and Decorating Techniques” and “Creative Variations and Substitutions” sections.
Nutrition
An automated tool is used to calculate the nutritional information. As such, I cannot guarantee the accuracy of the nutritional information provided for any recipe on this site.
