Easy No-Bake New Year’s Eve Cookies: Festive Decorated Oreos for a Sweet Celebration
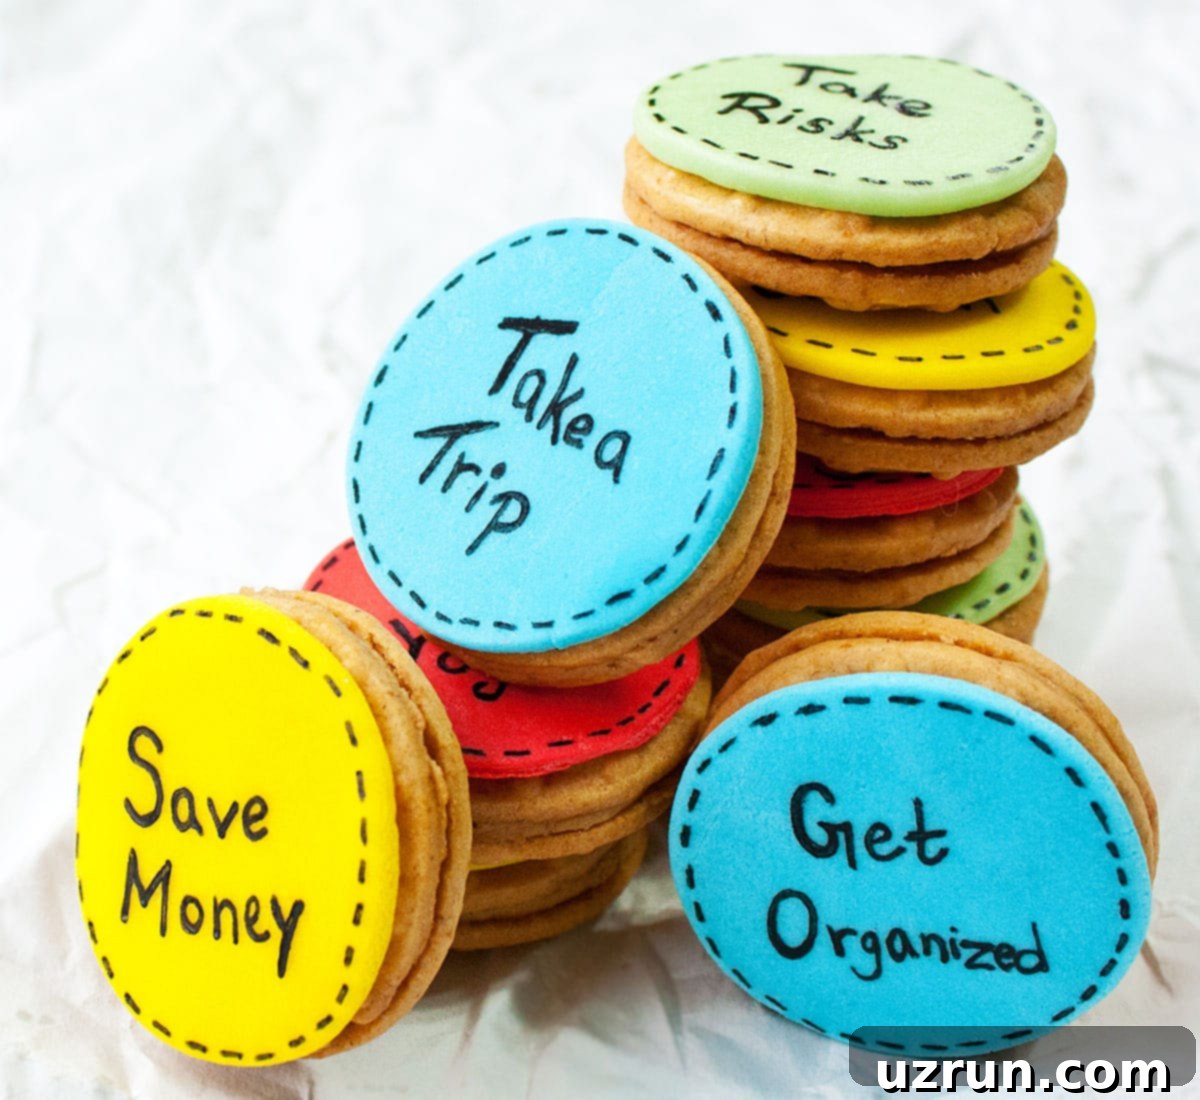
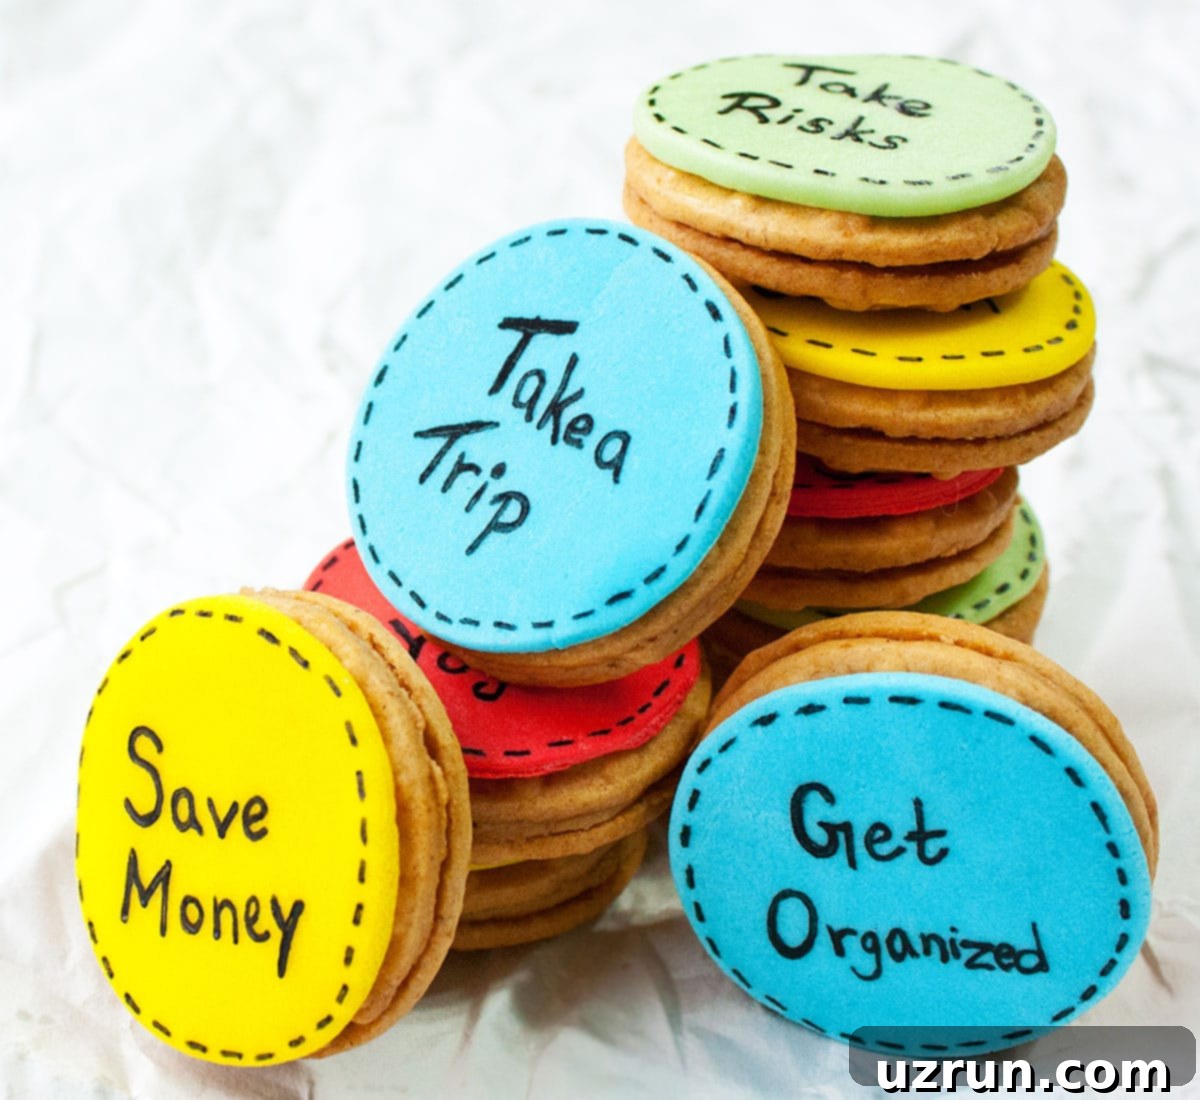
Welcome the New Year with a burst of color and a touch of sweetness! This incredibly easy recipe for New Year’s Eve Cookies features no-bake, decorated Oreos, making them the perfect stress-free treat for your holiday party. Crafted with simple, readily available ingredients like colorful fondant and edible markers, these festive cookies are not only delightful to eat but also incredibly fun to make. They’re an ideal activity for kids, who can help design their own edible resolutions or festive messages, just like our popular New Year Clock Cake. Get ready to create memorable moments and delicious bites as you count down to midnight!

The exhilarating countdown to the New Year is officially underway! As we approach January, it’s the perfect time to reflect and set intentions for the months ahead. This year, instead of merely jotting down resolutions on paper, why not immortalize them on delicious cookies? It’s a wonderfully engaging and creative way to celebrate new beginnings. These decorated Oreos are sure to be a hit at any gathering, offering a unique and personalized touch to your New Year’s Eve party menu.
If your celebration includes a toast with champagne, don’t miss out on complementing these cookies with other celebratory treats. We highly recommend making this elegant Easy Pink Champagne Cake, these delightful Champagne Cookies, or even these decadent Champagne Truffles. Each offers a sophisticated touch that pairs wonderfully with the festive spirit of New Year’s.
Table of contents
- Why You’ll Love These New Year’s Cookies
- Key Ingredients
- How to Make Easy Decorated Happy New Year’s Cookies
- Variations & Customization Ideas
- Expert Tips and Techniques
- Recipe FAQs
- Storage Best Practices
- More Decorated Cookies and Oreos

Why You’ll Love These New Year’s Cookies
There are countless reasons why these decorated Oreos are the ideal treat for your New Year’s celebration:
- Effortlessly Easy: No baking required! These are perfect for beginner bakers or those short on time during the busy holiday season.
- Kid-Friendly Fun: The simple decorating steps make this a fantastic activity for children. They can unleash their creativity with edible markers and colorful fondant.
- Customizable & Creative: From New Year’s resolutions to countdown numbers, or just festive designs, the possibilities for personalization are endless.
- Party Perfect: They are bite-sized, visually appealing, and can be made in advance, making them an excellent addition to any dessert table.
- Simple Ingredients: You only need a few basic items to transform ordinary Oreos into extraordinary festive cookies.
- No Oven Space Needed: Free up your oven for other dishes, as these delightful treats come together with zero baking.
Key Ingredients for Festive Oreos
Making these celebratory New Year’s cookies requires just a few essential components. Here’s a closer look at what you’ll need and why each ingredient is important:
- Oreos: The star of our no-bake show! While the classic chocolate Oreos are always a hit, I particularly love using Golden Oreos for their lighter color, which provides a beautiful contrast and vibrant base for colorful fondant. However, feel free to use any flavor you prefer, including chocolate, mint, or even seasonal varieties. The sturdy structure of Oreos makes them an excellent canvas for decoration.
- Fondant: This is what gives your cookies their smooth, colorful surface for writing and decorating. Fondant can be purchased pre-made in a wide array of colors, which is a fantastic time-saver, especially during the holidays. Alternatively, if you enjoy a more hands-on approach, you can make your own Marshmallow Fondant at home. Choose colors that evoke the New Year spirit, such as metallic gold, silver, black, white, or vibrant jewel tones.
- Corn Syrup: This acts as our “edible glue” to adhere the fondant to the top of the Oreo cookie. Corn syrup is perfect because it’s clear, has a mild flavor, and provides just the right amount of stickiness without making things overly wet. You only need a thin layer for effective adhesion.
- Edible Markers: These food-safe markers are essential for writing your resolutions, the New Year, or drawing festive designs onto the fondant. They come in various colors and tip sizes, allowing for both bold statements and intricate details. Black markers are excellent for clarity, but metallic gold or silver can add an extra celebratory sparkle.
How to Make Easy Decorated Happy New Year’s Cookies
Creating these festive cookies is straightforward and incredibly rewarding. Follow these simple steps for beautifully decorated New Year’s treats:
- Prepare the Fondant: Begin by rolling out your chosen fondant colors on a clean, lightly powdered sugar-dusted surface. Use a non-stick rolling pin for best results. Aim for an even thickness of about ⅛ inch. You want it thin enough to cut easily but thick enough to handle without tearing.
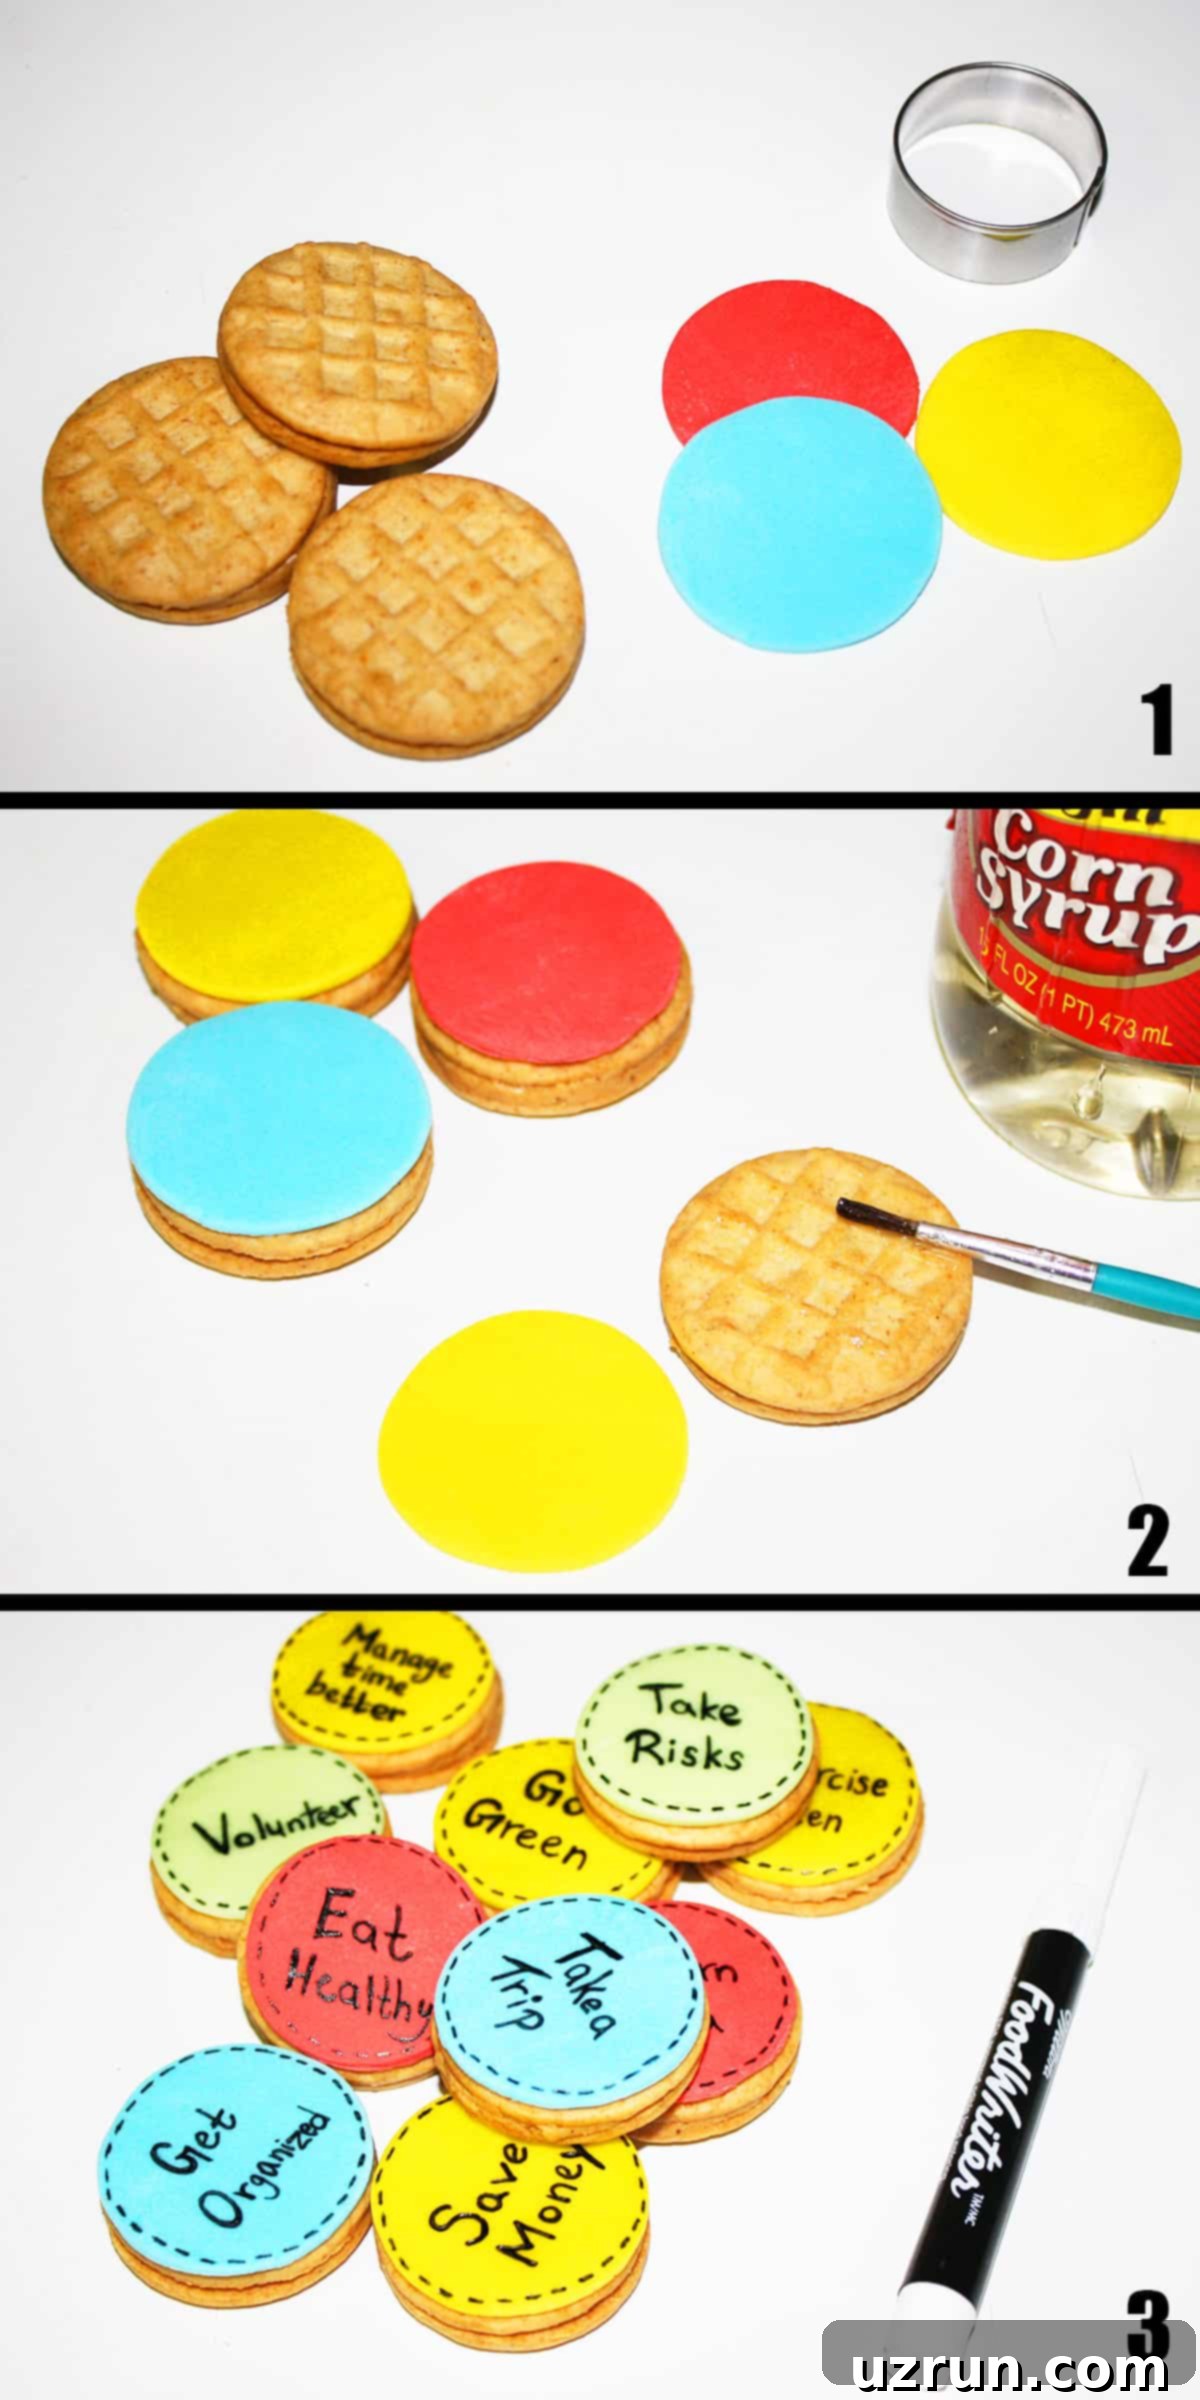
- Cut Fondant Circles: Select a round cookie cutter that is roughly the same size as your Oreos. Carefully cut out circular pieces from the rolled fondant (refer to Image 1 for guidance). Make sure your cuts are clean to ensure neat edges on your finished cookies.
- Attach Fondant to Oreos: Lightly brush a thin layer of corn syrup onto the top surface of each Oreo cookie. Be careful not to use too much, as excess will ooze out. Gently place a fondant circle on top of each corn syrup-brushed Oreo, centering it as best as you can. Lightly press down to secure it (as shown in Image 2).
- Allow Fondant to Dry: Once all your Oreos are covered with fondant, arrange them on a tray or wire rack. Let them sit out at room temperature, uncovered, for about 10-15 minutes. This crucial step allows the fondant to firm up slightly, creating a stable surface that is much easier to write on with edible markers. This prevents the marker from indenting or dragging on soft fondant.
- Decorate with Edible Markers: Now for the fun part! Using your edible markers, carefully write your New Year’s resolutions, the year, or any festive messages or designs onto the dried fondant (see Image 3 for inspiration). A fine-tip marker will give you the neatest, most precise writing.
- Present Your Cookies: Once decorated, these cookies are ready to be displayed! Arrange them on a platter for your party, or place them in a decorative cookie jar. You can even tie a ribbon around the jar with a cute tag that says, “This year, I will…” for a charming presentation.

Variations & Customization Ideas
These decorated Oreos are incredibly versatile! Here are some creative variations to make your New Year’s cookies truly unique:
- Make Gold Oreos: Elevate your New Year’s theme with stunning gold-covered Oreos. Gold and black is a classic and popular color combination for New Year’s parties. Instead of covering with colored fondant, simply use an edible gold spray or edible gold luster dust mixed with a drop of clear alcohol (like vodka or lemon extract) to paint each cookie until it’s fully covered and shimmering. Alternatively, spread a thin layer of American Buttercream Icing on top of each cookie and generously cover it with golden sprinkles for a sparkling finish.
- Use Sugar Cookies as a Base: If you prefer a more traditional cookie base, bake a batch of homemade sugar cookies. You can use our recipes for Easy Cut Out Sugar Cookies (With Cake Mix), Small Batch of Sugar Cookies, or even Chocolate Sugar Cookies. Once baked and cooled, decorate them using the same fondant and edible marker technique, or explore other icing options.
- Use Cookie Icing for Writing: For a more refined, piped look, replace edible markers with cookie icing. If you have a steady hand and some piping experience, you can use Royal Icing or Glace Icing to pipe your resolutions, numbers, or decorative patterns on top of each cookie. Both of these icings dry hard, creating a durable and elegant finish. Experiment with different piping tips for varied line thicknesses.
- Decorate with Edible Sugar Champagne Flutes/Glasses: Add an extra festive touch by adorning your cookies with pre-made, edible sugar decorations. You can find small sugar champagne flutes or glasses online or in the seasonal/baking aisle of most craft and grocery stores. These can be easily “glued” onto the fondant-covered cookies using a tiny dot of buttercream, royal icing, or even a small dab of corn syrup.
- Make Spritz Cookies with a New Year’s Theme: For a delicate and buttery option, create spritz cookies. These are made using a cookie press, and you can often find seasonal metal discs with New Year’s Eve-themed designs (like stars, champagne bottles, or fireworks). Try this recipe for Best Spritz Cookies (Almond Butter Press Cookies) or these Chocolate Spritz Cookies. Before baking, sprinkle them with golden sprinkles, gold sanding sugar, or edible gold pearls for a truly festive sparkle.
- Use Other Cream-Filled Cookies: Don’t limit yourself to just Oreos! While Golden Oreos are a favorite, feel free to use generic brands of cream-filled cookies, or even Nutter Butter cookies for a peanut butter twist. Ensure the cookie surface is relatively flat for easy fondant application.
- Create Countdown Cookies: Instead of writing resolutions, transform your cookies into an edible countdown! Write numbers from 10 down to 1 on individual cookies and enjoy munching on them as you count down to midnight. This is a particularly fun and interactive activity for parties with children.
Expert Tips and Techniques for Perfect New Year’s Cookies
Achieving beautifully decorated New Year’s Eve cookies is simple with a few insider tips:
- Allow Fondant to Dry Slightly: This is a crucial step for neat writing. After applying the fondant circles to the cookies, let them sit exposed to air for 10-15 minutes. This allows the surface to firm up, preventing the edible marker from indenting or dragging through soft fondant, ensuring your writing is clean and sharp.
- Use a Fine Tip Edible Marker: For elegant, legible writing, a fine-tip edible marker is your best friend. It allows for detailed script and prevents blocky letters. Practice your writing on a scrap piece of fondant first if you’re unsure.
- Avoid Refrigeration: Unlike many baked goods, these fondant-decorated cookies should not be refrigerated. Fondant reacts poorly to moisture; it becomes sticky and can even “sweat” when exposed to the humidity of a fridge. This moisture can also cause the marker ink to bleed, ruining your designs.
- Store-Bought vs. Homemade Fondant: While homemade marshmallow fondant generally offers a superior taste and texture, store-bought pre-colored fondant is a fantastic convenience, especially when time is short. It saves you the steps of kneading and coloring, allowing you to get straight to the decorating. Choose what best suits your schedule and preference.
- Match Cutter Size to Cookie: The cookie cutter you use for the fondant should be approximately the same size as your Oreos. If the cutter is too large, the fondant will extend awkwardly beyond the cookie’s edge, looking messy. If it’s too small, it won’t fully cover the top, leaving an unfinished look. Aim for a snug fit.
- Use Corn Syrup Sparingly: A little bit of corn syrup goes a long way! You only need to brush a very thin, almost imperceptible layer onto the Oreo to create sufficient adhesion for the fondant. Applying too much corn syrup will cause it to ooze out from the sides of the fondant, creating a sticky, unsightly mess. If this happens, gently dab away the excess with a clean paper towel.
- Clean Workspace: Ensure your workspace is clean and free of crumbs or excess powdered sugar, especially when working with fondant, as these can get stuck to your decorations.
- Work in Batches: If making a large quantity, work in small batches, especially with fondant. Keep unused fondant wrapped tightly to prevent it from drying out.

Recipe FAQs for New Year’s Cookies
Decorating cookies offers endless creative possibilities, and the method largely depends on your desired design and skill level. For these New Year’s Oreos, we use fondant and edible markers for a simple, no-bake approach. Other popular methods include using royal icing for intricate piping (which dries hard and crisp), glace icing for a slightly softer, glossy finish, buttercream icing for a rich, creamy texture, and, of course, a variety of sprinkles, edible glitter, and pre-made sugar decorations. Intricate patterns often require a steady hand, various piping tips, and a bit of practice, but simple designs can be achieved by anyone!
Proper storage is key to maintaining the freshness and appearance of your decorated cookies, and it varies based on the type of icing or decoration used. For cookies adorned with fondant (like these New Year’s Oreos) or royal icing, they should be stored in a covered, airtight cardboard box or container at room temperature. It’s crucial to keep them away from direct heat, sunlight, and especially moisture, as both fondant and royal icing can become sticky or bleed when exposed to humidity. For cookies decorated with buttercream icing, refrigeration is usually necessary. Store them in a sealed container in the refrigerator for up to 3 days, but be aware that some colors might slightly change in the cold.
Absolutely! These decorated Oreos are perfect for making ahead. You can prepare them 1-2 days in advance of your party. Ensure they are stored correctly in a covered cardboard box at room temperature, away from any moisture or direct heat, to keep the fondant from getting sticky and the designs looking fresh. This allows you to tackle your New Year’s Eve preparations without last-minute stress.
If corn syrup isn’t available, you have a few alternatives for adhering the fondant. A thin brush of water can sometimes work, but it needs to be very light to avoid dissolving the fondant. A small amount of thinned royal icing or a dab of buttercream frosting can also act as an adhesive. Even a bit of clear jam or piping gel can be used in a pinch. However, corn syrup is generally preferred for its neutral taste and ideal stickiness.
Yes, these cookies are exceptionally kid-friendly! The no-bake aspect means no hot ovens or sharp tools are needed. Kids can easily help with rolling out the fondant (with a little supervision), cutting out the circles, gently placing them on the Oreos, and most importantly, decorating with edible markers. It’s a fantastic activity to engage them in the New Year’s festivities and allows them to express their creativity.
Storage Best Practices for Decorated New Year’s Cookies
Proper storage ensures your beautiful New Year’s cookies remain delicious and visually appealing. Follow these guidelines to keep your decorated Oreos in optimal condition:
- Make Ahead: These cookies are excellent for preparing in advance. You can comfortably make them 1-2 days before your event. Store them in a single layer or separated by parchment paper in a covered, airtight cardboard box at room temperature. It’s crucial to keep them away from direct heat sources and any areas with high moisture, as both can negatively impact the fondant.
- Refrigerate: Refrigeration is generally not recommended for these specific cookies. The moisture and humidity inside a refrigerator can cause the Oreos to become soggy, and the fondant will likely become sticky and potentially “sweat” upon exposure to cold. This can also lead to the edible marker ink bleeding, compromising your designs.
- Room Temperature: This is the ideal storage method. Keep your decorated Oreos in a covered cardboard box or a sturdy airtight container. Ensure they are stored in a cool, dry place away from direct sunlight. This environment helps maintain the firm texture of the fondant and prevents the cookies from becoming soft.
- Freeze: Freezing these cookies is also not recommended. Upon thawing, the Oreos will likely become soggy due to moisture migration, and the fondant decorations will become sticky and potentially lose their shape or color integrity. These cookies are best enjoyed fresh or within a couple of days of preparation, stored at room temperature.
More Decorated Cookies and Oreos to Inspire You
If you loved decorating these New Year’s Eve Oreos, you’ll surely enjoy exploring other creative cookie and Oreo decorating projects. These ideas are perfect for various holidays, seasons, or just for fun:
- Snowflake Cookies (Decorated Oreos): Perfect for winter gatherings.
- Chocolate Covered Oreos (Dipped Oreos): A classic and versatile treat.
- Emoji Cookies (Fun Oreos): Express yourself with these playful designs.
- Snowman Cookies (Festive Oreos): A delightful addition to any winter celebration.
- Turkey Cookies (Thanksgiving Oreos): A cute and easy treat for the fall season.
- Spider Cookies (Spooky Oreos): Ideal for Halloween parties.
Recipe: Easy New Year’s Eve Decorated Oreos

Easy New Years Cookies (Decorated Oreos)
Abeer Rizvi
Pin Recipe
Want to Save This Recipe?
Enter your email & I’ll send it to your inbox. Plus, get great new recipes from me every week!
By submitting this form, you consent to receive emails from CakeWhiz
Ingredients
- 1 cup Marshmallow fondant In various colors of your choice.
- 12 Golden Oreos Or any other cream filled cookies of your choice.
- 2 tablespoon Corn syrup Can also use a very thin layer of buttercream icing or jam.
- Edible Markers Fine-tipped for best results.
Instructions
-
On a clean surface lightly dusted with powdered sugar, roll out your chosen colored fondant to about ⅛ inch thickness.
-
Using a round cookie cutter that is roughly the same size as your cookies, cut out circles of fondant.
-
Lightly brush a thin layer of corn syrup on top of each Oreo cookie, then gently stick a fondant circle on top, centering it carefully.
-
Allow the fondant-covered cookies to sit out, uncovered, at room temperature for 10-15 minutes. This step is essential to let the fondant dry slightly, making it firmer and easier to write on without indenting.
-
Using a fine-tip edible marker (such as a black one for contrast), write your New Year’s resolutions, the year, or any other festive messages or designs on top of each dried fondant circle.
-
Arrange your finished cookies on a platter or place them in a decorative cookie jar. For a charming presentation, wrap a ribbon around the jar with a cute tag that reads: “This year, I will…”
Notes
- Edible markers can be found online or in the cake decorating aisle of most craft stores (like Hobby Lobby, Michaels) or larger supermarkets (like Walmart).
- It’s crucial to allow the fondant to dry a little before writing. If the fondant is too soft, the marker tip will indent or drag, making a mess as you write.
- Always use a fine-tip marker for the cleanest, sharpest writing and intricate designs.
- If you’re short on time, pre-colored, store-bought fondant is a fantastic time-saver compared to making and coloring your own.
- A tiny amount of corn syrup is sufficient to make the fondant stick. Too much will create a sticky mess.
Nutrition
An automated tool is used to calculate the nutritional information. As such, I cannot guarantee the accuracy of the nutritional information provided for any recipe on this site.
