Easy Fondant Tulip Cookies: A Simple Step-by-Step Guide for Stunning Spring & Summer Treats
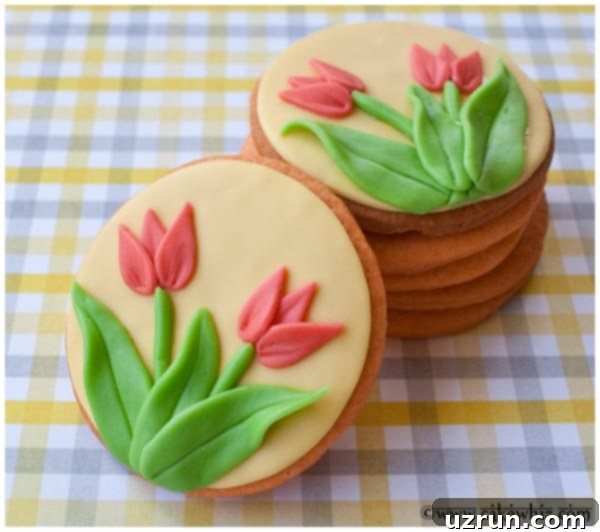
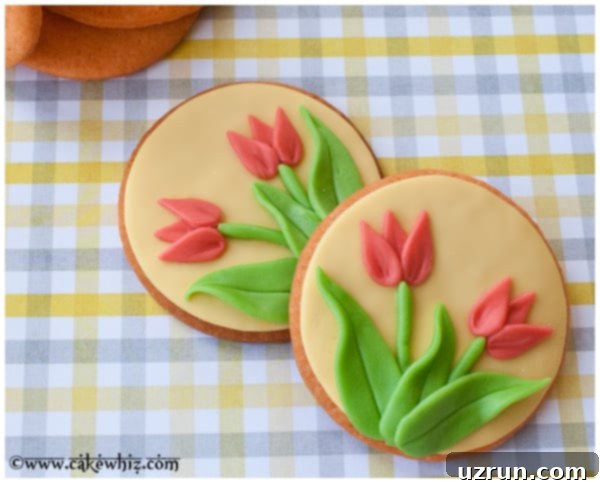
Welcome to a delightful world of edible art! This comprehensive, step-by-step tutorial will guide you through creating beautifully decorated tulip cookies using marshmallow fondant. Perfect for celebrating the arrival of Spring, brightening up Easter gatherings, or adding a touch of floral charm to any Summer party, these cookies are surprisingly easy to make. You won’t even need special cutters – just a few basic tools, round sugar cookies, and vibrant marshmallow fondant are all it takes to bring these lovely treats to life.

The breathtaking sight of tulips blooming everywhere served as the initial inspiration for this creative cookie project. While marshmallow fondant is our medium of choice for all the intricate decorating details, its versatility makes it perfect for both beginners and experienced bakers. Fondant offers a smooth, professional finish and allows for vibrant colors that truly pop. If you’re more accustomed to piping, you could certainly adapt these designs using Royal Icing or Glace Icing, though the techniques for forming petals would differ. For this tutorial, we focus on the simplicity and visual appeal of homemade marshmallow fondant, combined with readily available tools like toothpicks and basic cookie cutters. No need to invest in a specialized tulip cutter when you can achieve stunning results with what you likely already have!
Why Choose Fondant for Cookie Decorating?
Fondant, especially marshmallow fondant, is an excellent choice for decorating cookies for several compelling reasons. Its pliable texture makes it incredibly forgiving, allowing you to easily cut shapes, mold details, and even reposition elements if needed, which is a huge advantage for beginners. Unlike some icing methods that demand precise piping skills and a steady hand, fondant can be rolled out and cut with simple tools, making intricate and beautiful designs accessible to everyone. It also dries to a smooth, elegant, and non-sticky finish, which is ideal for stacking and transporting your decorated treats without fear of smudges or damage. Furthermore, homemade marshmallow fondant offers a delightful taste and aroma that complements your cookies, elevating your decorated masterpieces beyond just visual appeal. Its ability to hold vibrant colors without becoming translucent ensures your tulip cookies will be as eye-catching and beautiful as real spring blooms.
Essential Ingredients for Your Fondant Tulip Cookies
To embark on your tulip cookie decorating adventure, gather these key ingredients. Each plays a crucial role in ensuring your cookies are not only beautiful but also delicious and easy to assemble.
- Flat Sugar Cookies: These form the perfect foundation for our beautiful tulips. It’s absolutely vital to use flat, cut-out cookies for this project, as their smooth, even surface provides an ideal canvas for fondant decorations. Any bumps or unevenness on the cookie surface will be magnified by the fondant, making the decorations look less professional. We recommend a sturdy recipe that holds its shape well when baked. Consider a classic vanilla sugar cookie recipe or explore other options like Chocolate Sugar Cookies or Cranberry Orange Shortbread Cookies, as long as they promise a flat baking surface.
- Marshmallow Fondant: This is truly the star of our decoration! You have the option to use a high-quality store-bought fondant for convenience, but we wholeheartedly recommend using homemade marshmallow fondant. Not only does it taste significantly better – softer, sweeter, and with a more pleasant aroma – but it’s also often easier to work with, less prone to cracking, and more economical to make. You’ll need various portions of fondant to color in your desired shades for the tulip petals (e.g., yellow, pink, red, purple) and green for the stems and leaves.
- Corn Syrup (Edible Glue): This versatile sticky, sweet syrup acts as our primary “edible glue.” A very thin, almost imperceptible layer of corn syrup is perfect for adhering larger fondant pieces (like your base layer) to your cookies and for attaching smaller, delicate fondant details (such as petals and leaves) to each other, ensuring they stay securely in place without making the fondant soggy or discolored.
- Water: Used sparingly with a fine-tipped paintbrush, water can also serve as a very light adhesive for extremely delicate details or for smoothing out tiny imperfections on the fondant surface. Remember, less is definitely more here to avoid creating a sticky mess.
- Gel Food Colors: Essential for achieving vibrant, beautiful, and true-to-life colors for your fondant. We highly recommend using gel food coloring over liquid varieties. Gel colors are highly concentrated, meaning you need only a tiny amount to produce rich, vivid colors, and they will not thin out or alter the ideal consistency of your marshmallow fondant. Liquid food coloring, on the other hand, can add too much moisture, making the fondant sticky and difficult to manage.
How to Make Easy Fondant Tulip Cookies with Fondant: A Step-by-Step Guide
Follow these simple, easy-to-understand steps to transform plain sugar cookies into delightful tulip masterpieces. This process is designed to be straightforward and enjoyable, making impressive cookie decorating achievable for bakers of all skill levels.
- Prepare Your Cookies: Begin by baking your favorite recipe for flat sugar cookies. Once they are out of the oven, it is absolutely crucial to let them cool completely on a wire rack. This step cannot be rushed! Attempting to decorate warm cookies will cause the fondant to melt, sweat, and become a sticky, unmanageable mess, ruining your efforts. Ensure they are at room temperature before proceeding.
- Color Your Fondant: Divide your prepared marshmallow fondant into separate portions according to the colors you plan to use (e.g., one for yellow base, one for pink/red petals, one for green stems/leaves). Add a small amount of your chosen gel food color to each portion. Knead the gel color thoroughly into the fondant until the color is uniform and streak-free. This process ensures consistent, vibrant hues across all your decorations. Always store any unused fondant tightly wrapped in plastic wrap or in an airtight container to prevent it from drying out.
- Assemble and Decorate Your Tulips: Now, for the most creative and enjoyable part of the process! Clear a clean, dry work surface and lightly dust it with powdered sugar or cornstarch to prevent sticking. With your colored fondants, basic cookie cutters (a round and a heart shape work wonders), a small, sharp knife, and a toothpick, you will craft the beautiful tulip shapes. Pay close attention to the detailed instructions in the recipe card below for precise cutting, shaping, and assembly of each element of your tulip design.

Tips and Techniques for Perfect Fondant Tulip Cookies
Achieving beautifully decorated cookies is easier with a few expert tips and a little know-how. Keep these in mind as you work to ensure the best results and a smooth, enjoyable decorating experience, making your fondant tulip cookies truly stand out.
- Homemade Fondant vs. Store-Bought Fondant: While store-bought fondant offers undeniable convenience, homemade marshmallow fondant often proves to be superior in several aspects. It typically boasts a better flavor profile – softer, sweeter, and without the slight chemical aftertaste some commercial brands can have. It’s also generally more pliable and easier to roll without cracking. If you have the time, making your own is highly recommended for a truly gourmet cookie experience.
- Experiment with Colors: Don’t feel limited to the classic yellow, pink, and green color combination shown here. Spring and summer offer a vibrant palette of hues! Get creative and try purple tulips, bright orange blooms, delicate white petals, or even multi-colored petals for a unique effect. Let your artistic vision bloom and choose colors that perfectly complement your party theme or personal preference.
- Control the Use of Water or Corn Syrup: When adhering fondant pieces, precision is key. Use a very small, fine-tipped paintbrush and apply as little water or corn syrup as possible. A tiny dab is usually sufficient to create a strong bond. Too much moisture can make the fondant overly sticky, difficult to manage, and may even cause the sugar to dissolve, potentially ruining the smooth finish.
- Flavor Your Fondant: Elevate the overall taste experience by incorporating a few drops of your favorite extract into the fondant as you knead in the color. Vanilla, almond, lemon, or even a complementary orange extract can beautifully enhance and harmonize with the flavor of your sugar cookies, adding an extra layer of deliciousness.
- Choose the Right Cookie Base: The success of your decorated cookies hinges significantly on having a flat, smooth surface. Cut-out sugar cookies are ideal for this purpose. Avoid using drop cookies or those with very bumpy, uneven surfaces, as any inconsistencies will be magnified by the fondant, making your intricate decorations appear less professional. Ensure your chosen base cookie recipe yields a consistently flat top.
- Opt for Gel Food Colors: As previously emphasized, gel colors are paramount for fondant decorating. They are highly concentrated, meaning you need only a minimal amount to achieve vivid, rich colors. This is crucial because it helps maintain the fondant’s ideal consistency. Liquid food coloring, on the other hand, can introduce excessive moisture, making the fondant sticky, hard to roll, and difficult to cut.
- Always Decorate Cool Cookies: Patience is a virtue when it comes to cookie decorating! It is absolutely essential to ensure your baked cookies are completely and thoroughly cooled to room temperature before attempting to apply any fondant. Decorating warm cookies will cause the fondant to soften, melt, and become a sticky, unmanageable disaster, completely ruining your hard work and beautiful designs.
- Avoid Stacking Decorated Cookies Immediately: Once your beautiful tulip cookies are decorated, resist the urge to stack them right away, especially if the fondant is still soft. The delicate decorations can easily smudge, stick together, or get damaged. Allow them to fully set and dry for several hours (preferably overnight) in a single layer before carefully arranging them for storage or presentation.
- Fondant vs. Gum Paste: Know the Difference: While both are sugar-based pastes used in confectionery, gum paste is formulated to dry much harder and faster than fondant. This property makes it ideal for creating intricate, structural elements like delicate edible flowers, figures, or lace-like designs that need to hold their shape rigidly. However, for cookie decorations that are meant to be eaten and enjoyed for their softer, chewable texture, gum paste is not suitable. No one wants to bite into a rock-hard decoration! Stick to fondant for these delicious, delightful, and chewable tulip cookies.
- Use Basic Cutters Creatively: As this tutorial demonstrates, you absolutely do not need a specific tulip cookie cutter to create these stunning designs. A simple round cutter for the base and a heart cutter for the petals, combined with a little strategic shaping by hand and the detailing power of a toothpick, allows for incredible versatility and saves you money on specialized equipment. Think outside the box with your existing cookie cutter collection!
- Maintain a Clean Work Surface: Always ensure your work surface is meticulously clean and dry. Lightly dust it with powdered sugar or cornstarch before rolling out your fondant. This preventative measure is crucial for preventing the fondant from sticking and makes rolling and cutting much smoother and easier.
- Keep Fondant Covered: Fondant dries out remarkably quickly when exposed to air. To preserve its pliability and prevent it from becoming brittle, always keep any unused portions tightly wrapped in plastic wrap or stored in an airtight container while you are working on your cookies.

Storage Tips for Your Fondant Decorated Cookies
Proper storage is essential to maintain both the freshness and the exquisite beauty of your decorated tulip cookies. Follow these guidelines to keep them looking and tasting perfect for as long as possible.
- Room Temperature: This is generally the best and most recommended way to store fondant-decorated cookies. Once the fondant has completely dried and set (which may take several hours or overnight), place the cookies in a single layer within a covered, airtight box or container. Store them in a cool, dry place, away from any direct sunlight, heat sources, or excessive moisture. Stored correctly, your beautiful tulip cookies will remain fresh and visually appealing for up to 1 week. If you must stack them, ensure the fondant is absolutely dry and place a piece of parchment paper or wax paper between each layer to prevent sticking and preserve the delicate decorations.
- Refrigeration: Refrigerating fondant-decorated cookies is generally NOT recommended. The cold, humid environment and the condensation that forms inside a refrigerator can cause the fondant to become sticky, soft, and potentially “sweat” or bleed colors. This can ruin the smooth finish and vibrant hues of your decorations. It’s best to avoid the fridge for these delicate treats.
- Freezing: Undecorated sugar cookies freeze exceptionally well for up to 1 month when stored in a sealed, freezer-safe container. You can bake your cookies ahead of time and then thaw them at room temperature before decorating. However, decorated cookies with fondant should NOT be frozen. Similar to refrigeration, the thawing process will inevitably create condensation, which will make the fondant decorations sticky, soft, and unappetizing. The texture and appearance will be significantly compromised.
More Decorated Cookie Inspiration
If you thoroughly enjoyed the process of decorating these charming tulip cookies, you might love exploring other fun and easy cookie decorating projects. Expand your cookie art repertoire with these additional ideas, perfect for various seasons and occasions:
- Leftover Halloween Candy Cookies: A creative way to use up holiday candy.
- Easy Fall Cookies (Leaf Cookies): Celebrate autumn with beautiful leaf designs.
- Easy Dinosaur Cookies: A fantastic project for kids’ parties or dinosaur enthusiasts.
- Easy Flower Cookies: More floral fun with simple decorating techniques.
Full Recipe: Easy Fondant Tulip Cookies

Easy Tulip Cookies (Fondant)
Abeer Rizvi
Pin Recipe
Want to Save This Recipe?
Enter your email & I’ll send it to your inbox. Plus, get great new recipes from me every week!
By submitting this form, you consent to receive emails from CakeWhiz
Ingredients
- 6 Sugar cookies Baked, completely cooled, round shape. Optionally, color the cookie base itself orange and flavor with orange extract for a warm, complementary taste.
- 1 cup Marshmallow fondant Divided into portions and colored vibrant yellow (for the base), festive red/pink (for petals), and fresh green (for stems and leaves) using gel food coloring.
- 2-3 tablespoons Corn syrup Used as a thin layer of edible glue to adhere fondant pieces.
- ¼ cup Water For fine detailing, smoothing edges, or as a very light adhesive; used sparingly with a paintbrush.
- Powdered sugar or cornstarch For dusting your work surface to prevent fondant from sticking.
- Gel food coloring Various colors for tinting your marshmallow fondant (e.g., yellow, pink/red, green).
Instructions
-
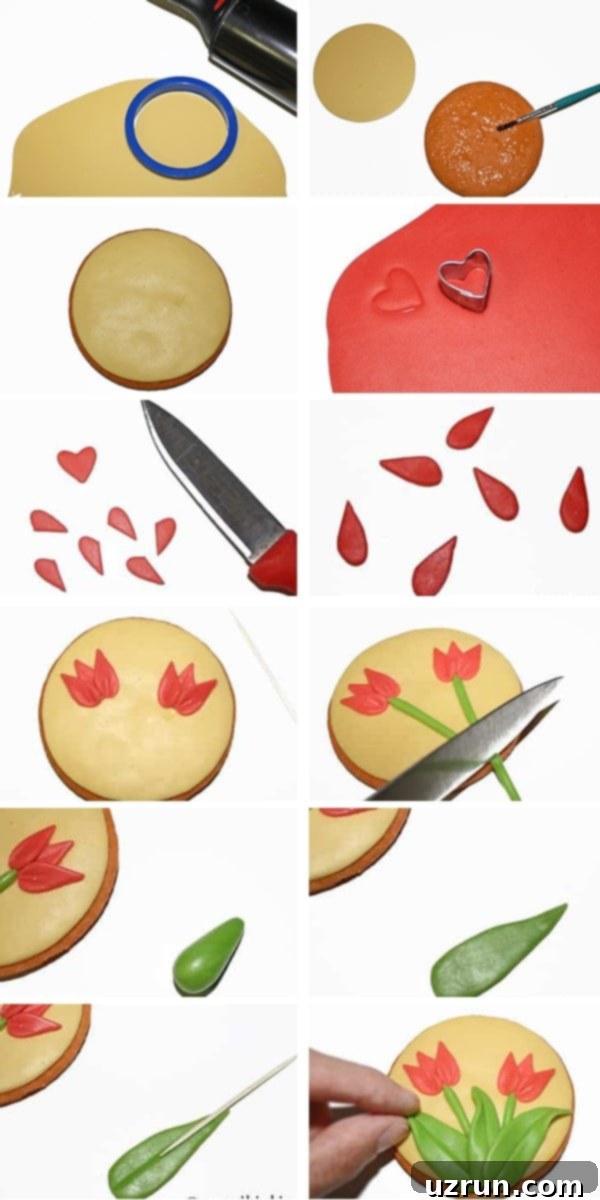
1. Prepare the Cookie Base: Begin by lightly dusting your clean work surface with powdered sugar or cornstarch to prevent any sticking. Take your portion of yellow-colored marshmallow fondant and roll it out evenly to approximately 1/8 inch thickness. Using a round cookie cutter that precisely matches the size of your completely cooled, baked sugar cookies, carefully cut out a perfect circular piece of yellow fondant. Repeat for all cookies.
-
2. Attach Fondant Base: Brush a very thin, even layer of corn syrup on top of one of your completely cooled sugar cookies. Gently place one of the cut yellow fondant circles onto the cookie, carefully aligning its edges with those of the cookie. Smooth it out thoroughly with your fingers or a fondant smoother to remove any trapped air bubbles and ensure a perfectly flat, vibrant base for your tulip design.
-
3. Create Tulip Petals: Next, roll out your pink or red fondant thinly, again on a lightly dusted surface. Use a small heart-shaped cookie cutter to cut out several heart pieces. For each individual tulip, you will typically need three “petals.” To form each petal, take one heart piece and cut it in half vertically, from the top point down to the center of the rounded bottom. Use your fingers to gently smooth out any sharp edges on the cut side and round them slightly, creating a more natural and soft petal shape. Now, arrange three of these half-heart petals in a cluster on your yellow fondant base, positioning them to form the beautiful bloom of the tulip. Use a tiny dab of water or corn syrup on the back of each petal to adhere them securely. With a toothpick, gently make small indentations on each petal to mimic natural veins and add realistic detail.
-
4. Add the Stem: Take a portion of your green fondant and roll it into a long, thin rope. Carefully position and attach this green rope just below the tulip petals, allowing it to extend downwards towards the base of the cookie to form the stem. Use a minimal amount of corn syrup or water to secure it firmly in place. Using a small, sharp knife or an exacto tool, trim any excess green fondant from the very base of the cookie to create a clean finish.
-
5. Form the Leaves and Finish: Take a small piece of green fondant and roll it into an irregular “cone-like” or teardrop shape. Gently flatten it with your fingers to create a long, tapered leaf shape. Use a toothpick to make a central indentation along the length of the leaf to mimic a natural vein. Attach these fondant leaves to the sides of your stem using a tiny bit of corn syrup for adhesion. For an even more natural and dynamic appearance, use your fingers to slightly bend or cup the edges of the leaves, giving them a three-dimensional quality. And just like that, your beautiful, easy tulip cookie is complete! Repeat this entire process for the remaining cookies, enjoying the creative journey with each one.
Notes
- For the best possible results and to fully understand all the nuances and helpful hints, be sure to read all the detailed tips and techniques provided above in the main article body before you begin decorating.
- Leftover decorated cookies can be stored effectively in an airtight container at room temperature for up to 1 week. To best preserve their beautiful appearance and freshness, ensure they are kept away from any moisture, direct sunlight, and sources of heat.
- Consider making a batch of our small batch sugar cookies as they provide the perfect flat and stable base for these delicate fondant decorations.
- If you find your marshmallow fondant becomes too sticky while working with it, lightly dust your hands and your work surface with a small amount of powdered sugar or cornstarch. Conversely, if it seems too dry or stiff, knead in a tiny bit of vegetable shortening to restore its pliability.
Nutrition
An automated tool is used to calculate the nutritional information. As such, I cannot guarantee the accuracy of the nutritional information provided for any recipe on this site.