Easy Homemade White Chocolate Bark Recipe: The Ultimate Guide for Delicious Gifts & Treats
Discover the incredibly simple yet delightfully decadent world of homemade white chocolate bark! This quick and easy recipe requires just two core ingredients and opens up a universe of delicious topping possibilities. Whether you’re searching for the perfect Christmas dessert, a charming homemade gift, or simply a sweet treat to satisfy your cravings, this white chocolate bark is an absolute winner. Its rich, creamy flavor is truly phenomenal and can even be used creatively for cake decorating, like this stunning Chocolate Bark Cake. Much like our beloved White Chocolate Truffles and White Chocolate Fudge, this recipe consistently proves to be a crowd-pleaser, delivering gourmet taste with minimal effort.

Table of Contents
- What is White Chocolate Bark?
- Why You’ll Love This Easy White Chocolate Bark Recipe
- How to Make The Best Homemade White Chocolate Bark From Scratch
- Mastering White Chocolate Peppermint Bark (Candy Cane Bark)
- Key Ingredients for Perfect White Chocolate Bark
- Endless Variations and Toppings for White Chocolate Bark
- Expert Tips and Techniques for Flawless Chocolate Bark
- Storage and Packaging for Freshness and Gifting
- More Irresistible White Chocolate Desserts
What is White Chocolate Bark?
White chocolate bark is a popular confection known for its impressive appearance and delightful simplicity. At its core, it’s a type of candy or dessert made by melting white chocolate, spreading it into a thin layer, and then adorning it with a variety of toppings before allowing it to set. Unlike traditional dark or semi-sweet chocolate bark, white chocolate offers a creamy, sweet, and often vanilla-infused base that beautifully complements a wide array of flavors and textures. Its versatility makes it a fantastic canvas for creativity, allowing you to customize it for any occasion, holiday, or personal preference. From crunchy nuts and chewy dried fruits to festive sprinkles and savory pretzels, white chocolate bark transforms simple ingredients into an elegant and irresistible treat.
Why You’ll Love This Easy White Chocolate Bark Recipe
This homemade white chocolate bark recipe isn’t just easy; it’s a game-changer for anyone looking to create impressive treats without the fuss. Here’s why it’s destined to become your new favorite:
- Effortlessly Simple: With just two main ingredients (white chocolate and your chosen topping), this recipe is incredibly straightforward. No baking, no complex techniques – just melt, spread, top, and chill!
- Quick to Make: From start to finish, you can have a batch of delicious white chocolate bark ready in under 30 minutes, including chill time. Perfect for last-minute guests or sudden sweet cravings.
- Infinitely Customizable: The beauty of bark lies in its adaptability. The possibilities for toppings are truly endless, allowing you to tailor it to specific holidays, dietary preferences, or flavor profiles.
- Stunningly Beautiful: Despite its simplicity, homemade white chocolate bark looks incredibly elegant and professional. It’s perfect for gifting or displaying on a dessert platter.
- Budget-Friendly: Making your own candy is often more economical than buying gourmet treats, especially when you can buy ingredients in bulk.
- Kid-Friendly Activity: The simple steps make it a wonderful activity to do with children, letting them choose and sprinkle their favorite toppings.
How to Make The Best Homemade White Chocolate Bark From Scratch
Creating delicious homemade white chocolate bark is a breeze. Follow these straightforward steps for a perfect batch every time:
- Melt the White Chocolate: The first crucial step is to gently melt your chosen white chocolate. This can be achieved using a microwave or a double boiler. If using a microwave, heat in 30-second intervals, stirring thoroughly after each, until smooth and fully melted. Be extremely cautious not to overheat, as white chocolate can seize or burn easily.
- Prepare Your Pan: Line a baking sheet or a large platter with wax paper or parchment paper. This vital step ensures your chocolate bark won’t stick and can be easily removed once set.
- Spread Evenly: Once melted and smooth, pour the white chocolate onto the prepared pan. Use an offset spatula or the back of a spoon to spread it into a thin, even layer. Aim for about a ¼ inch thickness for the best texture – not too thin to be brittle, and not too thick to be overly chewy.
- Sprinkle Toppings Generously: This is where the fun begins! While the chocolate is still wet and warm, generously sprinkle your chosen toppings over the entire surface. Press them down gently to ensure they adhere to the chocolate. Have your toppings prepped and ready before melting the chocolate, as it begins to set quickly.
- Allow Chocolate to Set: Transfer the baking sheet to the refrigerator and chill for at least 20-30 minutes, or until the chocolate is completely hardened and firm to the touch. Alternatively, you can let it set at room temperature, which might take an hour or two depending on your ambient temperature.
- Break into Pieces: Once fully set, carefully peel the bark off the parchment paper. Then, using your hands, simply break the large slab into smaller, irregular pieces. This rustic look is part of the charm of chocolate bark. If you prefer cleaner edges, a sharp knife warmed under hot water can be used, but the beauty of bark is its imperfect, natural breakage.
Mastering White Chocolate Peppermint Bark (Candy Cane Bark)
White chocolate peppermint bark, often called candy cane bark, is a holiday classic. Its cool, minty flavor combined with creamy white chocolate and a satisfying crunch makes it an irresistible festive treat. Here’s how to perfect it:
- Melt the White Chocolate: Follow the same melting instructions as above, ensuring your white chocolate is smooth and lump-free.
- Spread on Prepared Surface: Pour the melted white chocolate onto a baking sheet lined with wax paper or parchment paper, spreading it evenly to your desired thickness.
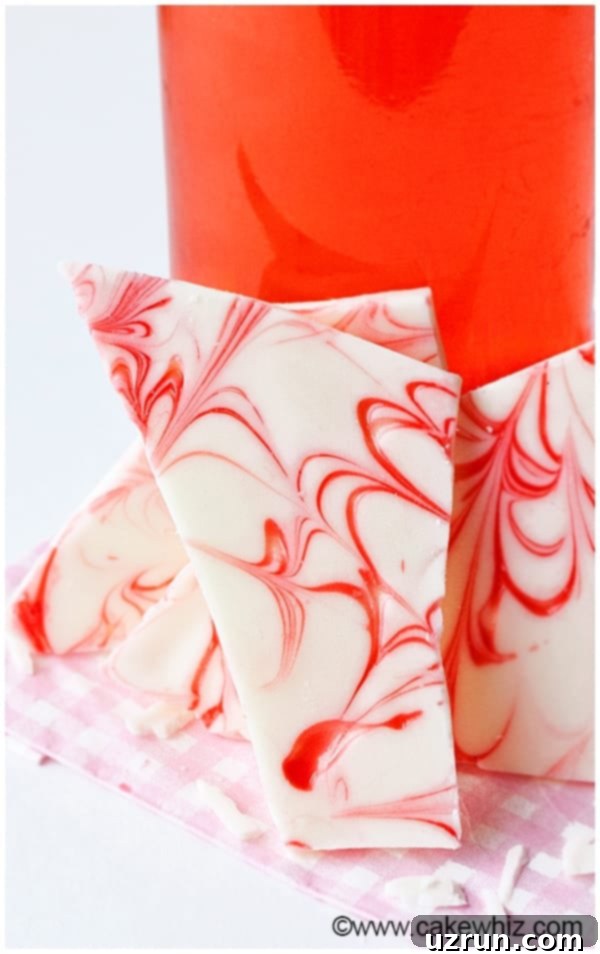
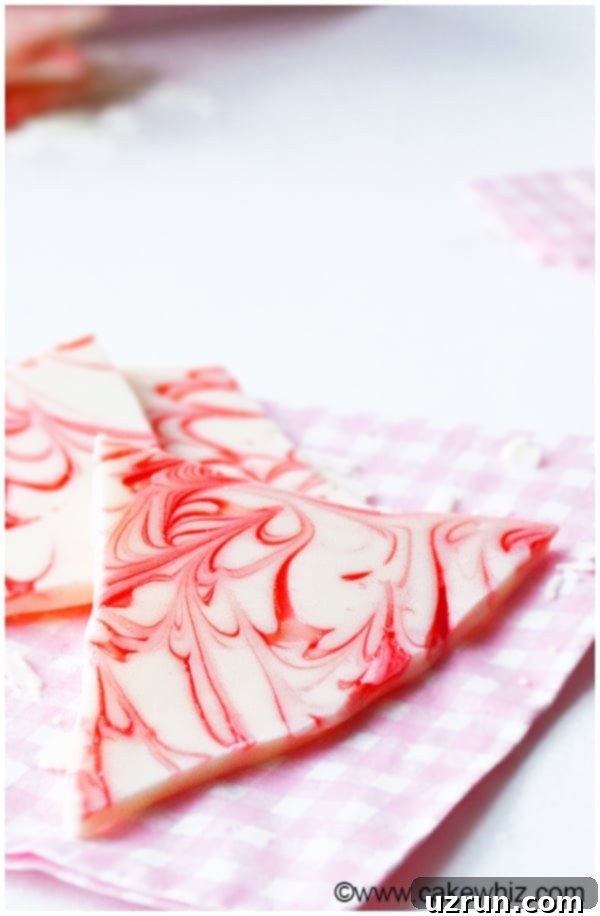
- Add Peppermint Goodness: You have a couple of options here. You can generously toss crushed peppermint candies or candy canes directly over the wet white chocolate for a crunchy texture and vibrant color. Alternatively, for a swirled effect, drizzle thick candy cane syrup or peppermint syrup over the chocolate. If using syrup, use a toothpick to gently swirl it into abstract patterns, being careful not to overmix, which can cause stickiness later.
- Set and Break: Allow the peppermint bark to set completely in the refrigerator for 20-30 minutes. Once firm, break it into smaller, festive pieces. The combination of sweet white chocolate and refreshing peppermint makes this bark a holiday favorite, perfect for sharing or gifting.
Key Ingredients for Perfect White Chocolate Bark
The beauty of white chocolate bark lies in its simplicity, requiring just a few quality ingredients to achieve a delicious result. Here’s what you’ll need:
White Chocolate: This is the star of your bark! The quality and type of white chocolate you choose will significantly impact the final flavor and texture.
- White Chocolate Chips: A convenient and widely available option. Look for good quality brands that melt smoothly.
- White Almond Bark: Despite its name, almond bark often contains no almonds but is a confectionary coating made with vegetable fats. It’s designed to melt smoothly and harden quickly without tempering, making it very easy to work with. However, its flavor is typically not as rich as true white chocolate.
- Fancy Gourmet White Chocolate Bars: For the best flavor and a truly luxurious bark, opt for high-quality white chocolate bars with a higher cocoa butter content. Brands like Ghirardelli, Lindt, or Callebaut offer superior taste and meltability.
- White Candy Melts: Similar to almond bark, candy melts (also known as confectionary coating wafers) are designed for easy melting and setting. They come in various colors and are great for vibrant, custom barks, though the flavor profile is generally sweeter and less complex than pure white chocolate.
The flavor and consistency will vary slightly depending on your choice, so experiment to find your favorite!
Toppings: This is where you can unleash your creativity! Toppings add texture, flavor, and visual appeal. The full list of endless options can be found below, but common choices include nuts, sprinkles, small candies, dried fruits, and more.
Endless Variations and Toppings for White Chocolate Bark
The real fun of making white chocolate bark comes from customizing it with an array of delicious toppings. Don’t be afraid to mix and match to create unique flavor combinations! Here are some ideas to inspire your next batch:
Sprinkles: A classic for adding color and a touch of whimsy. There is an incredible variety available – from classic rainbow jimmies to festive nonpareils, sparkling sugars, and themed sprinkle mixes for any holiday or celebration. Pick anything you like to match your occasion!
Dried Fruits: Add a chewy texture and a burst of natural sweetness or tang.
- Shredded Coconut: Toasted or untoasted, it adds a tropical flavor.
- Chopped Apricots: Sweet and slightly tart.
- Dried Cranberries: Offer a tart contrast to the sweet white chocolate.
- Dried Mangoes: A tropical, sweet, and chewy addition.
- Other Dried Berries: Like blueberries or cherries for a fruity twist.
Freeze-Dried Fruits: These offer an intense fruit flavor and a delightful crunch.
- Strawberries: Classic and vibrant.
- Kiwis: For a slightly tart and exotic note.
- Mangoes: Sweet and intensely fruity.
- Raspberries: A beautiful tart counterpoint.
- Blueberries: Small bursts of tangy sweetness.
Nuts: Provide a satisfying crunch and rich, earthy flavors. You can use them whole, chopped, or toasted for enhanced flavor.
- Almonds: Sliced, slivered, or chopped for a delicate crunch.
- Pistachios: Offer a vibrant green color and a unique, slightly sweet flavor.
- Pecans: Buttery and rich.
- Walnuts: Earthy and robust.
- Cashews: Creamy and mildly sweet.
- Macadamia Nuts: Luxurious and buttery.
- You can even sprinkle crushed Peanut Brittle or these Candied Nuts for an extra layer of flavor and crunch.
Candies: Turn your bark into a fun, whimsical treat with your favorite confections.
- M&M’s: Colorful and chocolatey.
- Reese’s Pieces or Mini Peanut Butter Cups: For peanut butter lovers.
- Chopped Candy Bars: Like Twix, Snickers, Rolos, or your favorite caramel-filled bars.
- Gummi Candies: For a chewy, fruity addition (note: these might become harder when chilled).
- Seasonal Candies: Leftover Halloween candies, Easter mini eggs, or Christmas M&M’s are another excellent option to clear out your pantry and create festive bark!
Chopped Up Cookies: A fantastic way to add texture and familiar flavors.
- Oreo Cookies: Crushed for a classic cookies and cream bark.
- Chocolate Chip Cookies: For serious chocoholics, adding more chocolatey goodness and a chewy-crisp texture.
- Graham Crackers: Broken into pieces for a s’mores-inspired bark.
Brownie Bits: Cut up homemade or store-bought brownies into super small chunks for a rich, fudgy texture. This adds a wonderfully decadent element.
Marshmallows: Mini marshmallows are best! They add a soft, chewy texture and a sweet, comforting flavor, especially delightful when combined with other toppings like cookie bits or nuts.
Nut Butters & Sweet Spreads: Create beautiful swirls and a creamy, nutty flavor.
- Peanut Butter, Nutella, or any other nut butter: Gently heat until warm and slightly thinner consistency, then drizzle or dollop over the melted white chocolate. Use a toothpick or a skewer to swirl them into beautiful abstract patterns. You really must try this Peanut Butter Chocolate Bark for inspiration.
- Cookie Butter (Biscoff Spread): For a unique, spiced cookie flavor.
Thick Jams, Preserves, and Sweet Sauces: For a gourmet touch.
- Such as this Homemade Caramel Sauce or Homemade Dulce De Leche. These add a luscious, gooey layer.
- Even this Easy Homemade Strawberry Jam or other fruit preserves can create a delightful fruity swirl.
- Rooh-Afza: It is an Indian rose syrup that’s sweet, fragrant, and provides a beautiful rose aroma and flavor. Drizzle and swirl for an exotic twist.
Pretzels: Chop them up roughly and sprinkle on top to create that classic sweet and savory taste and an irresistible salty crunch. The contrast between the salty pretzel and the sweet white chocolate is highly addictive.
Potato Chips: This might sound unusual, but crushed potato chips add a lovely, delicate crunch and create a surprisingly delicious sweet and salty flavor combination that will have everyone asking for more.

Expert Tips and Techniques for Flawless Chocolate Bark
While white chocolate bark is incredibly simple, a few expert tips can elevate your homemade candy from good to truly exceptional:
- Use the Best Quality White Chocolate: This is arguably the most important tip. The quality of your white chocolate directly impacts the overall flavor and texture of your bark. Cheaper white chocolate can be overly sweet or have an artificial taste, and may not melt as smoothly. Brands like Ghirardelli, Callebaut, or even high-quality store brands with a good cocoa butter percentage are recommended for a superior finish.
- Handle Syrups with Care: When incorporating thick liquids like caramel or rose syrup, remember that syrup typically doesn’t solidify in the same way chocolate does. When swirling it into the melted chocolate, aim for small, delicate swirls. Avoid creating large puddles or overly messy patterns, as these areas will remain sticky even after the chocolate has set. Smaller swirls equate to less to no stickiness, while larger, messier swirls can lead to a very tacky bark.
- How to Cut Chocolate Bark: For a rustic, charming look, simply use your hands to break the hardened chocolate into random pieces. This creates beautiful, organic edges. Don’t worry about perfection; having a mix of small and large pieces adds to its homemade appeal. If you prefer cleaner, more uniform cuts (perhaps for a more formal presentation), you can use a sharp knife. For the cleanest cuts, briefly warm the knife under hot water, wipe it dry, and then slice through the bark.
- Why is My Bark Soft?: If your white chocolate bark remains soft or doesn’t fully harden, it’s likely due to insufficient setting time or an issue with the chocolate itself. Ensure you’ve allowed enough time for it to chill undisturbed in the refrigerator (at least 20-30 minutes) or at room temperature (1-2 hours). If it’s still soft, it might be due to the type of chocolate used (some candy melts are designed to stay slightly softer) or an additive.
- Why is My Bark Grainy?: A grainy texture in chocolate is almost always a sign of either overheating or water contamination (seizing). When chocolate overheats, the sugar crystals burn, leading to a gritty texture. When even a tiny drop of water gets into melting chocolate, it causes the cocoa solids to clump together, making the chocolate thick, lumpy, and grainy. Unfortunately, once chocolate has seized or burnt, there’s no way to rescue it, and you’ll need to start over with fresh chocolate.
- Achieve the Right Thickness: The ideal thickness for white chocolate bark is about ¼ inch. This “sweet spot” ensures the bark is firm enough to snap cleanly but not so thick that it’s difficult to bite into. If it’s too thin, it can be overly brittle and break apart too easily; too thick, and it can feel cumbersome and overwhelm the toppings.
- Always Line Your Pan: This tip is absolutely crucial. Always line your baking sheet with wax paper or parchment paper. This non-stick barrier is essential for easily removing the hardened chocolate bark without it sticking to the pan, ensuring a smooth and clean lift-off.
- Work Quickly and Efficiently: Melted white chocolate begins to cool and set relatively fast once spread. To ensure your toppings adhere properly, have all your chosen ingredients measured, chopped, and arranged within easy reach *before* you start melting the chocolate. This way, you can sprinkle them quickly and evenly over the wet chocolate before it hardens.
- Consider Tempering (Optional): While not strictly necessary for bark made with candy melts or almond bark, tempering pure white chocolate can give it a professional shine, a crisp snap, and prevent blooming (streaky white marks). However, for a simple, homemade bark, melting carefully and letting it set is usually sufficient.
- Food Coloring for White Chocolate: If you want to color your white chocolate, always use oil-based food coloring or special candy colors. Water-based food gels or liquid food coloring can cause the chocolate to seize.
Storage and Packaging for Freshness and Gifting
Proper storage ensures your white chocolate bark remains fresh and delicious, especially if you’re making it ahead or preparing it as a gift.
Room Temperature Storage: It’s best to store your homemade white chocolate bark in an airtight container at room temperature for 1-2 weeks. To prevent pieces from sticking together, separate layers with sheets of wax paper. This method works well as long as your living environment isn’t excessively hot and humid, which can cause chocolate to melt or become sticky.
Refrigeration: While you can store bark in the fridge, it’s generally not recommended for extended periods. Thawing chilled chocolate can sometimes create little condensation marks on the surface, making it appear less attractive or “bloomed” (though still safe to eat). Moreover, certain toppings like cookies and pretzels may absorb moisture and become soggy upon thawing, compromising their texture.
Freezing: Freezing is generally not recommended for white chocolate bark for the same reasons as extended refrigeration. The condensation that forms during thawing can affect both the appearance and the texture of moisture-sensitive toppings.
How to Package Bark for a Homemade Gift: White chocolate bark makes a delightful and personal edible gift. Here are some elegant packaging ideas:
- Small Gift Boxes: Line a small, sturdy gift box with wax paper, arrange the bark pieces neatly inside, and then tie a beautiful ribbon around the box. This creates a professional and charming presentation.
- Cellophane Bags: For a simpler, yet still attractive option, place a few pieces of bark into small cellophane candy bags. Tie them with a decorative twist tie or a ribbon. This is perfect for party favors or distributing to many friends.
- Decorative Tins: For a more substantial gift, use a festive tin lined with parchment paper. This also offers better protection for the bark.
- Layering: Always separate layers of bark with wax paper or parchment paper to prevent them from sticking together, especially if packaging multiple layers in one container.
For more creative ideas, check out this post I wrote on many cool Food and Cookie Packaging Ideas.
More Irresistible White Chocolate Desserts
If you love white chocolate, explore these other fantastic recipes:
- White Chocolate Peppermint Cookies
- White Chocolate Chip Cookies (With Cake Mix)
- White Chocolate Macadamia Nut Cookies (Soft & Chewy)
- White Chocolate Buttercream Frosting
- White Chocolate Oatmeal Cranberry Cookies
Recipe

White Chocolate Bark
Abeer Rizvi
Pin Recipe
Want to Save This Recipe?
Enter your email & I’ll send it to your inbox. Plus, get great new recipes from me every week!
By submitting this form, you consent to receive emails from CakeWhiz
Ingredients
- 4 cups White chocolate
- 1-2 tablespoon Thick red peppermint syrup or candy cane syrup Can also use rose flavored syrup like Indian “Rooh-Afza”
Instructions
-
Melt white chocolate in the microwave at 30-second increments. Be careful not to overheat and burn the chocolate.
-
Pour this melted chocolate on a cookie tray, lined with wax paper. Spread it with a spatula. You can keep it as thin or as thick as you like.
-
Pour syrup randomly on top of the melted chocolate.
-
Run a toothpick throughout the chocolate until you have tiny swirls of syrup.
-
Place the tray into the fridge for 30 minutes or until the chocolate hardens.
-
Then just break it into smaller pieces and enjoy!
Notes
- Read all my tips above.
- Store leftovers in a sealed container in the fridge or at room temperature for up to 1 week.
Nutrition
An automated tool is used to calculate the nutritional information. As such, I cannot guarantee the accuracy of the nutritional information provided for any recipe on this site.
