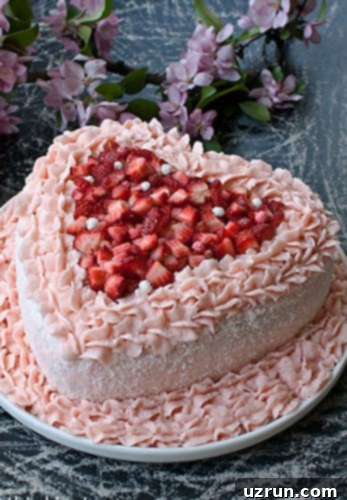
The Ultimate Pink Velvet Cake Recipe: Easy Homemade Perfection for Any Celebration
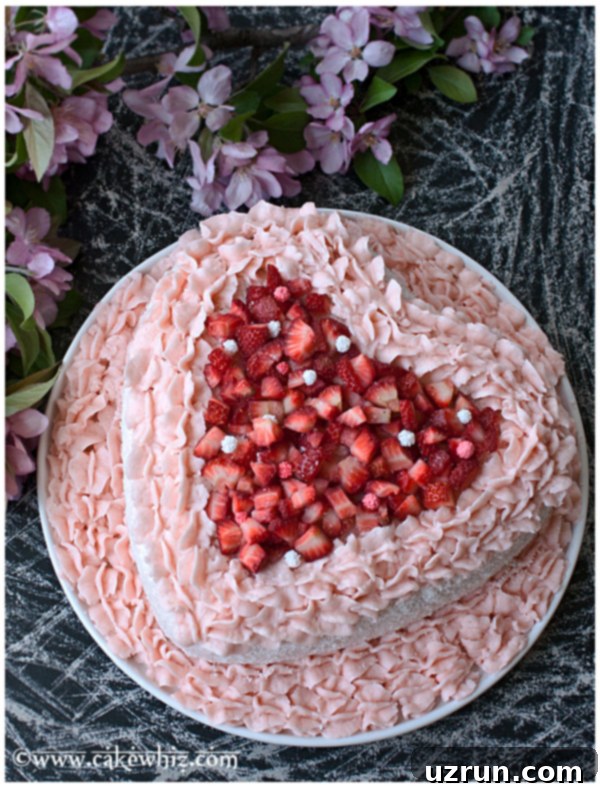
Forget everything you thought you knew about traditional red velvet! Prepare to fall in love with this enchanting pink velvet cake recipe. Imagine a cake that’s not only incredibly soft and moist but also boasts a stunning, vibrant pink hue, making it the most romantic dessert you can bake. Paired with a luscious strawberry frosting and adorned with fresh strawberries, this homemade treat is absolutely perfect for Valentine’s Day, a charming birthday celebration, or any moment that calls for a touch of sweetness and color. Just like its cousin, the Moist Red Velvet Cake, this pink rendition is guaranteed to impress.
Many assume that all “velvet” cakes are merely colored vanilla cakes. However, a true red velvet cake has a distinct vanilla flavor with a subtle hint of cocoa, which reacts with buttermilk and vinegar to deepen the red color. Over time, this classic has inspired many other “velvet” variations, and while some are just colored vanilla cakes, they all share that signature soft, tender crumb. Our pink velvet cake from scratch is a delightful take on this tradition, offering a light, airy texture and a beautiful pink appearance. It’s often referred to as a “pink sponge cake recipe” by some, but its unique qualities truly make it stand out. For more delightful pink treats, be sure to explore these Pink Desserts {Valentine’s Day Desserts}.
UPDATE: This beloved pink velvet cake recipe was originally shared a few years ago. We’ve recently enhanced this post by adding new pictures of the cake slices, giving you an even better look at its irresistible texture and vibrant color.
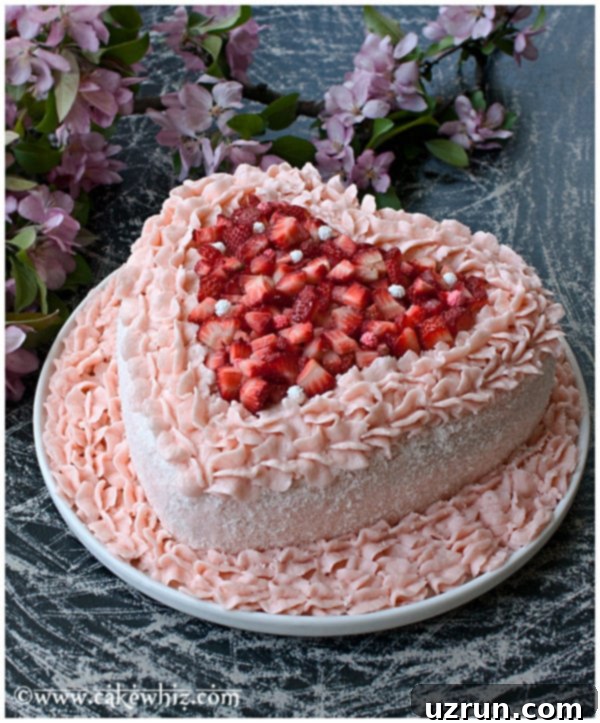
Table of contents
- What is Pink Velvet Cake? Does it Have Cocoa Powder?
- How to Make Easy Pink Velvet Cake Recipe From Scratch?
- How to Color Batter Pink?
- Creative Variations for Your Pink Velvet Cake
- Pro Tips and Techniques for a Perfect Pink Velvet Cake
- Storage Solutions for Homemade Pink Velvet Cake
- More Valentine’s Day Cake Ideas
What is Pink Velvet Cake? Does it Have Cocoa Powder?
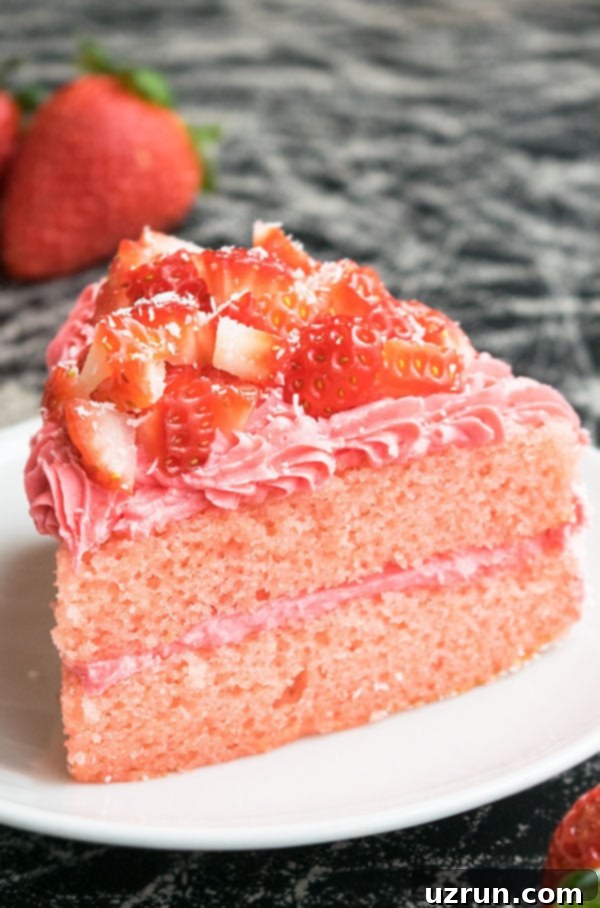
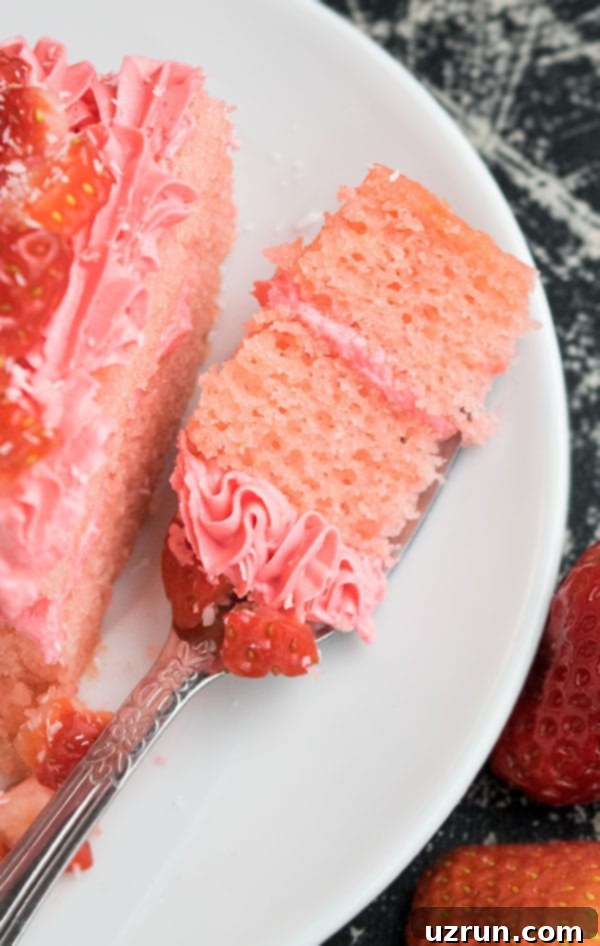
A pink velvet cake is a delightful dessert known for its signature soft, moist, and tender crumb, coupled with a beautiful pink color. Unlike its close relative, the red velvet cake, which typically contains a touch of cocoa powder, pink velvet cake usually does not include cocoa powder. This distinction allows the pure vanilla flavor to shine through, creating a lighter and brighter taste profile that perfectly complements its whimsical hue. The “velvet” in its name refers to the exceptionally smooth and fine texture achieved through a combination of buttermilk and specific leavening agents. It’s often frosted with a creamy, complementary icing like our vibrant strawberry buttercream, enhancing both its flavor and visual appeal.
How to Make Easy Pink Velvet Cake Recipe From Scratch?
Creating this stunning homemade pink velvet cake is simpler than you might think! Follow these key steps to achieve a perfectly moist and flavorful result:
- Cream Butter and Sugar: Begin by creaming together softened butter and granulated sugar until the mixture is light, fluffy, and pale in color. This crucial step incorporates air, which contributes to the cake’s light and airy texture.
- Mix in Wet Ingredients: Gradually add large eggs one at a time, ensuring each is fully incorporated before adding the next. Stir in vanilla extract for flavor and buttermilk, which provides moisture and a subtle tang. Finally, incorporate your pink gel food coloring until you achieve your desired vibrant shade.
- Whisk Dry Ingredients: In a separate bowl, thoroughly whisk together the all-purpose flour, baking powder, baking soda, and salt. Whisking ensures these ingredients are evenly distributed, preventing pockets of leavening agents or salt in your final cake.
- Combine and Bake: Gently fold the dry ingredients into the wet mixture, mixing just until combined. Be careful not to over-mix, as this can develop the gluten too much, resulting in a dense, tough cake. Pour the batter into your prepared pan and bake until a toothpick inserted into the center comes out clean. Allow the cake to cool completely on a wire rack.
- Frost and Decorate: Once fully cooled, frost your cake generously with the recommended strawberry frosting. Embellish with fresh strawberry slices and shredded coconut for an extra touch of elegance and flavor. Slice, serve, and enjoy your beautiful homemade creation!
How to Color Batter Pink?
Achieving that perfect pink hue for your velvet cake is a straightforward process. The most effective method is by adding pink gel food coloring directly into the wet cake batter and mixing it thoroughly. Gel food coloring is highly concentrated, meaning you’ll need only a small amount to achieve a vibrant color without significantly altering the consistency of your batter. If pink gel isn’t available, you can use a small amount of red food coloring; start with a tiny drop and gradually add more until you reach your desired shade of pink. Liquid food coloring can also work, but you’ll likely need to use more, which might slightly thin your batter – hence, gel is usually the preferred choice for its potency and minimal impact on consistency. Always add food coloring incrementally, mixing well after each addition, until you are happy with the color saturation.
Creative Variations for Your Pink Velvet Cake
This versatile pink velvet cake recipe can be adapted in many exciting ways to suit your taste, occasion, or simply to try something new:
- Make Cupcakes: Transform your cake into delightful pink velvet cupcakes! This recipe yields approximately 24 standard cupcakes. Adjust baking time to about 18-22 minutes, or until a toothpick comes out clean. Cupcakes are perfect for parties and easy serving.
- Create a Cake Roll: For a different presentation, bake the batter in a flat cookie sheet or jelly roll pan. Once baked and cooled, you can fill and roll it into an elegant cake roll, enough for two rolls. This offers a lighter, more delicate dessert option.
- Experiment with Other Frostings: While strawberry frosting is a fantastic complement, feel free to try other delicious options. My family and friends also adore this cake with classic Cream Cheese Frosting, which adds a lovely tang. If you’re a chocolate lover, a rich Chocolate Cream Cheese Frosting could create a sophisticated flavor contrast.
- Utilize a Cake Mix: If you’re short on time, some local grocery stores occasionally stock pink velvet cake mix boxes, though these can be seasonal. While scratch baking offers superior flavor and texture, a mix can be a convenient shortcut for this cake or even cookies. Always follow package directions for best results.
- Add Diverse Fillings: Elevate your cake by adding delicious fillings between the layers. Consider a smooth Homemade Vanilla Custard for a creamy surprise, a light and airy Homemade Stabilized Whipped Cream, or even a decadent Chocolate Whipped Cream for an extra layer of indulgence.
- Infuse Cherry Flavor: For a lovely twist, make your cake cherry-flavored. Use Maraschino Cherry Frosting for a vibrant pink topping, and add a layer of sweet Cherry Pie Filling between the cake layers for an explosion of fruity taste.
Pro Tips and Techniques for a Perfect Pink Velvet Cake
Achieving a perfectly moist, tender, and beautifully colored pink velvet cake comes down to a few essential techniques and considerations. Whether you’re making a special Valentine’s Day heart cake or a classic round one, these tips will help ensure success:
- Don’t Substitute Buttermilk: Buttermilk is a key ingredient in velvet cakes. Its acidity reacts with baking soda to create a tender crumb and light texture, while also adding significant moisture and a subtle, pleasant tang that balances the sweetness. Do not replace buttermilk with regular milk, as it will drastically alter the cake’s texture and flavor profile. If you don’t have buttermilk on hand, refer to the homemade substitute tip below.
- Ensure Room Temperature Ingredients: This is a golden rule in baking! Make sure your butter, eggs, and buttermilk are all at room temperature before you start mixing. Room temperature ingredients emulsify much better, creating a smooth, cohesive batter that bakes evenly and results in a finer, lighter crumb.
- Cool the Cake Completely Before Frosting: Patience is a virtue when it comes to frosting a cake. Never frost a warm or even slightly warm cake. The heat will cause your frosting to melt, slide off, and create a crumbly mess. Allow the cake to cool down entirely on a wire rack before you even think about applying that delicious strawberry frosting.
- What to Do with Leftover Cake Scraps: If you trim your cake or have extra pieces, don’t let them go to waste! Leftover cake or cake scraps are perfect for making delightful Cake Pops and Cake Balls or rich Cake Truffles. Simply crumble the cake, mix with a little frosting, and shape into spheres before coating them in chocolate or sprinkles.
- Homemade Buttermilk Substitute: No buttermilk? No problem! You can easily make a substitute at home. Simply add 1 tablespoon of lemon juice or white vinegar to a 1-cup measuring cup. Then, fill the remainder of the cup with whole milk (or 2% milk). Stir the mixture gently and let it rest for about 5 minutes. The milk will curdle slightly, and you’ll have a perfect buttermilk substitute for your recipe.
- Avoid Over-mixing Cake Batter: Over-mixing flour in cake batter develops the gluten, leading to a tough, dense, and chewy cake rather than a soft, tender one. Mix the dry ingredients into the wet until *just* combined, with no streaks of flour remaining. A few small lumps are better than an over-mixed, tough batter.
- Don’t Over-Bake the Cake: Over-baking is the quickest way to a dry cake. Keep a close eye on your cake, especially during the last 10-15 minutes of baking. Bake only until a toothpick inserted into the center comes out clean or with a few moist crumbs attached. The edges should not be overly browned.
- Choosing the Right Pan Size: For a festive presentation, pour this batter into a greased and floured heart-shaped pan (typically 8×3 inches). If a heart shape isn’t desired, you can also use two standard 8×2 inch round cake pans. Ensure your chosen pan is properly prepared to prevent sticking, either by greasing and flouring or using parchment paper.
Storage Solutions for Homemade Pink Velvet Cake
Proper storage is essential to keep your pink velvet cake fresh and delicious. Here’s how to store it effectively:
- Room Temperature: If unfrosted or frosted with stable buttercream (not cream cheese-based, as this recipe uses strawberry frosting which is generally stable at room temp for a few hours), the cake can be left out in a sealed container for 2-3 hours, away from direct heat and moisture. For frosted cakes, refrigeration is generally recommended for longer freshness.
- Refrigerate: For optimal freshness and to preserve the frosting, store the cake in a sealed, airtight container in the refrigerator for 2-3 days. This prevents the cake from drying out and the frosting from spoiling.
- Freeze: Both baked, unfrosted cake layers and frosting can be frozen separately. Wrap the cooled cake layers tightly in plastic wrap and then aluminum foil, and store the frosting in an airtight container. They can be stored for up to 1 month. When you’re ready to enjoy, thaw the cake layers and frosting to room temperature before assembling and decorating according to the recipe instructions.
More Valentine’s Day Cake Ideas
Looking for more romantic and delightful cake ideas for Valentine’s Day or other special occasions? Explore these charming recipes:
- Love Letter Cake (Mini)
- Raspberry Mousse Cake
- Easy Cake Tower
- Easy Love Cake
- Pink Buttercream Ruffle Cake
- Cupcake Bouquet (Flower)
- Rosette Cake (Buttercream)
- Kit Kat Cake (With Strawberries)
Recipe
Pink Velvet Cake (From Scratch)
Abeer Rizvi
Pin Recipe
Want to Save This Recipe?
Enter your email & I’ll send it to your inbox. Plus, get great new recipes from me every week!
By submitting this form, you consent to receive emails from CakeWhiz
Ingredients
Cake
- 2½ cups All-purpose flour
- 1¼ cups Granulated sugar
- 1 cup Butter Unsalted
- 1 cup Buttermilk
- 3 Eggs Large
- 1 tablespoon Vanilla extract
- Pink gel coloring
- 1½ teaspoon Baking powder
- ½ teaspoon Baking soda
- ⅛ teaspoon Salt
Filling, Frosting, Decoration
- 2 cups Fresh strawberries Washed, Cut into small pieces, Patted dry with paper towels
- 2 cups Strawberry frosting
- 1 cup Coconut Shredded
Instructions
-
In a large mixing bowl, combine softened butter and granulated sugar. Cream them together with an electric mixer until the mixture is light, fluffy, and significantly paler in color. This process usually takes about 3-5 minutes.
-
Add the large eggs, one at a time, mixing well after each addition until fully incorporated. Stir in the vanilla extract and buttermilk. Finally, add your preferred amount of pink gel food coloring to achieve a vibrant pink hue and mix until the color is uniform throughout the wet batter.
-
In a separate, medium-sized bowl, whisk together the all-purpose flour, baking powder, baking soda, and salt. Sifting the flour beforehand is highly recommended for an even lighter cake texture.
-
Gradually add the whisked dry ingredients to the wet mixture in two or three additions, mixing on low speed or by hand until just combined and smooth. Do not over-mix! Over-mixing can lead to a tough, dense cake.
-
Pour the prepared batter into a greased and floured heart-shaped pan (Dimensions 8×3 inches) for a festive look. Alternatively, you can use two 8×2 inch round cake pans if you prefer.
-
Bake in a preheated oven at 350 degrees F (175 degrees C) for about 40-45 minutes. The cake is done when a toothpick inserted into the center comes out clean or with a few moist crumbs attached. Avoid opening the oven door too frequently during baking.
-
Once baked, remove the cake from the oven and let it cool in the pan on a wire rack for 10-15 minutes before inverting it onto the rack to cool completely. This is crucial for preventing the cake from breaking and for ensuring your frosting doesn’t melt.
-
Once completely cool, use a serrated knife to carefully cut the cake in half horizontally to create two layers. Spread a generous layer of strawberry frosting on the bottom half, then evenly distribute some of the small, patted-dry strawberry pieces over the frosting. Gently place the other half of the cake on top.
-
Using an offset spatula or knife, frost the entire exterior of your cake with the remaining strawberry frosting, creating a smooth or textured finish as desired.
-
Gently press finely shredded coconut onto the sides of the frosted cake. This adds a beautiful texture and subtle coconut flavor.
-
For a decorative touch, use a piping bag fitted with Tip 1M (a star tip) to pipe decorative swirls or borders along the top edge of your cake and around the base on the cake board.
-
Arrange additional fresh strawberry pieces on top of the cake, and sprinkle a final touch of shredded coconut for garnish. Your beautiful Pink Velvet Cake is now ready to be served and enjoyed!
Notes
- Always refer to all the detailed tips and techniques provided in the article above for best results, especially regarding room temperature ingredients and not over-mixing.
- I highly recommend sifting the all-purpose flour before adding it to your dry ingredients. This simple step helps to aerate the flour, preventing lumps and contributing to a lighter, more airy, and softer cake crumb.
- Any leftover pink velvet cake can be stored in a sealed, airtight container in the fridge for up to 2-3 days. Bring to room temperature before serving for the best flavor and texture.
Nutrition
An automated tool is used to calculate the nutritional information. As such, I cannot guarantee the accuracy of the nutritional information provided for any recipe on this site.
