Mastering Edible Chocolate Leaves: The Ultimate Guide for Stunning Fall & Thanksgiving Cakes
Transform your Fall, Autumn, and Thanksgiving cakes into edible works of art with these surprisingly simple yet incredibly elegant chocolate leaves. This comprehensive guide will walk you through everything you need to know, from selecting the right leaves to perfecting your chocolate coating and adding your beautiful creations to your desserts. What might look like a complex pastry chef’s technique is actually an easy and enjoyable project perfect for home bakers of all skill levels.
My journey with edible chocolate leaves began in childhood, watching my Mom craft these delicate decorations. Back then, my small, warm hands often turned melted chocolate into delightful but unidentifiable blobs. Over the years, I’ve refined the technique, learning how to achieve perfectly veined, crisp chocolate leaves every time. While they appear intricate, the process is remarkably straightforward, making them ideal for adding a rustic, natural touch to any festive celebration. Pair them with delightful treats like these Easy Fall Leaf Sugar Cookies for an unforgettable autumn dessert table.

Table of contents
- The Art of Crafting Edible Chocolate Leaves: A Step-by-Step Guide
- Creative Variations for Your Chocolate Leaf Decorations
- Essential Tips and Techniques for a Flawless Chocolate Leaves Cake
- Storing Your Beautifully Decorated Cake
- More Festive Fall and Thanksgiving Cake Ideas
The Art of Crafting Edible Chocolate Leaves: A Step-by-Step Guide
Creating your own edible chocolate leaves is a simple process that yields stunning results. Follow these detailed steps to master this elegant cake decorating technique:
- Select Your Leaves and Prepare Them: The first crucial step is choosing the right leaves. For these beautiful decorations, fresh, non-toxic leaves with distinct veins work best. Mint leaves are a fantastic choice not only for their robust structure but also for the lovely subtle flavor they can impart. Ensure your chosen leaves are clean and completely dry. Lightly rub a very thin layer of vegetable shortening (like Crisco) onto the heavily veined underside of each leaf. This critical step acts as a release agent, making it easier to peel the chocolate away later without breakage.
- Melt and Brush the Chocolate: Prepare your melted chocolate. You can use dark, milk, or even white chocolate. For best results, use good quality chocolate or candy melts. Melt the chocolate gently in a double boiler or microwave, stirring frequently until smooth and lump-free. Once melted, use a small, clean paintbrush (specifically designated for food use) to generously brush a thick, even layer of chocolate onto the greased, veined side of each leaf. The thickness is key here – a thin layer will be too fragile and prone to breaking during the peeling process.
- Chill for Setting: Carefully place the chocolate-coated leaves onto a baking sheet lined with parchment paper or wax paper. Ensure they are not touching each other. Transfer the baking sheet to the refrigerator or freezer. Chilling allows the chocolate to firm up quickly and thoroughly. Depending on the chocolate type and your fridge/freezer temperature, this can take anywhere from 5 to 15 minutes. The chocolate should be completely set and firm to the touch before proceeding.
- Gently Peel the Leaves: This is the most delicate part of the process. Once the chocolate is fully set, remove the tray from the chiller. Working quickly and gently, pick up each leaf by the stem or an edge where there isn’t chocolate. Very carefully peel the real leaf away from the hardened chocolate. The goal is to separate them cleanly, leaving behind a perfect chocolate replica with all the natural leaf veins imprinted. Place the finished chocolate leaves on a clean surface or back on parchment paper until you’re ready to use them.
Creative Variations for Your Chocolate Leaf Decorations
While classic chocolate leaves are beautiful, there are countless ways to customize them to match your dessert’s theme and flavor profile. Get creative with these inspiring variations:
Use these leaves to decorate cupcakes: Beyond cakes, these chocolate leaves make exquisite toppers for cupcakes. Imagine these delicate edible decorations adorning your Best Red Velvet Cupcakes {With Cream Cheese Frosting}, adding elegance to Best Vanilla Cupcakes, or providing a sophisticated touch to Mocha Cupcakes (Coffee Cupcakes). For cupcakes, you might want to use slightly smaller leaves or break larger ones into attractive pieces.
Experiment with colored chocolate/candy melts: To truly capture the spirit of Fall or Autumn, use vibrant colored chocolate or candy melts. Red, yellow, and orange melts can create a stunning seasonal palette. If you’re working with white chocolate, remember to use oil-based food coloring to tint it. Water-based food coloring will cause white chocolate to seize and become unusable. This allows you to achieve any shade imaginable, from deep autumn reds to bright spring greens.
Add extracts to the chocolate for a flavor boost: Infuse your chocolate leaves with additional flavor by stirring in a few drops of your favorite extract. Mint extract perfectly complements mint leaves, while vanilla, almond, or maple extracts can add a delightful aroma and taste to plain chocolate leaves. Always consider the overall flavor profile of your dessert to ensure the extract enhances, rather than overwhelms, the other components.
Make some elegant white chocolate ones: For a sophisticated and versatile decoration, use melted white chocolate to create beautiful white leaves. These can be left plain for a classic look or tinted with oil-based food coloring to match any event or holiday theme, from pastel Easter shades to vibrant Christmas hues.
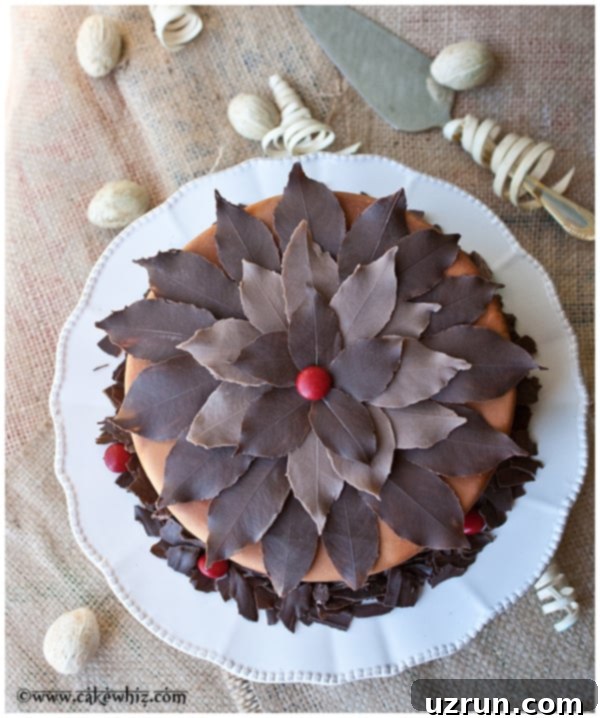
Incorporate other candies for the center of the cake: While I opted for a bright red M&M candy in the center of my cake’s leaf formation, feel free to use your imagination! Small cinnamon candy balls can add a spicy kick, red gumballs create a playful look, or even tiny edible pearls or sprinkles can add a touch of sparkle. Choose something that contrasts or complements your chocolate leaves and cake color.
Adjust the brown shade for depth: Achieve a range of “earthy” brown tones for your leaves. Dark chocolate will give you the deepest, richest brown. For a lighter, milk chocolate shade, use milk chocolate. If you desire a custom shade somewhere in between, you can easily lighten dark chocolate by mixing in a small amount of melted white chocolate until you reach your preferred hue. This technique allows for a natural variation in your autumn leaf collection.

Essential Tips and Techniques for a Flawless Chocolate Leaves Cake
To ensure your chocolate leaves cake is a resounding success, keep these expert tips and techniques in mind. They cover everything from cake preparation to handling your delicate chocolate creations.
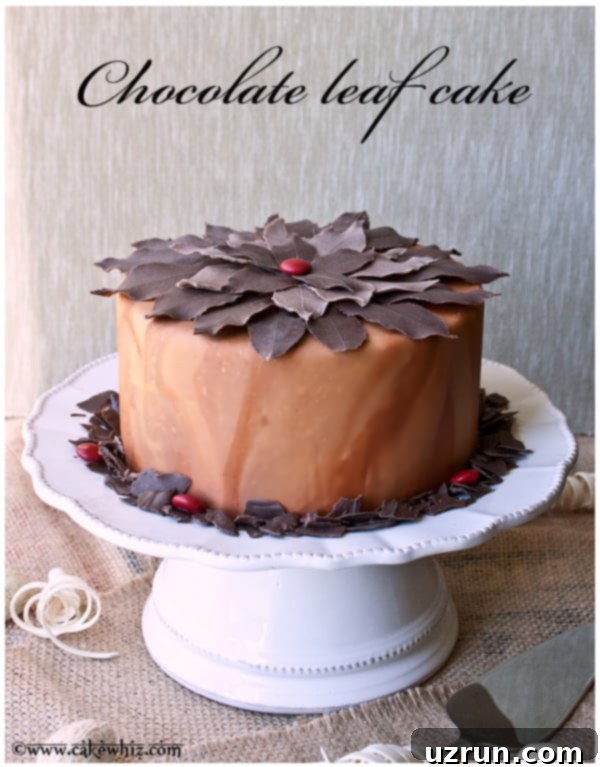
- What size cake to make? The cake featured here is an 8-inch round cake, beautifully covered in frosting and marbled fondant. However, the beauty of this decoration is its adaptability! You can apply chocolate leaves to any size or shape of cake you desire. Just remember to adjust the quantity of leaves you make—larger cakes will obviously require more for a full, lush display, while smaller cakes or individual cupcakes will need fewer.
- What is the cake covered in? My cake is enveloped in a smooth layer of homemade fondant, employing the elegant Marbled Fondant Technique. This technique adds depth and visual interest, mimicking natural rock or wood textures that complement the organic feel of the chocolate leaves.
- Omit the marbled fondant for simplicity: If you’re pressed for time or prefer a simpler aesthetic, you can easily skip the marbled fondant. Instead, roll out plain brown fondant for a classic, earthy base. Alternatively, buttercream or ganache in autumnal shades can also provide a wonderful backdrop for your chocolate leaves.
- How to attach the leaves to the cake? Securing your delicate chocolate leaves is important for presentation. I used a thin layer of frosting to “glue” them onto the cake. Other effective adhesives include a tiny dab of melted chocolate (the same kind you used for the leaves) or even a rich Chocolate Ganache. Apply the adhesive sparingly to avoid visible smudges.
- What side of the leaf to use? This is a critical detail for achieving realistic veins. A natural leaf typically has a smooth, glossy top side and a more textured, veiny underside. Always brush your melted chocolate onto the textured underside of the leaf. This ensures that when you peel the real leaf away, the intricate, natural vein patterns are perfectly imprinted onto your chocolate creation.
- Avoid touching the leaves too much: Chocolate is sensitive to heat, and the warmth from your fingers can quickly cause your delicate leaves to melt or smudge. Handle them as little as possible, ideally by the edges or using a small spatula or tweezers. Keeping your hands cold or wearing thin gloves can also help.
- Make sure you use a thick coating of chocolate: To minimize breakage during the peeling process, apply a generous, thick layer of chocolate to your leaves. A thin coating will be brittle and easily crack, especially around the edges. Don’t be shy with the chocolate; a robust layer ensures durability and a clean peel.
- Always remember to make extras: No matter how careful you are, some chocolate leaves are bound to break or not peel perfectly. It’s always a good idea to make at least 10-15% more leaves than you think you’ll need. This buffer will save you time and frustration if a few don’t turn out as planned.
- What to do with extra leaves? Don’t let imperfect or extra chocolate leaves go to waste! You can break them into smaller shards and sprinkle them artistically around the base of the cake or on the serving platter to add texture and visual interest. I also added some red M&M candies around the base for a delightful pop of contrasting color, which you could do with crumbled chocolate leaves as well.
- Try to keep leaves about the same size: For a more cohesive and professional overall presentation, select natural leaves that are relatively similar in size and shape. This creates a harmonious arrangement on your cake, though a slight variation can also add a natural, organic charm.
- Cool cakes completely before icing: This fundamental baking rule is paramount. Attempting to ice a warm or even slightly warm cake will result in melted, sliding icing, creating a messy finish. Always allow your cake layers to cool completely, preferably in the refrigerator for a short period, before applying any frosting or fondant.
- Level cakes for a pristine finish: For a stable and professional-looking cake, level your cake layers. Use a serrated knife or a cake leveling tool to carefully slice off any domed tops, making each layer as flat and even as possible. This ensures your cake stacks neatly and provides a smooth surface for fondant or frosting.
- How to trim excess fondant? After covering your cake with fondant, there will likely be excess around the base. Use a pizza cutter or a very sharp, thin knife to carefully trim away this excess, creating a clean, crisp edge where the cake meets the cake board or platter.
Storing Your Beautifully Decorated Cake
Proper storage is key to preserving the freshness and beauty of your chocolate leaves cake:
Refrigerate: Your cake, especially one decorated with chocolate leaves, is best stored in an airtight container in the refrigerator for up to 3 days. This helps maintain the structure of the chocolate and the freshness of the cake and frosting.
Freeze (with caution): I generally do not recommend freezing cakes covered in fondant, as fondant can become very sticky and weep upon thawing due to condensation. However, if your cake is *not* covered in fondant, you can freeze it in a freezer-safe container for up to 1 month. When ready to serve, thaw it to room temperature. Be aware that the chocolate leaves will become extra fragile and prone to breaking when frozen, so handle with extreme care.
More Festive Fall and Thanksgiving Cake Ideas
If you’re looking for more delicious and decorative cake ideas to celebrate the autumn season and Thanksgiving, explore these wonderful recipes:
- Apple Pie Cake
- Spice Cake (Chai Tea Cake)
- Tiered Rustic Cake
- Turkey Cake {Thanksgiving Cake}
- Chocolate Tree Cake
Recipe

Homemade Chocolate Leaves Cake
Abeer Rizvi
Pin Recipe
Want to Save This Recipe?
Enter your email & I’ll send it to your inbox. Plus, get great new recipes from me every week!
By submitting this form, you consent to receive emails from CakeWhiz
Ingredients
- 2 Chocolate cakes Round, Dimensions: 8×2 each
- 3 cups Chocolate cream cheese frosting
- 2 cups Marshmallow fondant Brown
- 1 tablespoon Shortening
- 30-40 Mint leaves
- ⅓ cup Dark chocolate Melted
- ⅓ cup Milk chocolate Melted
Instructions
-
Begin by baking your chocolate cakes according to your recipe. Allow them to cool completely on a wire rack before attempting to frost or decorate.
-
While the cakes are baking and cooling, prepare your chocolate cream cheese frosting. Ensure it’s smooth and ready for application.
-
Once cooled, place one cake layer onto your chosen serving dish or cake stand. If necessary, level the cake layers for an even surface.
-
Spread a generous, even layer of chocolate cream cheese frosting on top of the first cake layer.
-
Carefully place the second cake layer directly on top of the frosting.
-
Now, ice the entire stacked cake smoothly with the remaining chocolate cream cheese frosting, creating a crumb coat if desired, then a final smooth layer.
-
Roll out the brown marshmallow fondant to your desired thickness and carefully drape it over the iced cake. Smooth it down, and then use a pizza cutter or sharp knife to trim off any excess fondant around the base of the cake for a clean finish.
-
For the chocolate leaves, select your mint leaves (or other non-toxic leaves). Rub a very thin layer of shortening onto the heavily veined and textured underside of each leaf. This will help with easy release.
-
Melt your dark chocolate and milk chocolate in separate bowls. Using a clean paintbrush, paint some of the prepared leaves with the dark chocolate and others with the milk chocolate, coating the veined side thoroughly.
-
Tip: Ensure you apply a thick coating of chocolate. This is essential to prevent the chocolate leaves from breaking when you peel them off the real leaves.
-
Carefully place these chocolate-covered leaves on a cookie tray that’s been lined with wax paper. Chill them in the freezer for about 5 minutes, or until the chocolate is completely firm and set.
-
Remove the tray from the freezer. Gently peel each real mint leaf away from the hardened chocolate. Work carefully to preserve the intricate vein patterns.
-
To attach the chocolate leaves, spread a very thin layer of icing (or melted chocolate/ganache) on the top surface of the cake where you intend to place them.
-
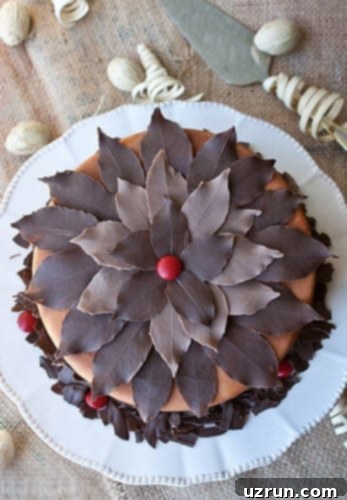
Arrange the chocolate leaves on top of the cake, creating a beautiful flower formation or an alternating dark and light pattern, depending on your aesthetic vision.
-
Place a small red candy, such as an M&M or cinnamon candy ball, directly in the center of your leaf formation for a vibrant pop of color.
-
For an extra decorative touch, sprinkle some shredded chocolate around the base of the cake. Your stunning Homemade Chocolate Leaves Cake is now ready to be enjoyed!
Notes
- For the best results and to avoid common pitfalls, be sure to read all the detailed tips and techniques provided above in the article.
- Leftovers of this beautifully decorated cake can be stored safely in a sealed container in the refrigerator for up to 3 days, ensuring your delicious dessert remains fresh.
Nutrition
An automated tool is used to calculate the nutritional information. As such, I cannot guarantee the accuracy of the nutritional information provided for any recipe on this site.
