Master the Art of Cupcake Decorating: A Comprehensive Guide for Beginners and Beyond
Welcome to the wonderful world of cupcake decorating! Whether you’re a complete novice or looking to refine your skills, this guide will equip you with everything you need to transform simple cupcakes into stunning edible masterpieces. You’ll discover how to create those picture-perfect swirls and delicate piped flowers that rival any professional bakery, all from the comfort of your own kitchen using simple ingredients and essential tools. Our step-by-step instructions, coupled with expert tips, will make cupcake decorating an enjoyable and rewarding experience. Get ready to impress your friends and family with your newfound baking artistry!
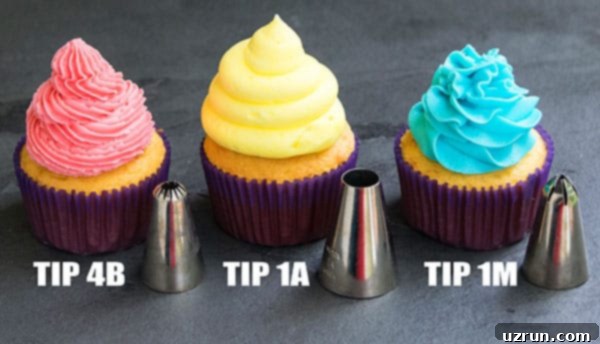
Table of Contents
- Essential Ingredients for Perfect Cupcake Decoration
- Your Essential Cupcake Decorating Tool Kit
- How to Properly Fill a Piping Bag
- Mastering the Classic Cupcake Swirl
- Decorating with Pastry Tip 1M: The Versatile Star
- Exploring Pastry Tip 4B: The Elegant French Star
- Using Pastry Tip 1A: For Smooth, Fluffy Swirls
- Creating Eye-Catching Two-Toned Icing Swirls
- Rustic Charm: Decorating Cupcakes with a Spatula
- Crafting Beautiful Rosette (Rose) Cupcakes with Tip 1M
- Piping Delicate Flower Cupcakes with Tip 104
- Advanced Floral Designs with Various Pastry Tips
- Creative Topping Ideas for Your Decorated Cupcakes
- Can I Decorate Cupcakes the Night Before?
- Storage Tips for Decorated Cupcakes
- More Baking and Decorating Resources
- Cupcake Decorating Recipe and Instructions
Essential Ingredients for Perfect Cupcake Decoration
Before you dive into the fun part of piping and decorating, it’s crucial to have the right foundational ingredients. High-quality frosting and well-baked cupcakes are key to achieving professional-looking results.
- Frosting: For piping and holding intricate shapes, American buttercream frosting is an absolute superstar. Its firm yet pliable consistency makes it ideal for piping swirls, flowers, and other detailed designs that retain their shape beautifully. If you’re exploring other options, be sure to check out my comprehensive Frosting and Filling Category for recipes that have been tested specifically for their piping suitability. While homemade is always recommended for superior taste and texture, store-bought canned frosting can be used in a pinch. To improve its piping consistency, chill it in the refrigerator for about an hour – this will help it firm up slightly. However, for a more rustic, spatula-applied look, store-bought frosting works wonderfully straight from the can.
- Cupcakes: A delicious base is paramount! Classic choices like Vanilla Cupcakes and Chocolate Cupcakes are always crowd-pleasers. The key is ensuring your cupcakes are completely cooled before you begin decorating. Warm cupcakes will melt your frosting, ruining your hard work. For even more delectable ideas, explore my extensive Cupcakes Category to find your next favorite recipe. Remember, a sturdy, well-baked cupcake provides the perfect canvas.
- Food Coloring: To add vibrant hues to your frosting, you have a few options: liquid, gel, or powdered food coloring. My top recommendation is gel food coloring. It’s highly concentrated, meaning you need only a small amount to achieve vivid colors, and its thick consistency won’t thin out your buttercream. Liquid food coloring, on the other hand, can add too much moisture, potentially making your frosting runny and difficult to pipe. Powdered food coloring is also a good option, especially for achieving deep, intense colors without altering texture significantly.
Your Essential Cupcake Decorating Tool Kit
Having the right tools makes all the difference in achieving professional-looking cupcake decorations. Here’s a breakdown of the essential equipment you’ll need, along with tips for choosing and using them.
- Piping Bags: These are indispensable. You can opt for disposable plastic bags or reusable fabric ones. I personally prefer the disposable plastic bags for their convenience – simply use and discard, making cleanup a breeze. While some home bakers try to use Ziploc bags, I strongly recommend investing in proper piping bags. They are designed to be stronger, easier to grip, and significantly more comfortable for controlled piping, ensuring a smoother decorating experience.
- Coupler: This small, often plastic, piece is incredibly useful, especially when working with smaller pastry tips. A coupler allows you to effortlessly change piping tips on a single bag of frosting without having to empty and refill the bag. This means you can create multiple designs or switch between different tip sizes using the same color of frosting, saving time and reducing waste.
- Piping Tips or Pastry Tips: These are the magic behind all those beautiful patterns! Piping tips come in a vast array of sizes and shapes, each designed to create a specific effect. From star tips for classic swirls to round tips for dots and petal tips for intricate flowers, selecting the right tip is crucial for your desired design. Start with a few versatile tips (like 1M, 4B, 1A, and 104) and expand your collection as you get more comfortable.
- Spatula: An offset spatula is a versatile tool in cupcake decorating. It’s perfect for efficiently filling your piping bags with frosting. Beyond that, it can also be used as a decorating tool itself, allowing you to spread frosting in a rustic, textured style, creating unique and charming finishes.
- Icing Bag Ties (or Rubber Bands): Simple yet effective, these ties or rubber bands are used to secure the open end of a filled piping bag. Tying the bag tightly prevents frosting from oozing out the top while you’re piping, keeping your hands clean and your workspace tidy.
How to Properly Fill a Piping Bag
Filling a piping bag correctly is the first step to successful decorating. A well-filled bag is easier to handle, reduces mess, and ensures consistent frosting flow.
- Insert the Pastry Tip: Start by placing your chosen pastry tip firmly into the piping bag, pushing it down towards the narrow end.
- Trim the Bag: With scissors, carefully snip off the very bottom, pointy portion of the bag. The cut should be just large enough for the pastry tip to protrude halfway, but not so large that the tip can fall through. Test by gently pushing the tip – it should feel secure.
- Prepare for Filling: Place the piping bag tip-down into a tall drinking glass. Fold the opening of the bag down around the rim of the glass. This creates a wide, stable opening, making it much easier to spoon in the frosting without making a mess.
- Add Frosting: Using a spoon or spatula, scoop your prepared frosting into the bag. Avoid overfilling; aim to fill the bag only about halfway. An overfilled bag is cumbersome and difficult to control. It’s always better to refill than to struggle with a too-full bag.
- Secure the Bag: Once filled, unfold the portion of the bag that was wrapped around the glass. Gather the plastic tightly at the top of the frosting and twist it. Secure this twisted section with an icing bag tie or a simple rubber band. This crucial step prevents the frosting from oozing out the back of the bag as you apply pressure during piping.
Mastering the Classic Cupcake Swirl
The classic cupcake swirl is a fundamental technique that every baker should know. It’s elegant, simple, and creates a beautiful foundation for additional decorations. Here’s how to achieve a perfect swirl:
- Position the Bag: Hold the piping bag directly above the center of the cupcake, at a 90-degree angle. Ensure your hand is steady and apply gentle, consistent pressure.
- Begin the Base Circle: Start squeezing the bag, piping a full circle of frosting around the very edge of the cupcake. This forms the base of your swirl.
- Move Inward for the Next Layer: Without stopping the pressure or flow of frosting, slightly move the piping bag inward to create a second, smaller circle of frosting directly on top of the first. Maintain an even flow.
- Continue Building Layers: Continue this process, piping and moving inward, for a total of three full circular rotations. As you move upwards, each subsequent circle should be slightly smaller than the one below it, creating that classic conical swirl shape.
- Finish the Swirl: Once you reach the peak of your swirl, gently release the pressure on the piping bag and pull it straight up and away from the top of the frosting. This creates a clean, neat finish without any “tails.”
Decorating with Pastry Tip 1M: The Versatile Star
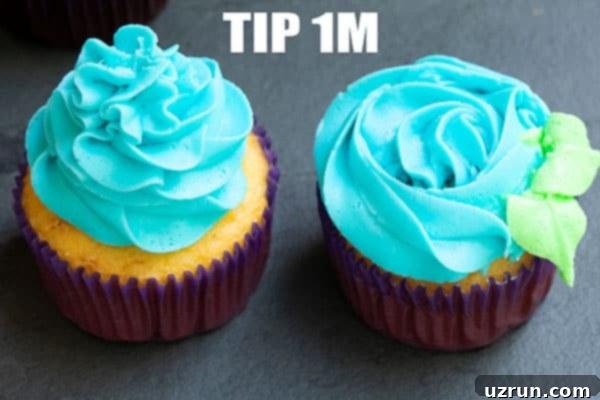
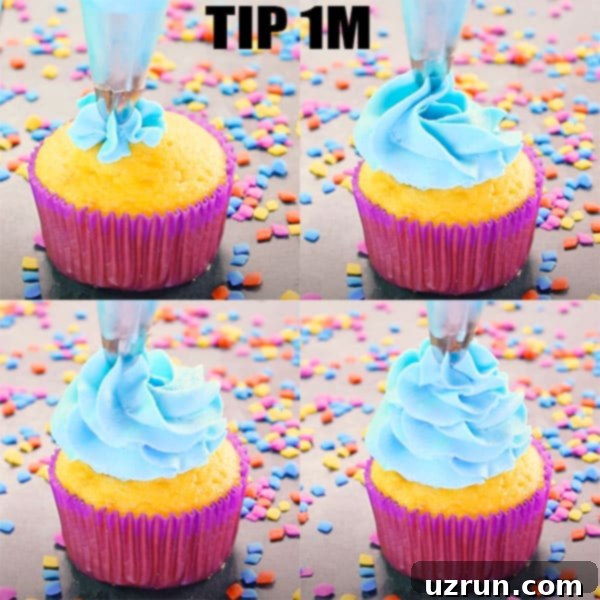
Pastry Tip 1M is arguably the most popular and versatile piping tip available, and for good reason. It effortlessly creates a gorgeous, classic star swirl that instantly elevates any cupcake. Its open-star design makes it incredibly easy to use, even for beginners, and produces a wonderfully textured finish that’s both appealing and sturdy.
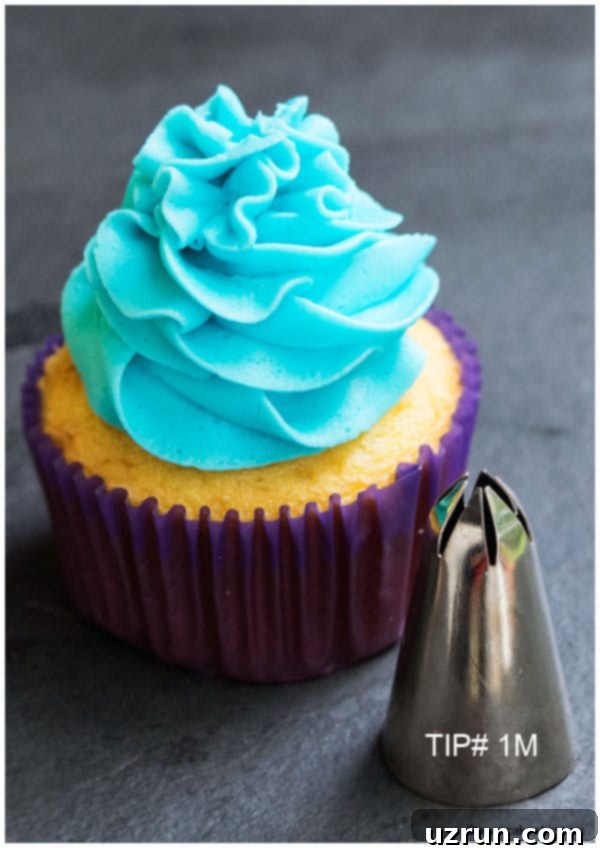
What’s truly remarkable about Tip 1M is its dual functionality: it can achieve both the iconic icing swirl and an elegant rose or rosette design, essentially giving you two beautiful looks from one single tip! This makes it a fantastic starter tip for anyone venturing into cupcake decoration.
Exploring Pastry Tip 4B: The Elegant French Star
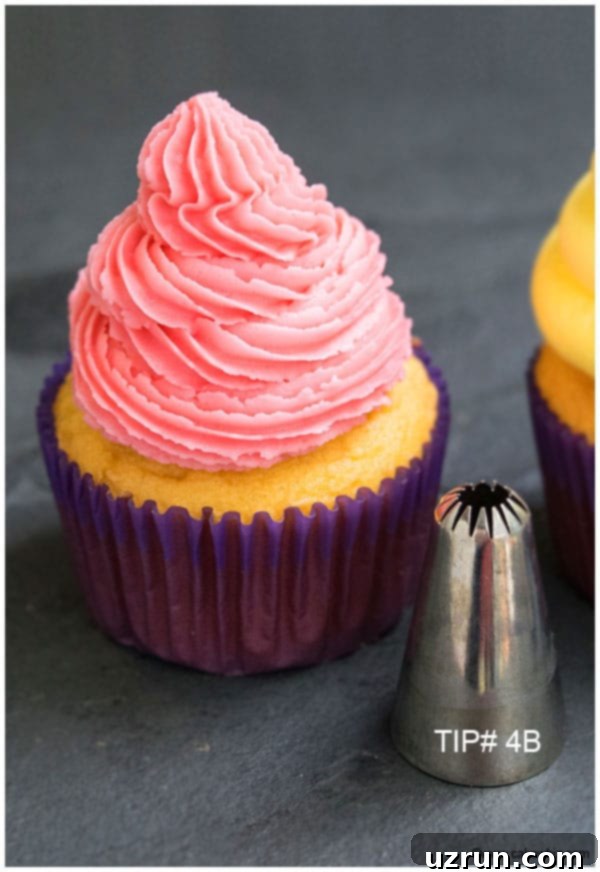
Pastry Tip 4B, often referred to as a “Big French Tip,” offers a lovely variation on the classic star swirl. While it maintains a star-like pattern, its deeper grooves create a less ruffled, more defined, and incredibly elegant swirl. This tip produces a sophisticated texture that’s still straightforward to pipe, offering a beautiful alternative to the 1M for a slightly different aesthetic.
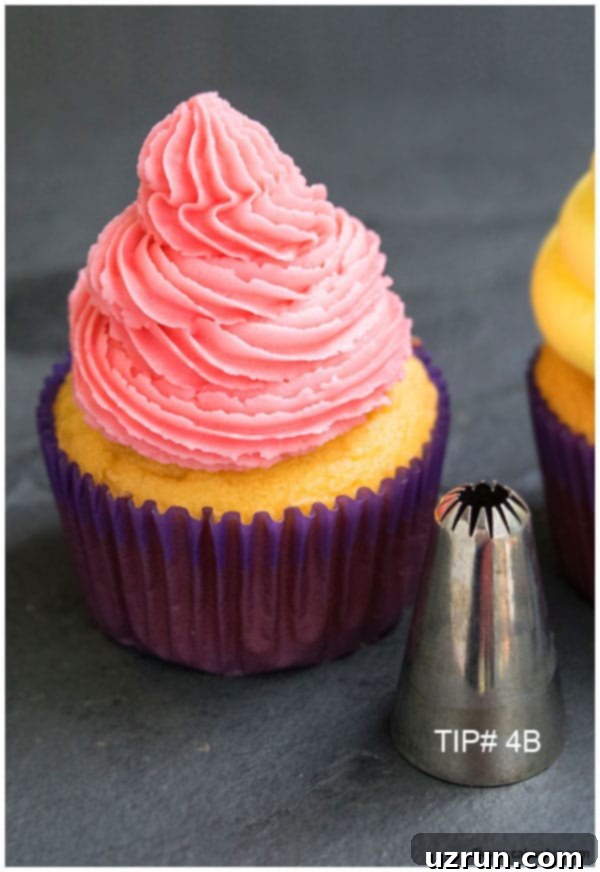
Similar to the 1M, this versatile pastry tip also allows you to achieve both a stunning swirl and a distinctive, beautiful flower design, expanding your decorating repertoire with just one tool.
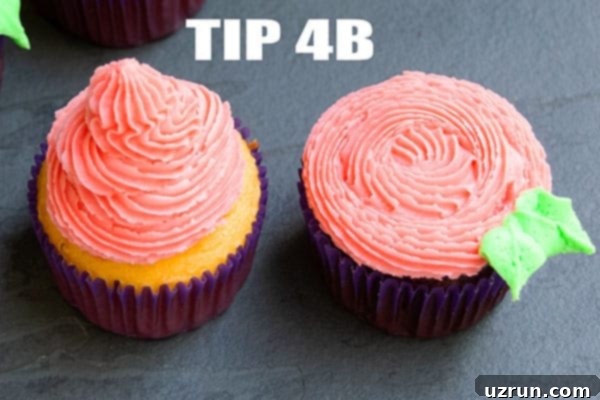
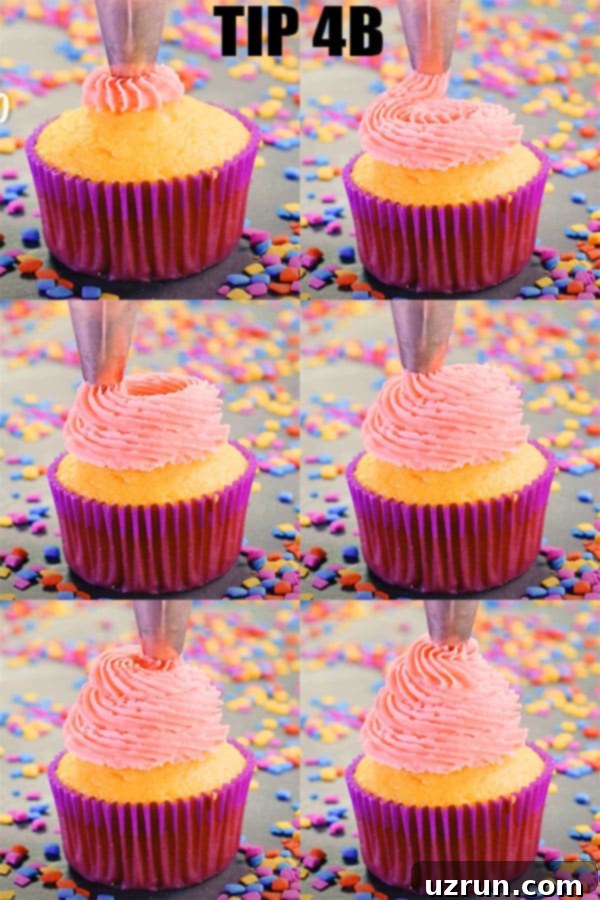
Using Pastry Tip 1A: For Smooth, Fluffy Swirls
Pastry Tip 1A, a large round tip, creates a wonderfully smooth and rounded swirl that evokes the look of a fluffy cloud. While perhaps not as frequently used as its star-shaped counterparts, it’s perfect for a sleek, minimalist frosting style or for specific designs like “hi-hat” cupcakes, where a tall, smooth dome is desired before dipping in chocolate. This tip allows for clean lines and a modern finish.
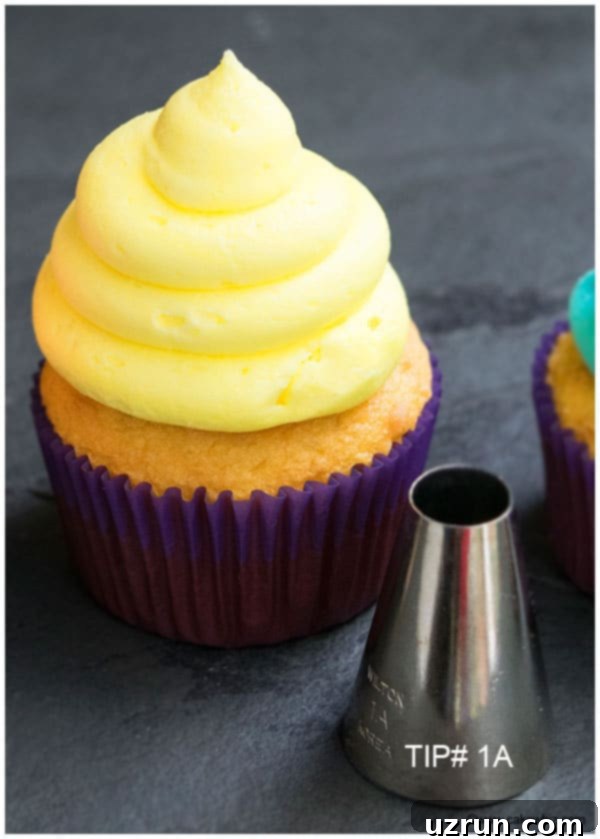
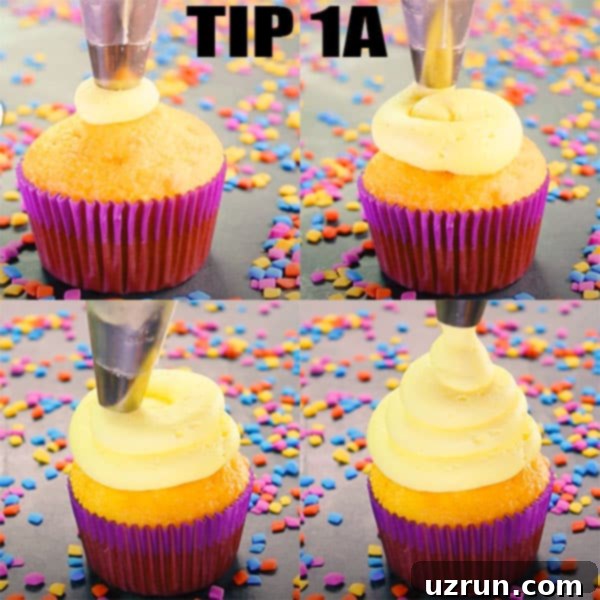
Creating Eye-Catching Two-Toned Icing Swirls
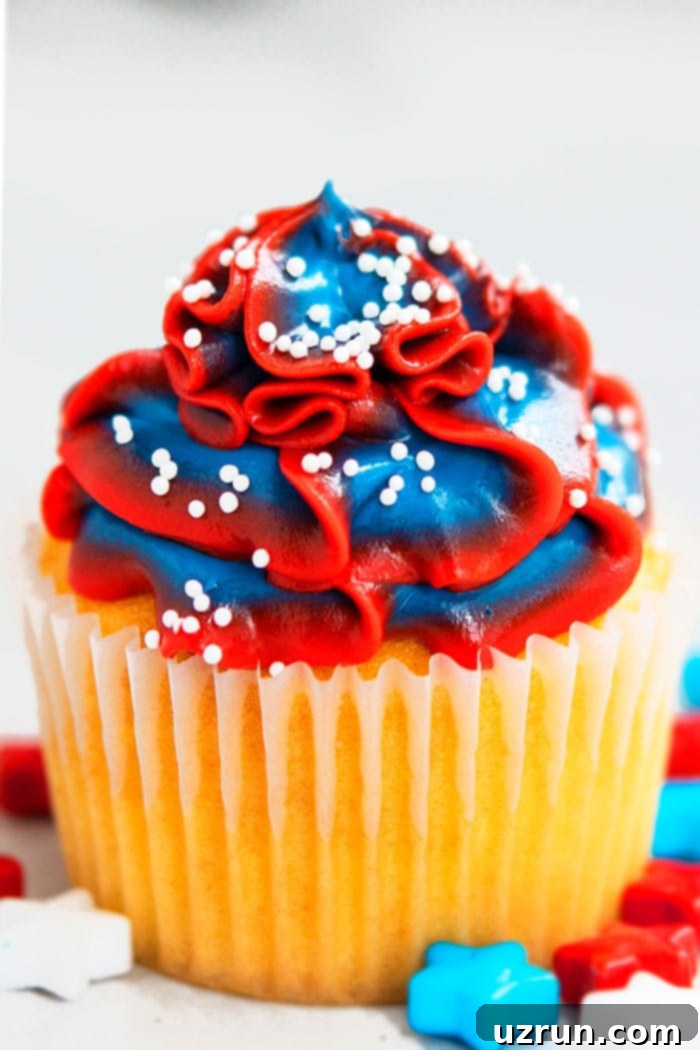
For an extra pop of color and visual interest, try creating two-toned icing swirls. This technique is surprisingly simple but yields incredibly striking results. The trick is to partially mix two colors of frosting within the piping bag, allowing them to swirl together as they emerge, creating a beautiful marbled effect.
To do this, prepare two different colors of buttercream frosting. Carefully add alternating spoonfuls of each color into a single piping bag. Once filled, tie the end of the piping bag securely with a rubber band. Then, gently roll the bag back and forth in the palms of your hands for a few seconds. This light mixing will allow the colors to blend partially at the tip without fully combining. Now, simply pipe your desired swirl onto your cupcakes. The frosting will emerge in a delightful two-tone pattern. For an even more festive touch, consider tossing some sprinkles over the freshly piped icing!
Rustic Charm: Decorating Cupcakes with a Spatula
Piping bags and pastry tips are fantastic, but sometimes the most beautiful designs are the simplest. If you prefer a more rustic, handmade aesthetic or simply want to avoid the fuss of piping equipment, a small offset spatula is your best friend. This method allows for a charming, artisanal look that’s incredibly easy to achieve.
To decorate with a spatula, begin by adding a generous spoonful of your favorite buttercream icing directly onto the center of a cooled cupcake. Then, using the flat side of your offset spatula, gently spread and swirl the frosting outward towards the edges of the cupcake. You can create soft peaks, subtle waves, or even a deep indentation in the center, perfect for filling with delightful surprises like caramel sauce, chocolate chips, or a shower of colorful sprinkles. This technique embraces imperfection, resulting in unique and inviting cupcakes every time.
Crafting Beautiful Rosette (Rose) Cupcakes with Tip 1M
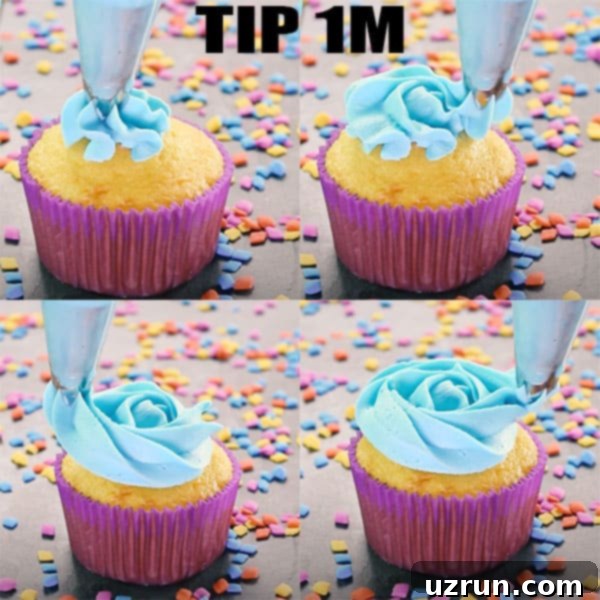
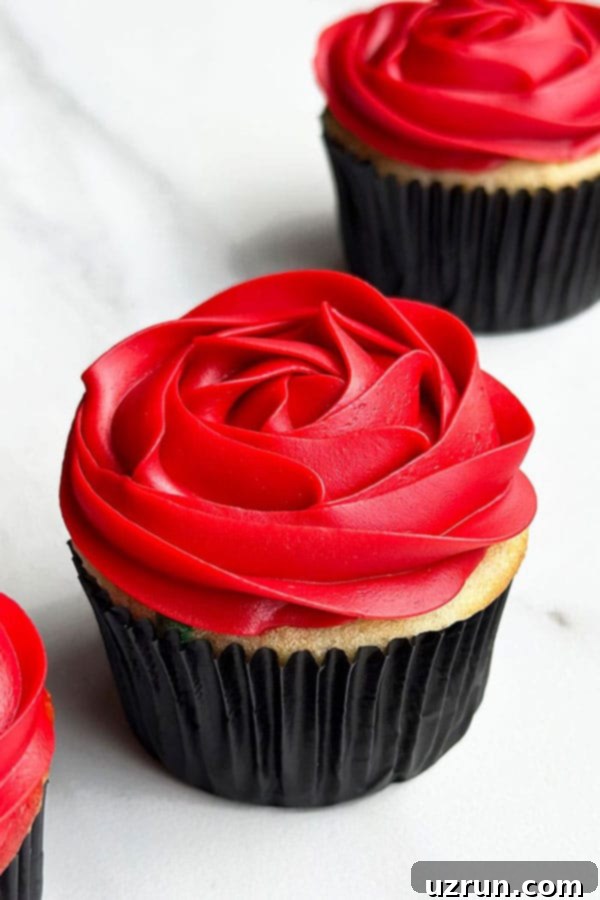
Beyond the classic swirl, Pastry Tip 1M is also perfect for creating elegant buttercream roses, often called rosettes. These stunning floral designs are surprisingly easy to master and add a touch of sophistication to any cupcake collection. The key is continuous motion and consistent pressure.
- Start at the Center: Hold your piping bag, fitted with Tip 1M, at a 90-degree angle directly over the center of your cupcake.
- Pipe the Rose: Begin to gently squeeze the piping bag, and simultaneously move your hand in a continuous clockwise (or counter-clockwise, if preferred) circular motion. Start small in the center and gradually expand the circle outwards, allowing the frosting to overlap and build upon itself. Maintain consistent pressure as you complete a full continuous circle until the entire top of the cupcake is covered, forming a beautiful, textured buttercream rose.
- Refine Your Technique: For even more detailed guidance on achieving perfect buttercream roses, I highly recommend checking out my separate, in-depth post on How to Pipe Red Rose Cupcakes. Practice makes perfect, and with a little patience, you’ll be creating stunning floral cupcakes in no time!
Piping Delicate Flower Cupcakes with Tip 104
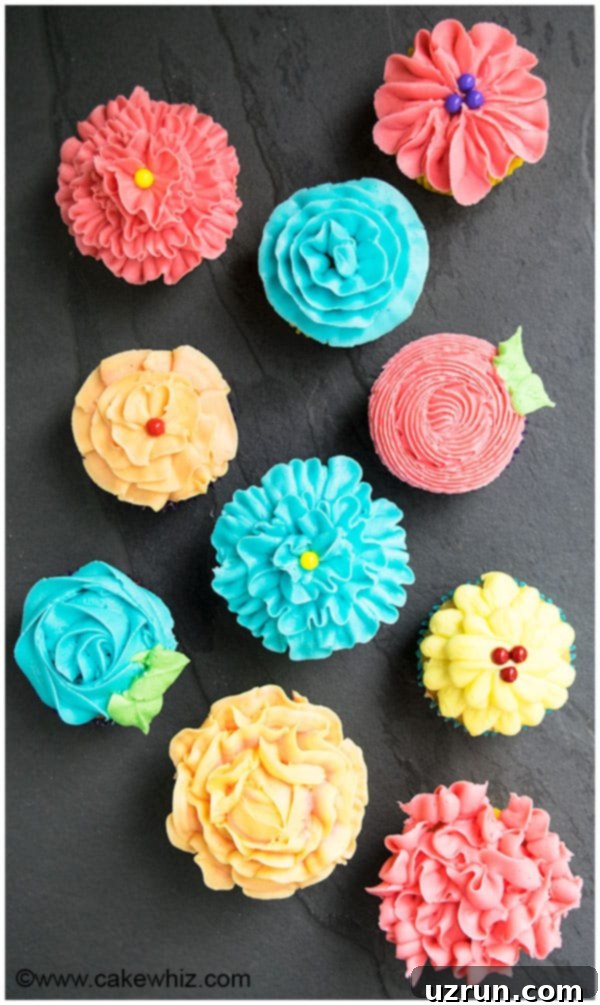
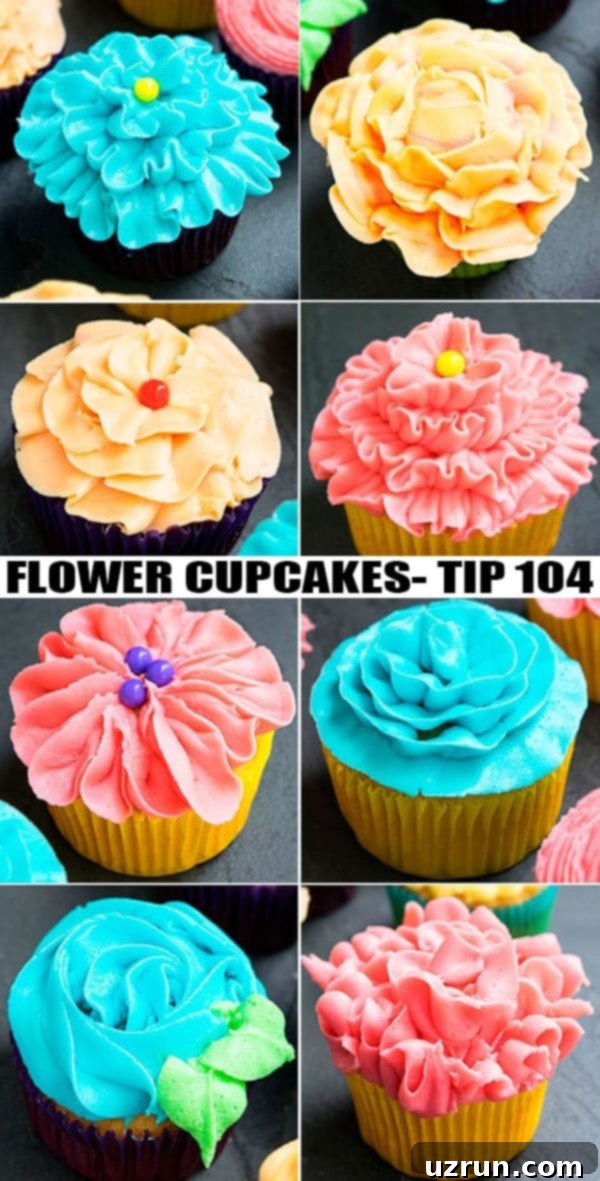
While Tip 1M creates a lovely rose, if your goal is to pipe a wide variety of delicate, realistic floral designs, Pastry Tip 104 (a petal tip) is absolutely essential. This tip features a teardrop shape that allows you to create thin, wavy petals by simply adjusting the angle and pressure. It’s perfect for crafting everything from roses with individual petals to elegant ruffles and charming blossoms. These types of flower cupcakes are particularly delightful for spring and summer celebrations, baby showers, or any occasion that calls for a touch of refined beauty. Look at the image below to see the incredible array of beautiful flower cupcakes you can create with this versatile tip!
Advanced Floral Designs with Various Pastry Tips
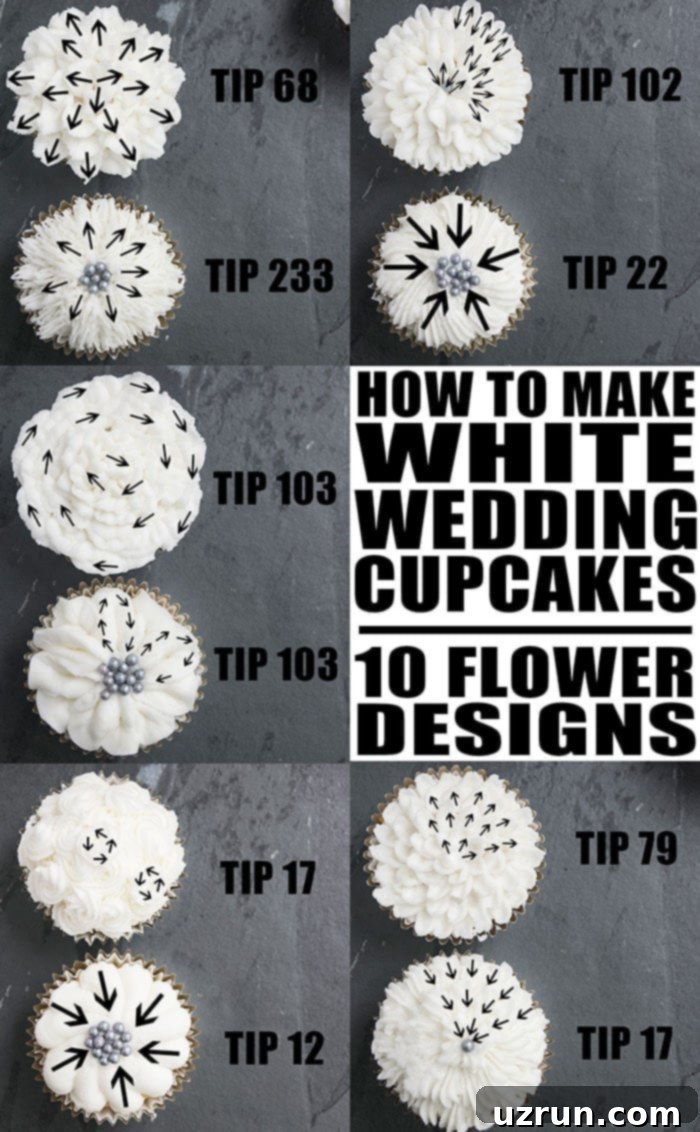
Once you’ve mastered the basics, you can expand your floral repertoire with an array of specialized pastry tips. Each tip offers unique possibilities for creating different elements of a flower, from delicate petals and leaves to intricate centers and grassy textures. Tips like 68 (leaf tip), 102 (small petal tip), 233 (grass/hair tip), 22 (star tip), 103 (petal tip), 17 (small star tip), 12 (small round tip), and 79 (large petal tip) allow for incredible customization and creativity. By combining these tips, you can build complex and breathtaking floral arrangements on your cupcakes.
The image below illustrates how the direction of your piping bag movements, combined with different tips, can create a vast variety of buttercream flowers. The black arrows indicate the precise motion needed to form petals, leaves, and other intricate details, guiding you towards crafting a stunning garden of edible blooms.
Creative Topping Ideas for Your Decorated Cupcakes
Once your cupcakes are perfectly frosted, the real fun begins: adding decorative toppings! This is where you can truly let your imagination soar and turn your cupcakes into unique works of art. The possibilities are endless, allowing you to tailor your creations to any theme, holiday, or personal preference. Don’t be afraid to think outside the box and combine different elements to mesmerize guests at your next party. Here’s a list of fantastic ideas to inspire you:
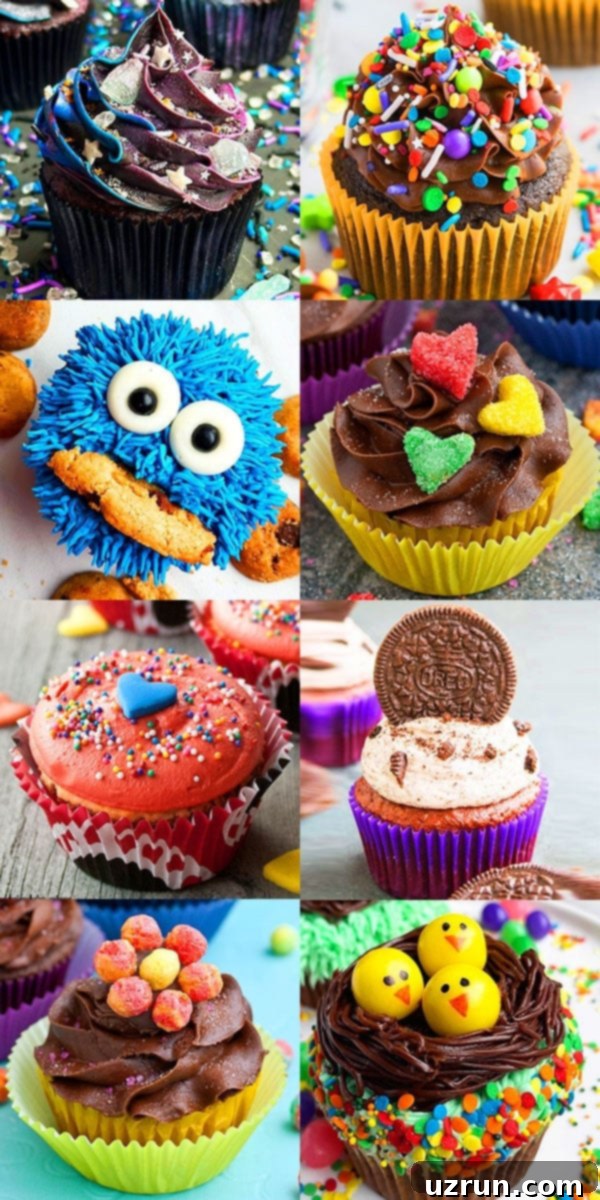
- Sprinkles: The ultimate classic! Sprinkles come in an astonishing variety of colors, shapes, and sizes these days, from classic jimmies and nonpareils to elaborate blends and edible glitter. You can even learn how to make Homemade Sprinkles for a truly custom touch. They’re perfect for adding a festive pop to any occasion, like these delightful Birthday Cupcakes (Pinata Cupcakes) or vibrant Rainbow Cupcakes (With Cake Mix).
- Fresh Fruits: For a fresh, vibrant, and slightly healthier touch, fresh fruits are an excellent choice. Strawberries, raspberries, and blueberries are particularly popular for their color and flavor. Always remember to wash and thoroughly pat your fruits dry before placing them on frosting to prevent moisture from bleeding into the icing. Imagine these beautiful Chocolate Strawberry Cupcakes (Valentine’s Day Cupcakes) or rich Chocolate Cherry Cupcakes.
- Fondant Toppers: Fondant allows for incredible detail and sculpting. You can purchase pre-made fondant cut-outs or get creative by making your own intricate designs. Unleash your inner artist to craft themed toppers, as seen in these adorable Dinosaur Cupcakes or the charming Bee Cupcakes (Bumblebee or Honey Bee).
- Candies: The candy aisle is a treasure trove of cupcake decorating possibilities! From gummy bears and M&Ms to miniature chocolates and hard candies, their diverse shapes, sizes, and colors offer endless inspiration. Let your imagination run wild to create fun designs like these cheerful Easter Chick Cupcakes with yellow gum balls, or festive Gingerbread Cupcakes adorned with candy cane shards.
- Cereal: Don’t underestimate the decorative power of breakfast cereal! With the vast array of colorful and uniquely shaped cereals available today, they can add an unexpected and playful texture to your cupcakes. Just look at how Froot Loops were used to create these whimsical Monster Cupcakes!
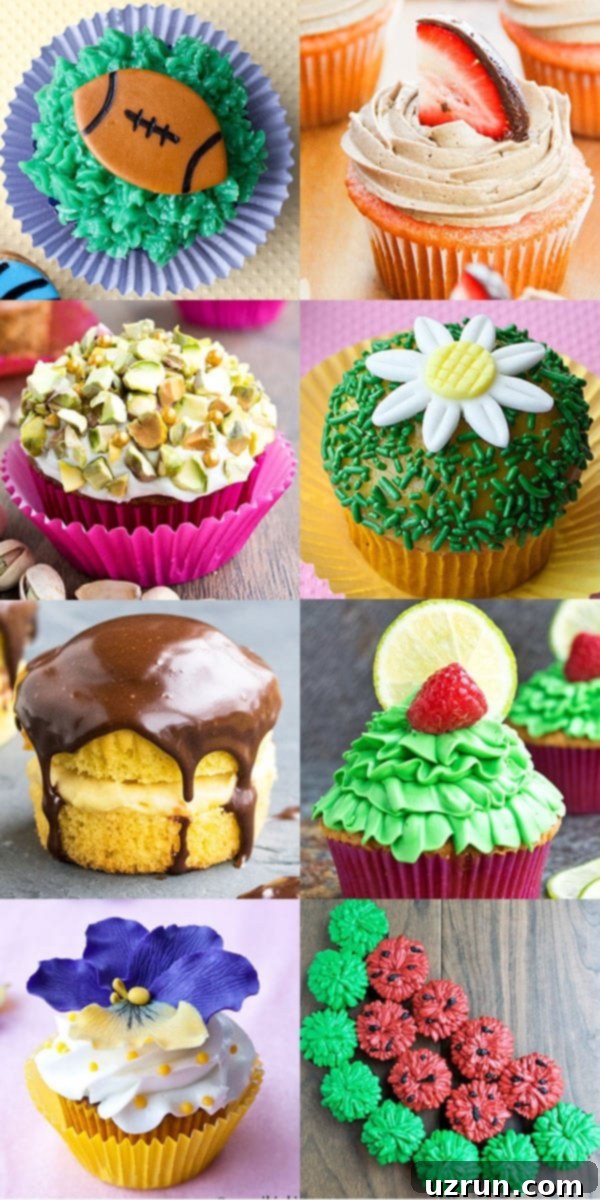
- Cool Arrangements (Pull-Apart Cupcakes): Sometimes, the decoration isn’t on a single cupcake, but in the collective arrangement. By icing individual cupcakes and then arranging them closely together, you can create a larger, cohesive image or shape that looks like a single cake but offers the convenience of individual servings. Check out these clever Watermelon Cupcakes (Pull Apart Cupcakes) or the impressive Football Cupcakes Cake.
- Chopped Nuts: For a sophisticated crunch and earthy flavor, finely chopped nuts are an excellent choice. Almonds, peanuts, pecans, and walnuts add a lovely texture and visual appeal. For something a little different, consider using pistachios, as seen in these delightful Carrot Cupcakes.
- Chocolate Molds: Elevate your cupcakes with custom chocolate toppers! Chocolate molds are available for virtually every holiday, theme, or season imaginable. Simply melt chocolate or candy melts, pour them into your chosen molds, let them set, and then pop out beautiful, edible decorations. They’re perfect for creating intricate details like the snowflakes on these enchanting Snowflake Cupcakes.
- Cookies: Crushed cookies or miniature whole cookies make fantastic cupcake toppers. Think Oreo cupcakes with a whole mini Oreo perched on top, or Cookie Monster cupcakes adorned with chocolate chip cookie pieces. They add both texture and an extra layer of flavor.
- Ganache Drizzle: For an elegant yet simple touch, a luscious drizzle or pour of chocolate ganache can transform a plain frosted cupcake. It adds a glossy finish and rich chocolate flavor that’s hard to resist, as beautifully demonstrated in these sophisticated Boston Cream Cupcakes.
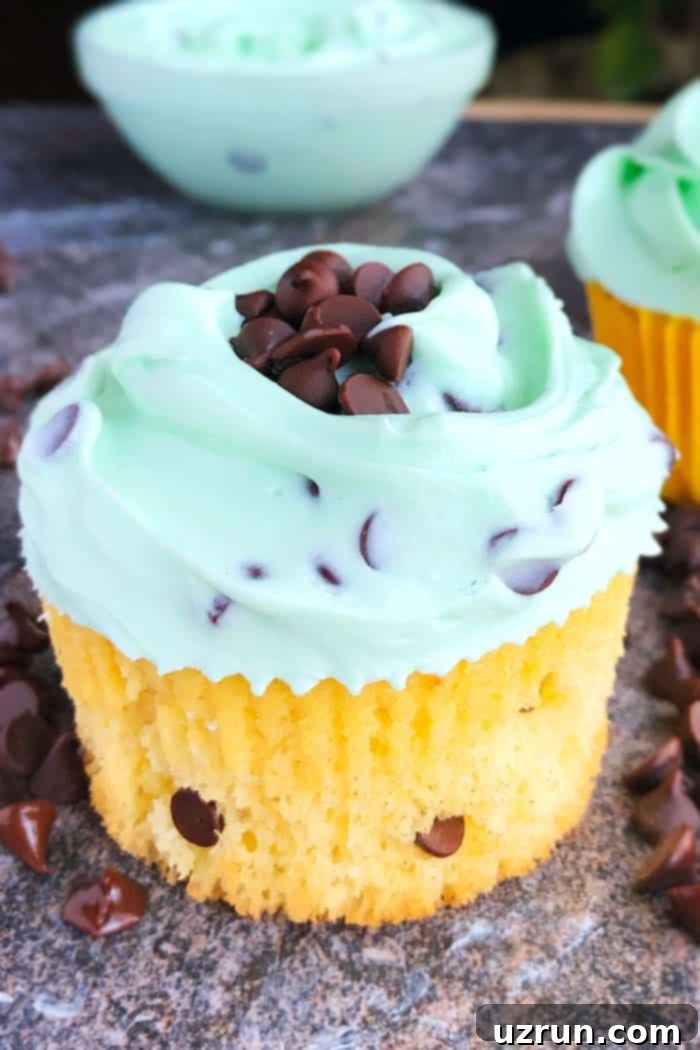
- Chocolate Chips: Classic and beloved, chocolate chips are always a hit. Mini chocolate chips are generally best for decorating as they provide a finer texture and are less overwhelming. Sprinkle them generously or arrange them in a pattern, as seen on these delightful Chocolate Chip Cupcakes (With Mint Frosting).
- Multi-Colored Frostings: Don’t limit yourself to a single color! Experiment with two-toned icing or create mesmerizing effects with even more colors. Blend them artfully, like in these cosmic Galaxy Cupcakes, to achieve whimsical and visually captivating designs that truly stand out.
- Stencils: Take your cupcakes to a new level of artistry with stencils. These allow you to create intricate patterns or messages on your frosting using powdered sugar, cocoa powder, or edible dust. It’s a fun and relatively easy way to add a sophisticated touch. Learn more about this technique in my post on How to Use Stencils (For Cake Decorating).
- Sugar Cubes: Decorative sugar cubes, whether store-bought in charming colors and shapes or Homemade Sugar Cubes, can add a unique structural element. To prevent them from dissolving into the frosting due to moisture, it’s best to place them on your cupcakes just before serving.
- Edible Sprays and Glitters: Add a touch of shimmer and sparkle! Wilton’s Color Mist sprays are excellent for an affordable and effective way to instantly change the color or add a subtle sheen to your frosting. For a truly glamorous finish, edible gold and silver glitter sprays can transform your cupcakes into dazzling treats.
- Plastic or Paper Cupcake Toppers: For quick and easy themed decorations, pre-made plastic or paper toppers are a lifesaver. Readily available in the baking aisle of most grocery stores, they often come with a handy toothpick attached, which can be easily inserted into your frosted cupcake. They’re perfect for birthdays, holidays, or adding a specific character theme.
- Marshmallows: Marshmallows are soft, sweet, and come in a surprising variety of shapes and sizes beyond the classic white squares. They make adorable and tasty toppers, adding an extra treat and a fun, whimsical texture to your decorated cupcakes.
Can I Decorate Cupcakes the Night Before?
Absolutely, decorating cupcakes the night before an event is not only possible but often highly recommended! This approach helps alleviate last-minute stress on the day of your party or gathering, allowing you more time to focus on other preparations. Piping frosting swirls, rosettes, or other stable designs can be done a full day in advance with excellent results.
However, a crucial consideration is the type of decoration you’re using. Any elements that are highly susceptible to moisture, such as delicate sugar decorations (like sugar cubes, unless added right before serving) or particularly airy items like cotton candy, should be added just prior to serving. These items can absorb moisture from the frosting or the air, causing them to dissolve, wilt, or lose their pristine appearance. For most buttercream-based designs and stable toppings like sprinkles or chocolate, preparing them the night before is perfectly fine and a smart time-saving strategy.
Storage Tips for Decorated Cupcakes
Proper storage is essential to keep your beautifully decorated cupcakes fresh and looking their best. The ideal method depends largely on the type of frosting and decorations you’ve used.
Room Temperature: Cupcakes frosted with American buttercream or a stable ganache can typically be stored at room temperature for up to 2-3 days. Place them in a covered airtight container or a specialized cupcake carrier. Ensure they are kept away from direct sunlight, heat sources, and excessive humidity, all of which can cause frosting to melt or become sticky.
Refrigerate: If your cupcakes feature perishable ingredients such as fresh fruits, cream cheese frosting, whipped cream toppings, or certain perishable fillings, refrigeration is necessary. Store them in a covered box or container to prevent them from absorbing odors from other foods in the refrigerator and to protect the frosting. Allow them to come to room temperature for about 15-30 minutes before serving for optimal flavor and texture.
Freeze: Freezing decorated cupcakes is generally not recommended, especially if they have intricate decorations or toppings like sprinkles and candies. The moisture in the freezer can cause sprinkles to bleed their color, candies to become sticky or dissolved, and delicate piping to lose its shape upon thawing. Even cupcakes with just a simple frosting swirl can be prone to freezer burn, affecting their texture and flavor. If you must freeze, ensure they are completely unfrosted or only have a very basic, sturdy frosting, and wrap them exceptionally well to protect against moisture loss.
More Baking and Decorating Resources
Continuously expanding your baking knowledge and decorating skills is part of the fun! Here are some additional resources to help you along your journey, offering valuable insights into different techniques and preparations:
- How to Make a Naked Cake: Learn the art of minimalist cake design, focusing on visible cake layers and subtle frosting.
- How to Make Homemade Cake Flour: Discover how to easily create your own cake flour for a lighter, more tender crumb in your baked goods.
- How to Make Red Frosting (Red Velvet): Master the technique for achieving vibrant, true red frosting, perfect for classic red velvet treats.
- How to Make Black Icing (Buttercream Frosting): Learn the secrets to deep, rich black buttercream without using excessive food coloring.
Recipe
How to Decorate Cupcakes
Abeer RizviWant to Save This Recipe?
Enter your email & I’ll send it to your inbox. Plus, get great new recipes from me every week!
By submitting this form, you consent to receive emails from CakeWhiz
Ingredients
- 12 Brownie cupcakes
- 4 cups Buttercream icing Can be colored with gel food coloring
Instructions
- Bake your chosen cupcakes according to recipe instructions and allow them to cool completely to room temperature. This is crucial to prevent the frosting from melting.
- While the cupcakes are baking and cooling, prepare your buttercream frosting. If desired, color it using gel food coloring for vibrant hues.
- Attach your preferred pastry tip to a piping bag (using a coupler if you plan to switch tips) and fill the bag approximately halfway with frosting.
- Twist the open end of the bag tightly and secure it with a rubber band or icing bag tie to prevent frosting from oozing out.
- To make a buttercream swirl (with pastry tips 1M, 4B or 1A): Hold the piping bag at a 90-degree angle directly over the center of the cupcake. Begin piping a continuous stream of frosting, starting at the outer edge of the cupcake and moving inward in three decreasing circular rotations. Release pressure and gently pull the bag away at the top to create a clean peak.
- To make a rose cupcake (with tip 1M): Hold the piping bag at a 90-degree angle in the center of the cupcake. Apply consistent pressure while moving your hand in a continuous clockwise circle, starting from the center and expanding outwards until the cupcake top is fully covered, forming a beautiful buttercream rose.
- Once frosted, you can further decorate your cupcakes with sprinkles, fresh fruit, candies, or other desired toppers as detailed in the comprehensive guide above.
Video Tutorial
Expert Tips & Notes
- Frosting Consistency is Key: Your buttercream frosting should be soft enough to pipe smoothly but firm enough to hold its shape. If it’s too runny, your swirls will collapse. If it’s too stiff, it will be hard to pipe and may tear the cupcake. Adjust by adding a tiny bit of milk/cream to thin or powdered sugar to thicken.
- Cool Completely: Always ensure your cupcakes have completely cooled to room temperature before you begin piping. Even slightly warm cupcakes will cause the buttercream to melt and ruin your intricate designs.
- Protect from Heat: Once decorated, keep your cupcakes away from direct heat sources and warm environments. Exposure to heat will soften and potentially melt the icing, especially delicate piped designs.
- Practice Makes Perfect (on Wax Paper!): If you’re new to piping, don’t feel pressured to get it perfect on your first try. I highly recommend practicing on a sheet of wax paper or parchment paper. This allows you to experiment with pressure, angles, and various motions without wasting cupcakes. You can even scrape the frosting back into the bag and reuse it!
- Use Gel Food Coloring: When coloring your frosting, opt for gel food coloring. Its concentrated nature means you need less, and it won’t thin out the consistency of your buttercream, unlike liquid food colorings which can add too much moisture.
- Steady Hand & Patience: Achieving a steady hand for piping comes with practice. Don’t be discouraged if your swirls or flowers don’t turn out exactly as you envisioned initially. Every attempt is a learning opportunity. Keep practicing, and you’ll see significant improvement over time!
- Clean Tips Regularly: For crisp, defined lines and patterns, especially with intricate tips, periodically wipe off any excess frosting that accumulates on the tip opening. This prevents blockages and ensures consistent design.
- Room Temperature Ingredients: When making your buttercream from scratch, ensure all ingredients (especially butter) are at room temperature. This helps create a smooth, emulsified frosting that’s ideal for piping.
- Don’t Overfill Your Bag: As mentioned in the “How to Fill a Piping Bag” section, overfilling makes the bag difficult to control and can lead to messy results. Fill only halfway and refill as needed.
- Rotate Your Cupcake: For consistent swirls, try rotating the cupcake with your free hand as you pipe. This can help maintain an even circle and makes the process easier for some decorators.
Nutrition Information
An automated tool is used to calculate the nutritional information. As such, I cannot guarantee the accuracy of the nutritional information provided for any recipe on this site.
