Mastering the Easy Round Shirt Cake: A Step-by-Step Fondant Tutorial for Father’s Day & Beyond
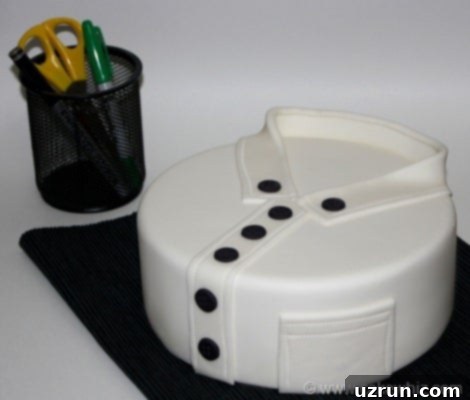
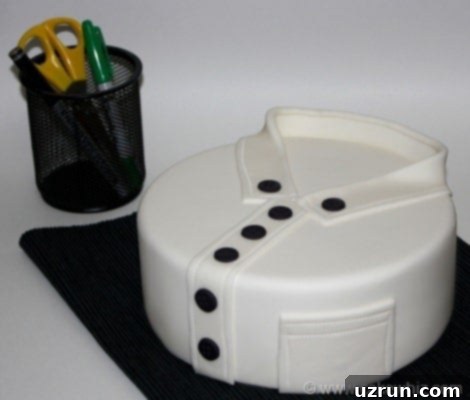
Creating a show-stopping cake doesn’t have to be complicated, especially when you’re celebrating a special man in your life! This comprehensive guide will teach you how to make an easy shirt cake, baked entirely from scratch using simple ingredients and basic decorating supplies. Unlike traditional rectangular shirt cakes, which often pose significant challenges when covering with fondant, our clever design utilizes a round cake, making the entire process much more manageable and enjoyable for bakers of all skill levels. This round shirt cake, adorned with smooth fondant details, is the perfect edible tribute for Father’s Day, Dad’s birthdays, or any occasion where you want to show appreciation with a personalized, homemade treat. Get ready to impress with this charming and surprisingly simple fondant shirt cake!
While many shirt cake designs you might encounter are rectangular, they frequently come with the daunting task of flawlessly covering sharp edges and vertical sides with fondant. This often demands a high level of practice and a good deal of patience to achieve a smooth finish. Round cakes, however, offer a much more forgiving canvas, making the fondant application significantly easier and quicker. If you’re keen to explore other creative shirt-themed treats, check out our delightful Tie Dye Shirt Cake or these adorable Shirt Cupcakes for more inspiration on adapting this unique design concept.

Why Choose a Round Shirt Cake? Simplicity and Elegance Combined
The beauty of this easy shirt cake design lies in its round shape. While a rectangular cake might seem more intuitive for a shirt, its straight edges and sharp corners can be a nightmare for fondant application, especially for those new to cake decorating. Fondant tends to tear or wrinkle around sharp angles, requiring meticulous smoothing and patching. A round cake, conversely, allows the fondant to drape and adhere much more smoothly, dramatically reducing the chances of imperfections and making the entire decorating process more enjoyable and less stressful. This approach doesn’t just simplify the process; it also lends a unique, modern elegance to the classic shirt motif, making your homemade shirt cake stand out from the crowd.
Essential Tools for Crafting Your Perfect Shirt Cake
Before you begin, gathering your tools will ensure a smooth and efficient decorating process. While you don’t need highly specialized equipment, having the right basics on hand will make a world of difference. Here’s a quick checklist of what you’ll likely need:
- Cake Pans: For baking your round cakes.
- Parchment Paper: To line your cake pans, ensuring easy release.
- Mixing Bowls and Spatulas: For cake batter and frosting.
- Offset Spatula: Essential for applying and smoothing frosting.
- Cake Board: For assembling and presenting your cake.
- Rolling Pin: Specifically for rolling out fondant to an even thickness.
- Pizza Cutter or Sharp Knife: For cutting fondant precisely.
- Small Round Cookie Cutter: For creating perfect fondant buttons.
- Paintbrush and Small Bowl of Water: For “gluing” fondant pieces together (use sparingly!).
- Fondant Smoother: While optional, this tool helps achieve a perfectly smooth finish.
- Wilton’s Cutter/Embosser Tool: For creating realistic stitch marks.
- Toothpick: For making buttonholes.
Step-by-Step Guide: How to Make an Easy Round Shirt Cake
Follow these detailed instructions to create your stunning fondant shirt cake. Each step is designed to be straightforward, ensuring even beginners can achieve a professional-looking result.
- Bake Your Cakes: Start by baking two 8-inch round cakes. A rich Chocolate Oreo Cake is an excellent choice, offering a delicious base that pairs wonderfully with cream cheese frosting. Ensure your cakes are baked evenly and are completely level after cooling.
- Cool Completely: This is a crucial step! Allow your baked cakes to cool down to room temperature on a wire rack. Attempting to frost or decorate warm cakes will lead to melted icing and a sticky, frustrating mess. Patience here pays off!
- Prepare Your Icing: While the cakes cool, prepare your frosting. A luscious Chocolate Cream Cheese Frosting complements the chocolate Oreo cake perfectly. Ensure your frosting is smooth, creamy, and at a good spreading consistency.
- Assemble and Crumb Coat: Place one cooled cake layer on your chosen cake board. Spread a generous layer of frosting evenly over the top. Carefully place the second cake layer on top, pressing gently to secure it. Now, apply a thin layer of frosting over the entire cake – top and sides. This is known as a “crumb coat” and is essential for trapping any loose crumbs, creating a clean canvas for your final frosting and fondant. Chill the cake for 15-20 minutes to set the crumb coat.
- Final Frosting Layer: Once the crumb coat is firm, apply a thicker, even layer of your chocolate cream cheese frosting over the entire cake, smoothing it as much as possible with an offset spatula. This smooth surface is key for perfect fondant application.
- Roll Out White Fondant: On a surface lightly dusted with powdered sugar or cornstarch, roll out your white fondant to an even thickness (about 1/8 inch or 3-4mm). Ensure it’s large enough to cover the entire cake.
- Cover the Cake with Fondant: Carefully lift the rolled fondant and gently drape it over your frosted cake. Begin smoothing the top of the cake, then work your way down the sides, gently stretching and smoothing the fondant to remove any air bubbles or wrinkles. A fondant smoother tool can be very helpful here.
- Trim Excess Fondant: Using a pizza cutter or a sharp knife, carefully trim away the excess fondant around the base of the cake, creating a clean, crisp edge.
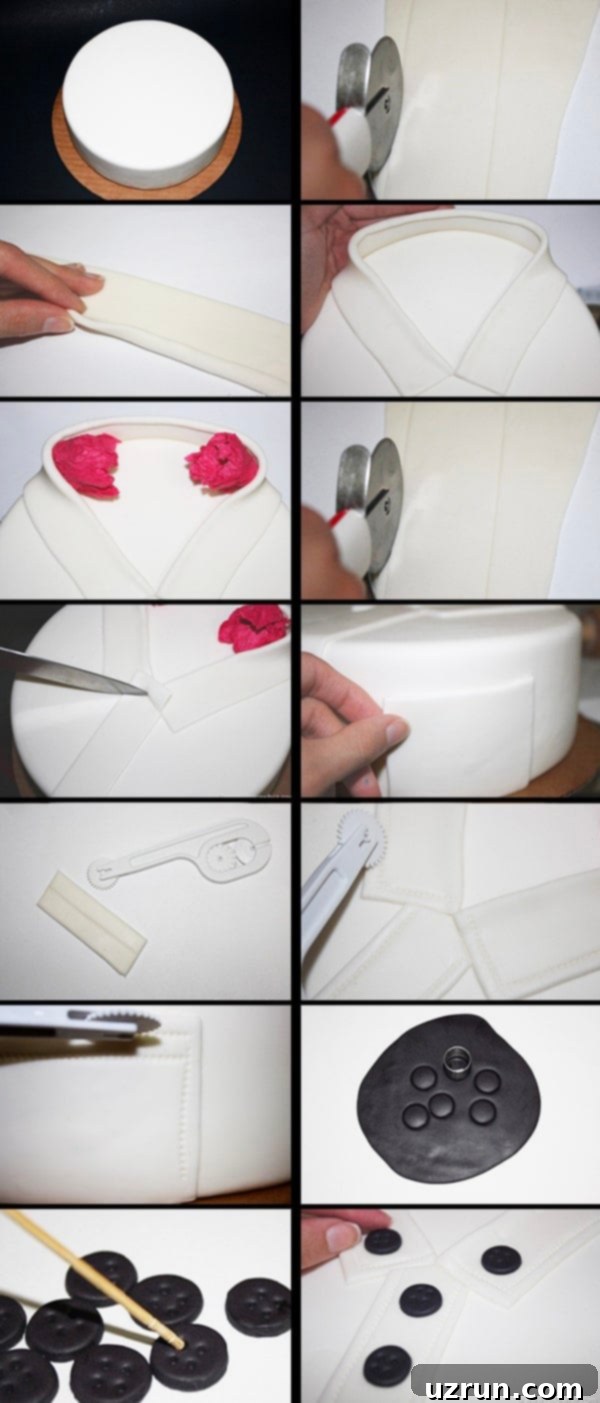
- Craft the Collar: Roll out a piece of white fondant and cut a strip approximately 2 inches wide and about 20 inches long (adjust length based on your cake’s circumference). Fold one long side of the strip slightly inward to create a realistic collar edge.
- Attach the Collar: Using a small paintbrush dipped *very lightly* in water (tap off excess on the side of a bowl), apply a tiny amount of water to the top edge of the cake where you want the collar to sit. Carefully place the folded fondant strip around the top perimeter of the cake, pressing gently to adhere. Overlap the ends slightly at the back if needed, or create a V-neck opening at the front.
- Shape and Support the Collar: To help the collar maintain its shape and give it a slightly raised, realistic look, gently crumple some gift wrapping tissue paper. Place small pieces of this crumpled paper underneath and along the sides of the collar until it sets. Remove the paper once the fondant has firmed up (usually after an hour or two).
- Create the Button Placket: Cut another white fondant strip, again about 2 inches wide and roughly 20 inches long. This will form the central placket where the buttons will be placed.
- Apply the Button Placket: With a tiny amount of water, stick this strip vertically down the center front of the cake, just below the collar. Press gently to secure.
- Trim the Placket: Use a sharp knife to carefully trim any excess fondant from the top and bottom of this central strip, ensuring it aligns neatly with the cake’s edges.
- Design the Pocket: Cut a rectangular piece of white fondant, roughly 3 by 2 inches, to create the shirt’s pocket. You can gently indent the top edge to give it a more open, realistic look.
- Attach the Pocket: Using a small amount of water, carefully attach the fondant pocket to the side of the cake, or wherever you prefer its placement.
- Add Stitching Details: For an authentic touch, use a Wilton’s cutter/embosser tool (or a clean ruler and toothpick for a simple line) to create delicate stitch marks around the edges of the collar, the button placket, and the pocket. This small detail truly elevates the homemade shirt cake.
- Make the Buttons: Roll out a small amount of black fondant (or white, if you prefer). Use a tiny round cookie cutter or the wide end of a piping tip to cut out several small circles for the buttons.
- Create Buttonholes: Using a toothpick, carefully make four tiny holes in the center of each fondant button to mimic thread holes.
- Final Assembly – Buttons: Apply a tiny dot of water to the back of each button and carefully stick them along the button placket and, optionally, on the collar. And just like that, your charming easy round shirt cake is complete! Enjoy your beautifully decorated masterpiece!
Creative Variations for Your Round Shirt Cake Design
While a classic black and white shirt cake is always a hit, don’t be afraid to unleash your creativity! This design is incredibly versatile and can be customized to suit any personality or occasion.
Try Other Colors and Patterns: Instead of a classic black and white shirt, consider vibrant blues, greens, or reds for the main “shirt” color. You could also add subtle patterns like stripes, polka dots, or even a plaid design using different colored fondant strips or edible markers. Imagine a Hawaiian shirt cake for a summer birthday, or a team jersey cake in their favorite sports colors!
Make a Larger Cake: This design scales up beautifully! If you’re feeding a bigger crowd, consider using a 10-inch or even 12-inch round cake. The same decorating instructions and techniques will apply, simply adjusting the dimensions of your fondant strips for the collar and placket to fit the larger circumference. Remember, larger cakes require more baking time and more fondant/frosting.
Explore Different Cake Flavors: The base cake is entirely up to you! While we used a delicious Chocolate Oreo Cake, feel free to experiment with your recipient’s favorite flavors. Imagine a rich Guinness Beer Cake for a more mature palate, or a classic Marble Cake for a universally loved option. Lemon, vanilla, red velvet – the possibilities are endless!
Pair with Other Frosting Flavors: The frosting beneath the fondant also offers a chance for flavor customization. Beyond chocolate cream cheese, consider a creamy Peanut Butter Frosting for a nutty kick, or a light and airy Coconut Cream Chocolate Frosting for a tropical twist. Ensure your chosen frosting is stable enough to support the fondant.
Add Accessories: Take your shirt cake to the next level by adding fondant accessories! A tiny fondant tie or bow tie, a pair of edible glasses, or even a personalized initial stitched onto the pocket can add extra charm and personality, making it truly unique for a Dad’s birthday cake or Father’s Day cake.
Expert Tips and Techniques for Fondant Cake Decorating
Achieving a smooth, professional-looking fondant cake is easier with a few insider tips. These techniques will help you master your easy shirt cake and other fondant creations.
Always Work with Cool Cakes: This cannot be stressed enough! Attempting to frost or apply fondant to a warm or even slightly cool cake is a recipe for disaster. The heat will melt your frosting, causing it to slide, and the fondant will become sticky, tear easily, and generally be unmanageable. Ensure your cakes are at absolute room temperature before you begin assembly and decorating.
Fondant vs. Gum Paste: Know the Difference: For covering cakes and creating larger, pliable decorations like shirt collars, fondant must be used. Fondant remains soft and pliable, allowing for smooth draping and easy cutting. Gum paste, on the other hand, dries much harder and faster. It’s typically reserved for intricate, delicate decorations like flowers, figurines, or thin structural elements that need to hold a firm shape, not for covering an entire cake.
Homemade Marshmallow Fondant vs. Store-bought Fondant: Both options are viable, and your choice often comes down to personal preference and time constraints. Homemade marshmallow fondant is often praised for its superior taste and aroma, making it a delicious alternative to some store-bought brands that can taste overly sweet or artificial. It’s also generally more cost-effective to make. However, store-bought fondant offers unparalleled convenience and consistency. If you’re new to fondant, store-bought can be a great starting point for ease of use. Experiment to find what works best for you!
When in Doubt, Buy Black Fondant: Crafting a truly deep, vibrant, and flawless black fondant from white fondant at home is incredibly challenging. It requires a significant amount of gel food coloring, which can alter the fondant’s texture, make it sticky, and often results in a greyish or streaky color rather than a rich black. It’s messy and time-consuming. For the best results and to save yourself frustration, I highly recommend purchasing pre-colored black fondant.
Use Water Sparingly for Adhesion: Water acts as a powerful adhesive for fondant, but too much can quickly turn your delicate pieces into a sticky, gooey mess. For attaching fondant details like the collar, placket, and buttons, use a fine-tipped paintbrush. Dip it *very lightly* in water, then tap off any excess on the side of a bowl or cup until it’s just barely damp. Apply this minimal amount to the back of your fondant piece before pressing it into place. Less is definitely more when it comes to water and fondant.
Smooth Fondant with Care: After draping your fondant over the cake, use a fondant smoother or the palms of your hands to gently smooth out any air bubbles or wrinkles. Work from the top down, pressing lightly. For stubborn air bubbles, a sterile pin can be used to poke a tiny hole, allowing the air to escape, then gently smooth over the area.
Prevent Fondant from Drying Out: Fondant dries out quickly when exposed to air. Always keep unused fondant tightly wrapped in plastic wrap and stored in an airtight container. When working with fondant, only take out what you need and keep the rest covered.

Storage and Make-Ahead Instructions for Your Shirt Cake
Proper storage is key to keeping your homemade shirt cake fresh and looking its best, especially when working with fondant.
Room Temperature Storage: A fully decorated cake, particularly one without perishable fruit fillings that require refrigeration, can generally be left at cool room temperature for up to 24 hours. This is ideal if you plan to serve it the same day or the following morning, as fondant tends to react to humidity in the fridge. Keep it covered loosely to protect it from dust.
Refrigerate Leftovers: Any leftover cake should be stored in a sealed, airtight container in the refrigerator. It will typically keep fresh for up to 3 days. Be aware, however, that the fondant decorations may become slightly sticky or tacky due to the moisture and condensation within the fridge. This is normal and doesn’t affect the taste, but it might alter the texture of the fondant.
Freezing Components for Future Enjoyment: You can prepare parts of this cake in advance and freeze them. Unfrosted cake layers can be wrapped tightly in plastic wrap and then aluminum foil, and stored in a sealed container in the freezer for up to 1 month. Similarly, excess frosting can be stored in an airtight container for the same duration. When you’re ready to assemble and enjoy, thaw the cake layers and frosting overnight in the refrigerator, then bring them to room temperature before decorating as per the instructions above.
Make-Ahead Instructions for Convenience: This easy shirt cake is an excellent candidate for making ahead. You can bake and fully decorate the cake up to 1 day in advance. Store it at cool room temperature (as described above) until you are ready to serve. This allows you to prepare for your celebration without last-minute stress!
More Inspiring Cake Ideas for Father’s Day or Dad’s Birthday
Looking for more creative ways to celebrate the special dads in your life? Here are some other fantastic cake ideas that are sure to bring a smile to their face:
- Father’s Day Cake (Tool Box Cake)
- Easy Pokemon Cake (Poke Ball Cake)
- Easy Sushi Cake
- Easy Star Wars Cake (Death Star Cake)
- Easy Galaxy Cake
- Pull Apart Football Cupcake Cake
Recipe

Easy Shirt Cake
Abeer Rizvi
Pin Recipe
Want to Save This Recipe?
Enter your email & I’ll send it to your inbox. Plus, get great new recipes from me every week!
By submitting this form, you consent to receive emails from CakeWhiz
Ingredients
- 2 Chocolate oreo cakes Dimensions: 8×2 each
- 4 cups Chocolate cream cheese frosting
- 4 cups Fondant White and black
Instructions
-
Bake the cakes and let them cool completely.
-
Place one cake on a cake board and use a spatula to spread icing on top.
-
Place the other cake on top of the frosting and press gently until secure.
-
Ice the entire cake smoothly in frosting.
-
Roll out white fondant.
-
Spread it over the frosted cake smoothly.
-
Cut off excess around the base of the cake with a pizza cutter.
-
Cut a white fondant strip which is 2 inches wide and about 20 inches long.
-
Fold one side of the strip slightly inward. This will be the shirt’s collar.
-
Using some water and a paintbrush, stick this strip around the top of the cake, where you want the collar to be positioned.
-
Get some gift wrapping tissue paper and crumple it up. Place these in the middle and along the sides of the collar so that it doesn’t lose its shape.
-
Cut another white strip which is also 2 inches wide and about 20 inches long.
-
Stick this piece below the collar, along the center with some water. This will be the button line.
-
Cut off excess fondant on the top and bottom of this strip with a knife.
-
Cut a rectangular piece of white fondant (mine was roughly 3 by 2 inches). This will be the shirt’s pocket.
-
Use water to stick this piece on the side of the cake or wherever you want this pocket to be positioned.
-
Use Wilton’s cutter/embosser tool to make stitch marks around the collar, the button line and even the pocket.
-
For the buttons, cut out a few circles using a small cookie cutter.
-
Use a toothpick to make 4 tiny holes in these buttons
-
Use some water to stick these along the button line and collar and you are done. Enjoy!
Notes
- Read all my tips above for best results!
- Leftovers can be stored in a sealed container in the fridge for up to 3 days, but be aware that the fondant decorations will become slightly sticky from the moisture.
Nutrition
An automated tool is used to calculate the nutritional information. As such, I cannot guarantee the accuracy of the nutritional information provided for any recipe on this site.
