Spooktacularly Simple: How to Make Easy Homemade Candy Eyes for Halloween Treats
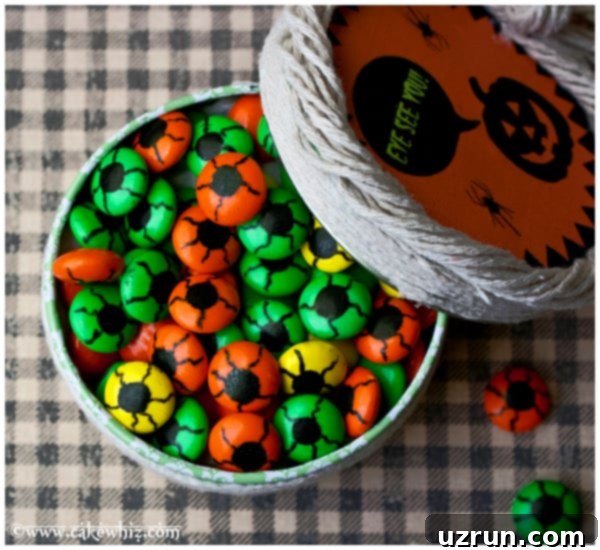
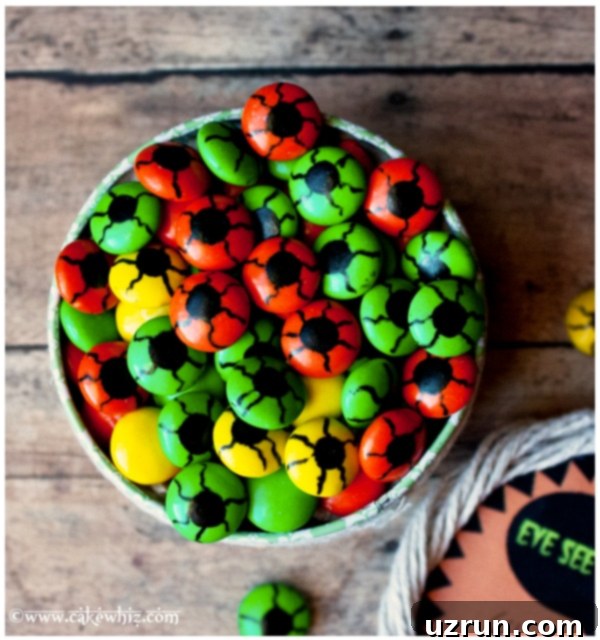
Get ready to add a dose of adorable spookiness to all your Halloween creations with these incredibly easy homemade candy eyes! Forget store-bought decorations; with just two simple ingredients – M&M candies and edible markers – you can whip up a batch of these fun, edible eyeballs in minutes. They are perfect for transforming any dessert into a ghoulish delight and are an absolute hit at kids’ Halloween parties, encouraging playful interaction with their food (and we fully support it in this case!).
Honestly, when it comes to quick Halloween treats, these spooky candies are probably the easiest things you’ll ever make. You only need two basic items and there are literally only two steps to follow. The absolute best part is watching the kids’ faces light up as they play with and then devour these whimsical eyes. While we usually preach against playing with food, these little googly eyes are an exception to the rule! Imagine filling these Halloween Treat Bags {Candy Goodie Bags} with a handful of these vibrant eyes, or taking your creepy-cool theme even further by incorporating them into this stunning Easy Eyeball Cake {Tutorial} for your next spooky soirée.

Why These Homemade Candy Eyes Are a Must-Make This Halloween
Before we dive into the simple steps, let’s explore why these DIY candy eyeballs deserve a spot on your Halloween preparation list:
- Unbeatable Simplicity: Seriously, it doesn’t get easier than 2 ingredients and 2 steps. This means less stress for you and more time for enjoying the festive season.
- Kid-Friendly Fun: This is a fantastic activity for children of all ages. Little ones can help sort the candies, and older kids can practice their drawing skills with the edible markers. It’s a safe and engaging craft that ends with a delicious reward.
- Incredible Versatility: These candy eyes aren’t just for eating on their own. They are the ultimate edible decoration, instantly adding personality and a spooky touch to a wide array of Halloween desserts.
- Cost-Effective: M&Ms and edible markers are generally inexpensive, making this a budget-friendly way to elevate your Halloween treats without breaking the bank.
- Instant Spooky Factor: A plain cupcake becomes a monster, a simple cookie becomes a ghost, and a basic cake gets an immediate eerie upgrade. These eyes are the quickest way to inject Halloween spirit into any sweet treat.
How To Make Homemade Candy Eyes? A Step-by-Step Guide
Creating your very own batch of spooky, edible googly eyes is remarkably simple. Follow these two easy steps to get started:
- Sort Out Your Spooky Color Palette: Begin by sorting through your bag of M&M candies. For a classic spooky Halloween look, focus on collecting orange, yellow, and green M&M candies. These colors tend to evoke a more eerie, monster-like vibe, perfect for the season. However, don’t limit yourself! Feel free to include other colors like red for bloodshot eyes, blue for ghostly gazes, or even brown for a more natural (but still spooky) look.
- Add the Pupil and Whimsical Squiggles: Once you have your colored M&Ms ready, it’s time to bring them to life with a black edible marker. Using a fine-tip marker (this is key for precision!), draw a circle in the center of each M&M to create the pupil. Don’t worry about perfection; slightly uneven circles can add to the charm! After the pupil, draw “squiggly” lines radiating outwards from the center. These squiggles give the eyes a fun, slightly bloodshot, or veiny effect, enhancing their spooky character. Experiment with different squiggle patterns – some can be thin, some thicker, creating unique expressions for each candy eye.
- Prepare for Display and Devouring: After drawing, allow the ink to dry completely at room temperature for a few minutes. This prevents smudging when you handle or store them. Once dry, transfer your homemade candy eyes into a small container, a decorative bowl, or directly onto your chosen Halloween desserts. Now they are ready to be admired, played with, and, of course, enjoyed!
Unleash Your Creativity: Variations For DIY Candy Eyeballs
While M&Ms are a fantastic base, the possibilities for homemade candy eyes extend far beyond! Get creative with these variations:
Gummy Eyeballs: For a chewier, more jiggly texture, use gummy candies as your base. Simply draw the pupils and squiggles directly onto them with your edible marker. If you happen to find gummy candies with a hole in the center (like gummy rings), you can get even more inventive by pressing an M&M candy into the center of the gummy to serve as a vibrant, contrasting pupil. Then, draw your squiggles around it on the gummy itself for a truly unique 3D effect.
Make Traditional White Eyeballs: If you’re aiming for a classic “googly eye” look, white candies are ideal. White M&M candies are often seasonal; you might find them in grocery stores around Valentine’s Day (often in bags of pink and white) or during Christmas (in red, green, and white mixes). You’ll need to sort through them to pick out the white ones. Alternatively, many baking supply stores or online retailers sell plain white chocolate candies or round white candies year-round that work perfectly.
Explore Other Round Candies: Don’t limit yourself to M&Ms! Many other round candies can be transformed into fantastic edible eyes. Consider options like:
- Gum Balls: Their larger size and smooth, glossy surface make them excellent for big, bold eyes.
- Sixlets: These smaller, chocolate-filled candy-coated spheres come in a variety of colors and have a nice, smooth finish.
- Skittles: While they have a slight texture, their vibrant colors can make for very expressive eyes. You could even sort them by color for specific themes.
- Round Mints: For a refreshing twist, use round mints. Just ensure their surface is smooth enough for the marker.
- Whoppers: These malted milk balls offer a unique texture under their chocolate coating, and their uniform roundness is perfect.
- Reese’s Pieces: With their distinct orange, yellow, and brown colors, these can make for deliciously peanut buttery eyes, especially for monster themes.
- Cinnamon Candies: If you want a little spice, small, round red cinnamon candies can make for fiery, intense eyes.
The key is to choose candies with a relatively smooth and firm surface for the best drawing results. Test a small batch first!
Use Jumbo Round Candies: To make larger, more dramatic eyes, opt for jumbo round candies. Think large gum balls, oversized chocolate spheres, or even spherical lollipops (just draw on the candy part, not the wrapper!). These are fantastic for decorating bigger cakes or as standalone statement pieces.
Creative Applications: Use Them to Decorate Cakes, Cupcakes, and More!
These candy eyes are not just a treat in themselves, but also a game-changer for Halloween decorating:
- Cakes and Cupcakes: Adorn your baked goods! Use them in place of traditional candy corns on an Easy Candy Cake, or scatter them atop this vibrant Halloween Cake {Twizzler Cake}. I’ve even used them to bring my Monster Cupcakes to life with minimal effort. Simply dab a tiny bit of frosting on the back of each candy eye to secure it to your cake or cupcake.
- Cookies: Transform ordinary cookies into spooky characters. They’re perfect for these Easy Monster Cookies {Candy Corn Cookies} or can be added to these Easy Ghost Cookies {No Bake} for an extra layer of spookiness.
- Brownies & Bars: Press them into freshly frosted brownies or blondies for a quick monster effect.
- Snack Mixes: Toss them into a spooky trail mix with pretzels, popcorn, and other Halloween candies for an unexpected visual treat.
- Cake Pops & Cake Balls: Give your cake pops a personality by adding a pair of candy eyes after dipping them in chocolate or candy melts.
Essential Tips And Techniques For Homemade Edible Googly Eyes
To ensure your edible googly eyes turn out perfectly every time, keep these helpful tips in mind:
Where to Buy Edible Markers?: Edible markers are your secret weapon here! You can easily find them online on platforms like Amazon, or directly from baking supply brand websites such as Wilton’s. Locally, check the cake decorating aisle at major retailers like Walmart, Michaels, Hobby Lobby, or any specialty baking store. Look for reputable brands to ensure food-safe ingredients and vibrant colors. They often come in multi-packs with various colors, but a black one is essential for pupils.
Highly Recommend Using a Fine Tip Edible Marker: For the best results, a fine-tip edible marker is your best friend. The precision it offers makes it significantly easier to draw clean, defined pupils and intricate squiggly lines. A broad tip might smudge or create pupils that are too large for smaller candies, whereas a fine tip allows for delicate details that truly bring your candy eyes to life. This is especially important for smaller candies like M&Ms.
The Ink Dries Quickly, But Be Patient: Edible marker ink typically dries quite fast, which is a huge convenience. However, until it’s completely dry at room temperature, it’s crucial to prevent the candies from touching each other. If you clump them together too soon, the ink might smear, transferring onto other candies or smudging your carefully drawn details. Lay them out on a sheet of parchment paper or a clean, dry tray for a few minutes until the ink is fully set before gathering them.
Storage Of Easy Homemade Edible Candy Eyes
Proper storage ensures your candy eyes remain perfect and ready for action:
Room Temperature is Best: Store your finished candy eyes in an airtight container, such as a Ziploc bag or a covered jar, at room temperature. Kept this way, they will maintain their quality and spooky charm for up to 1 month. Ensure they are kept away from direct sunlight or excessive heat, which can cause the candies to melt or the colors to fade.
Avoid Freezing Them: I strongly advise against freezing these candy eyes. The main reason is condensation. As the frozen candies thaw, moisture will form on their surface, causing the edible marker ink to smear, run, and ultimately come off. This will ruin the detailed artwork and the overall spooky effect you worked hard to achieve.
Frequently Asked Questions About Candy Eyes
- Can I use regular markers instead of edible ones? Absolutely NOT. Regular markers contain chemicals and dyes that are not safe for consumption. Always use markers specifically labeled as “edible” or “food-safe” when decorating food.
- Are these candy eyes suitable for all ages? Yes, they are generally suitable for most ages. However, as with any small candy, supervise very young children to prevent choking hazards.
- How far in advance can I make these for a party? You can make these homemade candy eyes up to one month in advance, provided they are stored properly in an airtight container at room temperature.
- Can I make different colored pupils or irises? Yes! While black is classic for pupils, you can purchase edible markers in various colors. Use a different colored marker for the inner circle (iris) before adding a smaller black pupil for a more complex eye design.
- What if my M&Ms are slightly irregular? Don’t worry about it! Slight imperfections in the candy shape or your drawing can actually add to the charm and unique character of your monster eyes. Embrace the quirkiness!
More Easy Halloween Desserts to Spook Up Your Celebration
If you loved making these candy eyes, you’ll adore these other simple and fun Halloween dessert recipes:
- Easy Spider Cake {Spider Web Cake}
- Easy Candy Corn Cake {With Frosting}
- Easy Mummy Cake {Halloween Cake}
- Oreo Spider Cookies {No Bake}
Recipe for Homemade Candy Eyes (Eyeballs)

Homemade Candy Eyes (Eyeballs)
Abeer Rizvi
Pin Recipe
Want to Save This Recipe?
Enter your email & I’ll send it to your inbox. Plus, get great new recipes from me every week!
By submitting this form, you consent to receive emails from CakeWhiz
Ingredients
- 1 cup M&M candies Orange, yellow and green colors recommended for spooky theme, but any colors work!
- 1 Black Edible Marker Fine tip recommended for precision.
Instructions
-
Sort Candies: From a large bag of M&M candies, sort out the orange, yellow, and green ones. These colors are traditionally best for a spooky Halloween vibe, but feel free to use any colors you like for different monster looks!
-
Draw Eyes: Using a black edible marker (a fine tip works best for details), draw a medium-sized circle in the center of each M&M to create the pupil. Then, draw small “squiggly” lines radiating out from the pupil to give the candy eyes a fun, slightly eerie, or bloodshot appearance.
-
Dry and Enjoy: Allow the candies to air-dry at room temperature for a few minutes (on parchment paper if possible) to prevent smudging. Once dry, place them in a small container, or immediately use them to decorate your favorite Halloween cakes, cupcakes, cookies, or other treats. Enjoy the spooky fun!
Notes
- Be sure to read all the detailed tips and variations mentioned above in the article for best results and more creative ideas.
- Leftover candy eyes can be stored in an airtight Ziploc bag or a covered jar at room temperature for up to 1 month. Do not freeze.
- For traditional white eyeballs, look for seasonal white M&Ms or other plain white round candies.
- Experiment with different round candies like gumballs, Sixlets, or Reese’s Pieces for varied sizes and flavors.
Nutrition
An automated tool is used to calculate the nutritional information. As such, I cannot guarantee the accuracy of the nutritional information provided for any recipe on this site. This information is provided for general guidance only.
These homemade candy eyes are truly a game-changer for Halloween entertaining. They prove that you don’t need complex baking skills or expensive ingredients to create memorable and fun holiday treats. With just a bag of M&Ms, an edible marker, and a few minutes of your time, you can add a touch of playful spookiness to everything from simple cookies to elaborate cakes. So, gather your little monsters, unleash your creativity, and get ready to bring your Halloween desserts to life with these irresistible edible eyeballs!
Don’t forget to share your amazing creations with us on social media using #CandyEyes and tagging @cakewhiz. Happy Halloween baking!
