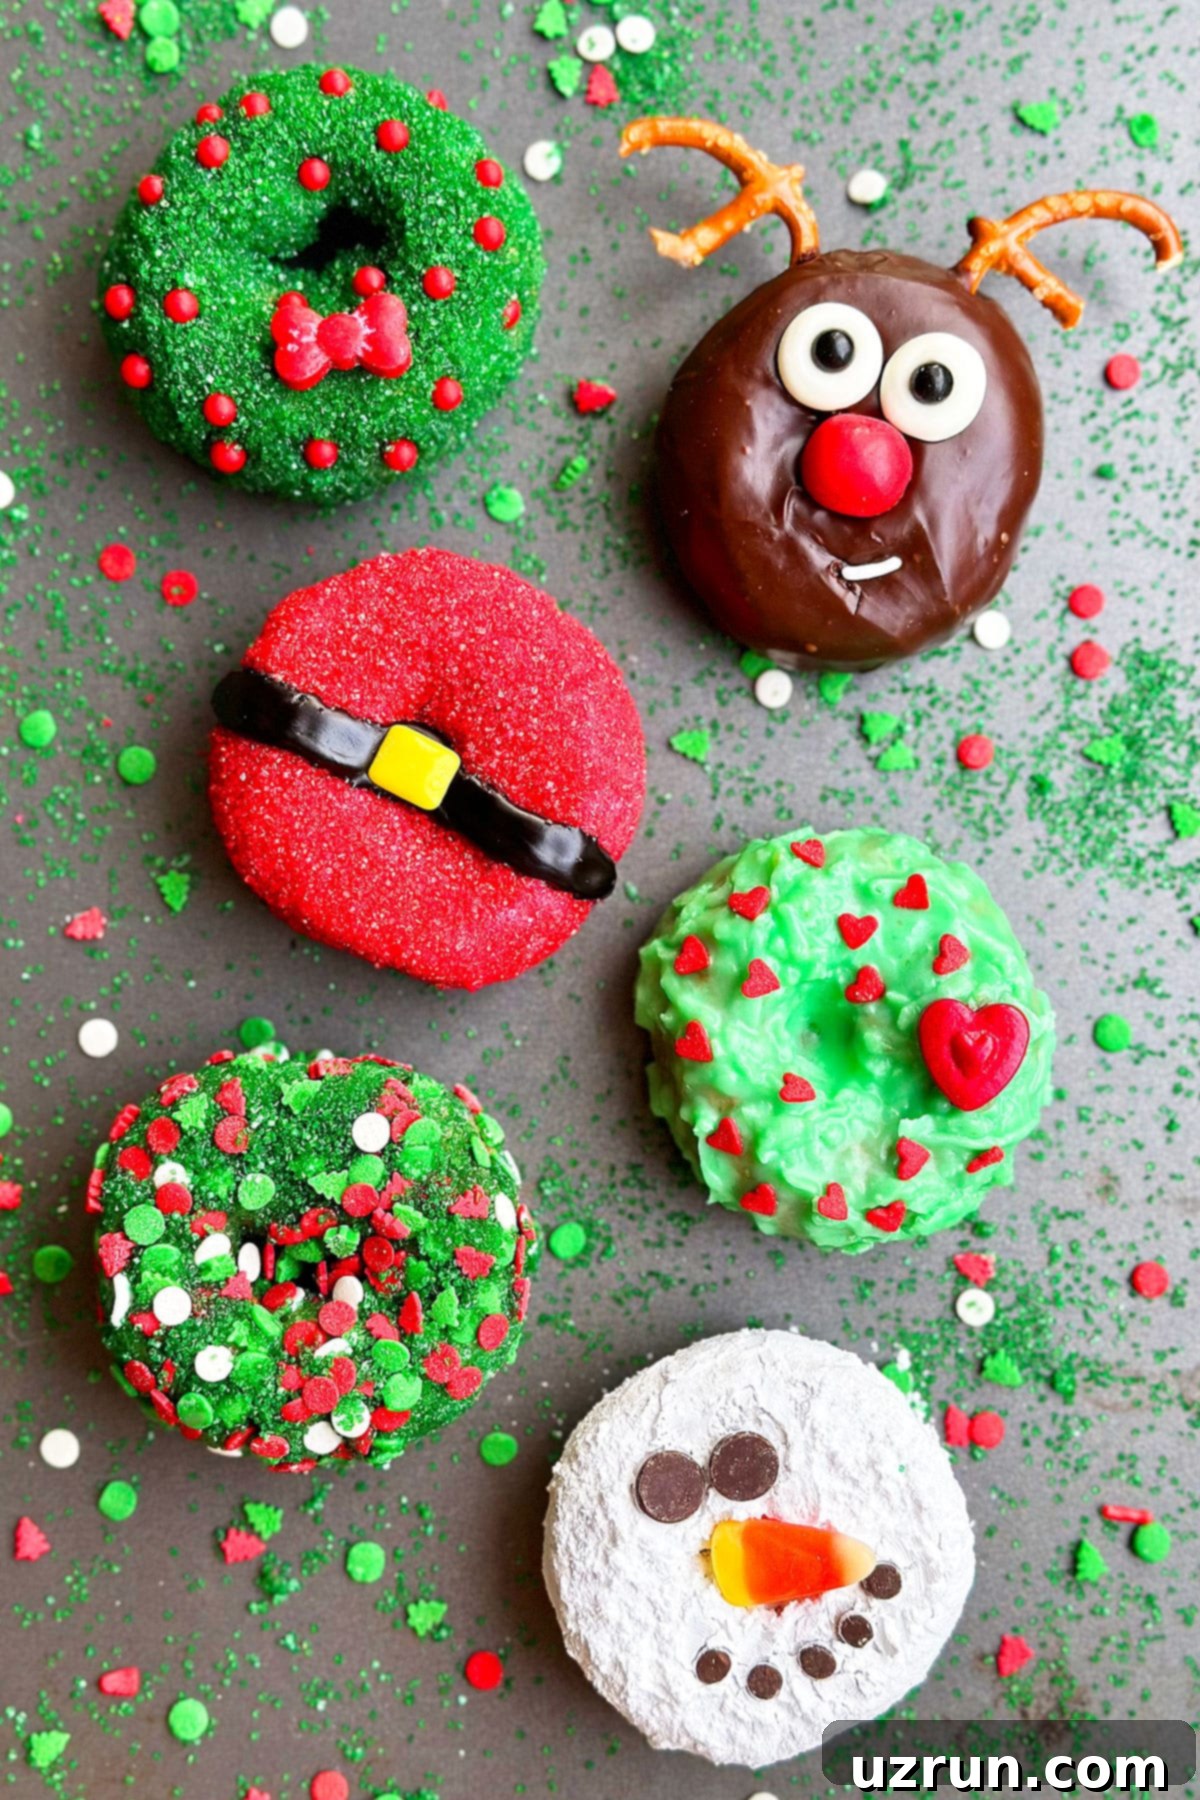
Easy Homemade Christmas Donuts: Festive Designs for a Magical Holiday Season
Get ready to sprinkle some holiday magic with these incredibly quick and easy Christmas donuts! Whether you’re a seasoned baker or just starting, these homemade delights are crafted with simple ingredients and can be decorated in countless ways to embody the spirit of the season. Imagine transforming a plain donut into a cheerful snowman, a festive reindeer, a beautiful wreath, a jolly Santa, or even the mischievous Grinch!
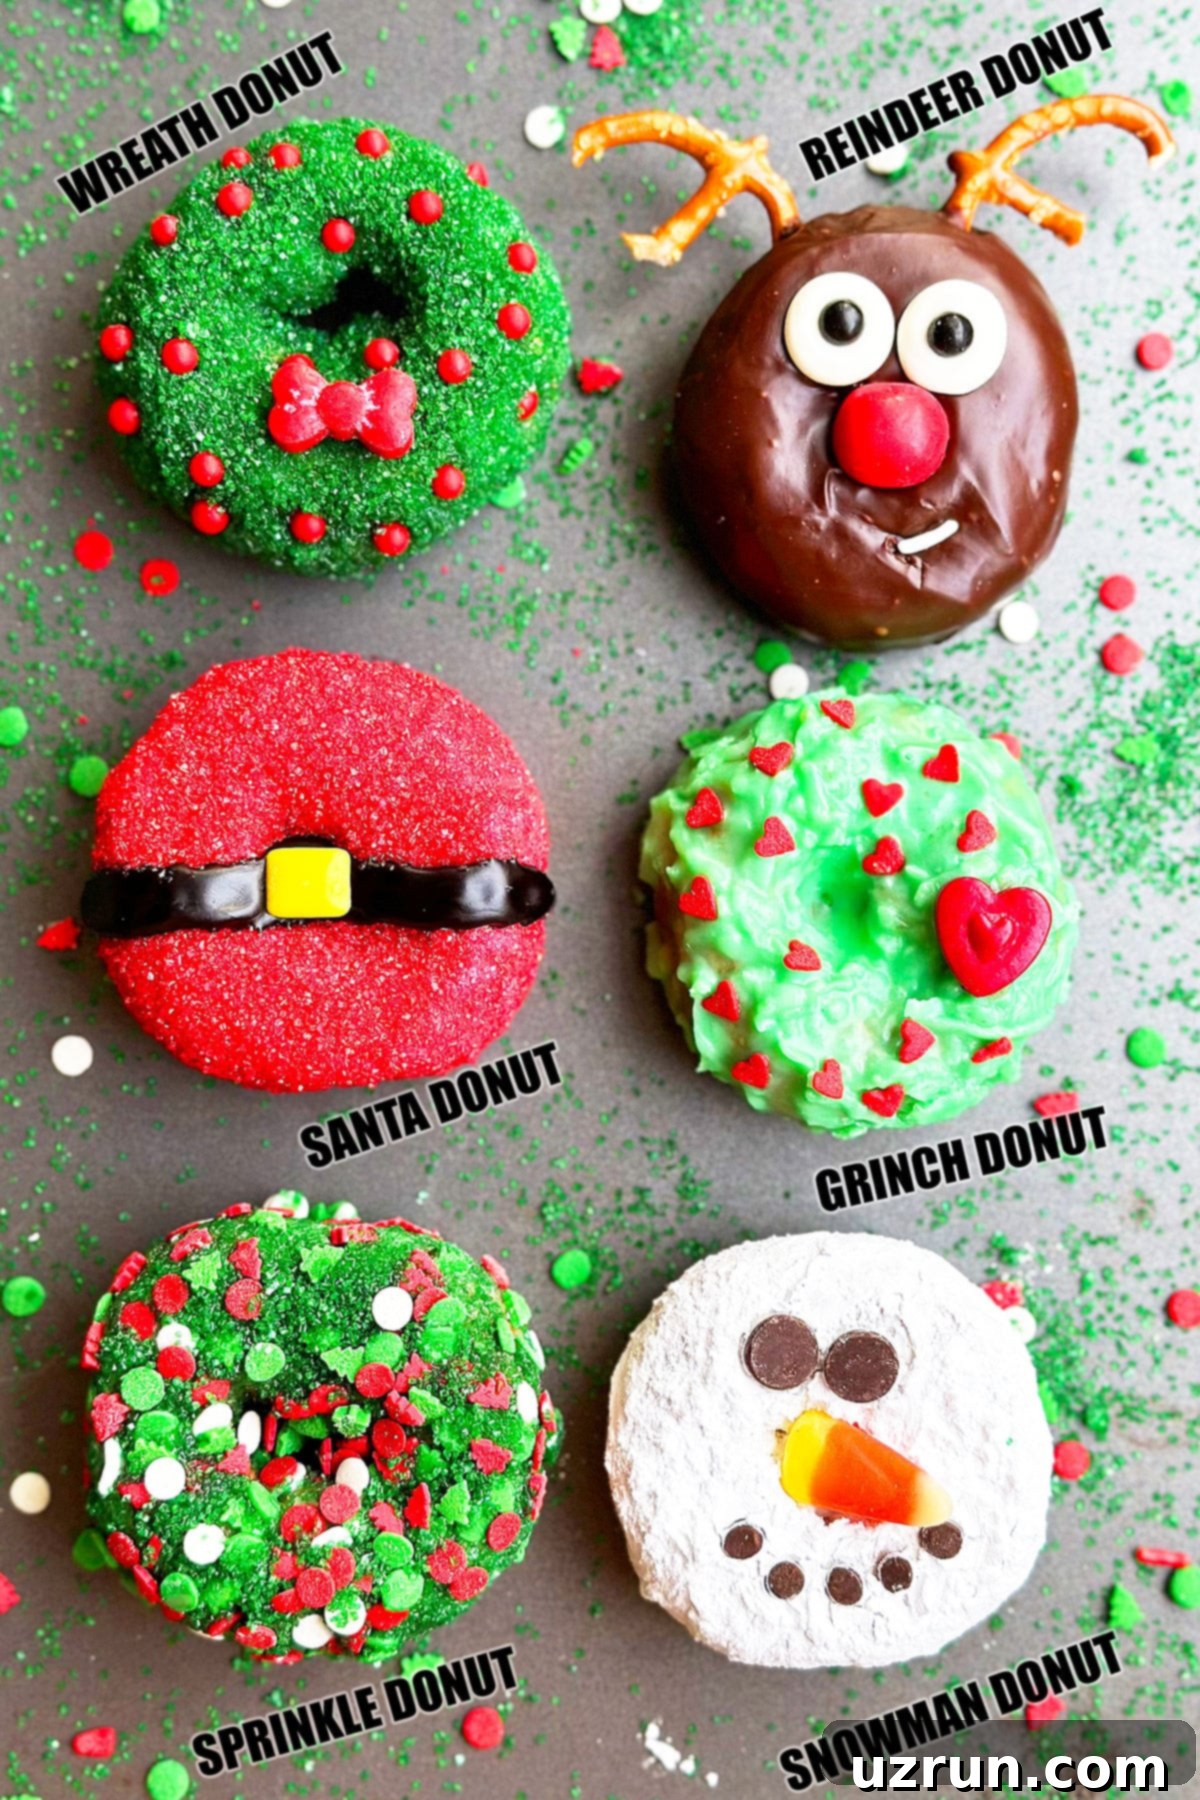
The holiday season is synonymous with delicious treats and festive cheer. Major donut chains like Dunkin’ and Krispy Kreme always roll out their best holiday flavors and intricate designs, inspiring many home bakers to recreate that magic. This year, why not bring that festive creativity into your own kitchen? Making your own decorated donuts is a wonderfully fun and easy way to celebrate Christmas and other special occasions. It’s a fantastic activity for families, a charming gift for friends, or just a delightful treat to enjoy with a cup of hot cocoa during those cozy winter evenings.
The joy of these Christmas donuts lies in their versatility and the sheer delight of personalizing each one. They’re more than just a dessert; they’re a canvas for holiday expression! You can tailor them to any Christmas theme or character, making them perfect for school parties, office gatherings, or a sweet addition to your Christmas morning breakfast spread. Beyond Christmas, donuts are perfect for any festive event. If you love experimenting with themed donuts, be sure to check out some of my other fun donut recipes for upcoming events, including my Baked Pumpkin Donuts for Fall, Jelly Filled Donuts for a classic indulgence, Apple Cider Donuts for autumn vibes, Halloween Monster Donuts for spooky fun, and even Pikachu (Pokemon Donuts) for a pop culture twist.
Table of contents
- Key Ingredients for Festive Christmas Donuts
- Creative Variations for Your Christmas Donuts
- How to Make the Best Easy Christmas Donuts
- Jolly Santa Donuts
- Rudolph the Red-Nosed Reindeer Donuts
- Festive Christmas Wreath Donuts
- Charming Snowman Donuts
- Grinch Donuts: A Whimsical Holiday Treat
- Essential Tips and Techniques for Donut Decorating
- Storing Your Christmas Donuts
- Christmas Donut Recipe FAQs
- More Delicious Christmas Desserts
Key Ingredients for Festive Christmas Donuts
Crafting these delightful Christmas donuts is all about combining simple base ingredients with a vibrant array of decorations. Here’s a breakdown of what you’ll need to create your edible masterpieces, turning ordinary donuts into extraordinary holiday treats:
- Donuts: The fundamental base of our festive treats! You have the flexibility to either bake or fry your donuts from scratch for that authentic homemade taste and aroma, or to save valuable time during the busy holiday season, opt for good quality plain, unglazed store-bought donuts. Ensuring they are unglazed is key, as it provides a clean canvas for your custom glazes and vibrant toppings.
- Assorted Candies: This is truly where the imaginative fun begins! Gather a wide variety of small candies that evoke Christmas cheer. Think classic red gum balls perfect for Rudolph’s glowing nose, versatile candy eyes that instantly bring characters to life, and charming bow candies that add an elegant touch to wreaths. Don’t limit yourself – explore options like mini marshmallows for snow, small licorice for fine details, or even chocolate-covered pretzels for structural elements.
- Various Sprinkles: Sprinkles are essential for adding dazzling texture and sparkle to your holiday donuts. Stock up on vibrant red and green sanding sugar for glittering coatings, elegant sugar pearls for a sophisticated touch, and a diverse mix of Christmas-themed sprinkles in various festive shapes like stars, trees, and snowflakes. Feel free to mix and match different types and colors to achieve truly unique and eye-catching effects.
- Food Coloring: A crucial component for transforming plain glazes and icings into a kaleidoscope of holiday colors. Gel food coloring is highly recommended as it provides the most vibrant and concentrated colors without significantly thinning out the consistency of your glazes, ensuring a rich, deep hue for your Grinch green or Santa red.
- Powdered Sugar: This fine, sweet powder is a versatile ingredient, used for both decorative dusting and for achieving the perfect smooth consistency in your glazes and icings. It’s ideal for creating a delicate, snowy finish on your snowman donuts or for thickening a glaze to the desired spreadable texture.
- Chocolate Chips: Keep both mini and regular-sized chocolate chips on hand. Mini chips are incredibly useful for intricate details like mouths or buttons on a snowman, providing fine accents. Regular-sized chips can form larger features like expressive eyes or, when melted, add a rich, decadent chocolatey flavor to glazes and ganache.
- Vanilla Glaze: A foundational, classic, and incredibly versatile glaze. It’s simply made by combining powdered sugar, a touch of milk (or water), and a splash of pure vanilla extract. This creates a smooth, quick-setting base that is perfect for many decorations and can be effortlessly tinted with various food colorings.
- Chocolate Ganache: A luxurious and rich coating, created from a simple combination of chocolate chips and warm heavy cream. It produces a glossy, decadent finish that is absolutely perfect for Rudolph the Reindeer donuts, hardening to a smooth and appealing texture.
- Black Icing: Essential for adding striking details and outlines. You can either make it from scratch by incorporating black food coloring into a simple powdered sugar icing, or for convenience, purchase a tube of ready-made black icing from your local grocery or craft store. It’s vital for elements like Santa’s belt, snowman eyes, or intricate piping.
- Shredded Coconut: This ingredient adds a fantastic textural element, providing a wonderful “snowy” or “furry” effect, particularly effective for the Grinch donuts. You can adjust the amount used according to your personal preference, from a subtle hint to a more pronounced coconut flavor and appearance.
- Pretzel Twists: These salty snacks offer a surprising and creative solution for edible decorations. They are absolutely perfect for crafting realistic and sturdy antlers for your reindeer donuts. Just ensure you specifically use the twisted variety, not the straight pretzel sticks, to achieve the ideal antler shape.
Creative Variations for Your Christmas Donuts
The beauty of decorating Christmas donuts lies in the endless possibilities for creativity and customization. Don’t feel limited to the specific designs shown; let these ideas spark your imagination and encourage you to experiment with new festive creations!
- Make them Mini-Sized: Mini donuts are absolutely adorable and incredibly easy for little hands to handle, making them a perfect addition to children’s parties, school events, or as part of a varied holiday dessert platter. You can use a mini donut pan for baking smaller versions from scratch, or simply purchase plain mini donuts from your local bakery. All the same decorating techniques apply, just on a more delightful, bite-sized scale!
- Experiment with Other Candies: The holiday season brings an abundance of themed candies to store aisles, providing a treasure trove of decorating potential. Look for items like mini candy canes, crushed peppermints, red and green M&Ms, small gingerbread cookie cutouts, or even edible glitter. Don’t be afraid to mix and match different textures, shapes, and flavors to create truly unique and personalized donut characters.
- Explore More Sprinkle Options: Sprinkles are your best friend when it comes to adding instant festive flair and sparkle. Beyond the classic sanding sugar and sugar pearls, seek out specialized Christmas sprinkle mixes, edible metallic stars, intricate snowflake sprinkles, or even silver and gold dragees for a touch of elegance and glamor. Get creative with layering different types for a multi-dimensional, eye-catching look.
- Try Different Glaze/Frosting Flavors: While vanilla and chocolate glazes are delicious staples, the holiday season is an excellent time to infuse festive flavors directly into your donut coatings. The glazes included in the recipe card are reliable and yield great results, but you can certainly experiment! Consider using my Red Frosting for a bold, vibrant base, a zesty Lemon Glaze for a bright and tangy contrast, a refreshing Easy Mint Frosting for a cool, wintery taste, or a rich Chocolate Ganache Frosting for an extra layer of decadence.
- Design a Santa or Elf Face: For a more detailed character donut, start by coating the donut with a base of melted white chocolate or milk chocolate. Once set, use finely piped colored icing and small candies to meticulously create the facial features of an elf or Santa. For Santa, mini dehydrated marshmallows can make a fluffy, realistic beard, while thin strips of fruit by the foot can be shaped into a distinctive red hat atop his head. Edible markers can also add fine details like rosy cheeks or a twinkle in the eye, bringing your characters to life.
- Create a Larger Christmas Tree Donut Display: This impressive display is perfect for a holiday centerpiece and makes for a fantastic conversation starter! Frost a dozen or more donuts entirely in vibrant green glaze, then sprinkle them with small, colorful round candies to represent festive Christmas lights. Arrange these green “ornamented” donuts artfully in the shape of a Christmas tree on a large platter or cutting board. It’s a fantastic pull-apart treat, much like a cupcake cake, making it easy and fun for guests to grab and enjoy.
- Build a Triple Snowman Donut Stack: Take your snowman design to the next level by combining three snowman donuts into a delightful stack. Secure them one on top of the other with a small dab of icing if needed to prevent them from sliding. Keep the bottom two donuts plain white, perhaps lightly dusted with powdered sugar, and focus all your decorating efforts on the top tier to create the snowman’s cheerful face (complete with eyes, a carrot nose, and a button mouth). This creates a whimsical, towering treat that’s sure to impress!
- Experiment with Icing Piping: After dipping your donuts in a single color glaze, get creative with piping different colored icings onto the surface. Use a fine tip to draw a whimsical, squiggly Christmas tree shape in the center of a donut, create intricate snowflake patterns that shimmer, or pipe a classic red and green plaid pattern for a cozy, festive feel. Food coloring pens can also be used for adding delicate, intricate details and personalized messages.
How to Make the Best Easy Christmas Donuts
Crafting these festive Christmas donuts is a simple and enjoyable process, perfect for bakers of all skill levels. The general method involves three main steps, which you’ll then customize for each unique holiday character. Get ready to transform plain donuts into adorable edible art with minimal effort and maximum fun!
- Prepare Your Donuts: First and foremost, ensure your donuts are completely cooled if you’ve baked or fried them yourself. Any residual warmth will melt your glazes and decorations. If you’re opting for convenience with store-bought donuts, make sure they are plain and unglazed to allow for your custom glazes and decorations to truly shine through.
- Dip and Glaze: Now, select your desired base glaze – this could be a classic vanilla glaze, a rich chocolate ganache, or a custom-colored icing you’ve prepared. Gently dip each donut into the chosen glaze, ensuring an even and thorough coating. Lift the donut and allow any excess glaze to drip off back into the bowl before moving to the next step.
- Decorate with Festive Flair: This is arguably the most exciting and creative part! While the glaze is still slightly wet (but not hot to the touch), strategically place candies, sprinkles, and piped icing to bring your chosen festive designs to life. Work quickly but precisely, as glazes can set rapidly.
These are the foundational steps that will guide you. Below, you’ll find detailed, step-by-step instructions and further inspiration for creating each specific Christmas donut design, complete with visual aids to guide you through every fun stage of the decorating process.
Jolly Santa Donuts
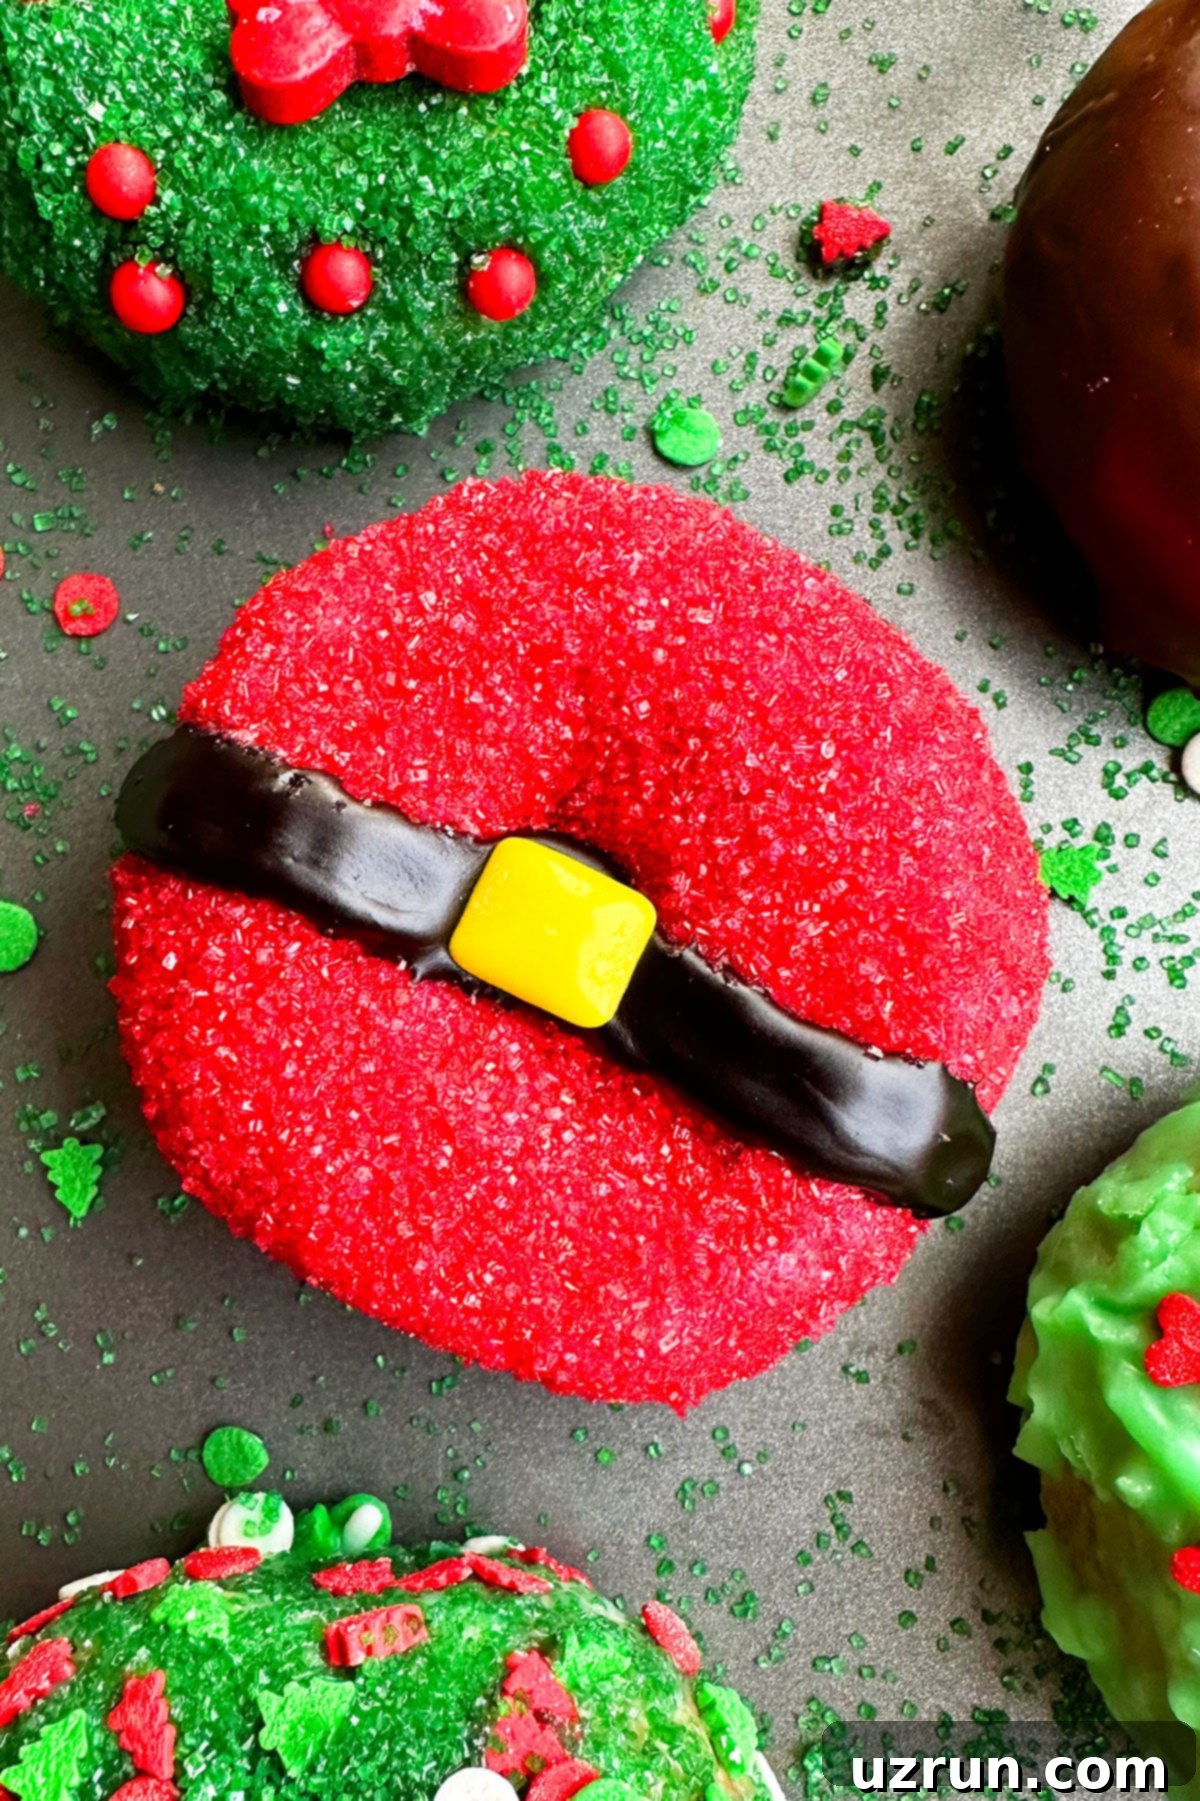
Bring the magic of the North Pole to your plate with these adorable Santa donuts! This design captures Santa’s iconic red suit and belt, making them an instant holiday favorite, especially for kids who adore the jolly old elf. They’re simple to assemble and look incredibly festive on any dessert platter.
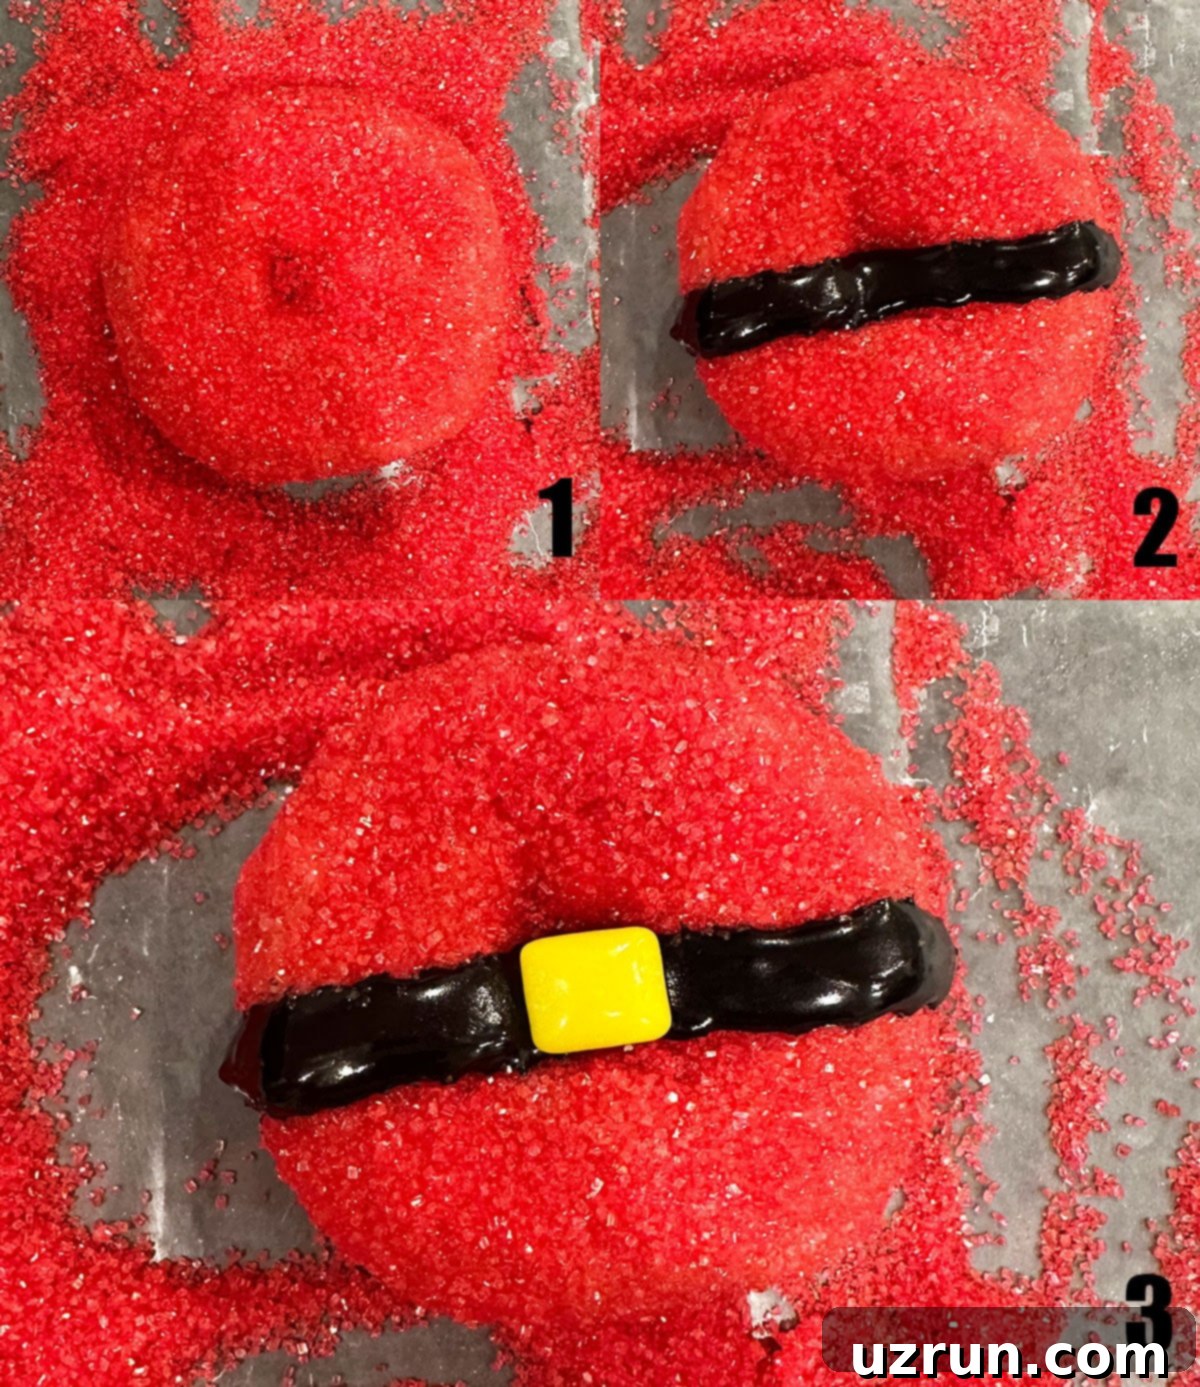
- Dip: Gently dip the entire donut into a smooth, prepared vanilla glaze, ensuring it’s fully coated from edge to edge.
- Coat Completely: Immediately after dipping, generously coat the glazed donut in vibrant red sanding sugar. This gives Santa’s suit its signature sparkling, festive red hue.
- Pipe: Using a piping bag fitted with a small round tip and filled with black icing, carefully pipe a neat, horizontal band across the center of the donut, perfectly representing Santa’s classic belt.
- Stick On: While the black icing is still slightly wet and tacky, carefully stick a yellow square candy (or a small piece of yellow fondant) directly in the center of the black band to form Santa’s iconic, gleaming belt buckle.
Rudolph the Red-Nosed Reindeer Donuts
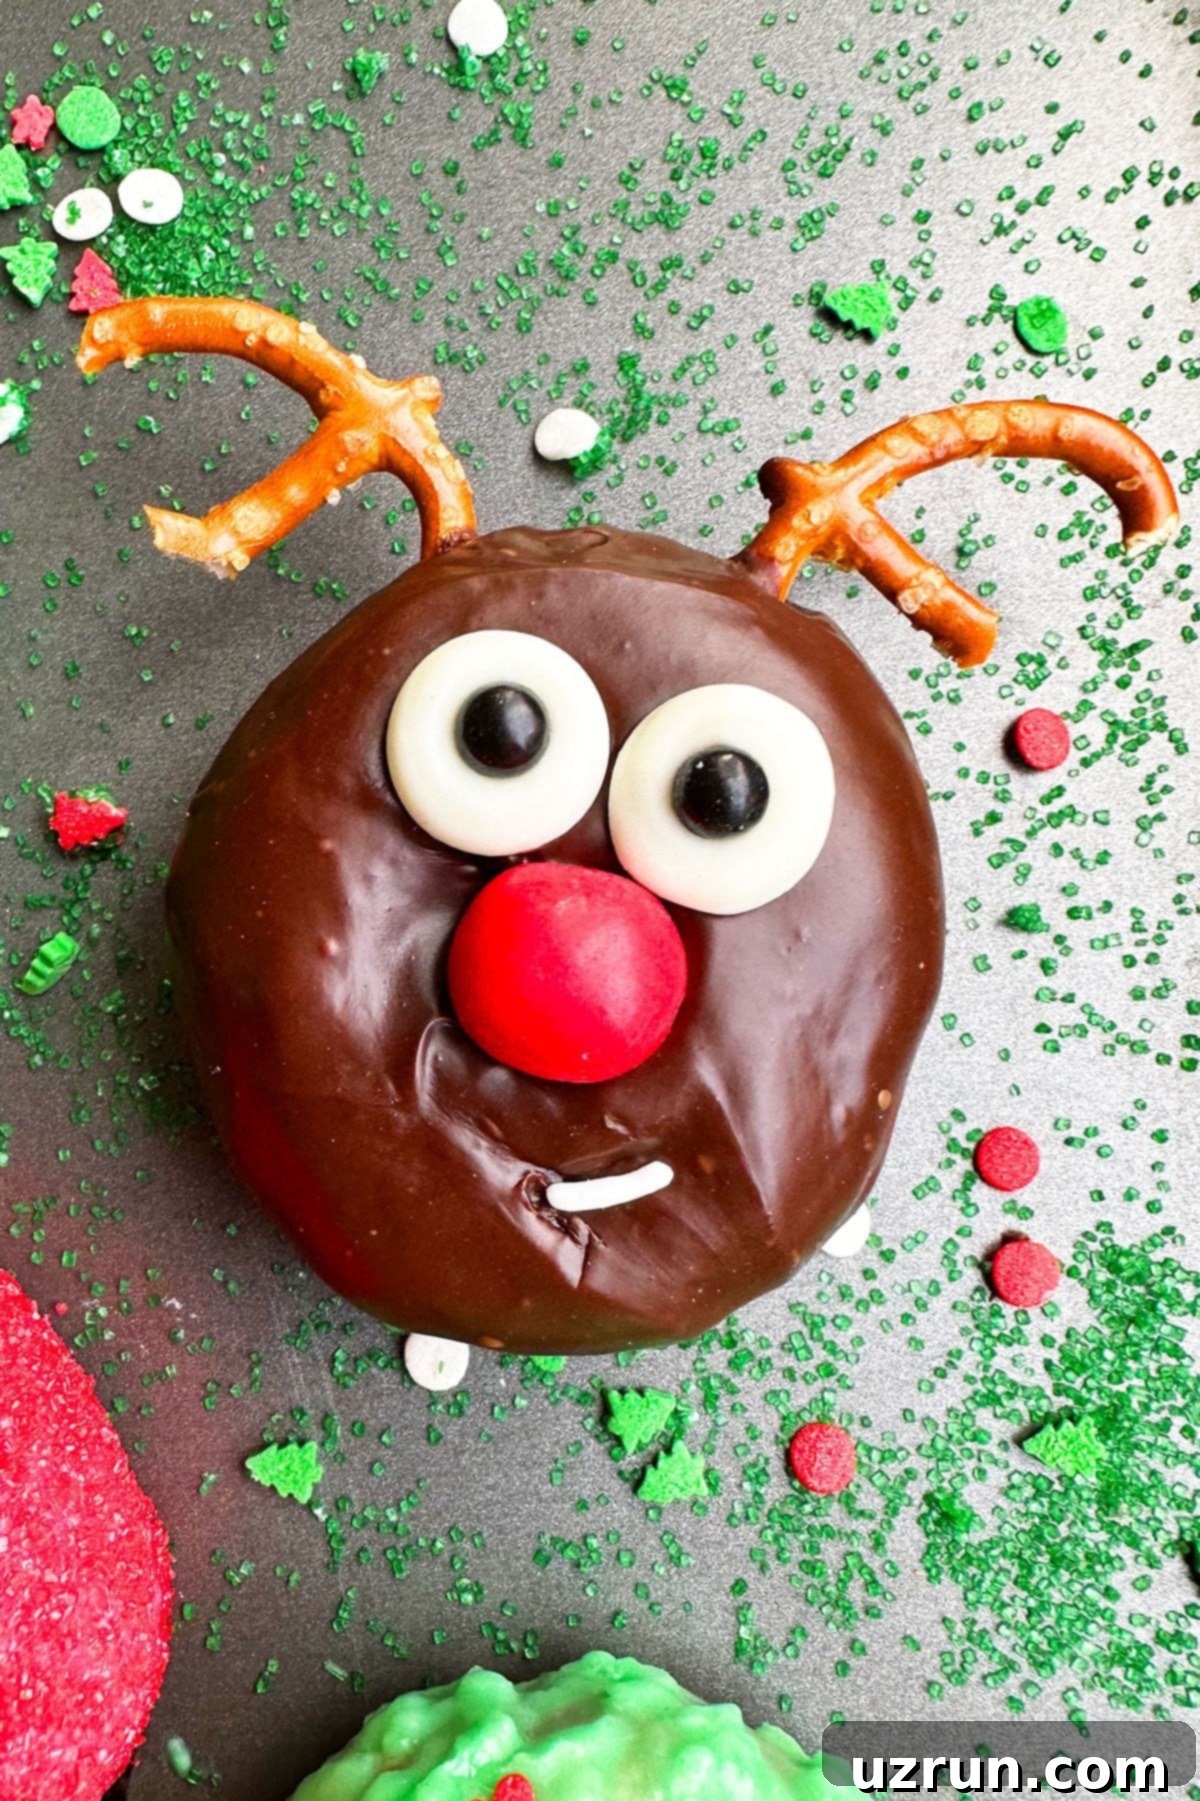
Everyone’s favorite reindeer, Rudolph, makes a charming and utterly delicious appearance as a donut! These chocolate-covered delights, complete with crunchy pretzel antlers and a bright red nose, are incredibly cute and surprisingly easy to create. They’re sure to be a hit with kids and adults alike at any holiday gathering, bringing a smile to every face.
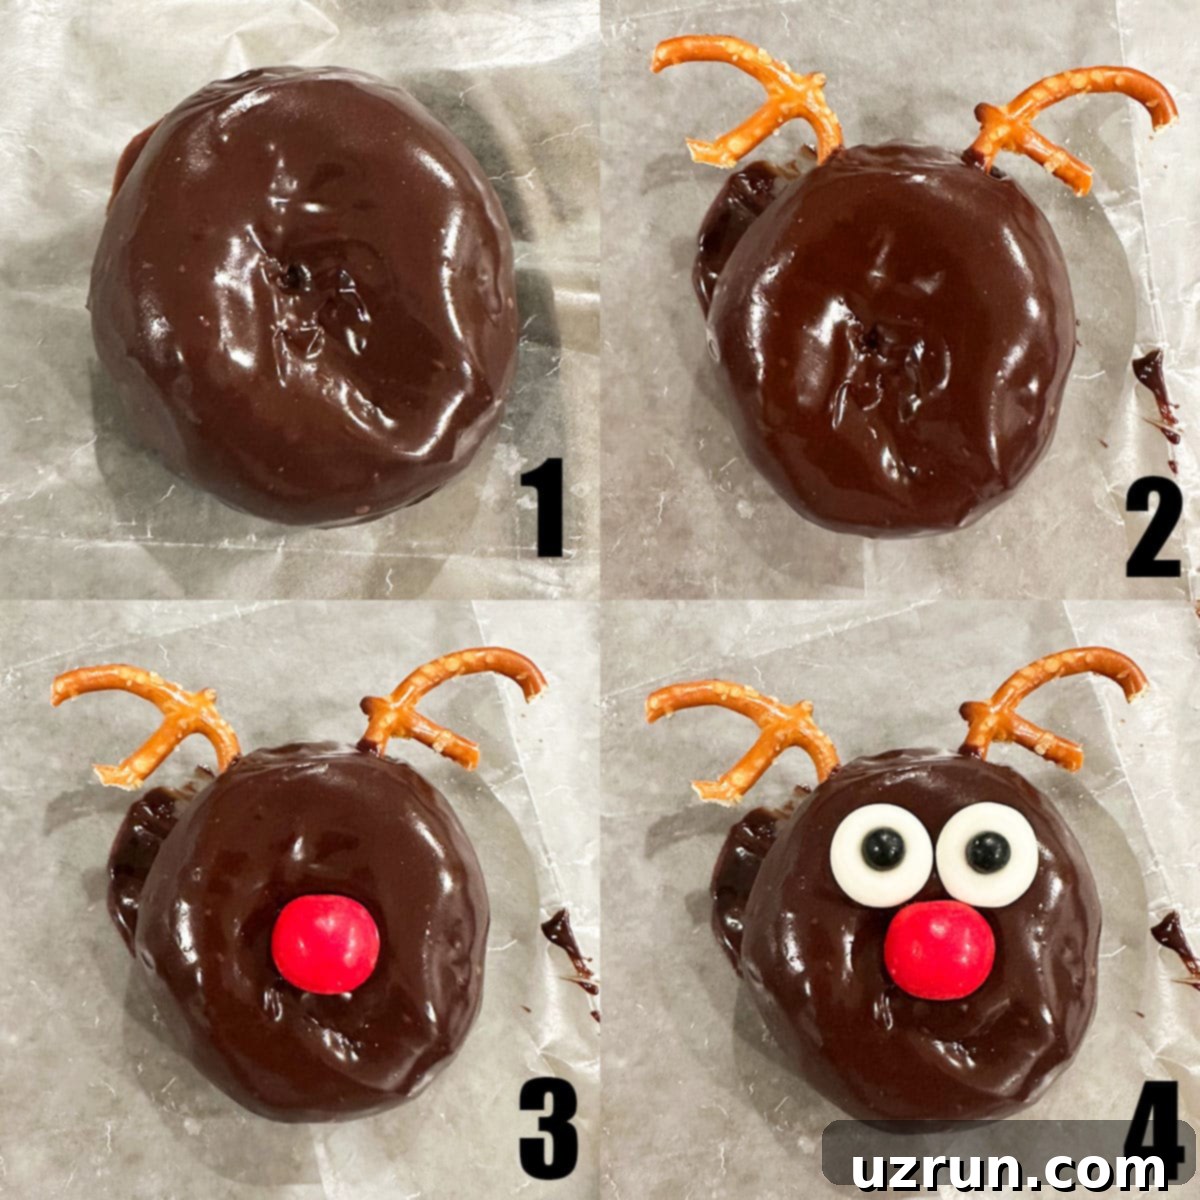
- Dip: Submerge the donut entirely in luscious chocolate ganache, ensuring a smooth, even, and rich brown coating that forms Rudolph’s warm fur.
- Stick: While the ganache is still wet and pliable, gently place two expressive candy eyes on the top portion of the donut to give your reindeer a friendly, watchful gaze.
- Break: Carefully break a pretzel twist in half. Position these two halves on either side of the top of the donut, just above where the eyes are placed, to form Rudolph’s distinctive, branch-like antlers.
- Press: Firmly press a bright, shiny red gum ball directly in the center of the donut, slightly below the eyes. This will be Rudolph’s iconic, glowing red nose, shining brightly!
- Add: Complete Rudolph’s endearing face by adding a small white jimmie sprinkle near the bottom of the donut, creating a cheerful, curved mouth.
Festive Christmas Wreath Donuts
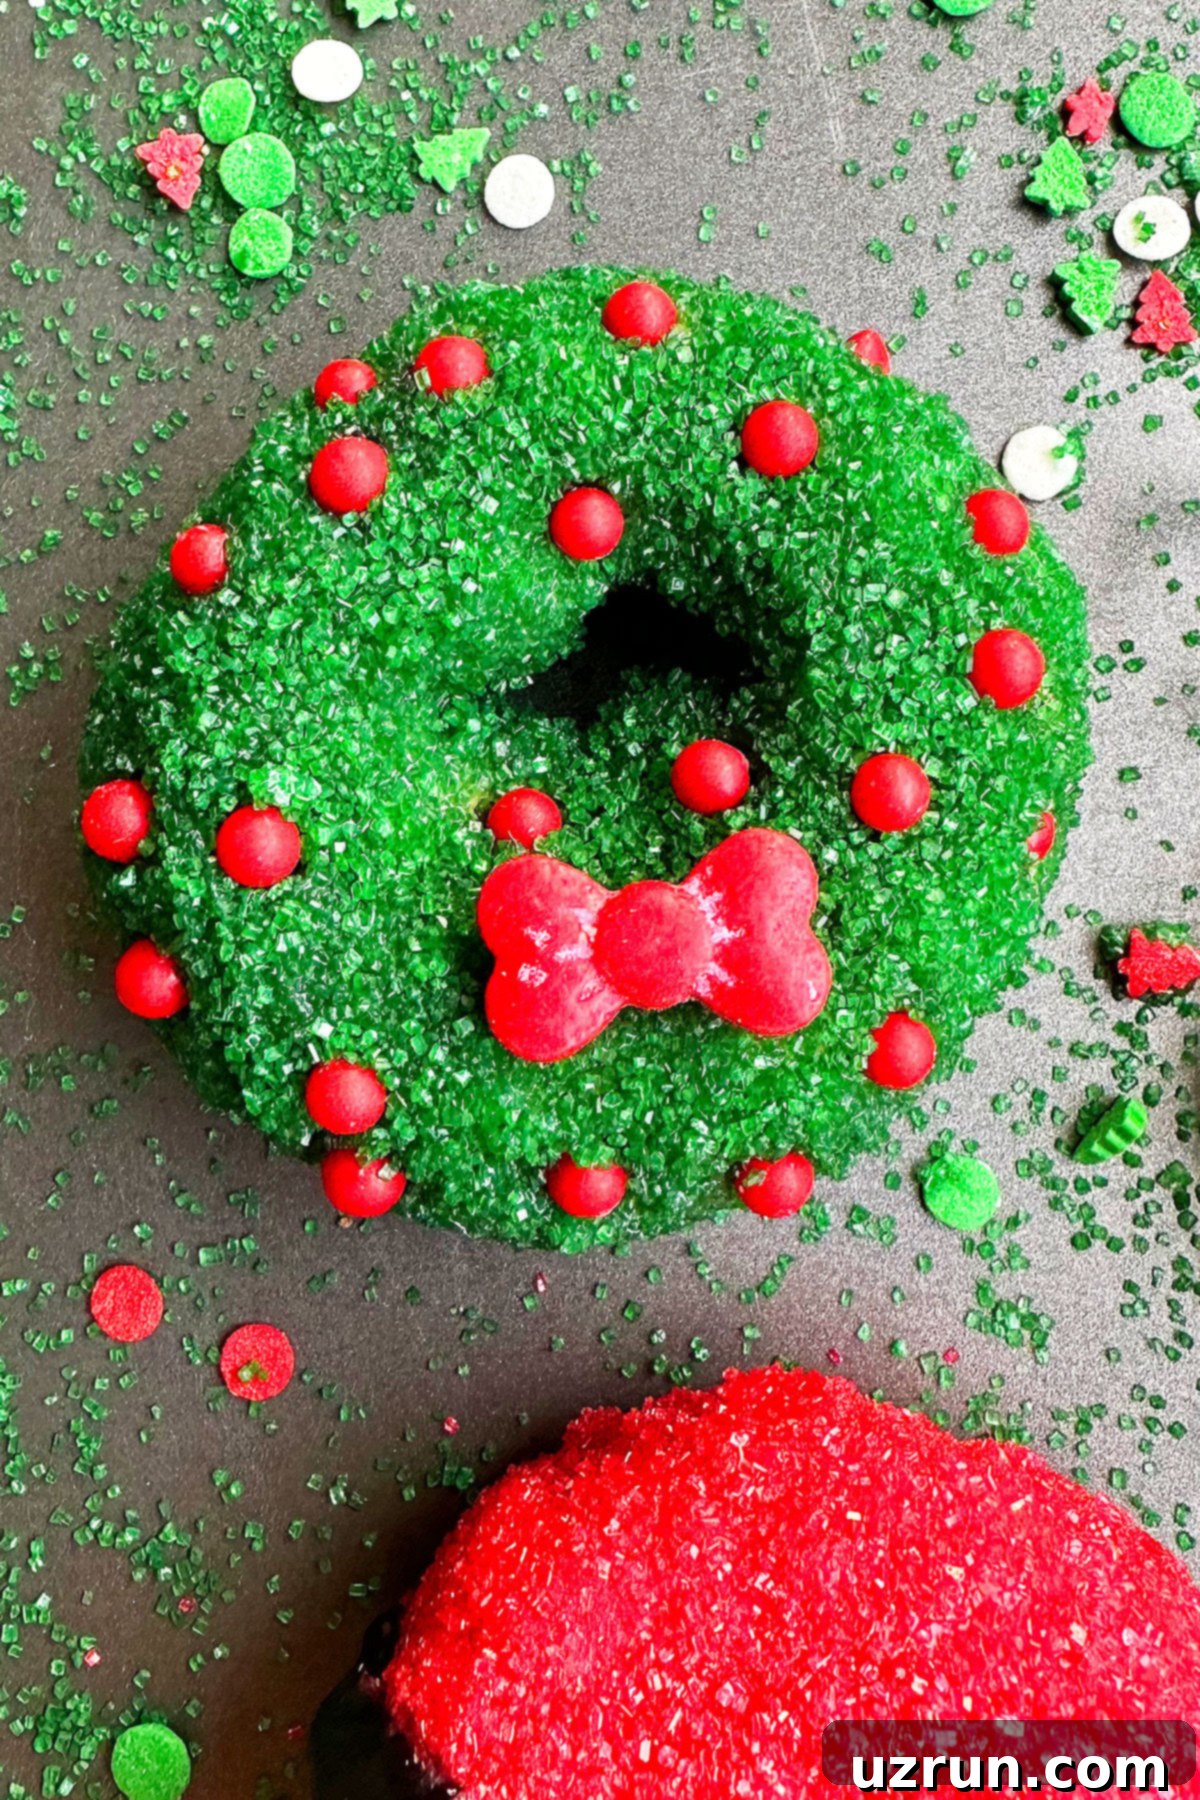
Adorn your holiday table with these elegant and symbolic Christmas wreath donuts. Representing everlasting life and holiday hospitality, these green-hued treats, beautifully dotted with glistening red “berries” and a sweet bow, are simple yet sophisticated and perfectly capture the spirit of traditional holiday decor. They are a beautiful and tasty addition to any celebration.
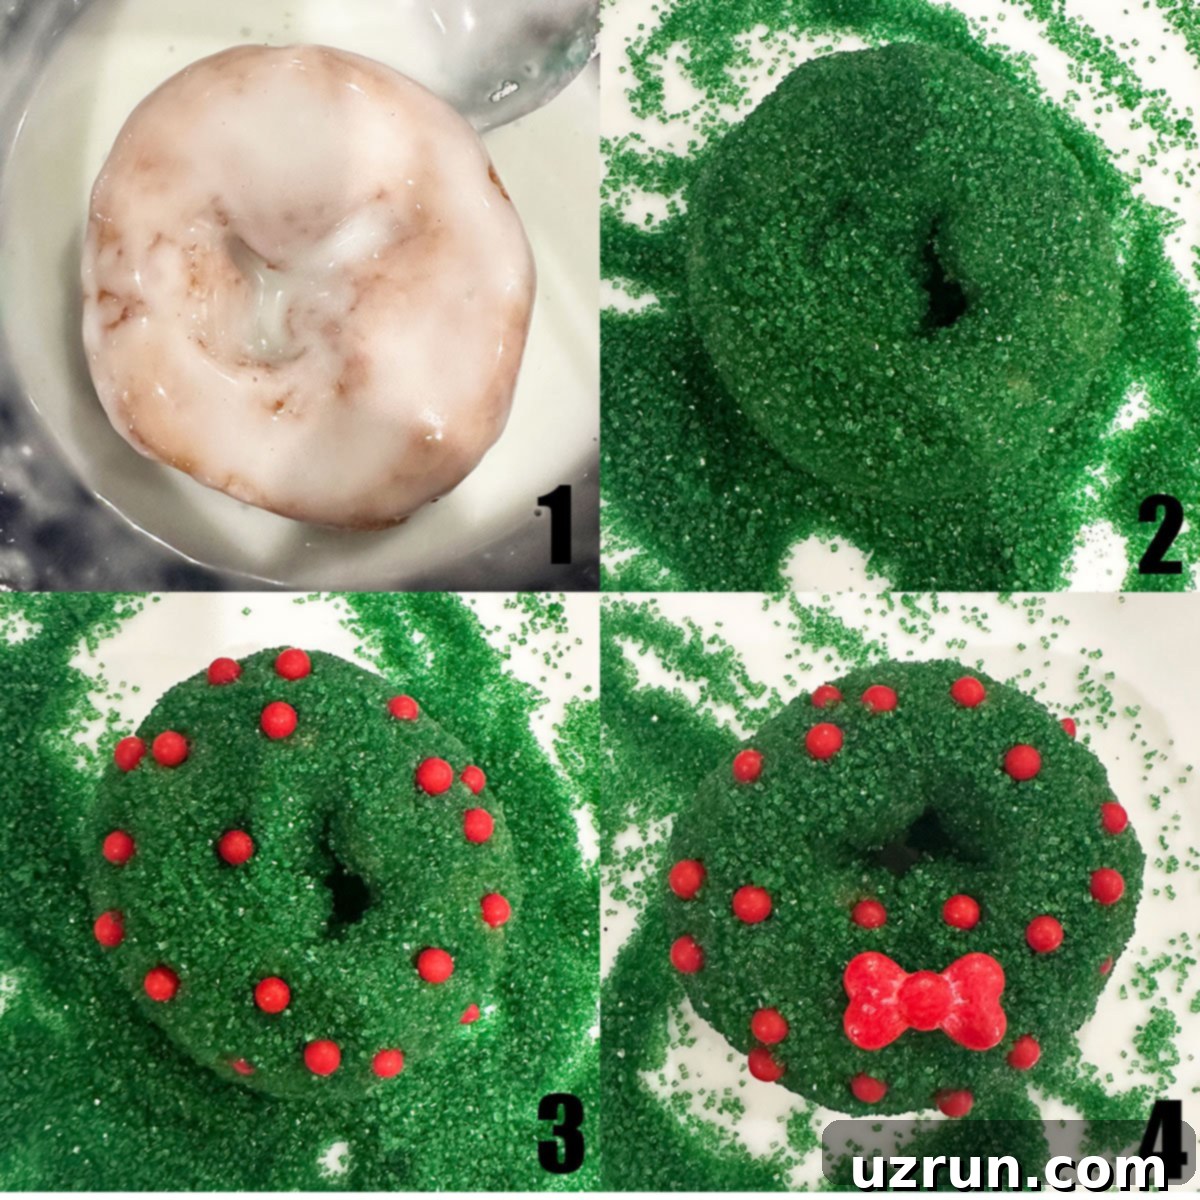
- Dip: Immerse the donut completely in a smooth vanilla glaze, ensuring an even coating that provides a clean, neutral base for the green.
- Coat: Immediately after dipping, generously coat the donut with vibrant green sanding sugar until it’s entirely covered. This creates the lush, sparkling foliage of a traditional Christmas wreath.
- Push: While the green sanding sugar is still slightly tacky and adhesive, gently push several bright red sugar pearls all over the donut. These will serve as charming, glistening “berries” that adorn your festive wreath.
- Stick: To complete the elegant wreath, gently stick a small red bow candy near the bottom of the donut. If needed, use a tiny dab of glaze or a dot of icing on the back of the bow to securely attach it in place.
Charming Snowman Donuts
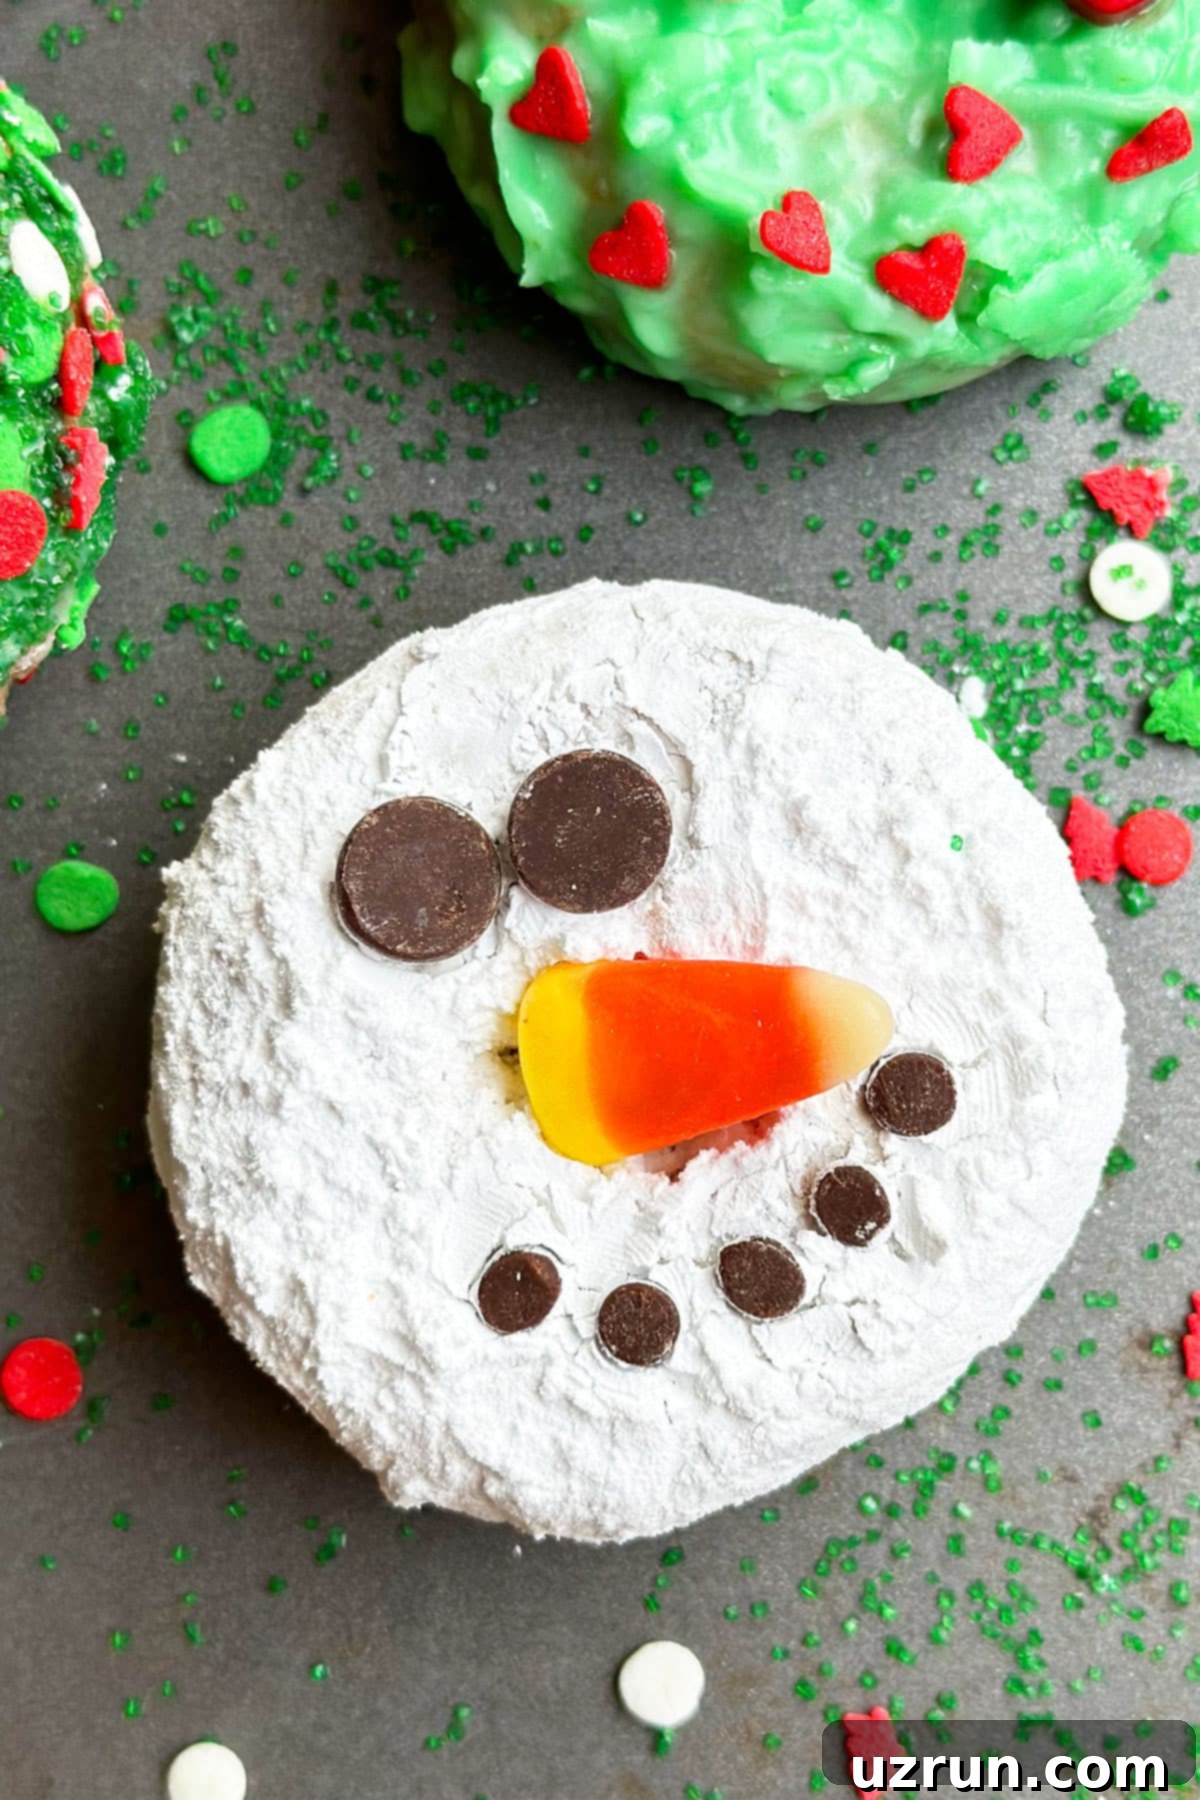
These snowman donuts are a delightful homage to winter’s favorite frosty friend. Simple, elegant, and irresistibly cute, they evoke cherished childhood memories of building snowmen on a snowy day. They are perfect for a cozy winter treat, a charming addition to a festive gathering, or as a fun activity for children. The powdered sugar gives them a lovely soft, snowy texture that feels just like fresh snow.
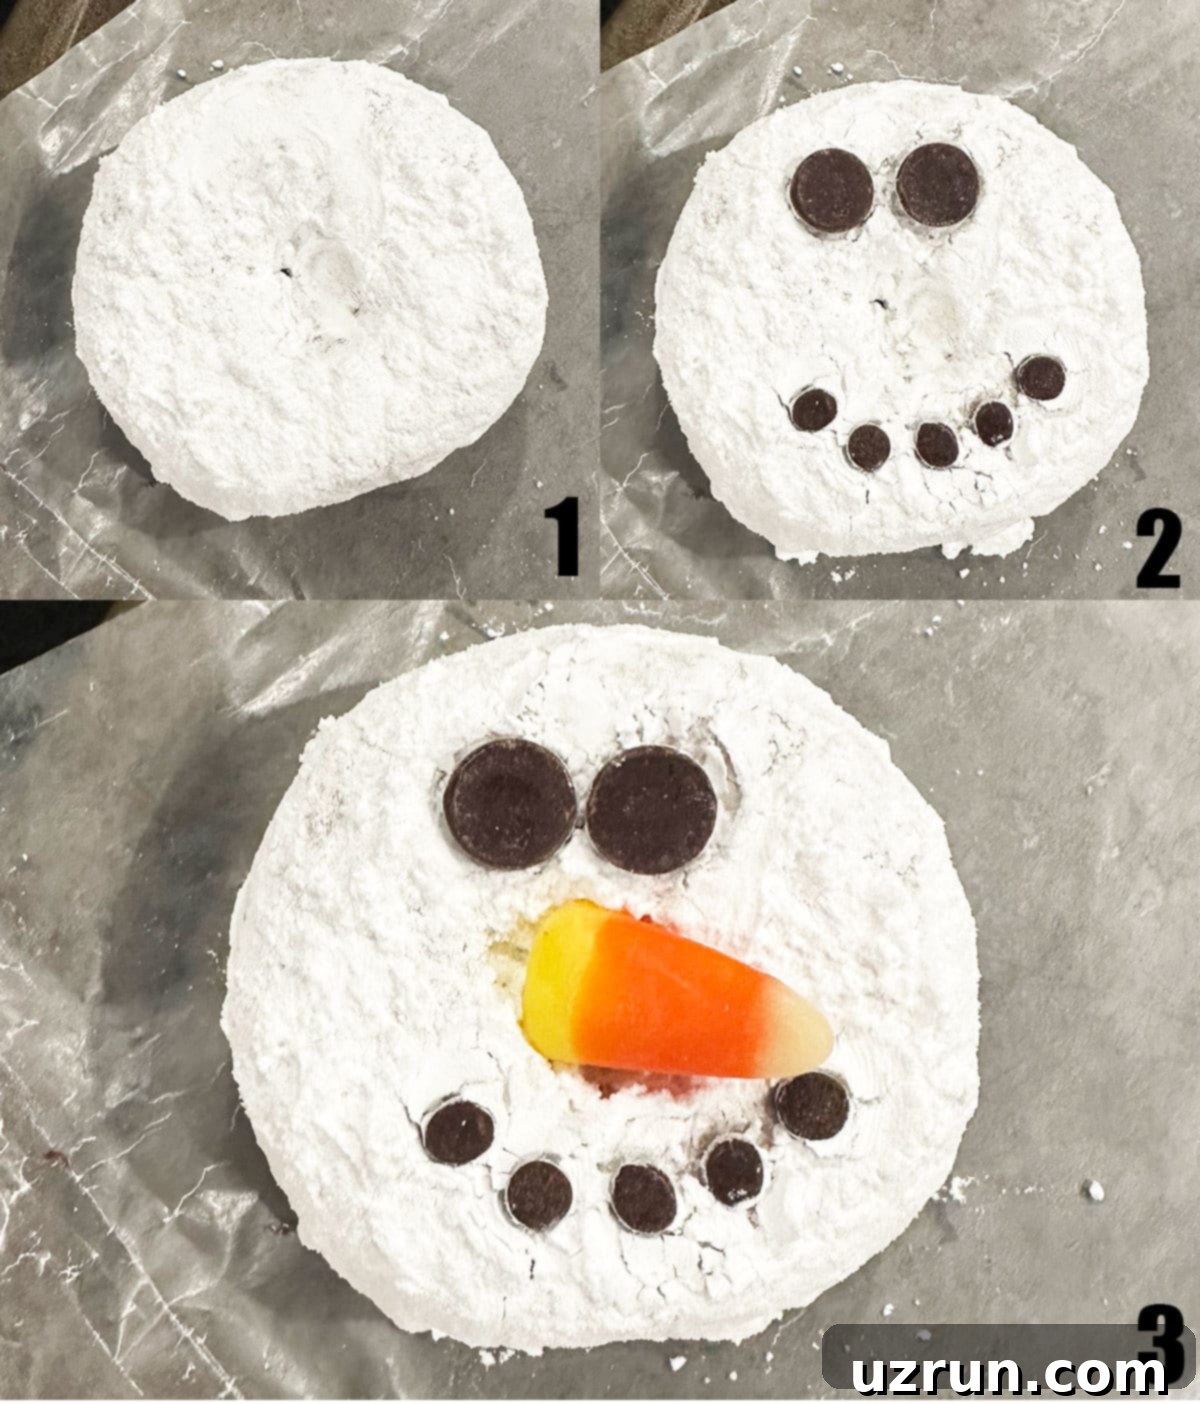
- Cover: Generously cover the entire donut in a delicate, even dusting of powdered sugar. This creates a pristine white “snow” base, essential for your friendly snowman’s body.
- Push: Carefully push two larger chocolate chips onto the top portion of the donut. Position them as the snowman’s expressive eyes, giving him a curious or happy look.
- Firmly Place: Arrange several mini chocolate chips in a cheerful, curved line near the bottom of the donut. This forms a sweet, dotted smile for the snowman’s mouth, adding to his friendly appeal.
- Press: Gently press a candy corn into the middle of the donut, positioned between the eyes and mouth. This creates the classic, pointy orange carrot nose, bringing all the snowman’s features together.
Grinch Donuts: A Whimsical Holiday Treat
Channel the mischievous yet ultimately warm-hearted spirit of the Grinch with these vibrant green donuts! Perfect for fans of the classic holiday story, these unique treats combine a fantastic textured coating with a splash of Grinch-inspired red for a truly whimsical and fun Christmas donut. The shredded coconut adds a wonderful “furry” texture that perfectly mimics the Grinch’s signature look.
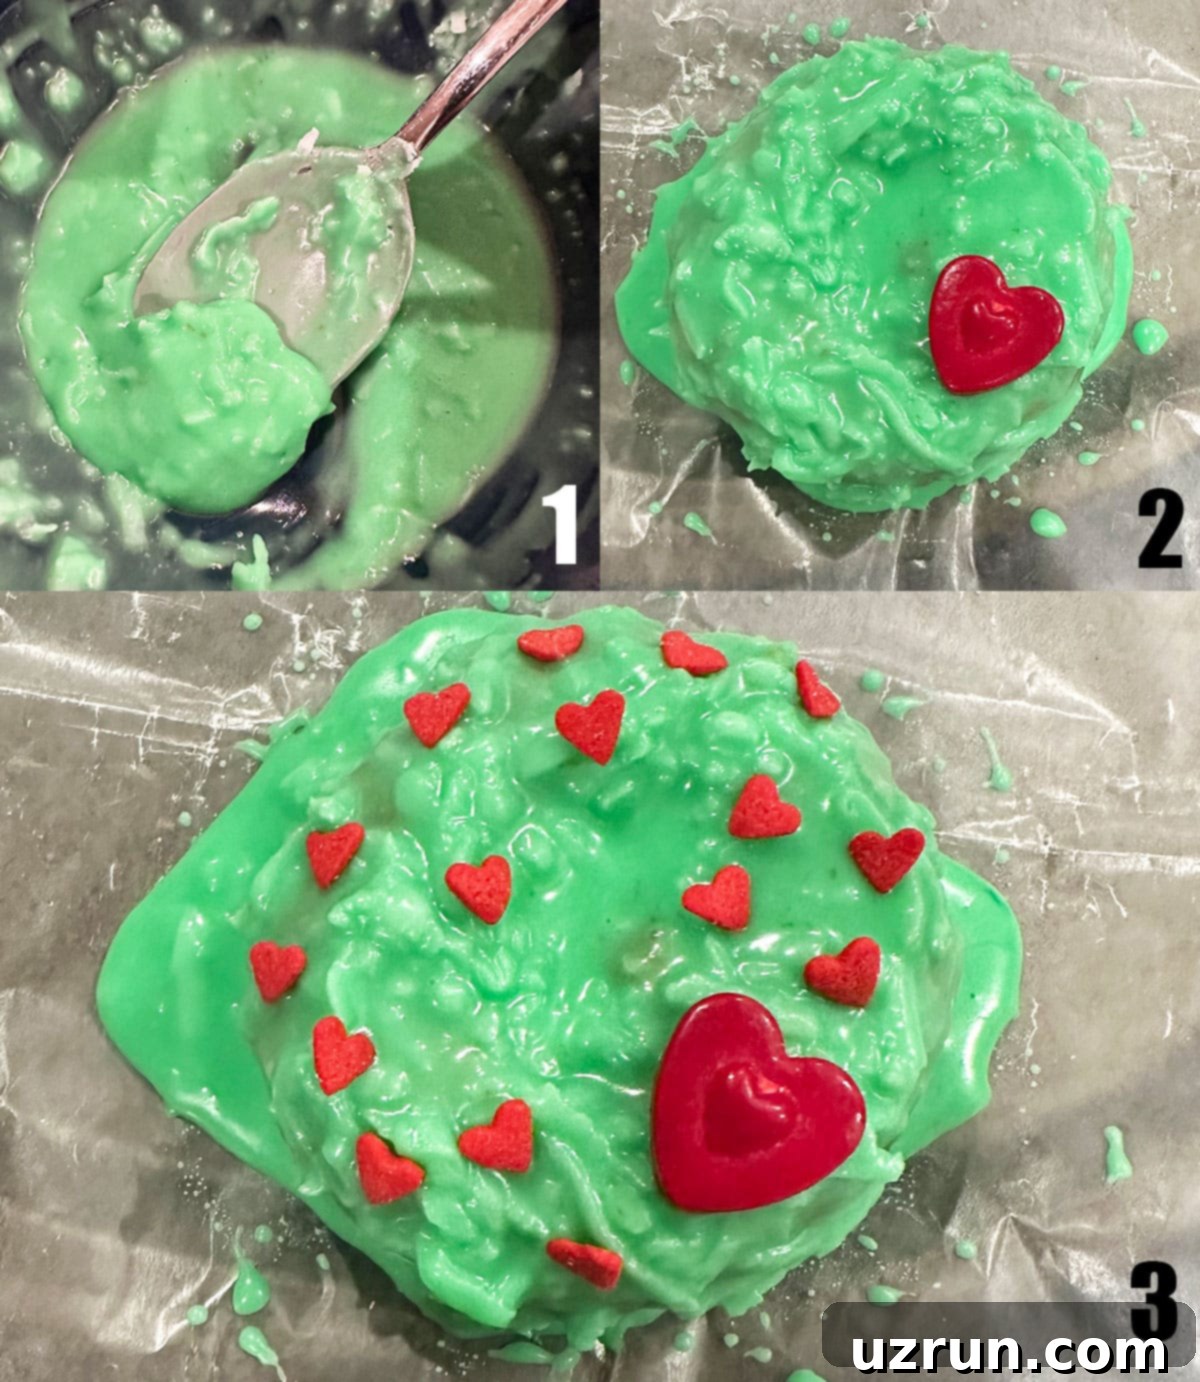
- Tint Glaze: First, prepare your vanilla glaze according to the recipe. Then, tint it a vibrant, unmistakable Grinch-green using green food coloring. Mix thoroughly until a consistent, rich color is achieved throughout the glaze.
- Mix In: Stir in a generous amount of shredded coconut into the newly green glaze. This crucial step creates the wonderful, slightly textured “fur” of the Grinch, adding both visual appeal and a subtle coconut flavor.
- Dip: Carefully dip each donut into the green coconut mixture until it’s completely covered. Ensure the shredded coconut adheres well to the glaze, creating a full, textured coating.
- Stick: While the glaze is still wet and tacky, artfully stick various red sprinkles – especially heart-shaped ones if you can find them – all over the donut. This playfully represents the Grinch’s small heart that grew three sizes, completing the whimsical transformation.
Essential Tips and Techniques for Donut Decorating
Mastering the art of donut decorating is all about a few clever tricks and careful preparation. Follow these essential tips to ensure your Christmas donuts turn out perfectly picture-worthy, delicious, and easy to create, making your holiday baking experience a joy from start to finish!
- Start with Plain Donuts for Best Results: If you’re opting for convenience with store-bought donuts rather than baking from scratch, always make sure to buy plain, unglazed varieties. This is paramount because it provides a perfectly clean canvas, allowing you to apply your chosen colored glazes and intricate icing designs without any conflicting underlying flavors or textures. A blank slate ensures your creative vision comes to life exactly as intended.
- Always Cool Donuts Completely: This is a critically important step that cannot be overstated! Never, under any circumstances, attempt to ice or decorate warm donuts. The heat from the donut will inevitably cause your glazes, icings, and delicate candy decorations to melt, slide off, or become a sticky, unmanageable mess. Always allow your homemade donuts to cool fully on a wire rack for at least 30-60 minutes, or even longer if they are particularly warm to the touch. Patience here will save you frustration!
- Utilize Food Tweezers for Precision: For intricate designs or the precise placement of very small sprinkles and individual candies (such as tiny candy eyes, individual sugar pearls, or small decorative elements), food-grade tweezers are an invaluable tool. They allow for much greater accuracy and control than attempting to use your fingers, especially when dealing with sticky or delicate decorations. This ensures your characters have perfectly aligned features.
- Employ Mini Tongs for Clean Dipping: Dipping donuts into glazes or ganache can quickly become a messy business. Mini tongs are an excellent tool for holding the donut securely while you immerse it into the coating. This clever trick prevents your hands from getting excessively sticky and covered in frosting, which can then inadvertently transfer to other donuts or decorating elements, keeping your workspace tidier. It’s especially helpful when working with sanding sugar, which tends to cling to everything!
- Don’t Skimp on the Decorations: The true magic and visual appeal of Christmas donuts come from their elaborate, vibrant, and joyful appearance. This is absolutely not the time to be frugal with your decorating supplies! Splurge on a wide variety of colorful sprinkles, unique holiday-themed candies, and different colored icings. The more variety and abundance you have at your disposal, the more striking, professional, and utterly charming your finished treats will look, truly capturing the festive spirit.
- Prepare Your Workspace with Wax Paper: Once your donuts are dipped in glaze or icing, they will naturally be wet and sticky and require some time to set and harden. To manage this efficiently, line a baking tray or a large, flat surface with sheets of wax paper or parchment paper. As you decorate each donut, immediately place it onto the lined tray. This simple step prevents the donuts from sticking to the surface and makes them incredibly easy to lift and remove once the icing has fully set and hardened, preserving your beautiful designs.
Storing Your Christmas Donuts
Proper storage is key to keeping your festive donuts as fresh and delicious as possible. While they are undoubtedly best enjoyed on the very day they are made for optimal flavor and texture, here’s how you can store them to maintain their quality for a little longer:
- Room Temperature: For maximum freshness and the best possible texture, place your decorated Christmas donuts in an airtight container or a sturdy covered box. Store them at a cool room temperature, away from direct sunlight or heat sources. Under these conditions, they will remain fresh and delightful for up to 2 days. Be aware, however, that some very delicate candy decorations might soften slightly over this period.
- Refrigerate: While I firmly believe these donuts are at their absolute peak flavor and texture on the day they are prepared, you can extend their shelf life by storing them in a sealed, airtight container in the refrigerator for up to 3 days. It’s important to be mindful that chilling can cause certain candies and other decorative elements to become noticeably harder and chewier than when fresh. Furthermore, the texture of the donut itself might also change slightly, becoming a bit firmer or denser.
- Freeze: Freezing decorated Christmas donuts is generally not recommended for several reasons. The moisture released during the thawing process can cause glazes to become sticky, watery, or even run off, ruining your careful decorations. Delicate candy decorations are particularly susceptible to becoming soggy, discolored, or detaching from the donut upon thawing. Additionally, the texture of the donuts themselves can suffer, potentially becoming somewhat tough, dry, or rubbery. For the best experience, it’s always advisable to enjoy these fresh!
Christmas Donut Recipe FAQs
Achieving a perfect, even, and smooth glaze on your donuts is simple with the right technique and a little practice. First, ensure your prepared glaze is at the right consistency – not too thick to clump, and not too thin to run off entirely. Pour the glaze into a shallow, wide bowl that is comfortably larger in diameter than your donuts. If you only want to ice the tops, gently hold the donut upside down over the bowl, dip the top into the glaze, and then carefully tap your hand a few times to allow any excess icing to drip back into the bowl. This prevents puddles and ensures an even layer. Immediately place the iced donut on a cooling rack to allow the glaze to set completely. If you wish to coat the entire donut, fully submerge the donut in the bowl of glaze. Use a large fork or a pair of mini tongs to quickly lift and remove the donut from the bowl, allowing excess glaze to drip off. Transfer it immediately to a cooling rack, ideally with a sheet of wax paper or parchment paper lined underneath to catch any further drips and prevent sticking to your counter.
Beyond the fun and creative decorations, infusing your donuts with distinctive festive flavors elevates them to another level of holiday deliciousness. The best Christmas donut flavors often evoke warmth, spice, and traditional holiday ingredients. Some of the most popular and beloved holiday donut flavors to consider include rich and creamy Eggnog (achieved with eggnog-flavored glaze), warm and spicy Gingerbread (by adding gingerbread spices to the dough or glaze), tart Cranberry (using dried cranberries or cranberry extract), refreshing Peppermint (with peppermint extract and crushed candy canes), decadent Red Velvet (a classic cake flavor adapted for donuts), and sweet Sugar Cookie (mimicking the taste of freshly baked sugar cookies). You can achieve these delightful flavors by adding extracts, spices, zest, or even fruit purees directly into your donut batter or glazes for a truly immersive holiday taste experience.
More Delicious Christmas Desserts
If you’re looking to expand your holiday baking repertoire and impress your guests with a variety of sweet treats, these festive desserts are perfect companions to your delightful Christmas donuts. They’re all designed to add extra cheer, sparkle, and sweetness to your celebrations!
- Easy Christmas Tree Cupcakes: Adorable and simple cupcakes decorated to look like miniature, frosted Christmas trees, complete with edible ornaments.
- Snowman Cookies/Oreos: Fun and creative snowman designs crafted using popular sandwich cookies, perfect for a quick and cute treat.
- Christmas Tree Cookies: Classic cut-out sugar cookies shaped and intricately decorated like festive evergreen trees, a timeless holiday baking tradition.
- Jumbo Gingerbread Men Cookies: Large, wonderfully spiced gingerbread cookies, ideal for decorating with royal icing and sharing with loved ones.
- Christmas Tree Brownies: Rich, fudgy chocolate brownies cut into charming tree shapes and adorned with festive green frosting and colorful sprinkles.
- Santa Hat Brownies: Decadent brownies topped with a swirl of white frosting and a fresh strawberry to perfectly resemble Santa’s iconic red hat.
Recipe
Easy Christmas Donuts
Abeer Rizvi
Pin Recipe
10 minutes
20 minutes
20 minutes
50 minutes
Dessert
American
12
Donuts
158
kcal
Want to Save This Recipe?
Enter your email & I’ll send it to your inbox. Plus, get great new recipes from me every week!
By submitting this form, you consent to receive emails from CakeWhiz
Ingredients
- 12 Donuts Can be homemade or store-bought
- 2 cups Vanilla glaze
- 1 cup Chocolate ganache
- ½ cup Powdered sugar
- ¼ cup Chocolate chips Mini and regular size
- ¼ cup Candy corns
- ¼ cup Red sanding sugar
- ½ cup Black icing
- 2 tablespoon Yellow square candies
- 1-2 tablespoon Shredded coconut Adjust according to your preference
- Green food coloring
- ½ cup Heart sprinkles Big and small sizes
- ¼ cup Eye candies
- ¼ cup Pretzel twists
- ¼ cup Red gum balls
- ½ cup Christmas sprinkles
- ¼ cup Green sanding sugar
- 2 tablespoon Red sugar pearls
- 2 tablespoon Bow candies
Instructions
-
Bake donuts and allow them to cool fully, or buy plain donuts from your favorite bakery or grocery store. Ensure they are completely cool before proceeding with any decoration.
-
Snowman: To create your frosty friend, generously cover the entire donut in a fine layer of powdered sugar. For the eyes, carefully push two large chocolate chips onto the top portion of the donut. Create a cheerful smile by firmly placing mini chocolate chips in a curved line near the bottom. Complete the face by gently pressing a candy corn into the middle for a distinctive carrot nose.
-
Santa: Dip the donut completely in vanilla glaze, then immediately coat it all over with vibrant red sanding sugar to form Santa’s suit. Using a piping bag fitted with a small round tip and filled with black icing, pipe a horizontal black belt across the center. Secure a yellow square candy in the middle of the belt for the buckle.
-
Grinch: For this whimsical treat, tint your vanilla glaze a bright Grinch-green using green food coloring. Stir in shredded coconut to achieve a “furry” texture. Dip the donut fully into this mixture until it’s completely covered. While the glaze is still wet, artfully stick large and small red heart sprinkles all over, representing the Grinch’s growing heart.
-
Reindeer: Begin by dipping the donut fully in chocolate ganache, creating a rich brown base. Position two candy eyes on the top part of the donut. Break a pretzel twist in half and carefully stick the halves along the sides of the top, forming the antlers. Press a red gum ball into the center for Rudolph’s glowing nose, and add a small white jimmie sprinkle near the bottom for the mouth.
-
Sprinkles: For a simple yet festive look, dip the donut completely in vanilla glaze. Immediately after dipping, generously cover it with your favorite mix of Christmas sprinkles. The more colorful and varied, the better!
-
Wreath: Dip the donut fully in vanilla glaze, then completely coat it in green sanding sugar for a lush, evergreen effect. Push several red sugar pearls all over the donut to act as festive berries. Finish by sticking a small red bow candy near the bottom, securing it with a touch of glaze if needed.
Notes
- Cooling is Crucial: Remember, do not ice warm donuts! The heat will cause the decorations and icing to melt and slide off, ruining your festive designs. Ensure they are completely cool to the touch before you begin decorating.
- Food Coloring Choice: For the best results and most vibrant colors, especially when tinting glazes, use gel food coloring or high-quality liquid food coloring. They provide rich hues without significantly altering the glaze consistency, which is vital for perfect coverage.
- Storage Guidelines: For optimal freshness and best texture, these donuts are truly best enjoyed on the day they are made. If you have leftovers, they can be stored in a covered, airtight box at room temperature for up to 1 day, or in the refrigerator for up to 2 days. Be aware that candies might harden in the fridge.
- Get Creative: Don’t hesitate to refer to the “Variations” and “Tips and Techniques” sections above for even more ideas to customize your donuts, experiment with different flavors, and perfect your decorating skills! Let your imagination lead the way to unique holiday treats.
Nutrition
Carbohydrates: 34g
Protein: 1g
Fat: 2g
Saturated Fat: 2g
Polyunsaturated Fat: 0.03g
Monounsaturated Fat: 0.1g
Cholesterol: 0.04mg
Sodium: 45mg
Potassium: 84mg
Fiber: 1g
Sugar: 28g
Vitamin A: 0.4IU
Vitamin C: 0.1mg
Calcium: 15mg
Iron: 1mg
An automated tool is used to calculate the nutritional information. As such, I cannot guarantee the accuracy of the nutritional information provided for any recipe on this site.
Tried this recipe?
Leave a comment below or rate and tag @cakewhiz on social
