Craft the Perfect Father’s Day Surprise: Easy Homemade Tool Box Cake Recipe
Celebrate the amazing dads in your life with a truly unique and delicious creation: an easy homemade Father’s Day Tool Box Cake! This detailed guide will show you how to craft a stunning chocolate cake, lavishly covered in rich chocolate frosting and versatile fondant, then adorned with an array of edible handyman tools. It’s more than just a dessert; it’s a personalized masterpiece that combines your love for baking with a thoughtful nod to Dad’s handy side.
For those special occasions, we often turn to classic treats like these Father’s Day Shirt Cupcakes, which are always a big hit. However, this year, we wanted to elevate the celebration with something even more spectacular and personal for the wonderful fathers, grandfathers, and father figures who make our lives better every day. The secret to achieving this impressive design with surprising ease lies in the clever use of chocolate molds, simplifying the process while ensuring a professional finish. Imagine the look on Dad’s face when he sees a cake that looks just like his trusty tool box, complete with edible wrenches, hammers, and screwdrivers!
How to Create Your Spectacular Father’s Day Tool Box Cake
Making this charming tool box cake is a fun and rewarding process that comes together in several manageable steps. Whether you’re a seasoned baker or new to cake decorating, this guide breaks down each stage to ensure your success. From baking the perfect base to meticulously crafting the edible tools, you’ll find everything you need to know right here.
- Bake Your Cakes: Start with two delicious cakes. A rich and moist Guinness beer cake, baked in 8×2 inch round pans, provides a wonderful depth of flavor and a sturdy base for your creation. Ensure they are baked through and have a consistent texture.
- Cool Completely: Patience is key! After baking, allow your cakes to cool completely to room temperature on a wire rack. Attempting to frost or decorate warm cakes will lead to melted icing and a crumbly mess.
- Prepare Your Icing: While the cakes cool, whip up your chosen frosting. For a cohesive theme, you can even add a touch of Guinness beer to your chocolate frosting for an extra layer of flavor that complements the cake. Aim for a smooth, spreadable consistency.
- Assemble the Cake: Place one cooled cake layer on your chosen cake stand or serving plate. Generously ice the top surface, spreading evenly with an offset spatula. Carefully place the second cake layer on top, pressing gently to secure it.
- Crumb Coat and Final Frost: Apply a thin layer of frosting all over the entire cake – this is your “crumb coat” which traps any loose crumbs. Chill for 15-20 minutes, then apply a thicker, even layer of frosting to the entire cake, smoothing the sides and top for a perfect canvas.
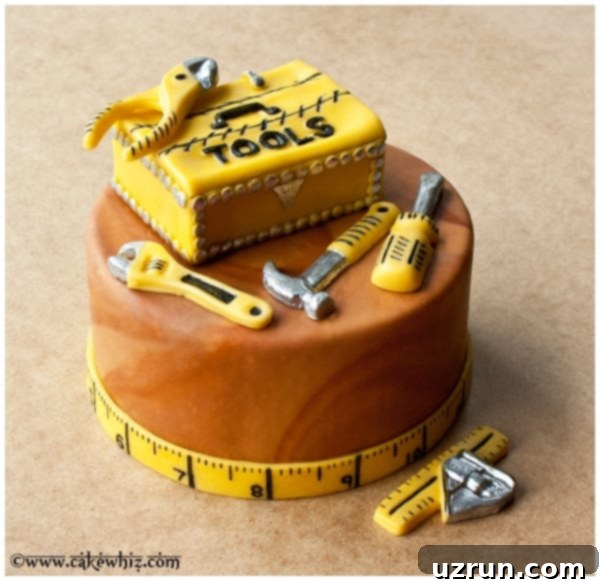
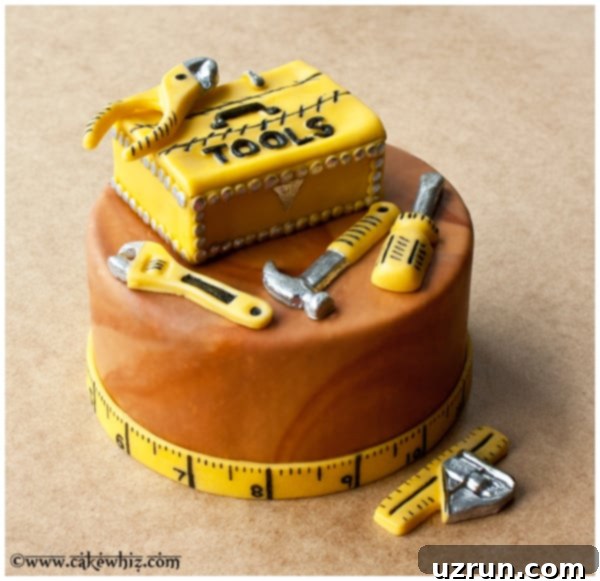
- Drape with Marbled Brown Fondant: Roll out your brown fondant to an even thickness. For a realistic wood-grain effect, try a simple marbling technique (refer to a guide like How to Marble Fondant if needed). Carefully drape the marbled fondant over the entire cake, smoothing it gently to eliminate air bubbles and wrinkles. Trim off any excess fondant along the base using a sharp knife or pizza cutter.
- Add the Measuring Tape Border: Roll out yellow fondant into a long, thin strip, approximately 1 inch wide and long enough to encircle the base of your cake. Lightly brush the base of the cake with a little water to help the fondant adhere, then carefully stick the yellow strip in place. Use a fine-tipped black edible marker to draw the numerical markings and lines, transforming it into a realistic measuring tape.
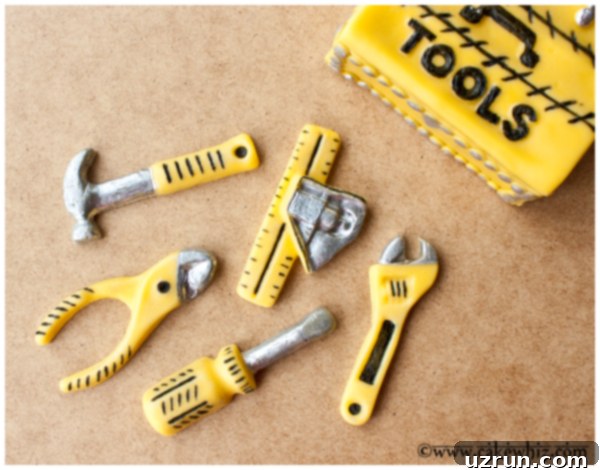
- Craft Gum Paste Tools: This is where the magic happens! Using a silicone chocolate mold designed for handyman tools, press gum paste into the cavities. Once set, gently remove the gum paste pieces. Allow these delicate pieces to dry completely until they are hard and sturdy – this often takes at least 24 hours, depending on humidity.
- Detail Edible Tools: Once the gum paste tools are fully dry, it’s time to add details. Use black edible paint or a fine-tip black edible marker for accents. For a metallic sheen, mix silver luster dust (like CK Nu-Silver) with a few drops of clear vanilla extract to create a paint, then carefully brush onto the tools where a silver finish is desired.
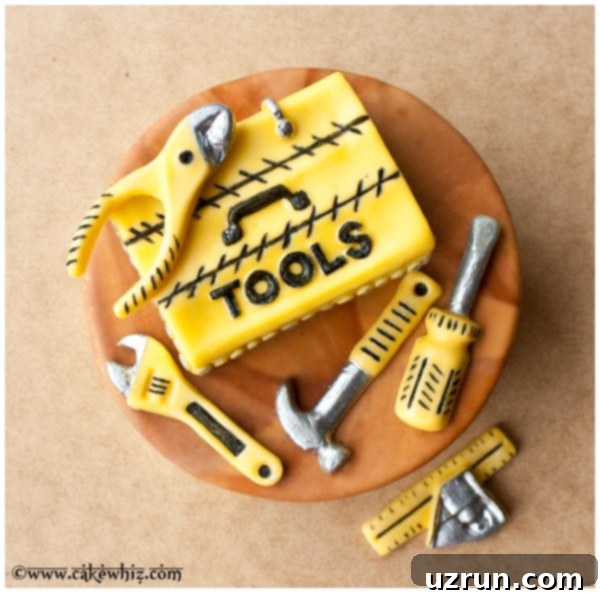
- Decorate and Display: With your tool box structure and tools prepared, carefully arrange them on top of your fondant-covered cake. Place the tool box first, then artfully scatter the various edible tools around and inside the box. Your masterpiece is now complete and ready to impress!
Creative Variations for Your Happy Father’s Day Cake Design
While the classic tool box design is always a winner, there are many ways to customize your Father’s Day cake to perfectly match Dad’s personality and preferences. Here are a few ideas to spark your creativity and make your cake truly unique:
- Experiment with Different Color Combinations: The rustic brown and yellow theme works beautifully for a tool box, but don’t limit yourself! Consider using Dad’s favorite colors, the colors of his favorite sports team, or even the colors of his company logo for a personalized touch. A vibrant blue tool box with orange tools could be striking, or perhaps a sleek black and silver design.
- Explore Other Delicious Cake Flavors: While the Guinness beer cake offers a unique and rich flavor, you can easily swap it for other beloved cake recipes. Imagine a Moist Triple Chocolate Cake (From Scratch) for the ultimate chocoholic dad, or a sophisticated Chocolate Coffee Cake for the coffee enthusiast. A classic vanilla or red velvet could also be fantastic choices.
- Pair with Unique Frosting Flavors: The chocolate cream cheese frosting is a divine choice, but consider other pairings that Dad might love. A rich Peanut Butter Frosting would be incredible with chocolate cake, or a glossy Chocolate Ganache Frosting for an extra luxurious feel. Cream cheese frosting can also be flavored with caramel, mint, or even a hint of his favorite liqueur.
- Build a Larger Tiered Cake: If you’re celebrating with a bigger family or simply want to make an even grander statement, consider adding an additional bottom tier. A 10-inch wide base tier would provide more surface area for additional edible tools and decorations, allowing for an even more impressive display. Remember to use appropriate dowel supports for stability when stacking tiers.
- Create a Taller Layer Cake: This recipe typically features two layers, but you can easily increase the height by adding more cake layers. For a multi-layered masterpiece, bake three or even four cake layers. Just be sure to use dowels or straws for internal support to prevent the upper layers from sinking into the lower ones, ensuring your cake stands tall and proud.
Essential Tips and Techniques for a Flawless Father’s Day Cake
Achieving a professional-looking and delicious tool box cake is all about mastering a few key techniques. These tips will help you avoid common pitfalls and ensure your Father’s Day creation is a resounding success.
- Always Work with Cool Cakes: This cannot be stressed enough! Never attempt to frost or decorate a cake that is still warm, even slightly. The heat will cause your icing to melt, fondant to sweat and slip, and ultimately lead to a sticky, messy disaster. Always ensure your cakes are completely cooled to room temperature, or even slightly chilled, before beginning decoration.
- Melted Chocolate vs. Gum Paste for Molds: Both melted chocolate and gum paste can be used in silicone molds to create edible decorations. Melted chocolate sets and hardens much faster, which is great if you’re short on time. However, I find that painting intricate details on chocolate can be more challenging. Gum paste, while taking longer to dry, offers a smoother surface for fine details and painting. Choose based on your desired look and timeframe.
- Avoid Fondant in Molds: While marshmallow fondant is fantastic for covering cakes, it’s generally not ideal for intricate molds. Fondant is much softer and more pliable than gum paste, making it difficult to remove from molds without distortion. It also takes a significantly longer time to dry and harden compared to gum paste, making it less practical for structural elements like tools.
- Prepare Molds for Easy Release: To ensure your molded pieces come out perfectly without sticking, always grease or dust the cavities of your silicone molds. If greasing, use a small amount of shortening (like Crisco) and apply it thinly with a brush. Avoid using oil, as it can sometimes affect the texture or appearance of the finished piece. Alternatively, a light dusting of powdered sugar works wonders for gum paste.
- Homemade vs. Store-Bought Fondant: You have options when it comes to fondant. Homemade marshmallow fondant is often preferred for its superior taste and aroma, making it a more pleasant eating experience. However, store-bought fondant offers convenience, especially pre-colored varieties, which can save you a significant amount of time and effort in coloring. Choose what best fits your skill level and schedule.
- Allow Tool Box Pieces to Dry Completely: This is a critical step, especially for the structural components of your tool box. If the gum paste pieces are still soft when you try to assemble them, they will bend, break, and refuse to hold their shape. Depending on humidity, this can take anywhere from 12 to 24 hours, or even longer. Plan ahead and give your pieces ample time to firm up.
- Understand Gum Paste Drying Time Variability: The drying time for gum paste pieces can vary significantly based on your environment. Higher moisture and humidity in the air will naturally lead to slower drying times. If you live in a humid climate, consider using a dehydrator on a very low setting or placing the pieces near a fan to speed up the process, but always check for firmness before assembling.
Storage and Make-Ahead Tips for Your Daddy Birthday Cake
Proper storage is essential to keep your Father’s Day cake fresh, beautiful, and delicious. Whether you’re making it in advance or saving leftovers, these guidelines will help preserve your hard work.
- Room Temperature Storage: A decorated cake, especially one covered in fondant, can typically be left at room temperature for up to 24 hours. This is ideal if your cake doesn’t contain any fresh fruit fillings or perishable components that require refrigeration. Keep it in a cool, dry place away from direct sunlight and strong odors, ideally covered with a cake dome.
- Refrigeration for Leftovers: If you have leftovers or need to store the cake for longer, place it in an airtight container in the fridge for up to 3 days. Be aware that fondant decorations may become slightly sticky or tacky due to the moisture in the refrigerator. To minimize this, you can place a piece of paper towel inside the container to absorb some humidity.
- Freezing for Extended Freshness: Unfrosted cake layers and frosting can be frozen separately in airtight containers for up to 1 month. When you’re ready to enjoy, simply thaw the cake layers in the fridge overnight. Allow the frosting to come to room temperature and re-whip if necessary, then proceed with assembling and decorating your cake as per the instructions.
- Make-Ahead Instructions: This Father’s Day cake is an excellent candidate for making ahead. You can bake the cakes, prepare the frosting, and even decorate the entire cake up to 1 day in advance. Store the finished cake at room temperature (if no perishable fillings) until you are ready to serve. This allows you to relax and enjoy Father’s Day without last-minute baking stress.
More Homemade Father’s Day Cake Ideas to Inspire You
If you’re looking for even more creative ways to celebrate Dad with a homemade cake, here are some fantastic ideas from our collection that are sure to delight:
- Tie Dye Shirt Cake
- Shirt Cake
- Easy Pokemon Cake (Poke Ball Cake)
- Easy Sushi Cake
- Easy Star Wars Cake (Death Star Cake)
- Ice Cream Cake
- Cookies and Cream Cake (Oreo Cake Tower)
- Easy Galaxy Cake
- Pull Apart Football Cupcake Cake
Ready to get baking? Here’s the detailed recipe for your very own Father’s Day Tool Box Cake!
Recipe
Father’s Day Cake (Tool Box Cake)
Abeer Rizvi
Pin Recipe
Want to Save This Recipe?
Enter your email & I’ll send it to your inbox. Plus, get great new recipes from me every week!
By submitting this form, you consent to receive emails from CakeWhiz
Ingredients
- 2 Guinness beer cake Round, Dimensions: 8×2 each
- 4 cups Chocolate cream cheese frosting
- 3 cups Marshmallow fondant Brown, yellow
- 1 cup Gum paste
Instructions
-
Bake cakes and allow them to cool completely.
-
Prepare frosting.
-
Assemble the cake by placing one cake on a serving plate.
-
Use a spatula to spread icing on top.
-
Place the other cake on top of the frosting and press gently to secure into place.
-
Ice the entire cake smoothly.
-
Spread out brown marshmallow fondant and do the marbling technique. Follow this tutorial: How to Marble Fondant.
-
To make a measuring tape border around the cake, roll out yellow fondant into a long strip. Use a pizza cutter to cut a 1 inch wide strip, long enough to cover around the base of the cake completely.
-
Brush some water around the base of the cake and and stick this measuring tape strip. Add all the numerical details with a fine tip black edible marker.
-
Keep this cake aside.
-
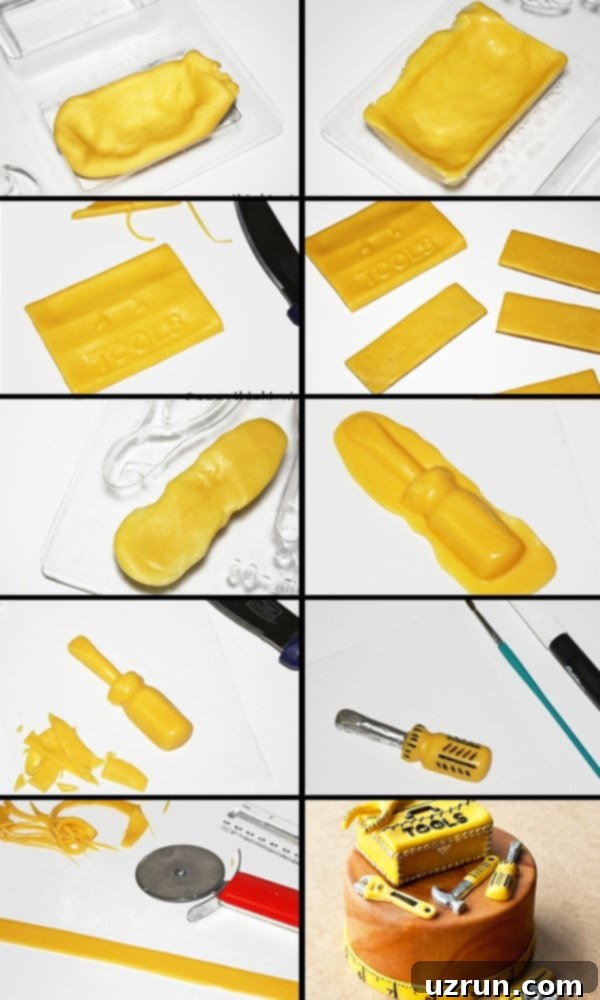
Bring out your tool box chocolate mold. I made the tool box first. To do that, rub some shortening in the cavities. Press some yellow gum paste into the cavity for the lid of your tool box. Use your fingers to smooth it out until the entire cavity is filled up. Some of the gum paste will “ooze” out but don’t worry about it. Then, gently peel your gum paste from the cavity and place it on a sheet of wax paper.All the details from the cavity should have gotten embossed onto your gum paste. Use a sharp knife to cut out the sides and you will end up with a rectangle.
-
Measure the sides of that piece you just made. Now, roll out some yellow gum paste and cut out the relevant sizes for the sides of this tool box. Allow these pieces to dry until hard. This can take up to 24 hours.
-
Use melted yellow chocolate or some gum paste glue or yellow royal icing to stick all the pieces together and then paint all the details. Use a fine tip black edible marker for all the black details.For silver details, mix some clear vanilla extract with CK Nu-Silver luster dust and use that to paint silver, where needed.
-
To make tools, rub some shortening into the cavities. Place a chunk of yellow gum paste into the cavity and start pressing with your fingers.Flip the mold and press down until the mold is lying flat on your table. Flip your mold back again.Gently, peel your gum paste out of the cavity and place it on a sheet of wax paper. Use a sharp knife to cut out all the excess and smooth out all the sides and corners with your fingers.
-
Once again, use a fine tip black edible marker to draw out all the black details. To add silver details, mix clear vanilla extract and CK Nu-Silver luster dust and paint silver where needed. Make as many tools as you need. Allow them to dry for 24 hours.
-
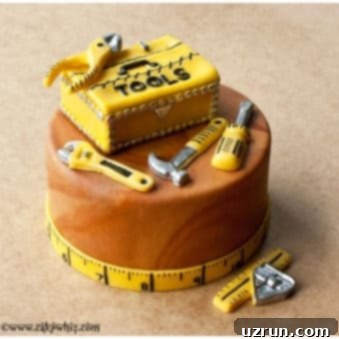
Once all the pieces are dry, just place your tool box and tools on top of the cake and you are done.
Notes
- Read all my tips above for best results.
- Leftovers can be stored in a sealed container in the fridge for up to 3 days.
Nutrition
An automated tool is used to calculate the nutritional information. As such, I cannot guarantee the accuracy of the nutritional information provided for any recipe on this site.
