Easy DIY Emoji Cookies (Emoji Oreos): Fun & Simple No-Bake Treat for Kids!
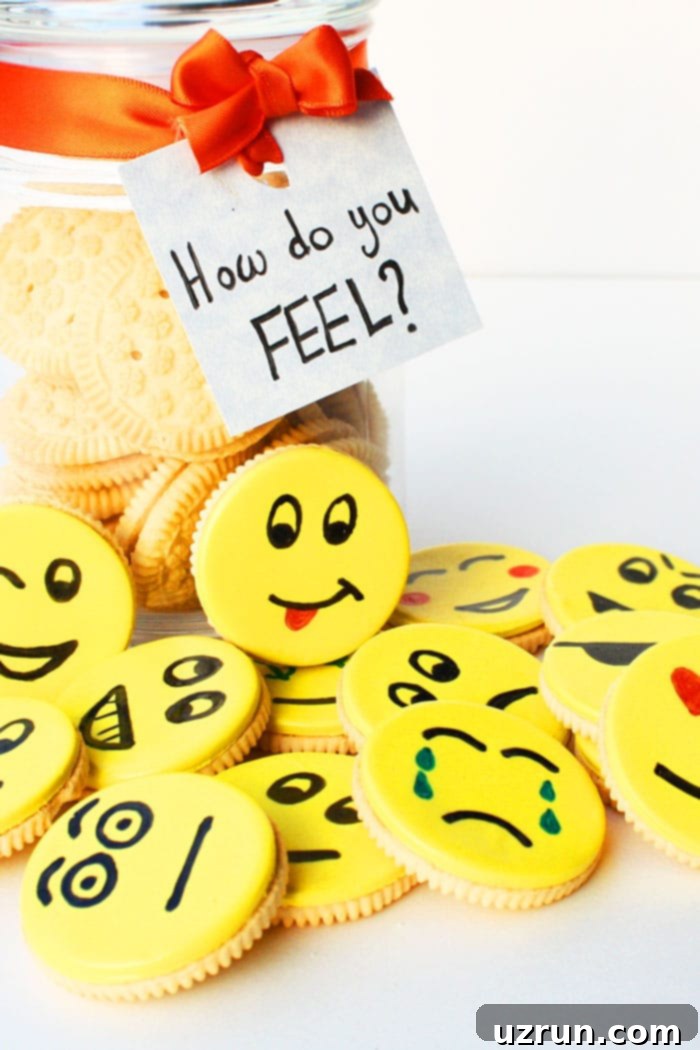
Get ready to bring some joy and laughter to your snack time with these unbelievably easy and adorable Emoji Cookies! Made with store-bought Oreos, colorful fondant, and simple edible markers, this no-bake recipe is a fantastic way to create personalized, fun treats in under 20 minutes. Whether you’re planning a kid’s birthday party, a casual playdate, or just want a sweet activity to do with your little ones, these emoji Oreos are sure to be a hit. Best of all, you don’t need any fancy cookie cutters – just your imagination!
Decorating cookies with Oreos is one of my favorite quick hacks for creating charming treats. If you love how simple and delightful these are, you’ll definitely want to explore other fun creations like these Snowman Cookies (Snowman Oreos), the festive Oreo Turkey Cookies, and even these delightful Mini Oreo Bites. All these recipes are designed to be straightforward and enjoyable, making them perfect projects to tackle with kids and create cherished kitchen memories.

Why You’ll Absolutely Love Making These Emoji Oreos
These emoji cookies aren’t just cute; they’re incredibly practical and fun to make. Here’s why they’ll become your go-to easy dessert:
- No Baking Required: The biggest win! We’re using delicious store-bought Oreos as our base, saving you time and effort in the kitchen. This makes them perfect for quick projects or when you want to avoid turning on the oven.
- Super Quick & Easy: From start to finish, you can have a batch of these fun treats ready in about 20 minutes. It’s an instant gratification kind of dessert, ideal for last-minute party preparations or spontaneous creative urges.
- Kid-Friendly Activity: This recipe is a fantastic way to get children involved in the kitchen. Rolling fondant, cutting circles, and especially drawing emoji faces offers a wonderful hands-on experience that sparks creativity and fine motor skills.
- Endless Customization: The world of emojis is vast! You can create happy, sad, silly, angry, surprised, or even custom emoji faces. Every cookie can be a unique expression, making them a personal and engaging treat.
- Simple Ingredients: You only need a few readily available items: Oreos, fondant (homemade or store-bought), buttercream icing, and edible markers. No obscure specialty ingredients needed.
- No Special Equipment: Forget about needing a collection of cookie cutters. A simple round cutter (or even a drinking glass rim or bottle cap) will do the trick for the fondant, making this accessible to everyone.
- Perfect Party Treat: These vibrant and expressive cookies are an instant mood booster and make fantastic centerpieces or party favors for any celebration. They’re also great for school events or bake sales.
Ingredients You’ll Need to Craft Your Emoji Masterpieces
Gathering your ingredients for these emoji Oreos is straightforward. Here’s a breakdown of what you’ll need and why each component is essential:
- Oreos (or other round cookies): The star of the show! You can use classic regular Oreos for that iconic chocolate and cream flavor, or switch it up with Golden Oreos for a vanilla base. Any other store-bought round cookie of a similar size would also work perfectly. The key is a flat, sturdy surface to decorate.
- Marshmallow Fondant: This is what gives your emoji cookies their smooth, colorful canvas.
- Mostly yellow colored: Yellow is the quintessential emoji color. You’ll need the largest quantity of yellow fondant.
- A small amount of red and green color too: To create popular emojis like the angry red face, heart eyes, or a nauseous green face. You’ll also need black for outlining and drawing facial features. You can color white fondant with gel food coloring or buy pre-colored fondant.
- Homemade vs. Store-bought: While store-bought fondant offers convenience, homemade marshmallow fondant is often praised for its better taste and texture. You can find a recipe for homemade marshmallow fondant linked in the recipe card below.
- Buttercream Icing: This acts as the edible “glue” to adhere the fondant circles to your Oreo cookies. A thin layer is all you need to create a strong bond without adding too much extra sweetness. American buttercream is simple to make and works perfectly.
- Edible Markers: These are your artistic tools! You’ll need black for outlines and pupils, and possibly red for hearts or tongues. Investing in good quality edible markers with fine tips will make drawing details much easier and more precise.
Step-by-Step Guide: How to Make Emoji Cookies (Emoji Oreos) with No Cutters
Creating these delightful emoji cookies is a breeze! Follow these simple steps to transform ordinary Oreos into expressive edible art:
- Prepare Your Workspace and Fondant: First, ensure your workspace is clean and lightly dusted with cornstarch or powdered sugar to prevent sticking. If using homemade fondant, ensure it’s kneaded until smooth and pliable. If using store-bought, it might also benefit from a quick knead to warm it up.
- Roll Out Yellow Fondant: Take your yellow fondant and roll it out evenly. Aim for a thickness of about ⅛ to ¼ inch (3-6mm). It should be thick enough to handle without tearing but thin enough not to be overwhelmingly chewy.
- Cut Circle Shapes: The magic of “no fancy cutters” truly shines here! While a round cookie cutter of the same size as your Oreos is ideal, you can easily use the rim of a small drinking glass, a shot glass, or even a bottle cap to cut out perfect circles from the rolled fondant. Ensure these circles are the same size as your cookies for a seamless look.
- Apply Buttercream Icing to Cookies: Using a small offset spatula or a butter knife, spread a thin layer of buttercream icing on top of each Oreo cookie. This acts as the adhesive for your fondant. You don’t need much – just enough to create a slightly sticky surface.
- Stick Fondant on Cookie: Carefully pick up a fondant circle and place it gently on top of a buttercream-frosted Oreo. Press down lightly and evenly across the surface of the fondant to ensure it adheres properly and smoothly to the cookie. Avoid pressing too hard, which can squeeze out the buttercream or indent the fondant.
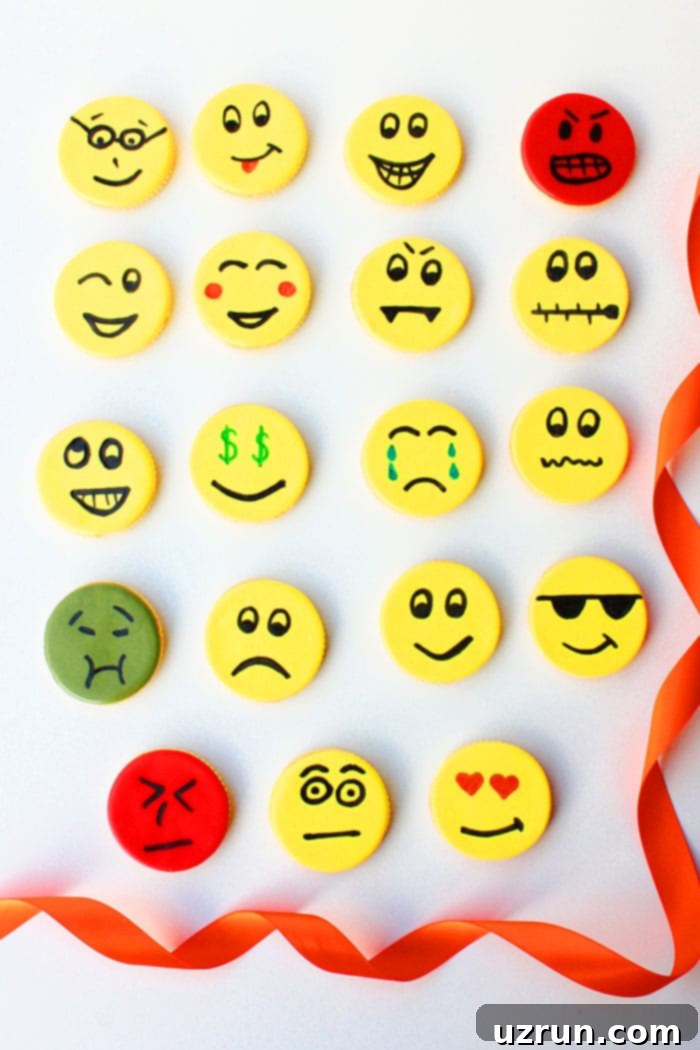
- Add Details on Fondant: Now for the fun part! Using your edible markers, draw your desired emoji faces onto the yellow fondant discs. Think happy faces, heart eyes, winks, worried brows, or silly tongues. Feel free to use small amounts of red or green fondant (cut into tiny shapes or rolled into thin strands) for elements like hearts, cheeks, or eyebrows before drawing with markers for a more dimensional look.
- Create Other Emoji Colors: Don’t limit yourself to yellow! Follow the same steps with red fondant to make angry or love-struck emojis, and green fondant for a sick or nauseous emoji. The possibilities are endless!
- Allow to Set (Optional but Recommended): For best results, let the decorated cookies sit for a short while (15-30 minutes) at room temperature. This allows the buttercream to set a bit more and the edible marker ink to dry, preventing smudging.
Enjoy your vibrant and delicious emoji cookies! They are perfect for sharing or enjoying yourself.

Creative Variations for Your Emoji Cookies
While the Oreo base is fantastic, don’t hesitate to experiment with these fun variations to customize your emoji cookies even further:
- Emoji Sugar Cookies: If you prefer a homemade cookie base, use a round cutter with these Cut Out Chocolate Sugar Cookies or these Cut Out Sugar Cookies (Small Batch). Once the cookies are baked and fully cooled, decorate them with fondant and edible markers following the same steps. This allows for more diverse cookie flavors.
- Use Whole Oreo Cookies: The original recipe uses just one side of the Oreo. If you have a full box of untouched Oreos, you can certainly use the whole cookie! Simply apply buttercream and fondant to the top of the entire Oreo. (My kiddo unfortunately ate all the creamy halves, leaving me with a box of non-creamy sides, but a whole Oreo works perfectly fine!).
- Decorate by Piping: For those with a steady hand and a knack for piping, you can decorate all the emoji details with Royal Icing or Glace Icing. Both of these icings dry hard, creating a smooth and professional finish. This method offers a different texture and look compared to edible markers.
- Use Other Cookies: Don’t limit yourself to Oreos! Instead, explore other store-bought round cookies like Nilla Wafers, shortbread rounds, or even homemade options from any of these Homemade Cookies recipes. Just ensure they are round in shape to fit the emoji theme.
- Flavor Fondant: Infuse your fondant with extra flavor! Mix in a few drops of your favorite extract (like vanilla, almond, lemon, or even mint) to change the taste. Choose an extract whose flavor would beautifully complement your chosen cookie base.
- Poop Emoji Cookies: Get creative with a popular, silly emoji! Use graham crackers as your base and cut them into a triangle or spiral shape (or pipe brown icing into the iconic swirl). Then, decorate with brown fondant and a black edible marker for the eyes and mouth.
- Ghost Emoji Cookies: For a spooky twist, use white fondant for your base and simply add black edible marker dots for eyes and a surprised mouth. Perfect for Halloween!
- Unicorn Emoji Cookies: While not a standard emoji, you can easily adapt the concept. Use white or rainbow-colored fondant, then add a small fondant horn, ears, and edible marker details for the eyes and blush.

Expert Tips and Techniques for Perfect Emoji Oreos
Achieving perfectly adorable emoji cookies is all about the details. Here are some essential tips and techniques to ensure your decorating process is smooth and your results are fantastic:
- Homemade Fondant vs. Store-bought Fondant: Both options work wonderfully for these cookies. Store-bought fondant is convenient and consistent, while homemade marshmallow fondant generally tastes and smells amazing, making it a favorite for many. If you’re going for taste, try making your own! You can find a link to a great marshmallow fondant recipe in the recipe card below.
- Use Gel Colors for Coloring Fondant: When coloring white fondant, always opt for gel food coloring over liquid food coloring. Gel colors are highly concentrated and thick, which means you need less of them to achieve vibrant hues. Liquid colors, on the other hand, can make your fondant sticky and tacky, making it difficult to roll and handle.
- Ensure Your Circle Cutter Matches Oreo Size: For a clean and professional look, it’s crucial that your fondant circle cutter (or the rim of your glass/bottle cap) is the exact same size as your Oreos. This allows the fondant to completely cover the top of the cookie, creating a smooth, even surface for your emoji faces.
- Lightly Dust Your Work Surface: To prevent fondant from sticking to your countertop or rolling pin, lightly dust them with cornstarch or powdered sugar. Use sparingly, as too much can dry out the fondant.
- Don’t Stack Decorated Cookies Immediately: Once your emoji cookies are decorated, resist the urge to stack them for at least a few hours, or until the marker ink has completely dried and the fondant has firmed up a bit. Stacking too soon can ruin the fondant, causing dents, and the marker ink can smudge, ruining your cute emoji faces.
- Where to Find Edible Markers: Edible markers are readily available and a must-have for these cookies. The two brands I frequently use and recommend are Wilton and Americolor. I personally prefer Americolor markers for their consistently fine tip, which is excellent for detailed facial expressions. Both brands can be found easily on Amazon, or in the cake decorating aisle of craft stores like Michaels or Hobby Lobby. Look for multi-color packs to give you more options for your emoji designs.
- Have Fun and Be Creative: Don’t stress about perfection! The beauty of emoji cookies is their playful nature. Encourage kids (and adults!) to get creative with expressions, mixing and matching eyes and mouths.

Proper Storage for Your Decorated Emoji Cookies
To keep your delightful emoji cookies fresh and presentable, proper storage is key. Here’s what you need to know:
- Room Temperature: Store any leftover emoji cookies in an airtight cardboard box. The cardboard helps to absorb any excess moisture, preventing the fondant from becoming too sticky. Keep them in a cool, dry place away from direct sunlight and humidity. They will remain fresh and delicious for up to 3 days.
- Refrigerate – Not Recommended: Placing these cookies in the refrigerator is generally not advised. The high moisture content in the fridge can cause both the Oreos and the fondant to absorb moisture, leading to a soggy cookie base and sticky, potentially discolored fondant.
- Freeze – Not Recommended: Freezing these emoji cookies is also not recommended. Upon thawing, the marker ink is highly likely to bleed and smudge, ruining your carefully drawn faces. Furthermore, the cookies and fondant will become soggy and sticky, compromising both texture and appearance.

Frequently Asked Questions (FAQs) About Emoji Cookies
Here are some common questions you might have when making these fun emoji Oreos:
Q: Can I use royal icing or glace icing instead of fondant?
A: Yes, absolutely! If you’re comfortable with piping, royal icing or glace icing can be used to cover the Oreos and then to pipe the emoji details. Both icings dry hard and create a smooth finish. However, fondant provides a much smoother canvas for edible markers, which are easier for beginners and children to use.
Q: How long do these emoji cookies last?
A: When stored properly at room temperature in an airtight cardboard box, your decorated emoji cookies will stay fresh and delicious for up to 3 days. Beyond that, the cookies might start to lose their freshness, and the fondant could become overly soft or dry.
Q: Can I make these emoji cookies ahead of time for a party?
A: Yes, you can definitely prepare these a day or two in advance. Just remember to store them correctly (room temperature, airtight cardboard box) and avoid stacking them until right before serving to prevent any damage to the decoration.
Q: Are edible markers safe to eat?
A: Yes, edible markers are specifically designed for food decoration and are perfectly safe to eat. They are made with food-grade ingredients and pigments. Always ensure you’re using markers labeled “edible” or “food-grade.”
Q: What if I don’t have a circular cookie cutter the right size?
A: No problem at all! You can use the rim of a small drinking glass, a shot glass, or even a clean bottle cap to cut out your fondant circles. Just choose one that matches the diameter of your Oreos. The goal is to get a neat, round piece of fondant to cover the cookie.
Q: Can I use different flavored Oreos?
A: Absolutely! Feel free to experiment with any flavor of Oreo you love – mint, peanut butter, birthday cake, or even seasonal varieties. The decorating process remains the same, and it’s a great way to add an extra layer of flavor to your emoji cookies.
More Fun Kids Party Desserts
- Erupting Volcano Cake (With Dry Ice Smoke)
- Cake Truffles (With Cake Mix)
- Homemade Sugar Cubes (2 Ingredients)
Recipe

Emoji Cookies (Emoji Oreos)
Abeer Rizvi
Pin Recipe
Want to Save This Recipe?
Enter your email & I’ll send it to your inbox. Plus, get great new recipes from me every week!
By submitting this form, you consent to receive emails from CakeWhiz
Ingredients
- 2 cups Marshmallow fondant Mostly yellow colored and a small amount of red and green color too
- 1 cup Buttercream icing
- 20 Oreos Golden Oreos or regular Oreos or any store-bought round cookies
Instructions
-
Roll out yellow fondant.
-
Use a circle cutter (that’s the same size as your Oreos) to cut out round shapes.
-
Use a spatula to spread buttercream icing on top of each Oreo cookie.
-
Place the circular fondant pieces on top of each frosted cookie and press gently to secure properly.
-
Use edible markers to draw facial details.
-
Follow the same steps with red fondant and green fondant to make the angry emoji and sick emoji. Enjoy!
Notes
- Read all my tips above.
- Leftovers can be stored in a cardboard box at room temperature for up to 3 days.
Nutrition
An automated tool is used to calculate the nutritional information. As such, I cannot guarantee the accuracy of the nutritional information provided for any recipe on this site.
