Easy Fudgy Reese’s Cookies with Cake Mix: The Ultimate Peanut Butter Chocolate Delight
Prepare yourself for a truly irresistible treat: homemade, fudgy, soft, and delightfully chewy Reese’s cookies! What makes these cookies so incredibly simple yet utterly delicious? They begin with a convenient chocolate cake mix, combined with just a few other pantry staples. Each bite is a harmonious explosion of flavors, generously packed with miniature peanut butter cups and the iconic crunch of Reese’s Pieces candy. This recipe is designed for ease without compromising on that coveted bakery-style taste and texture.
The timeless combination of chocolate and peanut butter is a culinary match made in heaven, and these cookies celebrate it beautifully. You’ll be amazed at how quickly and effortlessly these cookies come together, bringing together two of the most beloved flavors in the dessert world. They’re guaranteed to be devoured by both kids and adults in record time, making them perfect for parties, bake sales, or simply a cozy night in. If you find yourself unable to get enough of this delightful pairing, be sure to explore other mouth-watering options like these Chocolate Peanut Butter Cookies or our yummy Peanut Butter Chocolate Chip Cookies, which offer different twists on this classic duo.

How to Make Easy Reese’s Cookies with Cake Mix
Crafting these delectable Reese’s cake mix cookies is incredibly straightforward, perfect for bakers of all experience levels. The magic lies in using a boxed cake mix, which simplifies the ingredient list and significantly cuts down on prep time. Follow these easy steps to bake a batch of homemade cookies that taste like they came from a gourmet bakery:
- Combine Wet Ingredients: In a spacious mixing bowl, begin by whisking together the eggs and oil until the mixture is smooth and thoroughly combined. This forms the essential liquid base for your cookie dough, ensuring a moist and rich texture.
- Incorporate Dry Ingredients: Next, add the entire box of chocolate cake mix to your wet ingredients. The cake mix acts as the primary dry base, already containing flour, sugar, and cocoa powder, which eliminates the need for multiple measuring steps.
- Mix Until Just Combined: Using a spatula or an electric mixer on low speed, mix the wet and dry ingredients together. Be careful not to over-mix; stop as soon as a uniform dough forms. Over-mixing can develop the gluten in the flour, leading to tougher cookies.
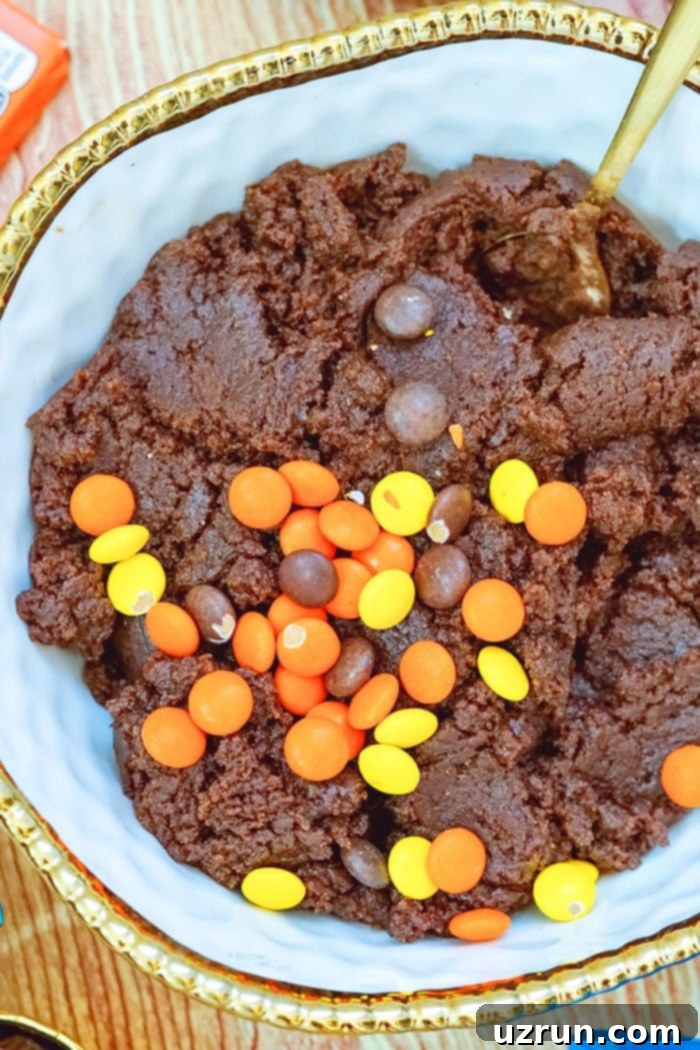
- Stir in Reese’s Pieces: Gently fold in the vibrant Reese’s Pieces candies. If you’re also using mini peanut butter cups, this is the perfect time to add those in as well, ensuring they are evenly distributed throughout the rich chocolate dough.
- Cover and Chill the Dough: Cover the bowl with plastic wrap and transfer the cookie dough to the refrigerator for at least 20 minutes. This crucial step helps the dough firm up, making it much easier to handle and preventing the cookies from spreading too much during baking, resulting in a perfectly thick and chewy texture.
- Scoop and Form Balls: Once chilled, scoop out uniform portions of the dough. You can use a cookie scoop for consistency or simply roll the dough into small, evenly sized balls with your hands. Evenly sized cookies ensure they all bake at the same rate.
- Bake to Perfection: Place the cookie dough balls onto a baking sheet lined with parchment paper. Bake in a preheated oven until the edges appear firm and lightly golden, but the centers still look slightly soft and fudgy. Remember, cookies continue to cook for a few minutes after they are removed from the oven, so slightly under-baking will yield a wonderfully soft and chewy result.
Delicious Cookie Add-ins to Customize Your Reese’s Treat
While Reese’s Pieces and mini peanut butter cups are the stars of these cookies, there’s always room for creativity! Cake mix cookies are incredibly versatile, and adding different ingredients can completely transform their flavor and texture profile. Here are some fantastic add-in ideas to inspire your next batch:
- Oatmeal: For a chewier texture and a touch of wholesome goodness, stir in a handful of quick or rolled oats. They add a lovely chew and a subtle nutty flavor.
- Semisweet Chocolate Chips: Enhance the chocolate flavor with classic semisweet chips. Their slight bitterness perfectly complements the sweetness of the Reese’s candies.
- White Chocolate Chips: Create a delightful contrast with creamy white chocolate chips. They add a different dimension of sweetness and a beautiful visual appeal against the dark chocolate cookie.
- Peanut Butter Chips: If you’re a true peanut butter fanatic, doubling down with extra peanut butter chips will elevate the flavor to new heights.
- Chocolate Chunks: For larger pockets of melted chocolate, opt for chocolate chunks. They provide a more intense chocolate experience with every bite.
- Shredded Coconut: Introduce a tropical twist and a chewy texture with shredded coconut. Toasted coconut would add an even deeper, nutty flavor.
- Butterscotch Chips: For a rich, buttery, and caramel-like flavor, butterscotch chips are an excellent choice that pairs surprisingly well with chocolate and peanut butter.
- Other Candies: Don’t limit yourself! M&M’s add a colorful crunch, while chopped Snicker bars bring in caramel, nougat, and nuts for a truly decadent cookie.
- Toffee Bits: These crunchy, buttery pieces melt slightly and add a wonderful caramelized flavor and satisfying texture.
- Chopped Nuts: Walnuts, pecans, or peanuts can add an extra layer of crunch and nutty flavor, enhancing the overall complexity of the cookie.
- Large Sprinkles: For a festive and fun touch, especially for birthdays or holidays, colorful large sprinkles can be mixed into the dough.
- Dried Fruits: Dried cranberries or cherries can add a tart, fruity counterpoint to the rich chocolate and peanut butter, creating an interesting flavor profile.
Creative Variations for Reese’s Pieces Cookies
These Reese’s cookies are delicious on their own, but they also serve as a fantastic base for more elaborate dessert creations. Here are some exciting variations to take your cookies to the next level:
Cookie Sandwiches: Transform your individual cookies into a truly decadent dessert by sandwiching a creamy filling between two cookies. While classic vanilla frosting is always a winner, you can get creative! Consider using your favorite ice cream for a refreshing frozen treat, a rich chocolate or peanut butter pudding, or even a generous spread of your preferred nut butter. For an extra special touch, try our Peanut Butter Frosting (4 Ingredients), a luscious Chocolate Cream Cheese Frosting, a light and airy Marshmallow Frosting, or the ever-popular Chocolate Buttercream Frosting. Once assembled, you can roll the edges of the sandwiches in more Reese’s Pieces or mini peanut butter cups for extra flair.
Try Another Cake Mix Flavor: Don’t feel confined to chocolate cake mix! This is where the “cake mix cookie” concept truly shines. Experiment with different cake mix flavors to dramatically alter the cookie’s character. Yellow or vanilla cake mix will yield a lighter, buttery base, while German chocolate or Devil’s food cake mix will intensify the chocolate experience. For more adventurous palates, consider lemon for a zesty twist, red velvet for a festive and colorful cookie, or even pineapple or strawberry mixes for unique fruity notes, especially when paired with complementary mix-ins.
Stuffed Cookies: Before baking, elevate your cookies by hiding a delightful surprise in the center of each chocolate dough ball. Simply flatten a portion of dough, place a small candy or filling in the middle, and then carefully wrap the dough around it, ensuring it’s completely sealed. Miniature chocolate candies, gooey caramels, or even a whole mini Reese’s Peanut Butter Cup are fantastic choices for a molten, flavorful core that will surprise and delight with every bite.
Dip Them: Once your cookies are baked and fully cooled, take them to the next level with a luxurious chocolate coating. Melt dark, milk, or white chocolate (or even a combination!) and dip half of each cookie into the melted chocolate. Lay them on parchment paper until the chocolate sets, creating a beautiful contrast in texture and an extra layer of chocolatey goodness. A sprinkle of sea salt on the wet chocolate can really enhance the flavors.
Roll in Coatings: For an added visual appeal and a boost in flavor and texture, roll your cookie dough balls in various coatings before baking. Powdered sugar creates a beautiful “crinkle” effect, granulated sugar adds a sparkly, crunchy exterior, and cocoa powder enhances the chocolate depth for a truly rich experience. This simple step can make your homemade Reese’s cookies look even more professional and enticing.

Essential Tips and Techniques for Perfect Reese’s Peanut Butter Cookies
Achieving the perfect soft, chewy, and fudgy Reese’s cookies is easy when you follow a few key tips and techniques. These insights will help you avoid common baking pitfalls and ensure every batch is a resounding success.
Why did my cookies spread? Why are my cookies flat? This is a common issue often attributed to the dough not being properly chilled, or an incorrect ratio of wet ingredients. Chilling the dough solidifies the fats, preventing them from melting too quickly in the oven and causing excessive spreading. Always ensure your oven is fully preheated to the correct temperature as well; baking in a cool oven can also cause spreading. Double-check your measurements, especially for oil or butter, as too much fat can lead to flat cookies.
Why are my cookies dry? Dry cookies typically result from either insufficient fat in the dough, using eggs that are too small, or most commonly, over-baking. If your dough seems too stiff before baking, you can add a tiny bit of liquid—like a teaspoon of milk, water, or oil—to achieve the right consistency. However, the most frequent culprit is baking for too long. Keep a close eye on your cookies and remove them from the oven when the edges are set but the center still looks slightly soft and glossy.
How to keep homemade cookies soft? A tried-and-true method to maintain the delightful softness of your homemade cookies is to place a slice of plain bread (or even a half apple) in the airtight cookie jar or container with them. The bread will gradually absorb moisture from the air, transferring it to the cookies and keeping them tender. The next day, you’ll find the bread slice dry and hard, having done its job perfectly.
You must chill dough: This step is non-negotiable for cake mix cookies, especially when using oil. Chilling the dough for at least 20-30 minutes firms up the fat, which helps the cookies hold their shape and prevents them from spreading excessively into thin, flat discs. It also allows the flavors to meld beautifully.
Make even cookie dough balls: Consistency is key for uniform baking. Using a cookie scoop (about 1.5-2 tablespoons) or carefully rolling equal-sized portions ensures that all cookies bake evenly. This prevents some from being overdone while others are undercooked, and results in a more professional-looking batch.
Butter vs. Oil: While both fats can be used, oil (like vegetable or canola oil) is often recommended for cake mix cookies as it contributes to a softer, more moist texture that stays fresh for longer. If you opt for butter, ensure it’s unsalted to control the overall saltiness of your cookies, and make sure it’s at room temperature for easier mixing.
Line baking tray with parchment paper: This simple trick is a game-changer. Parchment paper not only prevents your cookies from sticking to the baking sheet, ensuring they lift off cleanly, but it also aids in even baking and makes cleanup incredibly easy. A silicone baking mat works just as well.
Eggs should be at room temperature: Room temperature eggs incorporate more smoothly and evenly into the cookie dough. This leads to a more homogenous mixture, which in turn contributes to a better texture in your final baked cookies. If you forget to take them out ahead of time, you can quickly warm them by placing them in a bowl of warm water for a few minutes.
Don’t over-mix dough: Once the wet and dry ingredients are combined, mix only until just incorporated. Over-mixing develops the gluten in the flour, resulting in tough, dense cookies instead of the desired soft and chewy texture.
Don’t over-bake cookies: This is arguably the most important tip for soft cookies. Remove cookies from the oven when their edges are set and lightly golden, but the centers still look slightly underdone or soft. They will continue to firm up as they cool on the baking sheet and then on a wire rack.
Storage Guidelines for Your Homemade Reese’s Cookies
Knowing how to properly store your Reese’s cookies ensures they stay fresh, soft, and delicious for as long as possible. Whether you’ve made them ahead or have leftovers, these tips will help preserve their quality.
Room Temperature: Unfrosted Reese’s cookies can be stored in an airtight container at room temperature for up to 3 days. To maintain maximum freshness and softness, consider placing a slice of bread in the container as mentioned in the tips section.
Refrigerator: If you have frosted cookie sandwiches or prefer to extend the shelf life of unfrosted cookies, they can be stored in a sealed container in the refrigerator for up to 5 days. For frosted cookies, it’s best to place them in a single layer or use parchment paper between layers to prevent them from sticking together.
Make Ahead Instructions (Freezing Dough): These cookies are excellent for meal prepping or baking in batches. You can prepare the cookie dough and store it in a sealed, freezer-safe container or a heavy-duty freezer bag for up to 1 month. When you’re ready to enjoy freshly baked cookies, simply thaw the dough in the refrigerator overnight. Once thawed, form the dough into balls and bake according to the instructions provided in the recipe below. You can also freeze already-baked unfrosted cookies for up to 2-3 months in an airtight container, thawing them at room temperature before serving.

More Peanut Butter Cookie Recipes You’ll Love
If you’re as enamored with peanut butter cookies as we are, you’ll definitely want to explore these other fantastic recipes that celebrate the rich, nutty flavor of peanut butter:
- Easy Peanut Butter Cookies: The classic, simple, and satisfying cookie you know and love.
- Peanut Butter and Jelly Cookies (Thumbprints): A nostalgic favorite that combines two beloved flavors in one delightful bite.
- Easy Peanut Butter Blossoms Recipe: Soft peanut butter cookies crowned with a chocolate kiss, a timeless holiday treat.
- Small Batch Peanut Butter Chocolate Chip Cookies: Perfect for when you need a quick, healthy-ish fix without making a huge batch.
Discover More Delicious Cake Mix Cookies
Cake mix isn’t just for cakes anymore! It’s a fantastic shortcut for creating incredibly easy and flavorful cookies. Expand your cake mix cookie repertoire with these delightful recipes:
- Easy Heart Cookies (With Cake Mix): Perfect for Valentine’s Day or any occasion that calls for a sweet, heartfelt treat.
- Easy Pumpkin Cookies (With Cake Mix): A seasonal favorite, wonderfully soft and spiced, ideal for autumn baking.
- Chocolate Chip Cookie Cake (With Cake Mix): The ultimate crowd-pleasing dessert, made simple with a cake mix base.
- Gooey Butter Cookies (With Cake Mix): Irresistibly soft and chewy with a classic melt-in-your-mouth texture.
- White Chocolate Chip Cookies (With Cake Mix): A simple and elegant cookie, elevated by the creamy sweetness of white chocolate.
Recipe

Easy Reese’s Cookies (With Cake Mix)
Abeer Rizvi
Pin Recipe
Want to Save This Recipe?
Enter your email & I’ll send it to your inbox. Plus, get great new recipes from me every week!
By submitting this form, you consent to receive emails from CakeWhiz
Ingredients
These simple ingredients come together quickly to create an irresistible batch of Reese’s cookies:
- 2 Large Eggs (at room temperature for best results)
- ⅓ cup Vegetable Oil (or other neutral oil)
- 1 box Chocolate Cake Mix (standard 15.25 oz / 432g size)
- ¾ cup Reese’s Pieces (for extra peanut butter goodness, use a combination of half Reese’s Pieces and half mini Reese’s peanut butter cups, chopped if large)
Optional Filling for Cookie Sandwiches:
- 2 cups Vanilla or Peanut Butter Buttercream Icing
- 1 cup Mini Reese’s Peanut Butter Cups (halved or chopped for decor)
- ½ cup Reese’s Pieces (for rolling edges)
Instructions
Follow these straightforward steps to bake your perfect batch of Reese’s cake mix cookies:
-
In a large mixing bowl, crack the eggs and add the oil. Whisk them together thoroughly until the mixture is smooth and fully combined.
-
Pour the chocolate cake mix into the wet ingredients. Mix using a spatula or an electric mixer on low speed until all ingredients are just combined and a soft dough forms. Be careful not to over-mix.
-
Gently stir in the Reese’s Pieces (and any mini peanut butter cups, if using) until they are evenly distributed throughout the chocolate cookie dough.
-
Cover the bowl with plastic wrap and chill the cookie dough in the fridge for at least 20 minutes. This step is crucial for preventing the cookies from spreading too much during baking.
-
Preheat your oven to 350°F (175°C). Line a baking tray with parchment paper. Scoop out small, even portions of the chilled dough (about 1.5-2 tablespoons per cookie) and roll them into neat balls.
-
Place the cookie dough balls onto the prepared baking tray, leaving enough space between them for spreading.
-
Bake for 10-12 minutes, or until the edges of the cookies are firm and slightly golden, but the centers still appear soft and fudgy. Remember, they will continue to set as they cool.
-
For an even more appealing presentation, gently press a few extra Reese’s Pieces candies on top of the warm cookies immediately after removing them from the oven, before they cool completely. Let them cool on the baking sheet for 5 minutes before transferring to a wire rack. Enjoy them warm, or allow to cool completely to make cookie sandwiches.
-
To make cookie sandwiches: Once the cookies are entirely cool, flip half of them over. Using a spatula, spread a generous layer of buttercream icing onto the flat side. Top with the remaining cookies and press gently. For an extra decorative touch, roll the edges of the filled sandwiches in chopped mini Reese’s peanut butter cups and Reese’s Pieces. Serve immediately or store as directed.
Notes
- For comprehensive guidance, please read all the detailed tips and techniques provided in the sections above to ensure your cookies turn out perfectly every time.
- Unfrosted cookies can be stored in a sealed, airtight container at room temperature for up to 3 days. For longer freshness, they can be kept in the fridge for up to 5 days. Frosted cookie sandwiches, due to their filling, must be stored in the refrigerator for up to 5 days.
Nutrition
An automated tool is used to calculate the nutritional information. As such, I cannot guarantee the accuracy of the nutritional information provided for any recipe on this site.
