Easy & Festive New Year Clock Cake: Homemade Recipe for a Memorable Celebration
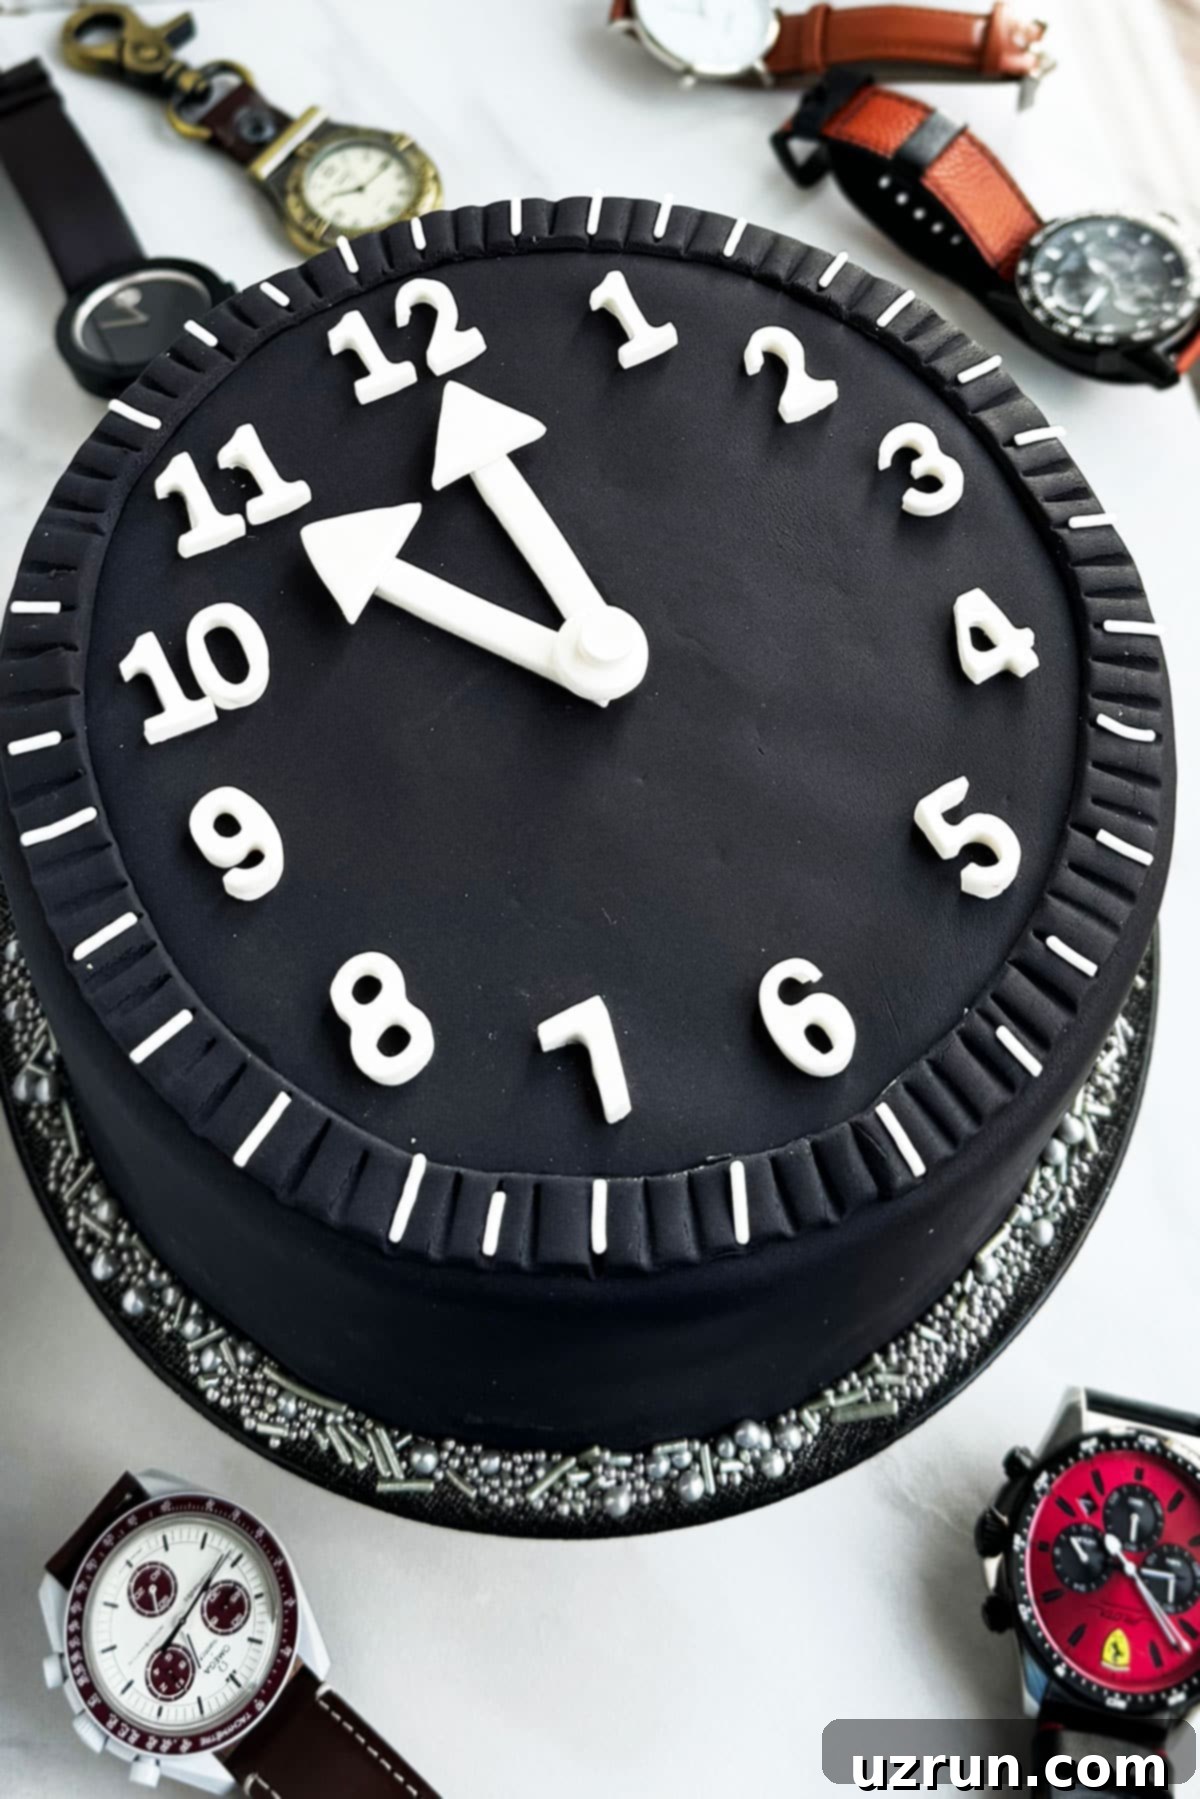
As the year draws to a close and a new one beckons, there’s no better way to celebrate than with a show-stopping homemade dessert. This incredibly easy New Year cake recipe is designed to be a delightful centerpiece for your New Year’s Eve party or a sweet treat to welcome the first day of January. Crafted with simple, readily available ingredients, this cake embodies the spirit of new beginnings and festive anticipation.
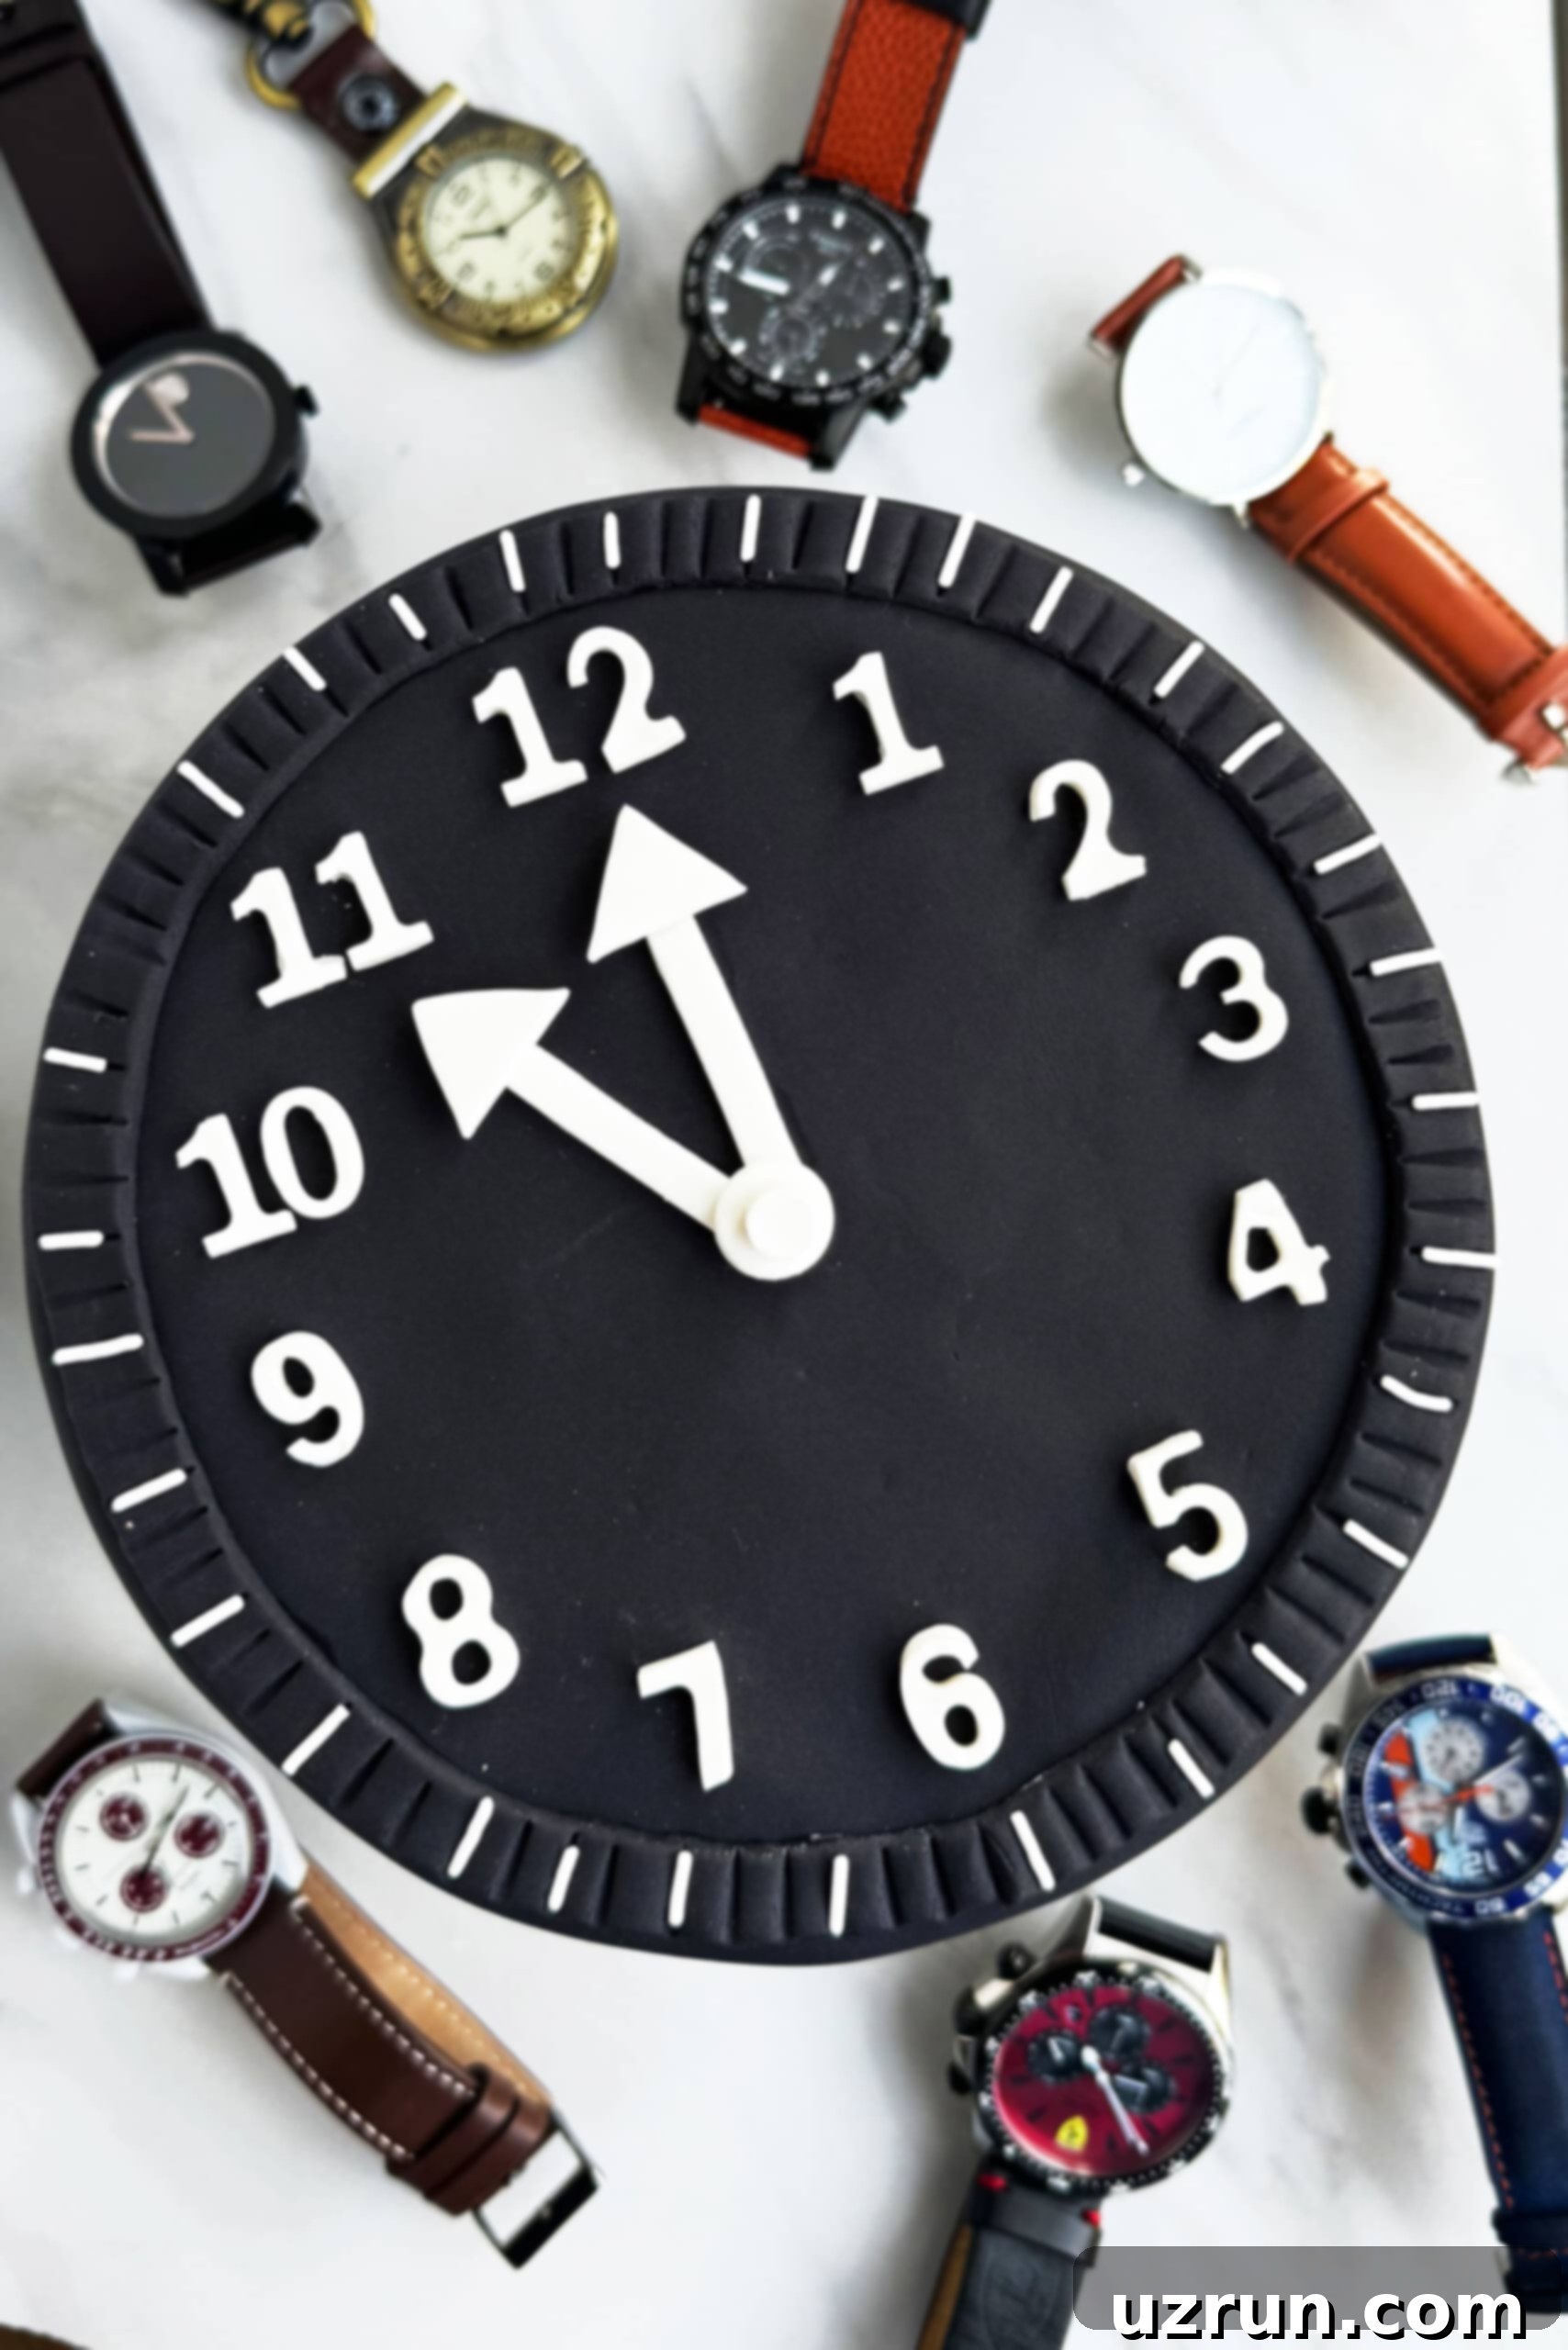
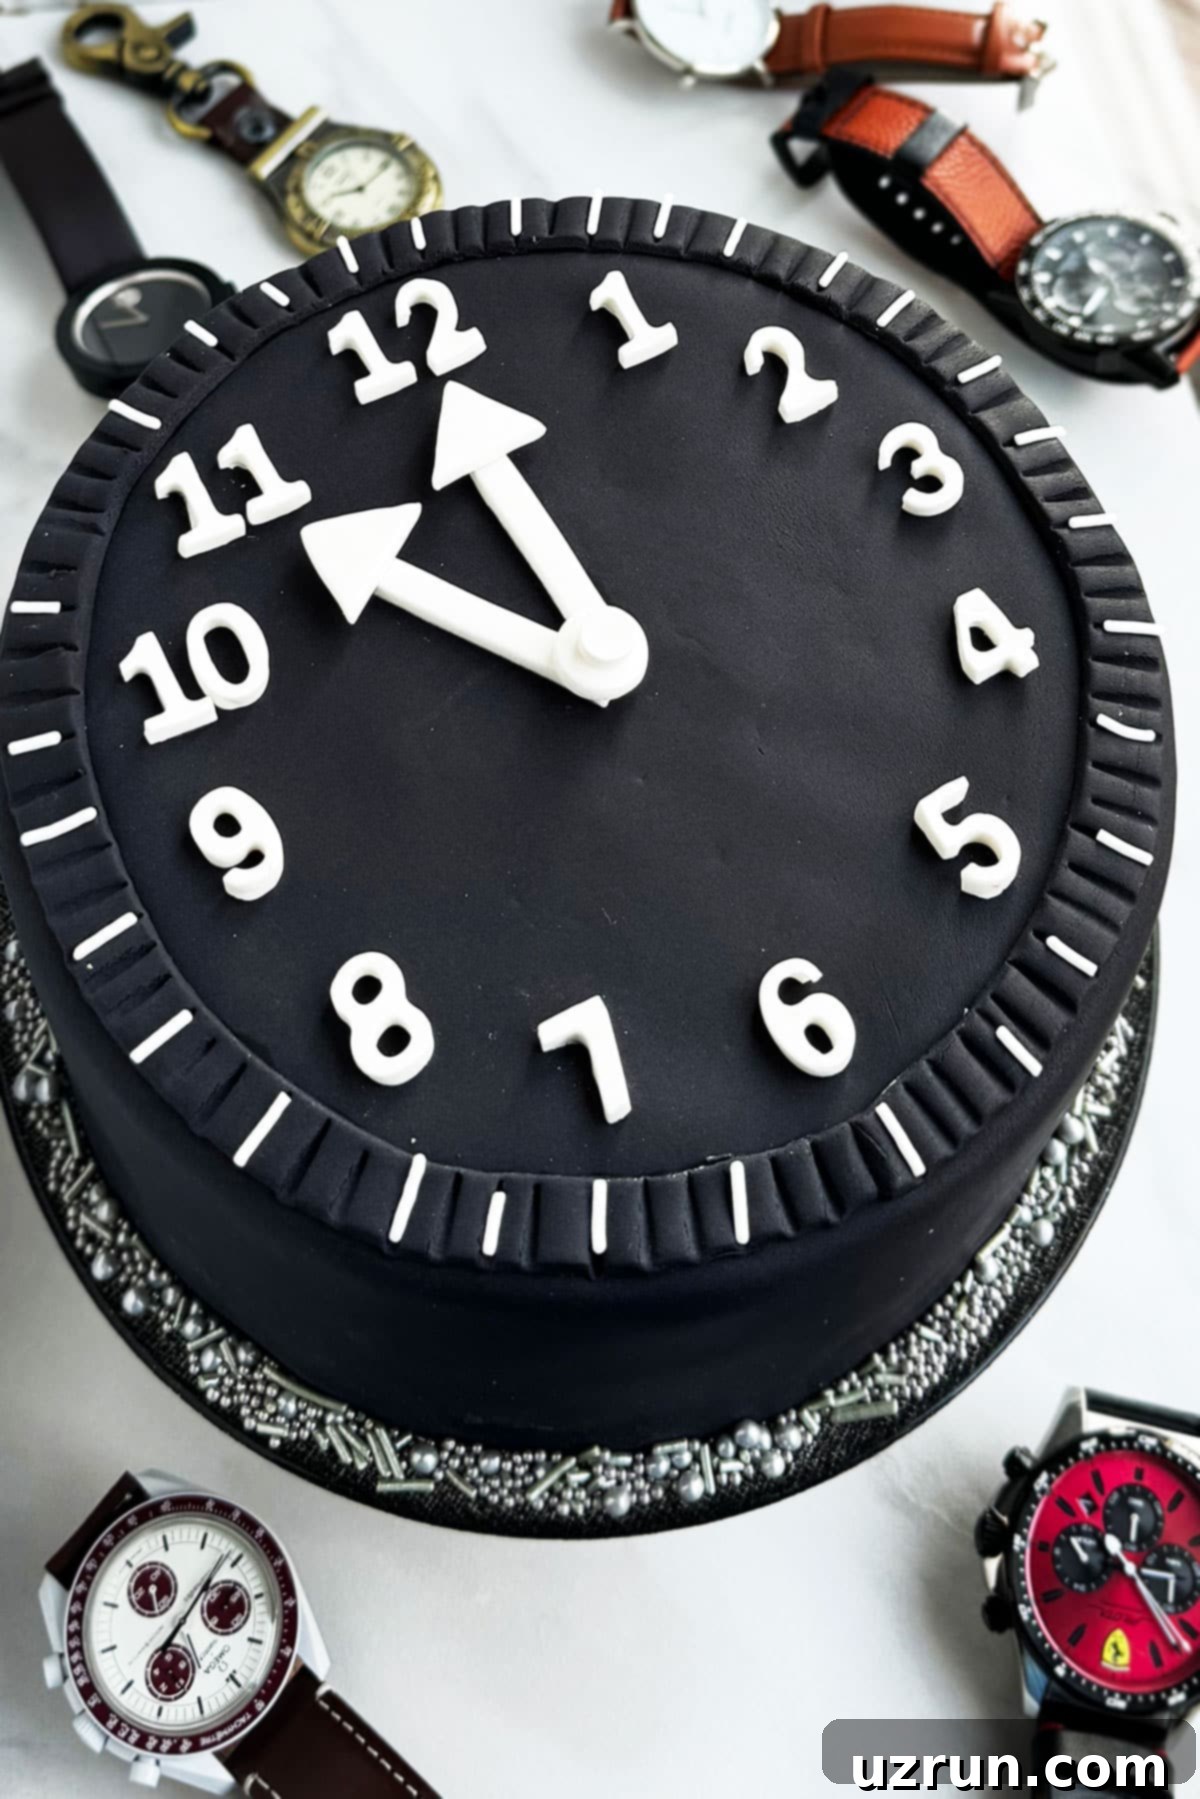
Our special “midnight clock cake” design features a striking combination of smooth buttercream icing, complemented by elegant white and black fondant accents. The step-by-step tutorial included in this guide ensures that even novice bakers can achieve a professional-looking result. Whether you’re hosting a grand celebration or an intimate gathering, this cake is sure to impress your guests and create lasting memories.
Worried about working with fondant? No problem at all! We’ve got you covered. This comprehensive post also includes a detailed cake decorating tutorial that uses only luscious buttercream, offering a beautiful alternative for those who prefer frosting-only designs or want a quicker decoration method. Get ready to bake, decorate, and celebrate the New Year in delicious style!
As we “clock” into a new year, it’s the perfect moment to embrace fresh starts and exciting new experiences, and what better way to begin than with a creative baking project? This spectacular New Year’s cake serves as an excellent starting point for trying something new in the kitchen. For those setting goals for the year ahead, you might even find inspiration in our delightful New Year’s Resolution Cookies – a fun and tasty way to visualize your aspirations. But be sure to dive into these scrumptious treats sooner rather than later, because as the saying goes, the clock is ticking, and delicious moments shouldn’t wait!
Beyond its primary role as a New Year’s centerpiece, this versatile clock cake design holds surprising potential for other special occasions. Imagine adapting it for Father’s Day, perhaps by personalizing the clock face with a meaningful time or adding small thematic elements. It could stand proudly alongside other themed creations like a robust Tool Box Cake, an epic Star Wars Cake, or an inspiring Karate Cake. This adaptability makes the clock cake a truly rewarding recipe to master, offering endless possibilities for custom celebrations throughout the year.
Table of Contents
- Key Ingredients for Your New Year Clock Cake
- Creative Variations for Your Clock Cake
- How to Make the Easy New Year Clock Cake (Fondant Method)
- Another Stunning Design Using Only Buttercream Frosting
- Expert Tips and Decorating Techniques
- New Year Clock Cake FAQs
- Storage Tips for Your Decorated Cake
- More Easy Decorated Cake Ideas
- Full Recipe: Easy New Year Clock Cake
Key Ingredients for Your New Year Clock Cake
Creating this festive New Year clock cake requires a few essential ingredients. Each component plays a vital role in both the flavor and visual appeal of your final masterpiece. Here’s a closer look at what you’ll need:
- Cake Base: You’ll need two perfectly baked round cakes to form the foundation of your clock. A sturdy, moist cake works best for stacking and decorating. While our recipe uses chocolate raspberry, feel free to choose your favorite flavor – just ensure it’s a reliable recipe that yields consistent results.
- Buttercream Icing: This isn’t just any frosting; it’s the versatile medium that binds your cake layers and provides a smooth canvas for your decorations. A classic American buttercream is ideal for its stability and ease of coloring, making it perfect for both filling and covering your cake before applying fondant or piping details.
- Black Fondant: Achieving a deep, rich black color with homemade fondant can be challenging and often results in a greyish hue. For the best visual impact and ease of use, we highly recommend opting for good quality store-bought black fondant. It will provide that crisp, midnight black background for your clock.
- White Fondant: This contrasting fondant is crucial for creating the intricate details of your clock face, specifically the numbers and the elegant clock hands. Its clean, bright color will pop against the black, making your clock legible and stylish.
- Decorative Sprinkles: To add that final touch of sparkle and festive flair, a mix of gray and white sprinkles are used. These little embellishments provide texture and a celebratory feel, mimicking glitter or stars around the edges of your New Year’s clock cake. Feel free to experiment with gold or silver for an even more glamorous look!
Creative Variations for Your Clock Cake
One of the joys of baking at home is the freedom to customize. This New Year clock cake, while stunning in its classic black and white, offers a canvas for endless creativity. Here are some inspiring variations to make your cake uniquely yours:
- Experiment with Cake Flavors: Don’t limit yourself to just one type of cake! The base flavor can significantly impact the overall experience. Consider a classic Vanilla Cake for a universally loved appeal, or a rich Red Velvet Cake for a pop of festive color beneath the dark fondant. A playful Funfetti Cake would add unexpected cheer, while a decadent Moist Triple Chocolate Cake is perfect for serious chocolate lovers.
- Introduce Exciting Fillings: Layering your cake with a delicious filling can elevate its taste profile. Think about a vibrant Strawberry Jam or tangy Raspberry Pie Filling for a fruity burst. For a lighter touch, Whipped Cream or its richer counterpart, Chocolate Whipped Cream, can add a luxurious texture. Warm, comforting options like Crockpot Apple Butter, classic Chocolate Ganache, silky Caramel Sauce, or a creamy Homemade Vanilla Custard will provide an extra layer of flavor and moisture.
- Explore Different Frosting Flavors: The outer frosting doesn’t have to be plain buttercream. Infuse your cake with unique flavors by using Marshmallow Frosting for a sweet, pillowy texture, or Easy Mint Frosting for a refreshing twist. A rich Caramel Frosting or a zesty Lemon Frosting can perfectly complement your cake base. For even more indulgence, consider a tangy Cream Cheese Frosting, decadent Chocolate Ganache Frosting, or a delicate White Chocolate Buttercream.
- Fondant-Free Design with Buttercream: If working with fondant isn’t your preference, this cake’s simple design is perfectly suited for an all-buttercream approach. You can easily achieve the clock effect using Black Buttercream Icing to cover the cake and pipe on the numbers and hands. This method is often quicker, simpler, and yields a soft, melt-in-your-mouth finish. The choice between fondant and buttercream is entirely yours, depending on your desired look and skill level.
- Play with Color Combinations: While black and white offers a classic, elegant midnight aesthetic, don’t shy away from vibrant colors! Imagine a striking blue and yellow clock, a whimsical purple and green, or a romantic pink and white. Your imagination is the only limit here – choose colors that match your party theme, favorite hues, or simply what brings you joy.
- Set a Meaningful Time: We’ve set our clock to just before midnight to signify the New Year. However, you can personalize this aspect for other occasions. For a birthday cake, set the hands to the time of the recipient’s birth. For an anniversary, perhaps the time the couple met or got married. This thoughtful detail adds a personal touch that guests will surely appreciate.
- Transform it into a Wristwatch: Get even more creative by modifying the basic round clock design to resemble a wristwatch! This can be done by strategically adding extra pieces of cake or fondant on either side of the main circle, shaping them to look like a watch strap. This fun adaptation makes for a unique birthday cake, especially for watch enthusiasts or a Father’s Day treat.
How to Make the Easy New Year Clock Cake (Fondant Method)
Creating this eye-catching New Year clock cake from scratch is a rewarding experience, and with these detailed steps, you’ll find it surprisingly straightforward. We’ll walk you through the fondant decorating method first, providing clear guidance for each stage.
- Prepare Your Cake Base: Start by baking your two round cakes according to your chosen recipe (like our delicious chocolate raspberry cake). It is absolutely crucial to allow the cakes to cool completely to room temperature before you begin decorating. Warm cakes will cause your buttercream to melt and slide, making decoration impossible. While the cakes are cooling, this is the perfect time to prepare your buttercream icing.
- Assemble the First Layer: Once cooled, place one of your cake layers onto your chosen cake stand or serving plate. Using an offset spatula, spread a generous and even layer of buttercream icing over the top surface of this cake. This not only adds flavor but also acts as a “glue” for the next layer.
- Stack and Crumb Coat: Carefully place the second cake layer directly on top of the iced first layer, aligning them neatly. Now, apply a thin layer of buttercream over the entire cake – top and sides. This is known as a crumb coat, and its purpose is to trap any loose crumbs, preventing them from mixing into your final, smooth layer of icing. Chill the cake briefly to set the crumb coat.
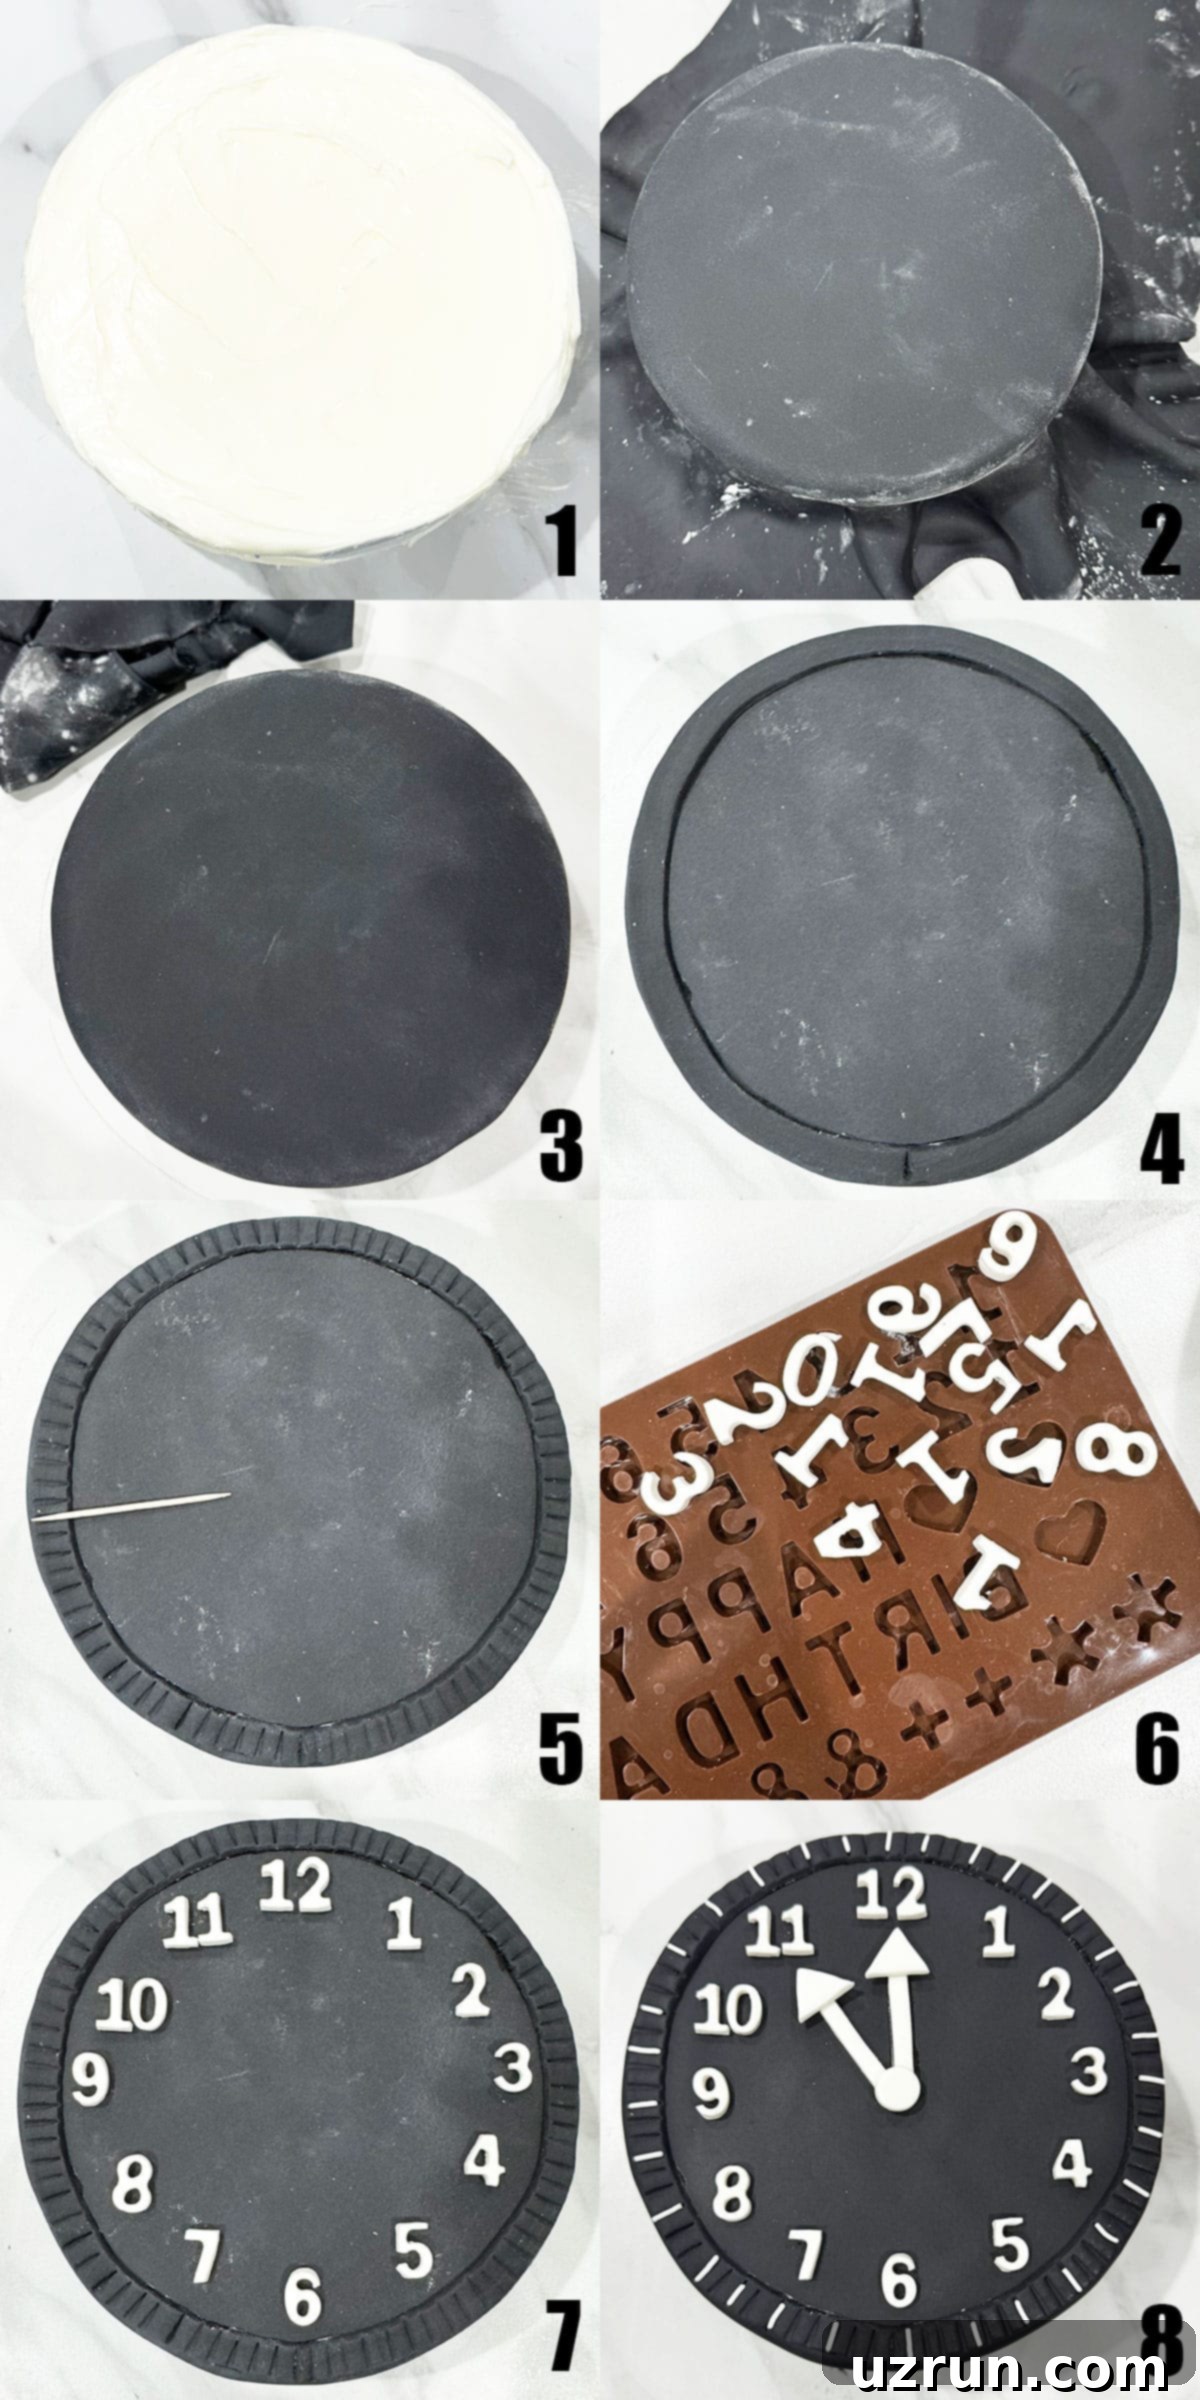
- Apply the Final Buttercream Layer (Image 1): Once the crumb coat is firm, apply a thicker, smooth layer of buttercream icing over the entire cake. Aim for as smooth a finish as possible, as this will be the foundation for your fondant.
- Roll Out Black Fondant (Image 2): Lightly dust your work surface with powdered sugar to prevent sticking. Knead your store-bought black fondant until it’s pliable. Using a rolling pin, roll out the fondant into a large, even circle, wide enough to cover the top and sides of your cake.
- Cover the Cake with Fondant (Image 3): Carefully lift the rolled fondant and gently drape it over your buttercream-covered cake. Begin smoothing it out from the top center, working your way outwards and down the sides. Use a fondant smoother or the palms of your hands to eliminate air bubbles and creases. Once smooth, use a pizza cutter or a sharp knife to trim away any excess fondant around the base of the cake, ensuring a neat edge.
- Create the Clock Rim (Image 4): Cut a thin, even strip of black fondant, approximately half an inch wide. Lightly brush a tiny amount of water around the top edge of your cake – this acts as a natural adhesive. Carefully apply the black fondant strip around this top edge, pressing gently to secure it.
- Add Detailed Indentations (Image 5): To give the clock rim a more refined, detailed look, use the side of a toothpick or a small modeling tool to gently make small, evenly spaced indentations all around the applied black strip. This adds texture and realism to your clock design.
- Form White Fondant Numbers (Image 6): Using a specialized fondant mold or even small candy molds designed for letters and numbers, create the numerals for your clock face (12, 1, 2, 3, etc.) out of white fondant. Ensure they are uniform in size and neatly cut.
- Attach the Numbers (Image 7): Lightly brush the back of each white fondant number with a tiny amount of water. Carefully place and adhere these numbers onto the black fondant clock face, spacing them out evenly as you would on a real clock. Start with 12, 3, 6, and 9 for accurate placement, then fill in the others.
- Craft Clock Hands (Image 8): Cut two small white fondant strips for the minute and hour hands, along with two tiny white triangles to form the arrow tips. These will be positioned in the center of the cake, pointing towards your chosen “midnight” time (or any time you prefer). Secure them with a tiny brush of water.
- Steam for a Flawless Finish: For that truly professional, clean, and smooth finish, steam your cake. Use a handheld garment steamer or a steam iron held at a safe distance (do not get too close, as water droplets can damage the fondant). This process helps to dissolve any residual powdered sugar from rolling and creates a beautiful, even sheen.
- Final Sparkle: To complete your festive creation, delicately scatter a few white jimmie sprinkles around the top edge of the cake, just above the black strip, mimicking stars. Then, toss some gray sprinkles around the base of the cake for an elegant finishing touch. Your exquisite New Year clock cake is now ready to be admired and enjoyed!
Another Stunning Design Using Only Buttercream Frosting
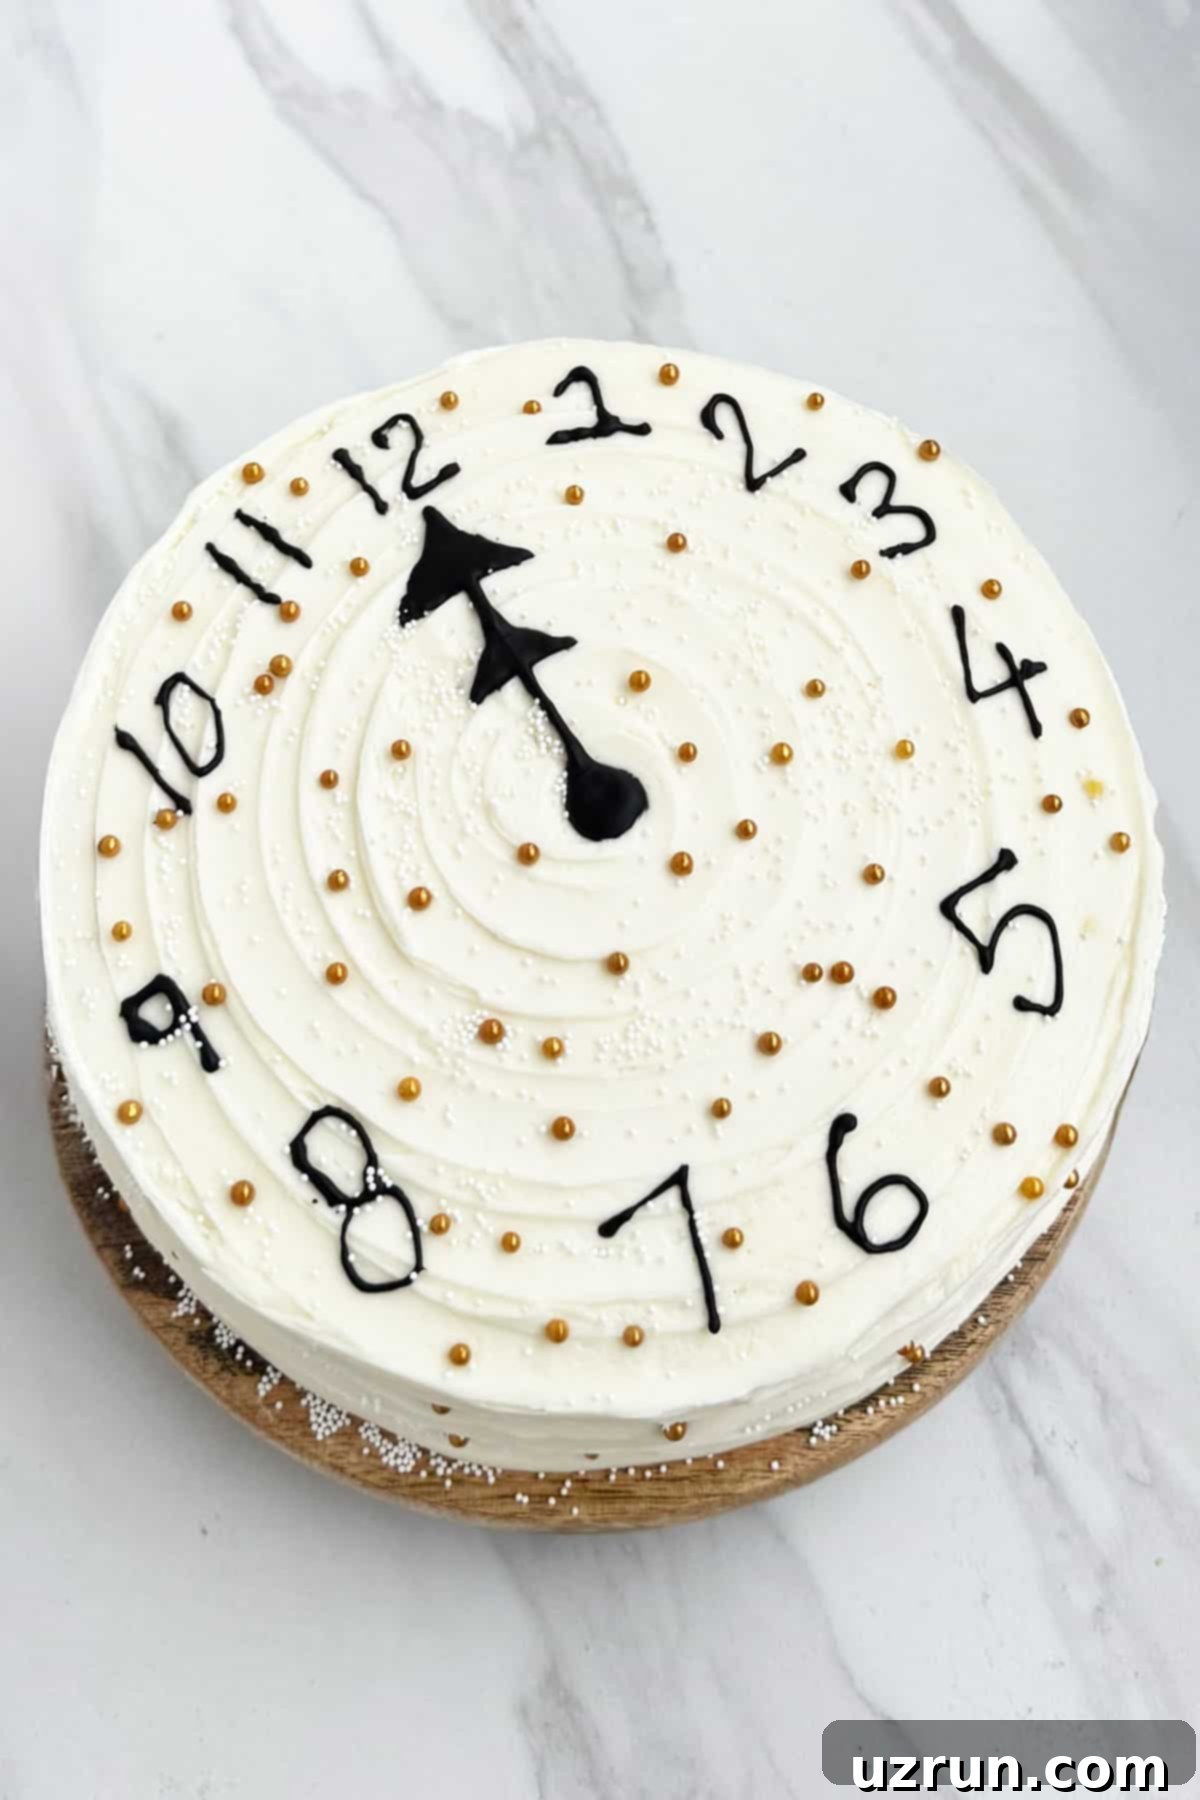
For those who prefer the creamy texture and taste of buttercream or wish to avoid fondant altogether, this alternative decorating method is perfect! It’s wonderfully simple, making it a fantastic project for beginner bakers or even for involving kids in the fun of New Year’s Eve preparations. This design achieves a beautiful clock effect purely with frosting.
- Bake and Cool Your Cakes: As with any cake decorating project, begin by baking your chosen cake layers and allowing them to cool completely on a wire rack. This is crucial for a stable and successful frosting application.
- Prepare White Buttercream: While your cakes are cooling, prepare a batch of smooth, white buttercream icing. Ensure it’s at the right consistency for spreading – not too stiff, not too runny.
- First Layer & Filling: Place one cooled cake layer onto your serving plate or cake stand. Use an offset spatula to spread a generous and even layer of white buttercream over the top surface. If desired, you can add a layer of your favorite jam or filling here for an extra burst of flavor.
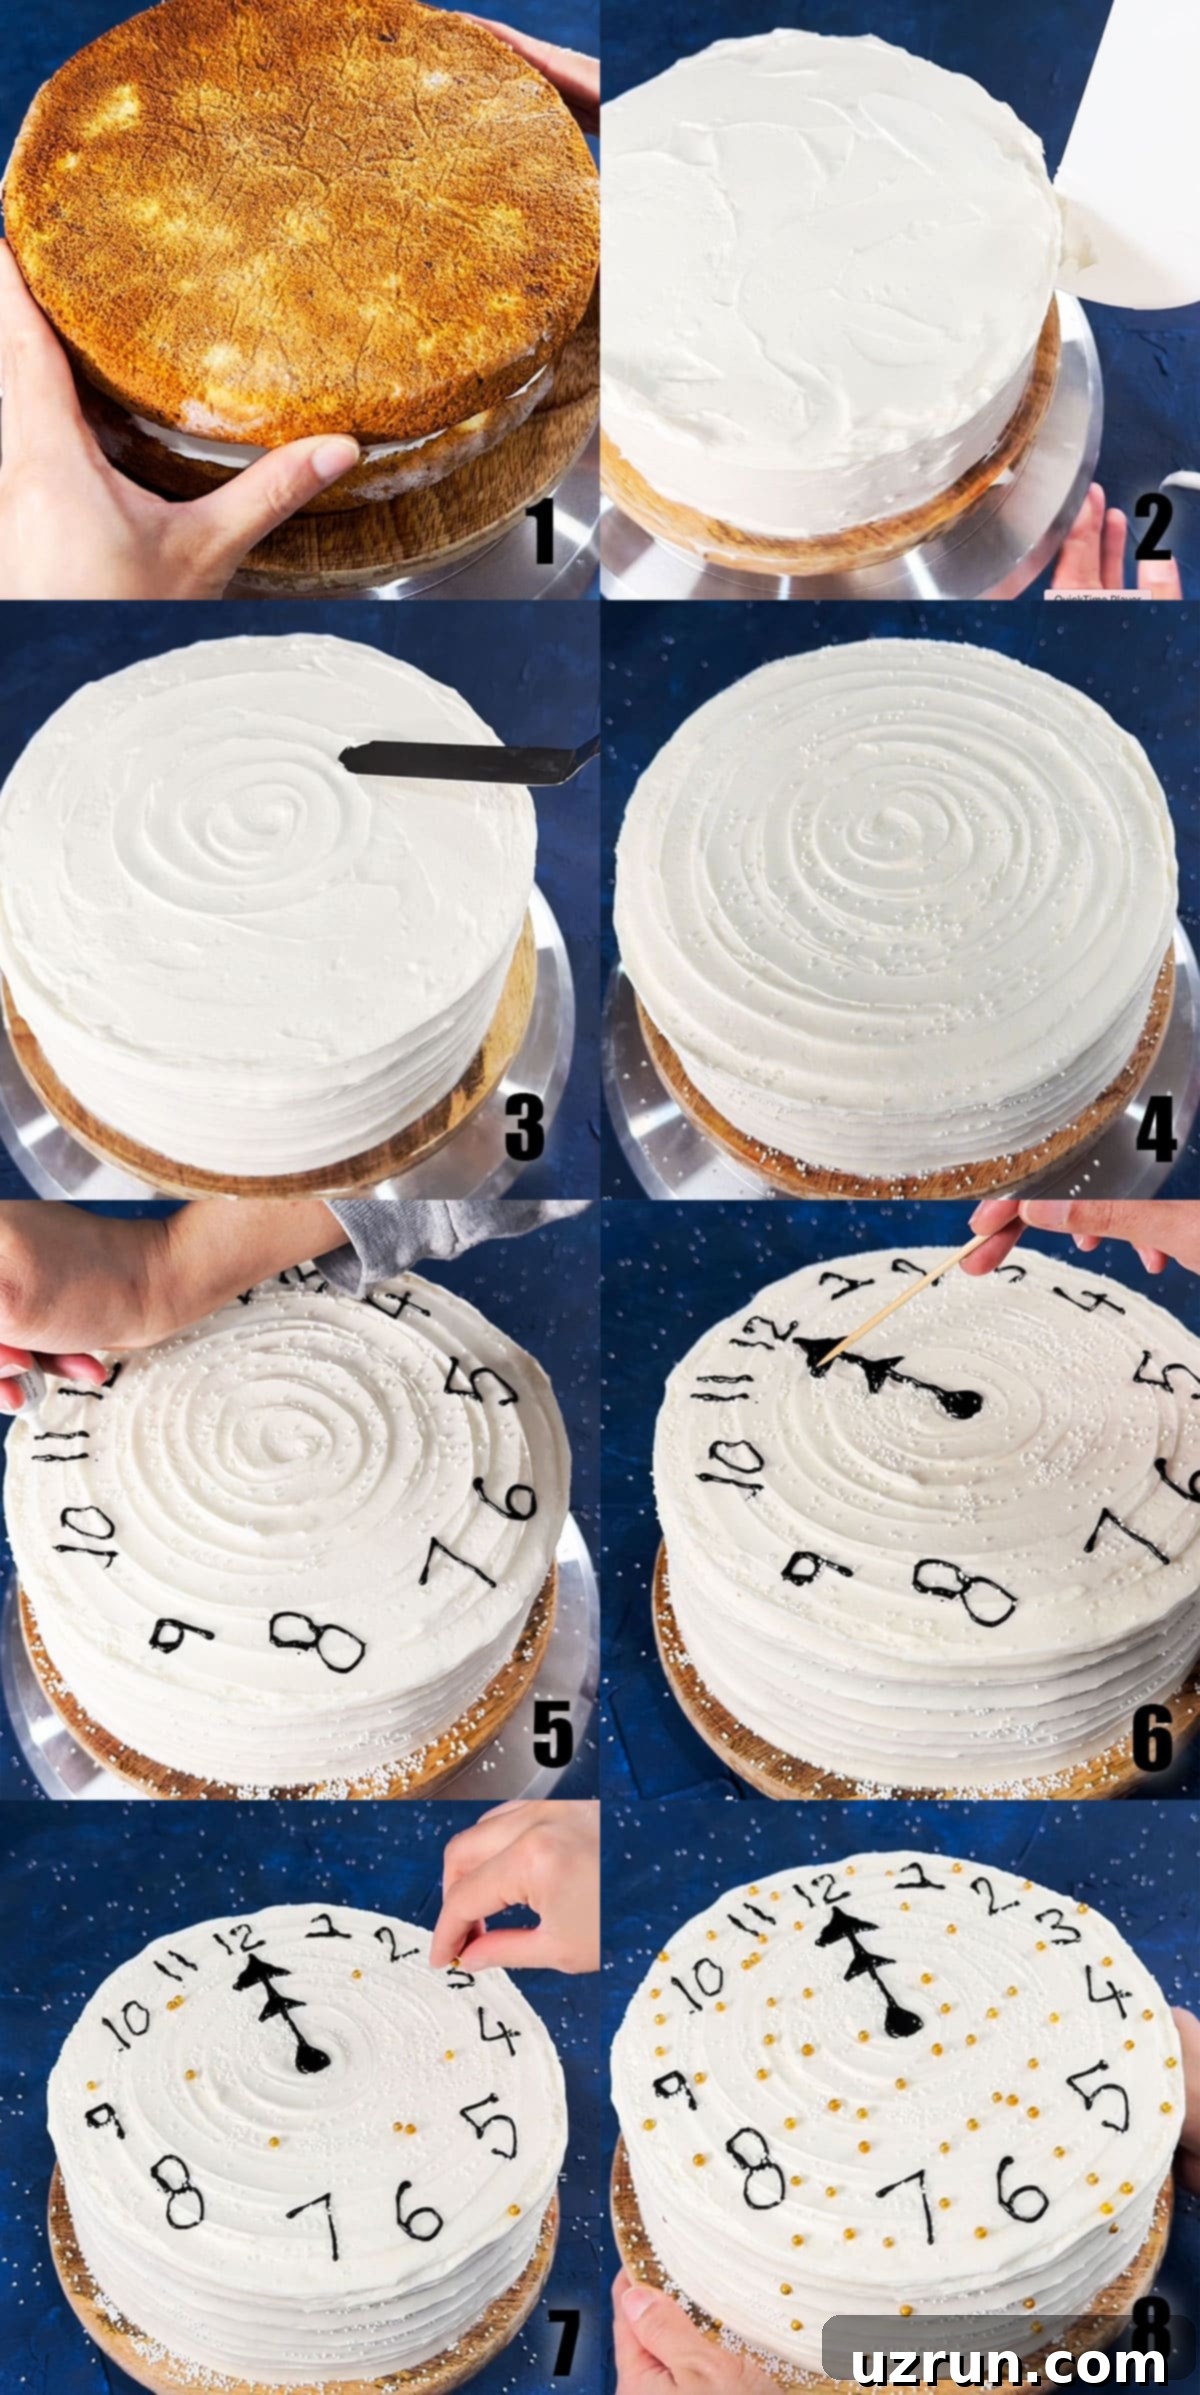
- Stack the Second Layer (Image 1): Carefully position the second cake layer directly on top of the iced first layer. Press gently to ensure it’s level and secure, forming a stable foundation for your clock cake.
- Crumb Coat and Final Frosting (Image 2): Apply a thin crumb coat of white buttercream to the entire cake, both top and sides. This step is essential for trapping any loose crumbs. Chill for 15-20 minutes until firm. Then, apply a final, smooth layer of white buttercream, aiming for a clean and even finish around the entire cake.
- Create a Spiral Pattern (Image 3): For an artistic touch, use the edge of an offset spatula to gently create a subtle spiral pattern on the top and sides of the cake. Start from the center of the top and swirl outwards, then repeat on the sides. This adds visual interest and texture.
- Add White Sprinkles (Image 4): If you like, gently toss a scattering of white sprinkles over the top of the cake. This can mimic snow or confetti, adding to the festive New Year’s theme.
- Pipe Black Buttercream Numbers (Image 5): Fill a piping bag with black buttercream icing and fit it with a very small round piping tip. Alternatively, you can use store-bought black icing tubes, making sure to cut the tip extremely tiny for fine lines. Carefully pipe the clock numbers onto the white cake surface. A helpful trick is to pipe the 12, 3, 6, and 9 first to ensure even spacing, then fill in the remaining numbers.
- Pipe Clock Hands (Image 6): Using the same black buttercream, pipe the hour and minute hands, pointing them to just before midnight (or your chosen time). For a cleaner look, use a wooden skewer to gently smooth out any slight imperfections in your piped lines, ensuring sharp, precise hands.
- Garnish with Gold Sprinkles (Image 7): To introduce a touch of elegance and sparkle, toss some gold sprinkles onto the top and sides of the cake. This pop of metallic color beautifully contrasts with the black and white, making your clock cake truly shine.
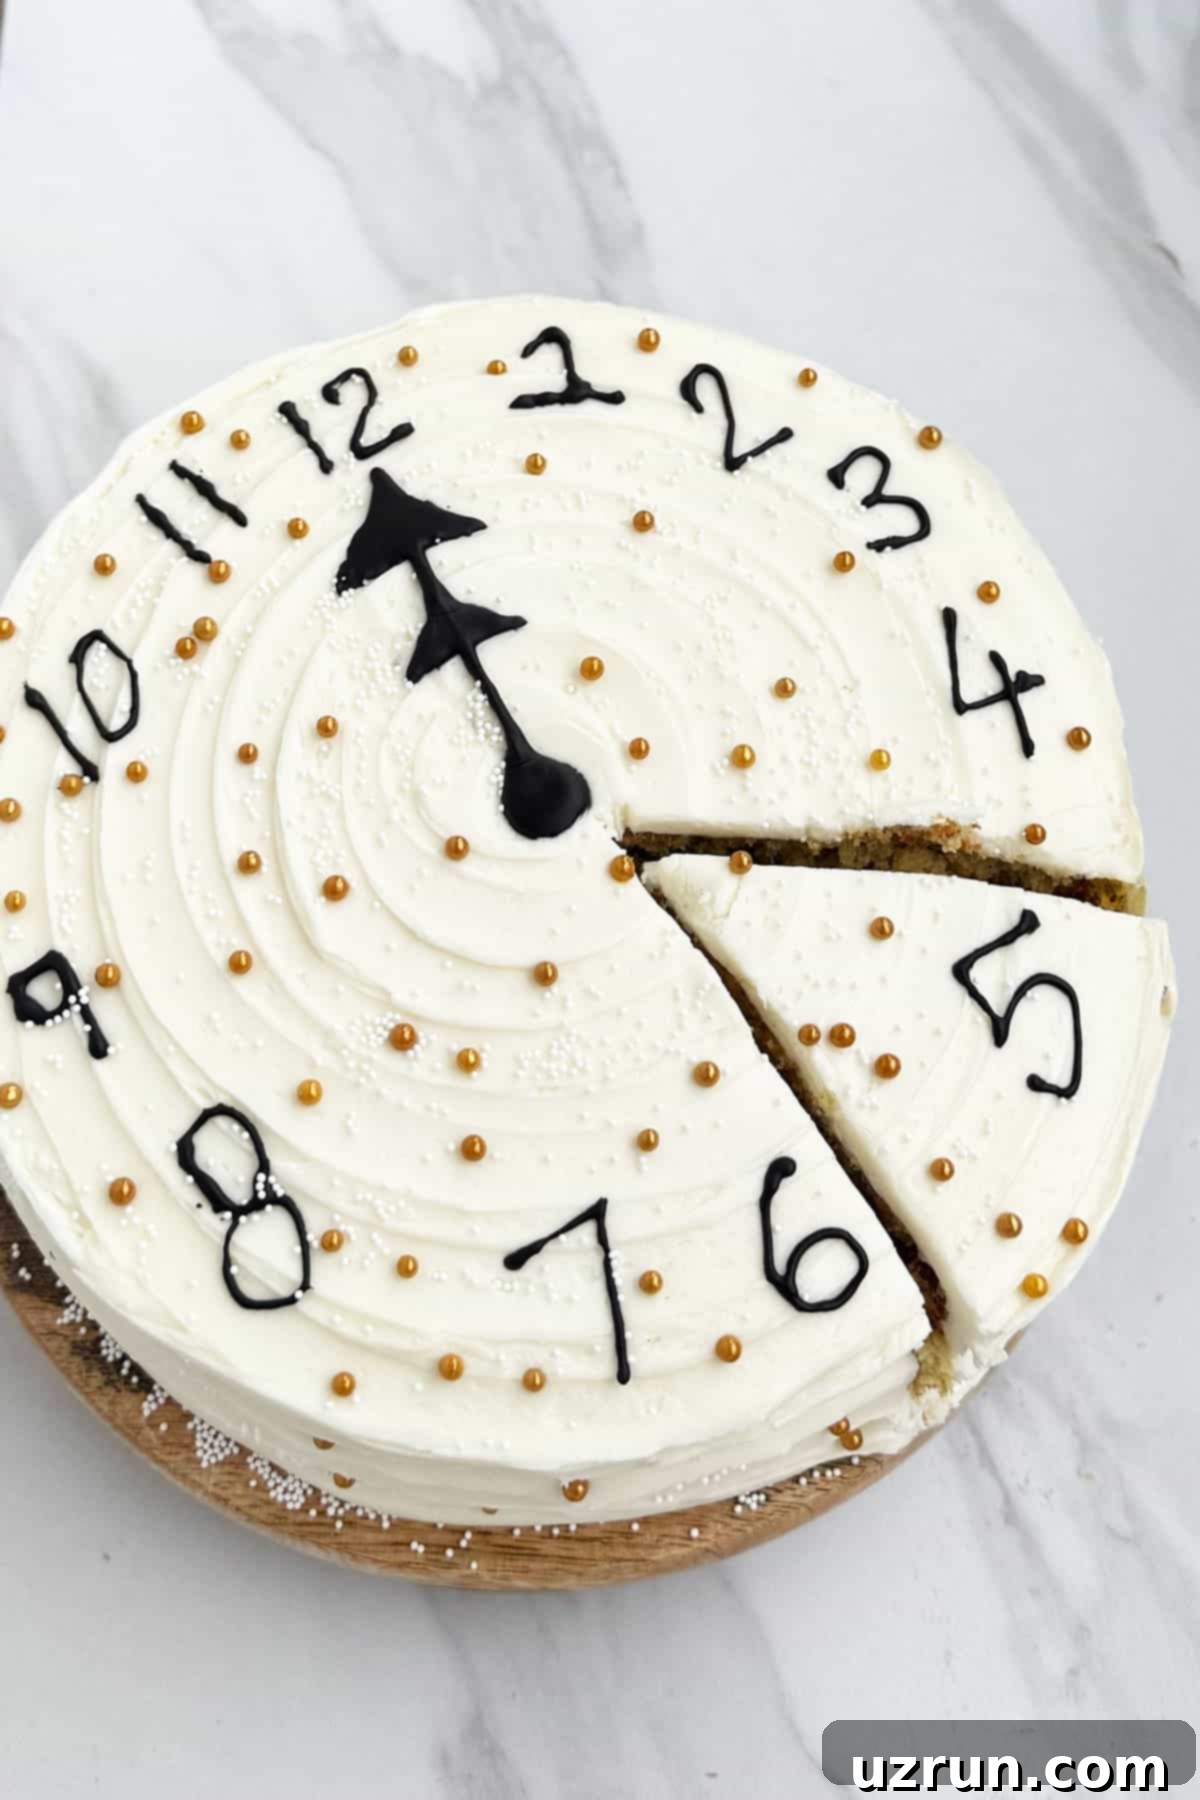
- Chill Before Serving (Image 8): Once decorated, cover your cake loosely and chill it in the refrigerator for at least 30 minutes to allow the buttercream to firm up. This makes for easier slicing and serving. Your stunning buttercream clock cake is now ready to be unveiled and enjoyed by your guests!
Expert Tips and Decorating Techniques
Achieving a beautiful, professional-looking cake is all about the details and knowing a few clever tricks. Here are some essential tips and techniques to ensure your New Year clock cake turns out perfectly, whether you’re using fondant or buttercream:
- Opt for Store-Bought Black Fondant: While making your own fondant can be rewarding, achieving a truly deep, consistent black color at home is notoriously difficult and can require a significant amount of food coloring, potentially altering the fondant’s texture and taste. For best results and to save time, we strongly recommend purchasing high-quality store-bought black fondant. Brands like Satin Ice and Wilton are excellent choices known for their workability and rich color saturation.
- Maintain Distance While Steaming Fondant: If you’re using the fondant method, steaming the cake at the end provides a pristine, smooth finish. However, it’s crucial to maintain an appropriate distance between the steamer and the cake. Holding it too close can cause water to splatter onto the fondant, creating unsightly puddles, streaks, or even dissolving parts of your delicate design. A gentle, even mist from a few inches away is ideal.
- Steaming Fondant is Essential for a Flawless Finish: For fondant-covered cakes, steaming is not just an optional step – it’s key to a refined, professional look. The steam helps to dissolve any lingering powdered sugar residue from rolling, tightens the fondant slightly, and gives the cake a beautiful, satiny sheen, making your clock cake truly stand out.
- Flavor Your Fondant: If you find the neutral taste or scent of plain fondant unappealing, you can easily enhance it. Before rolling out your fondant, knead in a few drops of a clear, concentrated food-grade extract of your choice. Vanilla, almond, lemon, or even peppermint extracts can add a delightful subtle flavor that complements your cake.
- Proper Surface Preparation for Fondant: When rolling out fondant, always ensure your work surface is generously dusted with powdered sugar (confectioners’ sugar). This layer is crucial for preventing the fondant from sticking, allowing you to roll it evenly and lift it without tearing. Don’t be shy with the dusting, but remember the steaming step will take care of any excess.
- Ensure Cakes are Completely Cool: This is a golden rule in cake decorating! Attempting to frost or cover a cake that is even slightly warm will lead to disaster. The heat will melt your buttercream, causing it to slide off the cake and create a messy, unstable structure. Patience is key here; allow your cakes ample time to cool completely to room temperature. You can even chill them briefly in the refrigerator once cooled for extra firmness.
- Master the Art of Spreading Icing: For a smooth, even buttercream layer, an offset spatula is your best friend. Use it to spread the icing smoothly across the top and sides of the cake. For beginners, applying a generous amount and then gradually smoothing it out with light, consistent strokes works best. Don’t overwork the icing, as this can introduce air bubbles.
- Efficient Fondant Trimming: When it comes to trimming excess fondant from the base of your cake, a clean, sharp pizza cutter is surprisingly effective. Its round blade allows for a smooth, continuous cut around the cake, achieving a much cleaner and straighter edge than a traditional knife, which can sometimes drag or tear the fondant.
- Practice Piping Skills (Buttercream Method): If you’re going for the all-buttercream clock, piping the numbers and hands requires a steady hand. If you’re new to piping, practice on a piece of parchment paper first. This allows you to get a feel for the pressure and movement before committing to the cake.
New Year Clock Cake FAQs
Here are some frequently asked questions to help you master your New Year’s clock cake:
A: Absolutely! We understand that not everyone is a fan of fondant, or perhaps you just prefer the taste and ease of buttercream. This clock cake design is wonderfully adaptable. You can easily achieve a stunning clock effect using black buttercream for the main cake coverage and then piping the numbers and clock hands with white or contrasting colored frosting. We’ve even included a dedicated section above with step-by-step instructions for an all-buttercream version!
A: Fondant often cracks and tears when it begins to dry out, losing its elasticity. To prevent this, it’s essential to work quickly once you’ve kneaded and rolled your fondant. Place it onto the cake as soon as possible after rolling to allow you to mold and smooth it while it’s still pliable. Keeping it covered when not actively working with it can also help, and a tiny bit of vegetable shortening kneaded into slightly dry fondant can sometimes revive it.
A: Steaming fondant cakes is a professional trick that offers several benefits. Firstly, it provides a much cleaner, more polished, and refined look by gently melting and evening out any minor imperfections on the surface. Secondly, it effectively dissolves any residual powdered sugar or cornstarch left from rolling, which can otherwise dull the fondant’s appearance. Lastly, it imparts a beautiful, subtle sheen to the fondant, making the cake look truly exquisite and photo-ready.
A: Fondant is highly sensitive to moisture and extreme temperature changes. “Sweating” or melting typically occurs when a fondant-covered cake is moved from a cold environment (like a refrigerator or freezer) to a warmer, more humid room. The moisture in the air condenses on the cold surface of the fondant, causing it to become sticky and release its color. To prevent this, try to keep fondant cakes at room temperature in a cool, dry place away from direct sunlight. If refrigeration is necessary, place the cake in an airtight box and allow it to come to room temperature very gradually, perhaps in a cooler part of your home, before exposing it to warmer air.
Storage Tips for Your Decorated Cake
Proper storage is essential to keep your beautiful New Year clock cake fresh and delicious. Here’s how to ensure your creation lasts as long as possible:
- Make Ahead Guidelines: You can certainly prepare this cake a day in advance, which is highly recommended for holiday entertaining. If your cake is covered in fondant, store it at room temperature in an airtight cake box or container. Keep it away from direct sunlight, heat sources, and excessive humidity, as these can negatively affect the fondant’s texture and appearance.
- Room Temperature Storage: For both fondant-covered and buttercream-only cakes, if kept in an airtight container or under a cake dome, your New Year cake will remain fresh and delightful at room temperature for approximately 2-3 days. While it will still be edible beyond this, the flavors and textures are always best enjoyed within the first couple of days.
- Refrigeration (Fondant Cakes): If you must refrigerate a fondant-covered cake due to a perishable filling or warm climate, be aware that the fondant may become slightly sticky or “sweat” due to the moisture and condensation in the refrigerator. To minimize this, place the cake in a tightly sealed cake box to protect it. It can be stored this way for up to 3 days. Allow it to come to room temperature before serving for the best flavor and texture.
- Refrigeration (Buttercream Cakes): Buttercream-only cakes typically fare better in the refrigerator. Store any leftover buttercream cake in an airtight container for up to 5 days. Again, let it sit at room temperature for about 30 minutes before serving to ensure the frosting is soft and creamy.
- Freezing (Fondant Cakes): Unfortunately, fondant-decorated cakes do not freeze well. The fondant tends to become excessively sticky, wet, and can even crack upon thawing, compromising the intricate design. We advise against freezing a fully decorated fondant cake.
- Freezing (Buttercream Cakes/Components): If you opt for the buttercream-only design, or wish to prepare components in advance, you can freeze undecorated cake layers and even batches of buttercream separately. Wrap cooled cake layers tightly in plastic wrap and then foil, and store in an airtight container for up to 1 month. Buttercream can be stored in an airtight container for up to 1 month. Thaw both in the refrigerator overnight, then bring to room temperature before assembling and decorating according to the instructions above.
More Easy Decorated Cake Ideas
Looking for more creative cake inspiration? Explore these other fun and easy decorated cake recipes:
- Easy Penguin Cake
- How to Make Ombre Cake (Blue)
- Rainbow Sprinkle Cake
- Easy Galaxy Cake
- How to Make Rosette Cake (Buttercream)
- Easy Cereal Cake (With Trix)
- Easy Dinosaur Cake (Dino Cake)
Full Recipe: Easy New Year Clock Cake
This easy homemade New Year cake recipe creates a festive midnight clock cake, perfect for celebrating. It features a delicious cake base, smooth buttercream, and elegant fondant decorations, complete with step-by-step instructions for a stunning finish. A buttercream-only option is also provided.
Author: Abeer Rizvi
Preparation & Baking Times
- Prep Time: 10 mins
- Cook Time: 40 mins
- Decorating Time: 30 mins
- Total Time: 1 hr 20 mins
Categorization
- Course: Dessert
- Cuisine: American
- Servings: 9 Slices
- Calories: 316 kcal per slice (approx.)
Ingredients
Gather these ingredients to create your beautiful New Year’s clock cake:
- 2 Chocolate Raspberry Cakes: Two round cakes, approximately 8×2 inches each, form the foundation. (You can use your preferred cake flavor).
- 3 cups Buttercream Icing: For filling and crumb coating the cake.
- 4 cups Black Fondant: Store-bought is recommended for best results in color and workability.
- 1 cup White Marshmallow Fondant: For crafting the clock numbers and hands.
- 2 tablespoons Gray Sprinkles: For decorative accents around the cake.
- 1 tablespoon White Sprinkles: Specifically long jimmies, for a festive top border.
Instructions
Fondant Method:
- Cool Cakes: Bake your chocolate raspberry cakes (or preferred flavor) and allow them to cool completely. While they cool, prepare your buttercream icing.
- Assemble Base: Place one cooled cake layer on a cake stand. Spread an even layer of buttercream icing over the top. Optionally, add a raspberry jam filling for extra flavor.
- Stack Layers: Gently place the second cake layer on top of the iced first layer and press lightly to secure.
- Buttercream Coating: Ice the entire cake smoothly with buttercream icing. This will create a clean surface for the fondant.
- Apply Black Fondant: Generously dust your work surface with powdered sugar. Knead and roll out the black fondant into a large circle, then carefully drape it over the cake. Smooth it over the top and sides, then trim excess fondant around the base using a pizza cutter for a clean edge.
- Add Clock Rim: Cut a thin strip of black fondant (about half an inch wide). Lightly brush water around the top edge of the cake and adhere the strip. Use a toothpick to create small indentations around the strip for detail.
- Create Numbers: Use a fondant mold or candy mold to cut out numbers (1-12) from white fondant.
- Attach Numbers: Lightly brush the back of each white fondant number with water and carefully stick them onto the black fondant clock face, ensuring even spacing.
- Form Clock Hands: Cut two small white fondant strips and two small triangles to create the hour and minute hands. Position and secure them in the middle of the cake, pointing to your desired time (e.g., just before midnight).
- Steam Cake: Steam the cake from a distance using a garment steamer. This dissolves powdered sugar residue and creates a smooth, clean, and shiny finish on the fondant.
- Final Sprinkles: Stick a few white jimmie sprinkles around the top of the cake and toss some gray sprinkles around the base for a festive touch. Enjoy!
Buttercream Frosting Only Method:
- Cool Cakes: Bake your cakes and ensure they are completely cool. Prepare your white buttercream icing.
- Assemble Layers: Place one cake on a serving dish. Spread white buttercream on top, then place the second cake layer on top and gently press.
- Ice Smoothly: Ice the entire cake smoothly with white buttercream.
- Spiral Pattern (Optional): Use an offset spatula to create a spiral pattern on the side and top of the cake.
- Add White Sprinkles (Optional): Toss some white sprinkles on top if desired.
- Pipe Black Numbers: Fill a piping bag with black icing and a small round tip (or use a store-bought tube with a tiny cut tip). Pipe numbers on the clock face, starting with 12, 6, 3, and 9 for even spacing.
- Pipe Clock Hands: Pipe arrows striking midnight. Use a wooden skewer to gently smooth out any imperfections in the piped lines.
- Gold Sprinkles: Toss some gold sprinkles on the top and sides of the cake for a pop of color.
- Chill: Cover and chill the cake until ready to serve.
Video Tutorial
Watch this video to see the step-by-step process of creating your New Year Clock Cake:
Recipe Notes
- Water for Fondant: Use water sparingly when adhering fondant pieces. A very small amount is sufficient; too much will make the fondant overly sticky and difficult to manage.
- Piped Numbers: If you’re confident with piping, you can pipe the numbers in white icing instead of using a mold for the fondant method, but a steady hand is crucial for neatness.
- Steaming is Key: Don’t skip steaming your fondant cake at the end! It’s vital for dissolving powdered sugar residue and achieving a pristine, smooth finish.
- Additional Tips: For more detailed advice and creative ideas, refer to the “Expert Tips and Decorating Techniques” and “Creative Variations” sections above.
- Leftover Storage: Store any leftover cake in an airtight container in the refrigerator for up to 3 days. Be mindful that fondant may become slightly sticky due to refrigeration moisture.
Nutrition Information (Approximate per serving)
- Calories: 316 kcal
- Carbohydrates: 51g
- Protein: 0.01g
- Fat: 12g
- Saturated Fat: 2g
- Polyunsaturated Fat: 6g
- Monounsaturated Fat: 4g
- Sodium: 140mg
- Potassium: 26mg
- Sugar: 48g
- Calcium: 2mg
- Iron: 0.1mg
Please note: Nutritional information is calculated using an automated tool and should be considered an estimate. Accuracy is not guaranteed.
We hope this comprehensive guide inspires you to bake a magnificent New Year’s clock cake for your upcoming celebrations. Whether you choose the elegant fondant finish or the creamy allure of buttercream, this recipe promises a delightful baking experience and a memorable dessert. Don’t hesitate to personalize your cake with different flavors, fillings, or color schemes to truly make it your own. Share your festive creations with us, and here’s to a sweet and successful New Year!
