Easy Easter Egg Nest Cake: A Delightful Homemade Treat for Your Spring Celebration
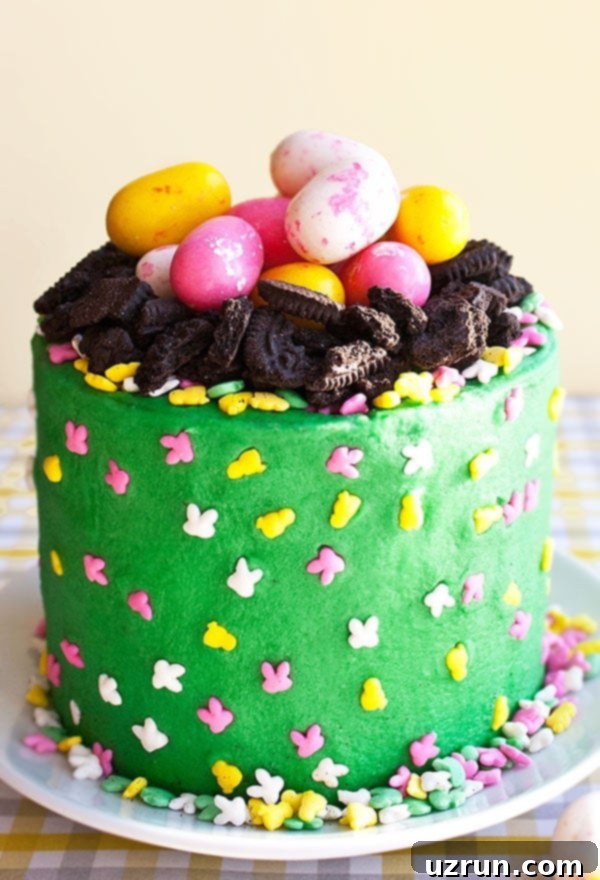
Get ready to impress your family and friends this Easter with a cake that’s as charming as it is delicious! Our Easy Easter Egg Nest Cake, also known as an Easter Nest Cake, is the perfect centerpiece for your holiday table. Crafted with simple ingredients and minimal effort, this homemade dessert is not only a fantastic way to use up those colorful leftover egg candies but also a joy to make, even with little helpers in the kitchen. Forget complicated molds; we’re showing you how to create a stunning egg nest design with ease.

Following in the footsteps of beloved seasonal treats like the Peeps Cake, this Easter Egg Nest Cake embraces the festive spirit with its vibrant decorations and delightful flavors. What makes this recipe truly special is its simplicity. You don’t need any specialized egg cake pans or intricate carving skills. It’s an ideal project for bakers of all levels, and kids absolutely love getting involved in the decorating process. While there are countless Easter Cake Ideas out there, this one stands out for its straightforward approach and charming result. For those who might prefer something other than cake, these delightful Birds Nest Cookies make a wonderful accompaniment.
Why You’ll Love This Easy Easter Egg Nest Cake
- Effortlessly Festive: Achieves a stunning Easter look without complex techniques.
- Beginner-Friendly: Perfect for new bakers or anyone looking for a stress-free dessert.
- Kid-Approved: The decorating steps are simple and fun for children to participate in.
- No Special Equipment: You won’t need an egg-shaped cake pan – just standard round mini cakes.
- Customizable: Easily adapt the cake flavor, frosting color, and decorations to your taste.
- Delicious Combination: Moist chocolate cake, creamy buttercream, crunchy Oreos, and sweet candy eggs create a delightful texture and flavor profile.
- Great for Leftovers: A clever way to use up any extra Easter egg candies you might have.
Making Your Easter Egg Nest Cake: A Simple Guide
Creating this adorable Easter Egg Nest Cake is a straightforward process, broken down into a few easy steps. You’ll be amazed at how quickly you can transform simple ingredients into a show-stopping dessert.
How to Make an Easy Easter Egg Cake Without a Mold: Step-by-Step
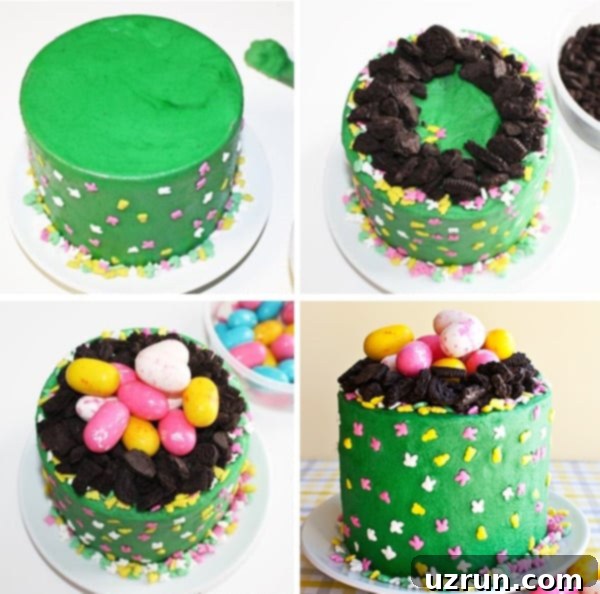
- Bake Your Mini Cakes: Start by baking six individual mini cakes. Chocolate is a classic choice, but feel free to experiment with your favorite flavor. Ensure they cool completely before frosting to prevent any melty mishaps.
- Stack and Frost: Once cooled, stack your mini cakes with a generous layer of frosting between each tier. Then, cover the entire cake smoothly with your chosen frosting, creating a neat canvas for decoration.
- Decorate with Sprinkles: Add a touch of whimsy by pressing festive Easter sprinkles along the sides of the cake. Bunny, duck, or flower shapes work wonderfully to enhance the spring theme.
- Create the Oreo Nest: Gently arrange crushed Oreo cookies in a circular ring on top of the cake. This creates the “nest” for your candies. Remember to leave the center open.
- Add the Egg Candies: Carefully place your colorful egg candies into the center of the Oreo nest, making it look like a cozy bird’s nest filled with Easter treasures.

Creative Variations for Your Easter Nest Cake
One of the best things about this recipe is its flexibility. You can easily customize it to match your preferences or theme. Here are some delightful variations to inspire your Easter baking:
- Upsize Your Cake: While this recipe uses charming mini chocolate cakes (around 4 inches), you can easily scale up to make a larger version. Simply bake a larger round cake (like an 8 or 9-inch layer cake) and follow the same frosting and decorating steps. Adjust ingredient quantities as needed for a bigger cake.
- Explore Different Sprinkles: The sides of your cake offer a fantastic opportunity for personalization. The original recipe uses cute bunny and duck-shaped sprinkles, which can often be found at Target, dollar stores, or specialty baking shops. However, don’t limit yourself! Consider using bird, flower, or classic egg-shaped sprinkles. You could even opt for pastel jimmies, nonpareils, or a custom blend that perfectly complements your Easter aesthetic.
- Alternate Nest Fillings: Crushed Oreos create a wonderful “dirt” or “nest” texture, but you have other delicious options. Try using crushed pretzels for a salty-sweet crunch, or even various cereals like Rice Krispies or Corn Flakes (mixed with a little melted chocolate for binding) to create a more rustic nest. Shredded coconut (toasted or green-tinted) also makes a lovely and flavorful nest.
- Craft an Egg-Shaped Cake: If you’re feeling a bit more adventurous, you can transform your round cakes into an egg shape. After baking and stacking your cakes, use a sharp knife to carefully carve the stacked layers into an oval, egg-like form. Once carved, proceed with frosting the cake smoothly. For a truly professional finish, you could even cover it with fondant and decorate as desired. If you’re interested in a more elaborate egg-themed cake, explore this Pinata Cake (Easter Robin Egg Cake) for a different spin.
- Play with Frosting Colors and Flavors: Green frosting perfectly mimics grass, but don’t hesitate to use other colors. Pastel shades like pink, blue, lavender, or yellow are incredibly popular for Easter. You can then pipe green “grass” details on top of the cake using a star tip, or simply use a single pastel color as your base. For frosting flavor, while American buttercream is classic, consider a cream cheese frosting for a tangy twist, or even a light whipped cream frosting for a less sweet option.
- Change the Cake Flavor: This recipe works beautifully with any cake base. Instead of chocolate, try a bright Vanilla Cake, a zesty Lemon Cake, or a fun and colorful Funfetti Cake. The possibilities are endless, allowing you to tailor the cake to your favorite flavors.

Essential Tips and Techniques for a Perfect Easter Nest Cake
Achieving a picture-perfect and delicious Easter Egg Nest Cake is easy with a few simple tricks. Keep these tips in mind to ensure your baking and decorating go smoothly:
- Cool Cakes Completely: This is a golden rule in baking! Warm cakes will melt your frosting, causing it to slide off and create a messy presentation. Ensure your mini cakes are thoroughly cooled to room temperature before you even think about applying icing. For quicker cooling, you can place them in the freezer for about 15-20 minutes after they’ve initially cooled on a wire rack for a bit.
- Frost Sides Smoothly: For a polished look, use an icing spatula, an offset spatula, or even a long, smooth, non-serrated knife to evenly spread and smooth the frosting around the sides of the cake. You can achieve very smooth results by rotating the cake on a turntable while holding your spatula steady.
- Press Sprinkles Gently: When applying sprinkles to the sides, press them gently into the frosting. This helps them adhere without disappearing or smearing the icing. For more control, you can pick up individual sprinkles with your fingers or a pair of clean tweezers, especially for larger or shaped sprinkles. Alternatively, you can gently roll the frosted cake edge in a shallow dish of sprinkles.
- How to Crush Oreos: You want chunks of Oreos for a realistic “nest” texture, not a fine powder. The best way to achieve this is to place them in a gallon-sized ziplock bag and gently break them with your hands. Avoid using a rolling pin, as it tends to crush them too finely. A knife can also be used to roughly chop them into desired pieces.
- Place Oreos in a Ring: When forming the nest, make sure to arrange the crushed Oreos in a distinct ring around the edge of the cake top, leaving the center clear. If you fill the entire top with Oreos, your delicate egg candies might roll off when placed, or they won’t have that distinct “nest” look. The raised edge of the Oreo ring helps to keep the eggs in place.
- Ensure Frosting Consistency: Your buttercream should be smooth and spreadable but firm enough to hold its shape. If it’s too soft, add a little powdered sugar; if too stiff, add a tiny bit of milk or cream.
Storage & Make-Ahead Instructions
Proper storage ensures your delicious Easter Egg Nest Cake remains fresh and enjoyable for longer:
- Refrigerate Leftovers: Any leftover cake should be stored in an airtight container in the refrigerator for up to 3 days. This helps to maintain its freshness, especially if your frosting contains dairy.
- Freezing Unfrosted Cakes: If you want to get a head start, you can bake the mini cake layers in advance. Allow them to cool completely, then wrap them tightly in plastic wrap and place them in a sealed container or freezer bag. Unfrosted cakes can be frozen for up to 1 month. When you’re ready to decorate, simply thaw the cakes in the refrigerator overnight, then proceed with frosting and decorating as per the instructions.
- Make Ahead Instructions: This cake is robust enough to be baked and decorated 1 day in advance. Store the decorated cake at room temperature in a cake dome or airtight container if your frosting is stable (like American buttercream). If your kitchen is warm or if you’re using a more perishable frosting (like cream cheese frosting), it’s best to refrigerate it and let it come to room temperature for about 30-60 minutes before serving.
More Festive Easter Desserts to Try
Looking for more charming treats to complete your Easter spread? Here are some other delightful ideas:
- Easter Bunny Cake: An adorable and classic Easter centerpiece.
- Easy Lamb Cake (With Marshmallows): A cute and simple lamb cake that doesn’t require a special mold.
- Easy Pig Cake (Fondant Pig Topper): A whimsical cake perfect for spring celebrations.
- Robin Egg Pinata Cake: A fun surprise inside with candies spilling out!
Recipe

Easter Egg Cake (Easter Nest Cake)
Abeer Rizvi
Pin Recipe
Want to Save This Recipe?
Enter your email & I’ll send it to your inbox. Plus, get great new recipes from me every week!
By submitting this form, you consent to receive emails from CakeWhiz
Ingredients
- 6 Chocolate cake Mini, 4 inch. You can use store-bought or homemade mini cakes/cupcakes.
- 4 cups American buttercream frosting Tinted green for a grass-like effect.
- ⅓ cup Easter sprinkles Bunny, duck, or egg shapes for festive decoration.
- 2 cups Oreos Roughly chopped for the nest texture.
- 2 cups Egg candies Various colors to fill the nest.
Instructions
-
Bake your 6 mini cakes according to package or recipe instructions, then allow them to cool down completely on a wire rack. This is crucial for successful frosting.
-
Prepare your green buttercream frosting. Frost the top of one cooled mini cake generously. Place another cake on top, pressing down very gently to secure it. Repeat until all mini cakes are stacked. Once stacked, frost the entire cake (top and sides) smoothly with the remaining green icing.
-
Carefully stick the Easter sprinkles randomly along the sides of the frosted cake, pressing them in gently so they adhere without marring the frosting.
-
Take your roughly chopped Oreos and arrange them in a circular formation on top of the cake, creating a “nest” shape. Ensure you leave a noticeable space in the very center of the circle.
-
Finally, gently place your colorful egg candies into the open center of the Oreo nest. Your beautiful and delicious Easter Egg Nest Cake is now ready to enjoy!
Video
Notes
- Please note that in the video tutorial, I used only yellow jimmies sprinkles just to try something different, showcasing another fun variation.
- Instead of baking 6 individual mini cakes, you can opt to make one large round cake and follow the same frosting and decorating steps to create a larger nest cake.
- Leftovers of this cake can be stored in a sealed container in the fridge for up to 3 days, maintaining its freshness and flavor.
Nutrition
An automated tool is used to calculate the nutritional information. As such, I cannot guarantee the accuracy of the nutritional information provided for any recipe on this site.
This Easy Easter Egg Nest Cake is more than just a dessert; it’s a celebration of spring, a fun family activity, and a truly delightful treat for everyone. With its simple assembly, customizable options, and charming presentation, it’s sure to become a beloved part of your Easter traditions. So gather your ingredients, enlist your little helpers, and get ready to bake a memorable cake that tastes as good as it looks!
