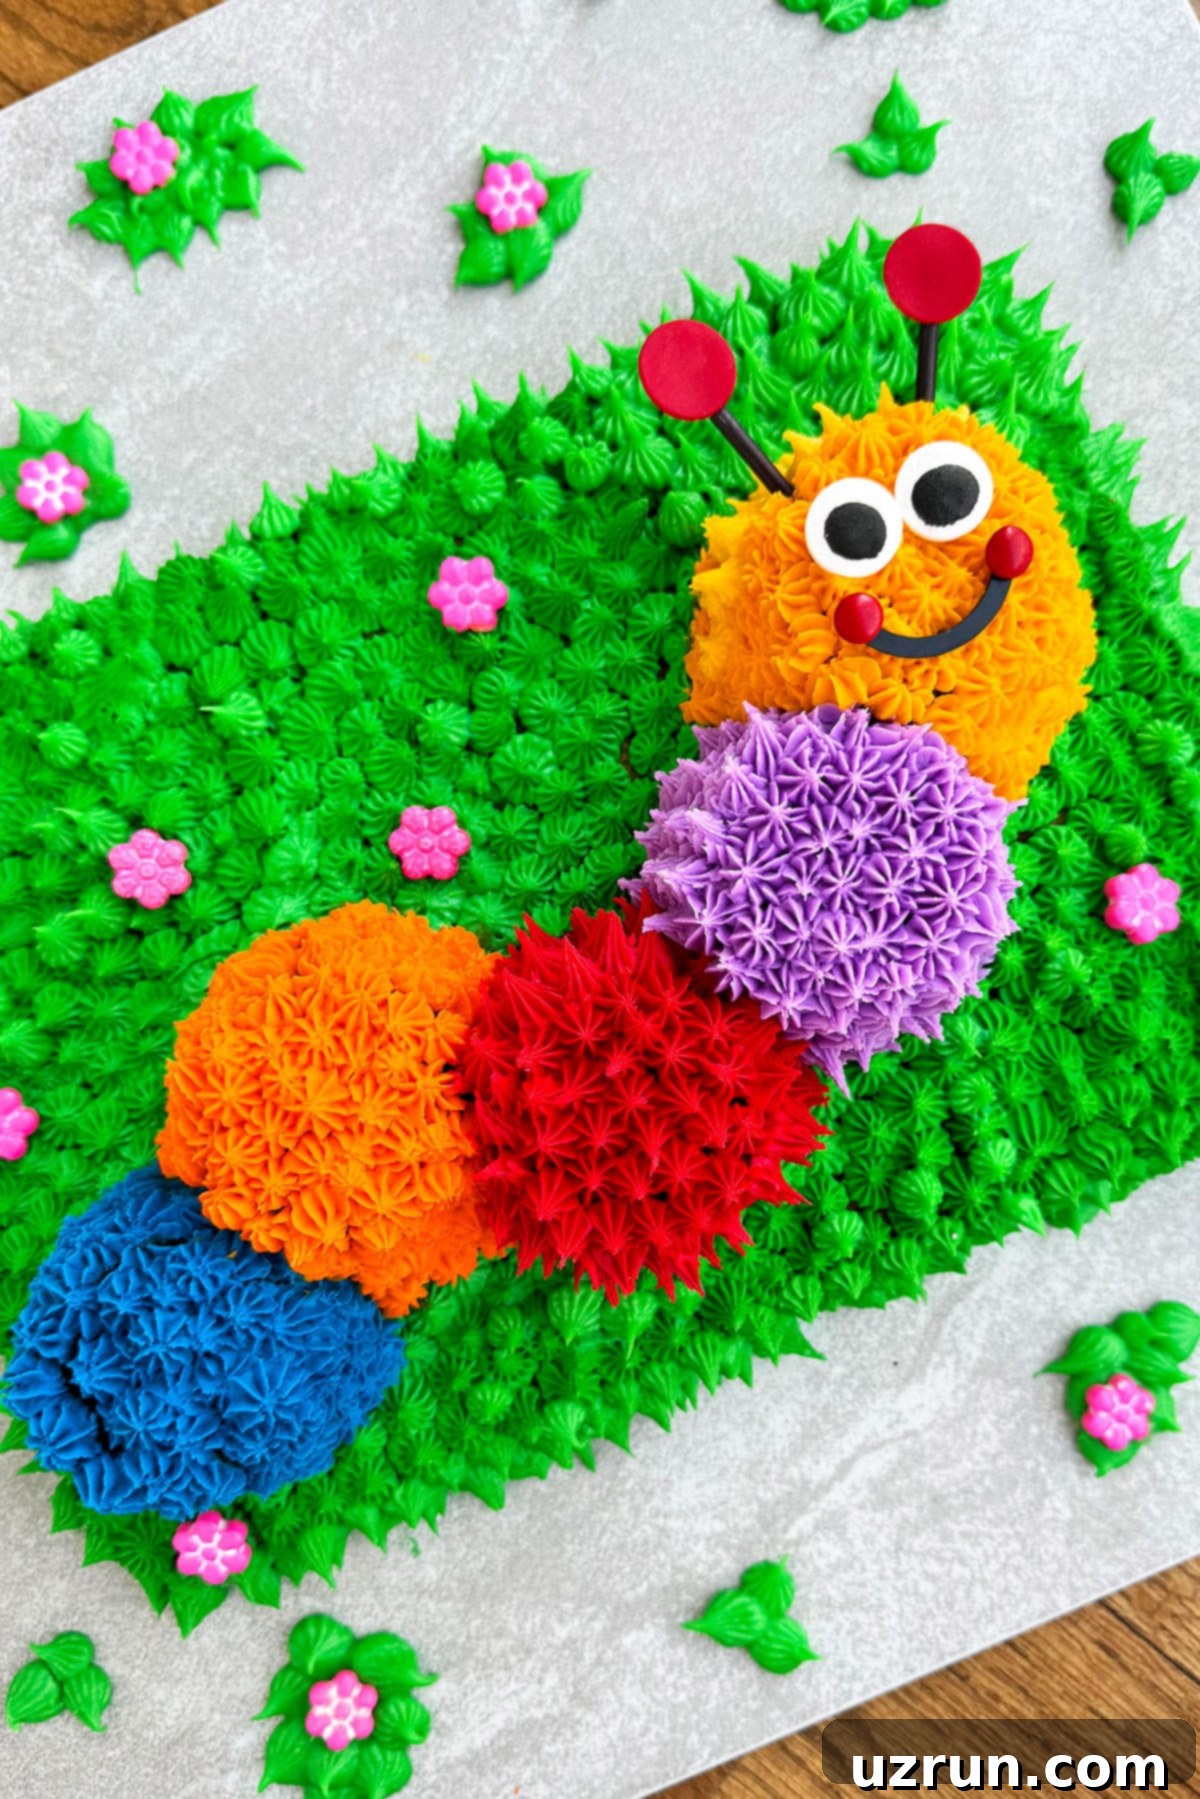
Easy DIY Caterpillar Birthday Cake: A Step-by-Step Guide with Buttercream Icing
Creating a magical birthday cake for your child’s special day doesn’t have to be complicated. This easy caterpillar cake recipe and tutorial provides a simple, homemade solution using readily available ingredients. Adorned with colorful buttercream icing, this whimsical cake is perfect for any kids’ birthday celebration, promising smiles and delightful memories. We’ll also share our party details for inspiration, making your planning even smoother!
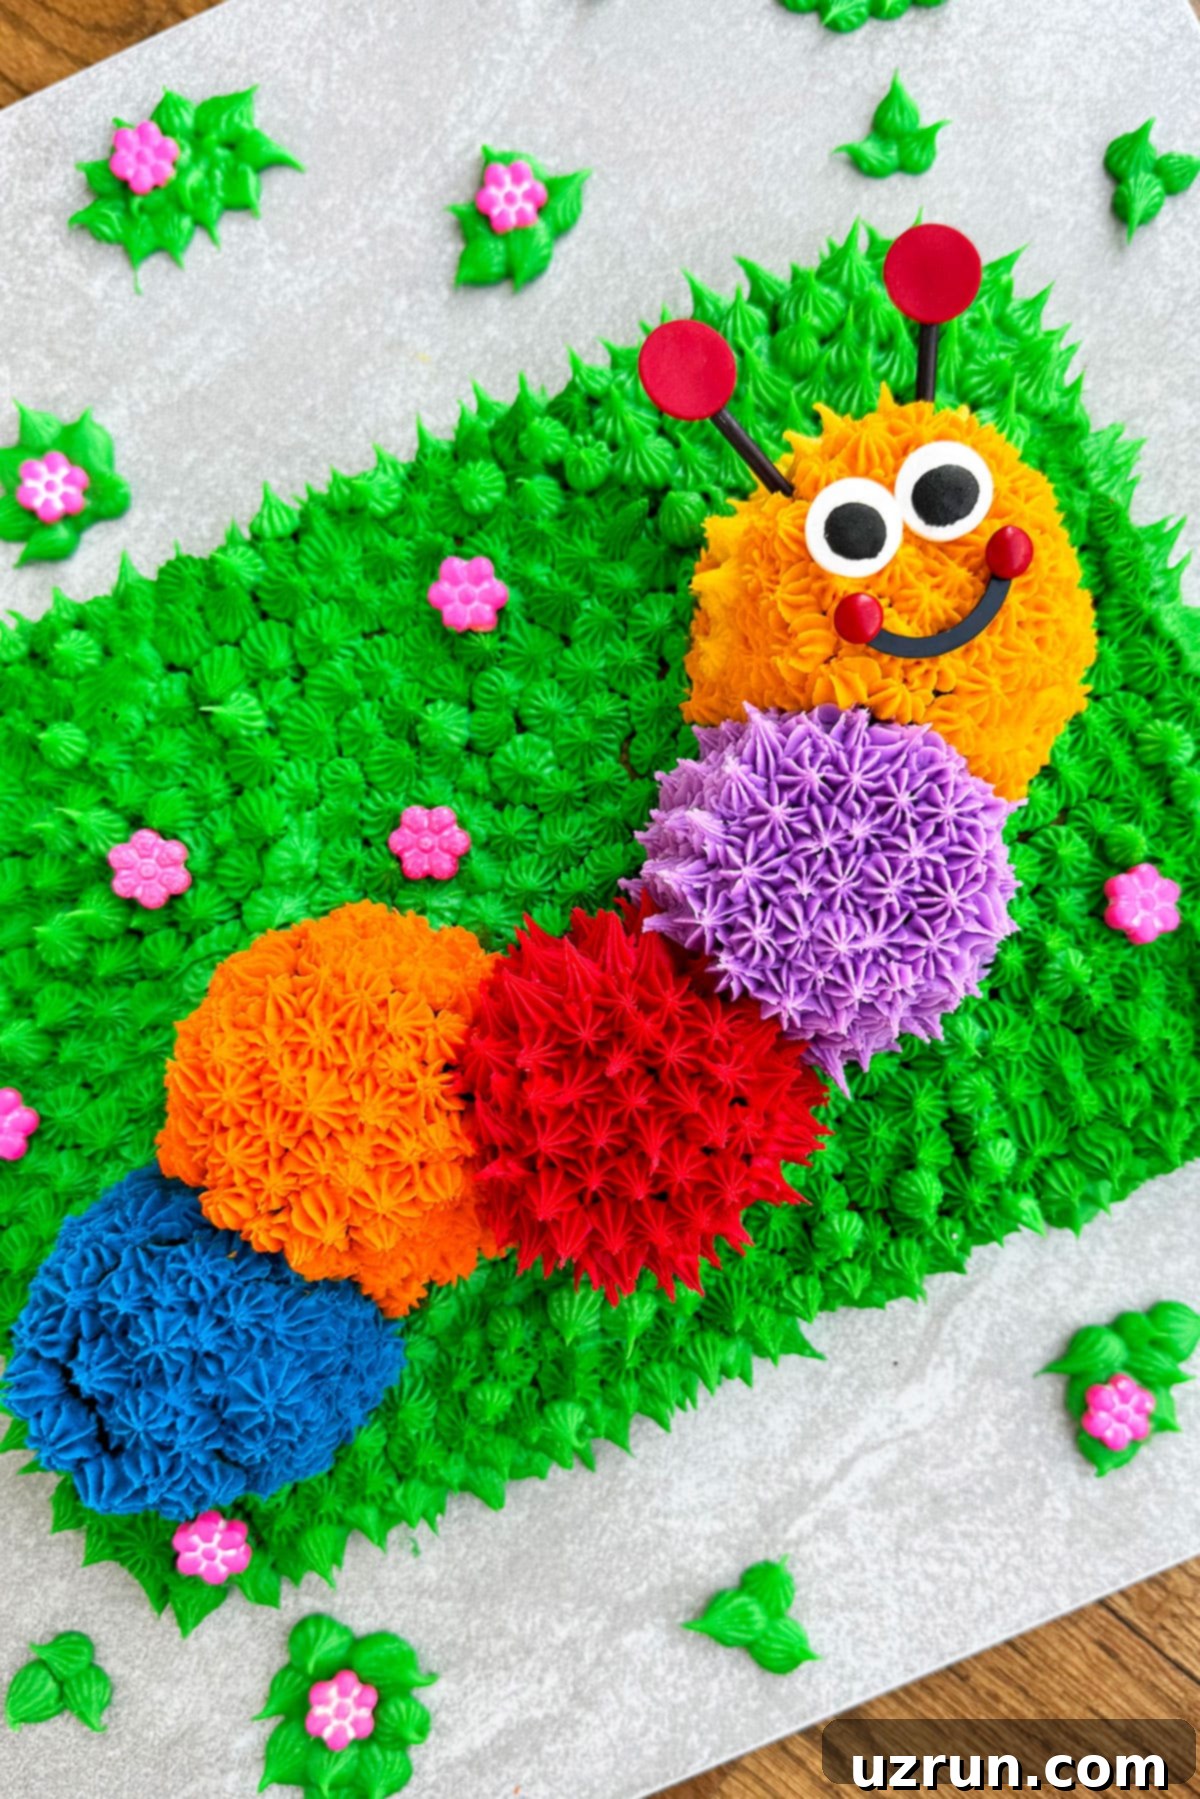
Celebrating our little one’s first birthday was a truly joyous occasion, and we wanted to make it extra special with a cake that reflected his budding personality. The inspiration for this adorable caterpillar cake came directly from his beloved Baby Einstein Caterpillar toys – those colorful companions were among his very first favorites and continue to capture his imagination. While there are many caterpillar cake designs out there, from the elaborate British Colin version to the iconic Hungry Caterpillar, our tutorial offers a simpler, more accessible approach, making it achievable for any home baker. This method avoids complex fondant work or intricate chocolate shells, focusing instead on vibrant buttercream and easy assembly, making it a fantastic DIY project for a memorable kids’ birthday cake.
Looking for more creative baking ideas? Be sure to explore these Easy Cake Decorating Ideas (Beginners) for simple yet stunning designs, and delve into our extensive collection of Birthday Cake Ideas to spark your imagination for future celebrations.
Table of contents
- Key ingredients for DIY homemade caterpillar birthday cake
- Variations to personalize your caterpillar cake
- How to make an easy caterpillar cake with buttercream icing?
- Tips and techniques for a perfect caterpillar cake
- Recipe FAQs
- Storage tips for your homemade cake
- More easy decorated cakes for inspiration
- Our caterpillar-themed party details
- Delicious party food ideas
- Essential party planning tips
Key Ingredients for Your DIY Homemade Caterpillar Birthday Cake
Crafting this delightful caterpillar cake starts with a few basic ingredients that come together to form its charming structure and vibrant decoration. Here’s what you’ll need:
- Yellow sheet cake: This forms the grassy base for your caterpillar. We opted for a classic yellow cake for its cheerful color and simple flavor profile, which pairs wonderfully with buttercream. For an extra festive touch, consider adding sprinkles directly into the batter to create a fun Funfetti look – a surefire hit with kids!
- Chocolate cupcakes (5): These are the building blocks of your caterpillar’s body. Chocolate provides a nice contrast to the yellow cake and buttercream, and their dome shape is perfect for creating the segments of the caterpillar. Each cupcake will be frosted a different, vibrant color.
- Buttercream frosting (green, purple, red, yellow, orange, blue): Our choice for this cake, American buttercream, is incredibly versatile. It’s easy to color, holds its shape well for piping, and provides a smooth, sweet finish. You’ll need various colors to bring your caterpillar to life and to create the lush green landscape.
- Black icing: Essential for those crucial small details that give your caterpillar personality, such as the smile and eye outlines. A small amount of black gel food coloring can transform a portion of your buttercream into this vital shade.
- Eyeball candies (2): These instantly bring character to your caterpillar’s face. While you only need two for the cake, having a larger package on hand is always a good idea for future baking adventures or spontaneous creature creations.
- Mini M&Ms (2 red): These small, colorful candies are perfect for adding cute, rosy cheeks to your caterpillar, completing its friendly expression.
- Flower candies: These decorative sugar flowers add a whimsical and colorful touch to the cake and cake board, enhancing the garden scene and making the entire presentation pop.
Variations to Personalize Your Caterpillar Cake
While our core recipe offers a fantastic starting point, there are many ways to customize your caterpillar cake to suit your preferences, theme, or skill level. Get creative with these variations:
- For a simple style: If you’re short on time or prefer a less intricate design, bake a classic round layer cake. Cover it entirely with green icing, perhaps using a grass piping tip for texture. Then, simply add a store-bought or easily molded fondant caterpillar topper on top. Stick a few flower candies around the cake, and you’ll have a charming, themed dessert with minimal effort.
- Try different colors of icing: Don’t limit yourself to the colors in our tutorial! Experiment with various color palettes for your caterpillar. You could create a soft pastel version for a delicate look, or go bold with neon shades for a truly electric party. Consider ombré effects or even rainbow stripes for each segment.
- Omit the sheet cake: Instead of a sheet cake base, you can make 5 large dome cakes (using a hemispherical pan or by carving round cakes). Arrange these dome cakes on a large, sturdy cake board to form the caterpillar’s body. Decorate them in a similar manner to the cupcakes in our recipe, piping colorful stars over each “dome” segment. This creates a larger, more substantial caterpillar.
- Use different frosting: While vanilla buttercream is our go-to for its stability and vibrant color absorption, other frostings can also work beautifully.
- Marshmallow Frosting adds a lighter, fluffier texture and a unique flavor profile.
- White Chocolate Buttercream Frosting offers a richer, creamier taste that’s always a crowd-pleaser.
- For dietary considerations, this Sugar Free Frosting is a great option, allowing everyone to enjoy a slice without guilt.
- Add sprinkles to the cake batter: For an instant boost of joy and a celebratory Funfetti look, fold colorful sprinkles into your cake batter before baking. This adds a delightful textural surprise and extra visual appeal that both kids and adults absolutely adore.
- Poke holes in the cake and fill: Elevate the flavor of your sheet cake by poking holes and filling them with delicious sauces or jams. This adds moisture and a burst of flavor in every bite. Consider:
- Homemade Caramel Sauce for a rich, buttery depth.
- Strawberry Jam or Raspberry Pie Filling for fruity sweetness.
- Chocolate Ganache for an intense chocolate experience.
- Whipped Cream for a light and airy texture.
- Lemon Curd for a tangy, refreshing zing.
- Dulce de Leche for a sweet, caramelized milk flavor.
- Homemade Vanilla Custard for a creamy, classic addition.
- Try a different cake flavor: While yellow cake is traditional, you can easily swap it for another delicious flavor.
- A rich Chocolate Sheet Cake would be decadent.
- Pistachio Cake offers a unique flavor and beautiful green hue.
- The hearty Texas Sheet Cake is known for its moist texture and fudgy frosting.
In fact, many of our tiered cake recipes can be adapted into a simple sheet pan cake. Consider recipes like our moist Red Velvet Cake, classic Vanilla Cake, festive Funfetti Cake, or delightful Easy Cherry Cake.
- Add extracts to the cake batter: Infuse your cake with extra flavor by adding a teaspoon or two of your favorite extracts to the batter. Almond extract provides a subtle nutty note, lemon extract offers a bright citrusy lift, maple extract adds warmth, and coconut extract transports you to a tropical paradise.
- Use fondant to decorate: For a completely different aesthetic, consider decorating with fondant instead of buttercream. Fondant provides a smooth, sculptural finish that can be very striking. Our Marshmallow Fondant recipe is a great option, known for being easier to work with and tasting better than traditional fondant. For expert tips, check out our posts on How to Color Fondant and How to Make Fondant Flowers. You can also get more inspiration from our New Year’s Cake.
- Just make chocolate cupcakes: If you’re hosting a smaller gathering or prefer individual servings, simply make several batches of chocolate cupcakes and decorate them like the caterpillar segments shown on our cake. Five cupcakes typically make one mini caterpillar. Arrange multiple mini caterpillars on a large cake board for a charming display. This pull-apart concept is similar to our Football Cupcakes Cake and allows guests to easily grab their own portion. You’ll likely want to bake at least two dozen cupcakes for a decent spread.
How to Make an Easy Caterpillar Cake with Buttercream Icing?
Follow these simple steps to bring your adorable buttercream caterpillar cake to life:
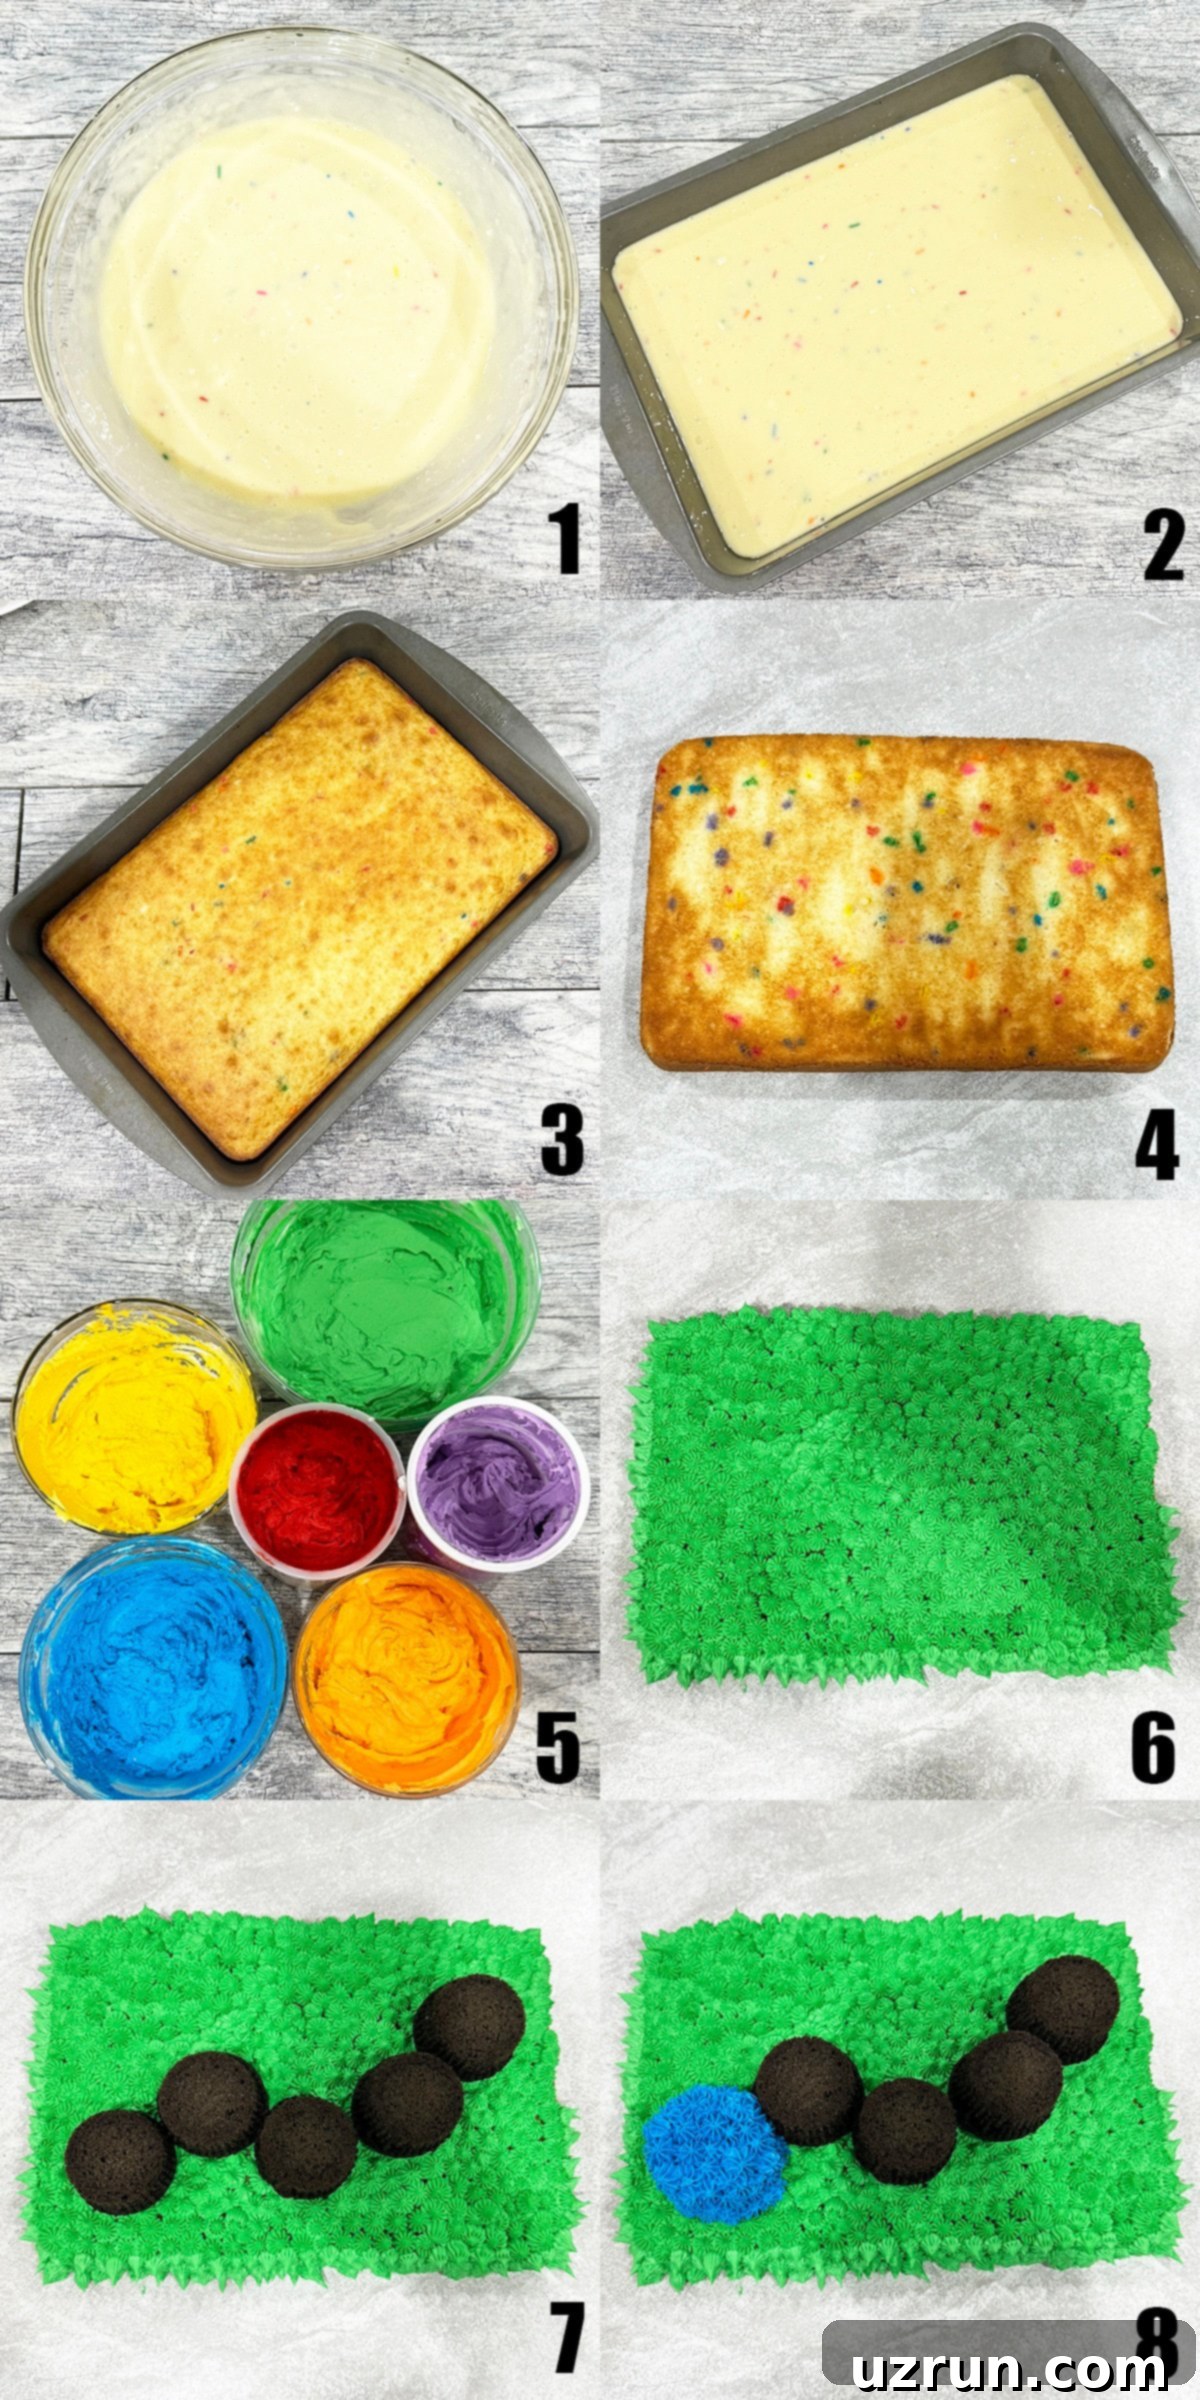
- Mix together ingredients: Begin by preparing the batter for both your yellow sheet cake and chocolate cupcakes. Ensure all ingredients are at room temperature for the best results, leading to a smooth, uniform batter (Image 1).
- Pour batter into prepared pans: Carefully distribute the cake batter into your greased and floured sheet pan, and the cupcake batter into lined muffin tins (Image 2).
- Bake cake and cupcakes: Bake according to your recipe’s instructions until a toothpick inserted into the center comes out clean. Once baked, allow them to cool completely on a wire rack. This is a crucial step – never decorate a warm cake! (Image 3).
- Remove cake from the pan: Once fully cooled, carefully invert the sheet cake onto a sturdy large cake board. This board will serve as the foundation for your entire cake design (Image 4).
- Prepare frosting: Make a batch of delicious buttercream frosting. Separate it into five different bowls and tint each with a different vibrant gel food coloring (green, purple, red, yellow, orange, blue) to match your caterpillar’s colorful body (Image 5).
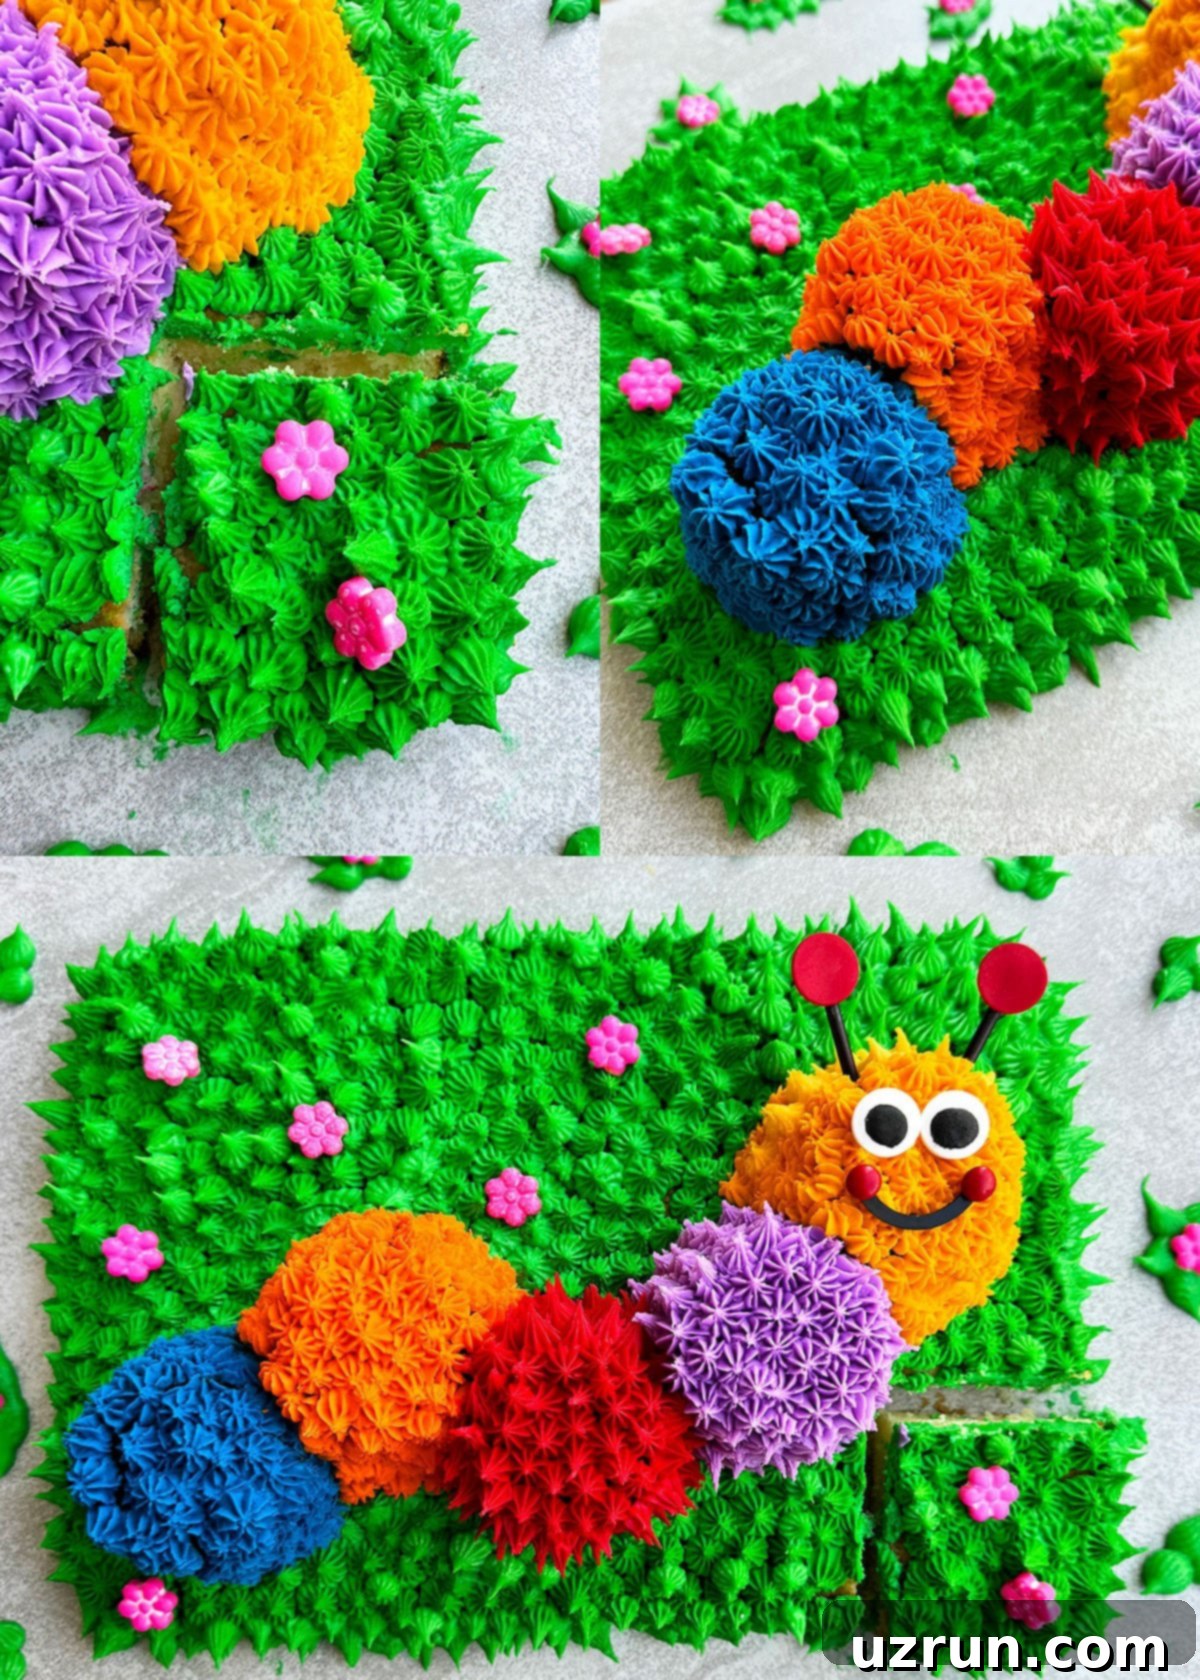
- Pipe little green stars: Fill a piping bag fitted with a star tip (like Wilton Tip #21) with green frosting. Pipe small, closely spaced green stars all over the top and sides of the sheet cake until it’s completely covered. This creates a lovely, textured “grassy” base (Image 6).
- Remove liners from cupcakes: Gently peel the paper liners from your chocolate cupcakes. Arrange these five cupcakes in a curved line on top of the green sheet cake to form the body of the caterpillar (Image 7).
- Pipe blue frosting: Using a clean piping bag with a star tip, pipe little star shapes all over the first cupcake. This will be the caterpillar’s rear segment (Image 8).
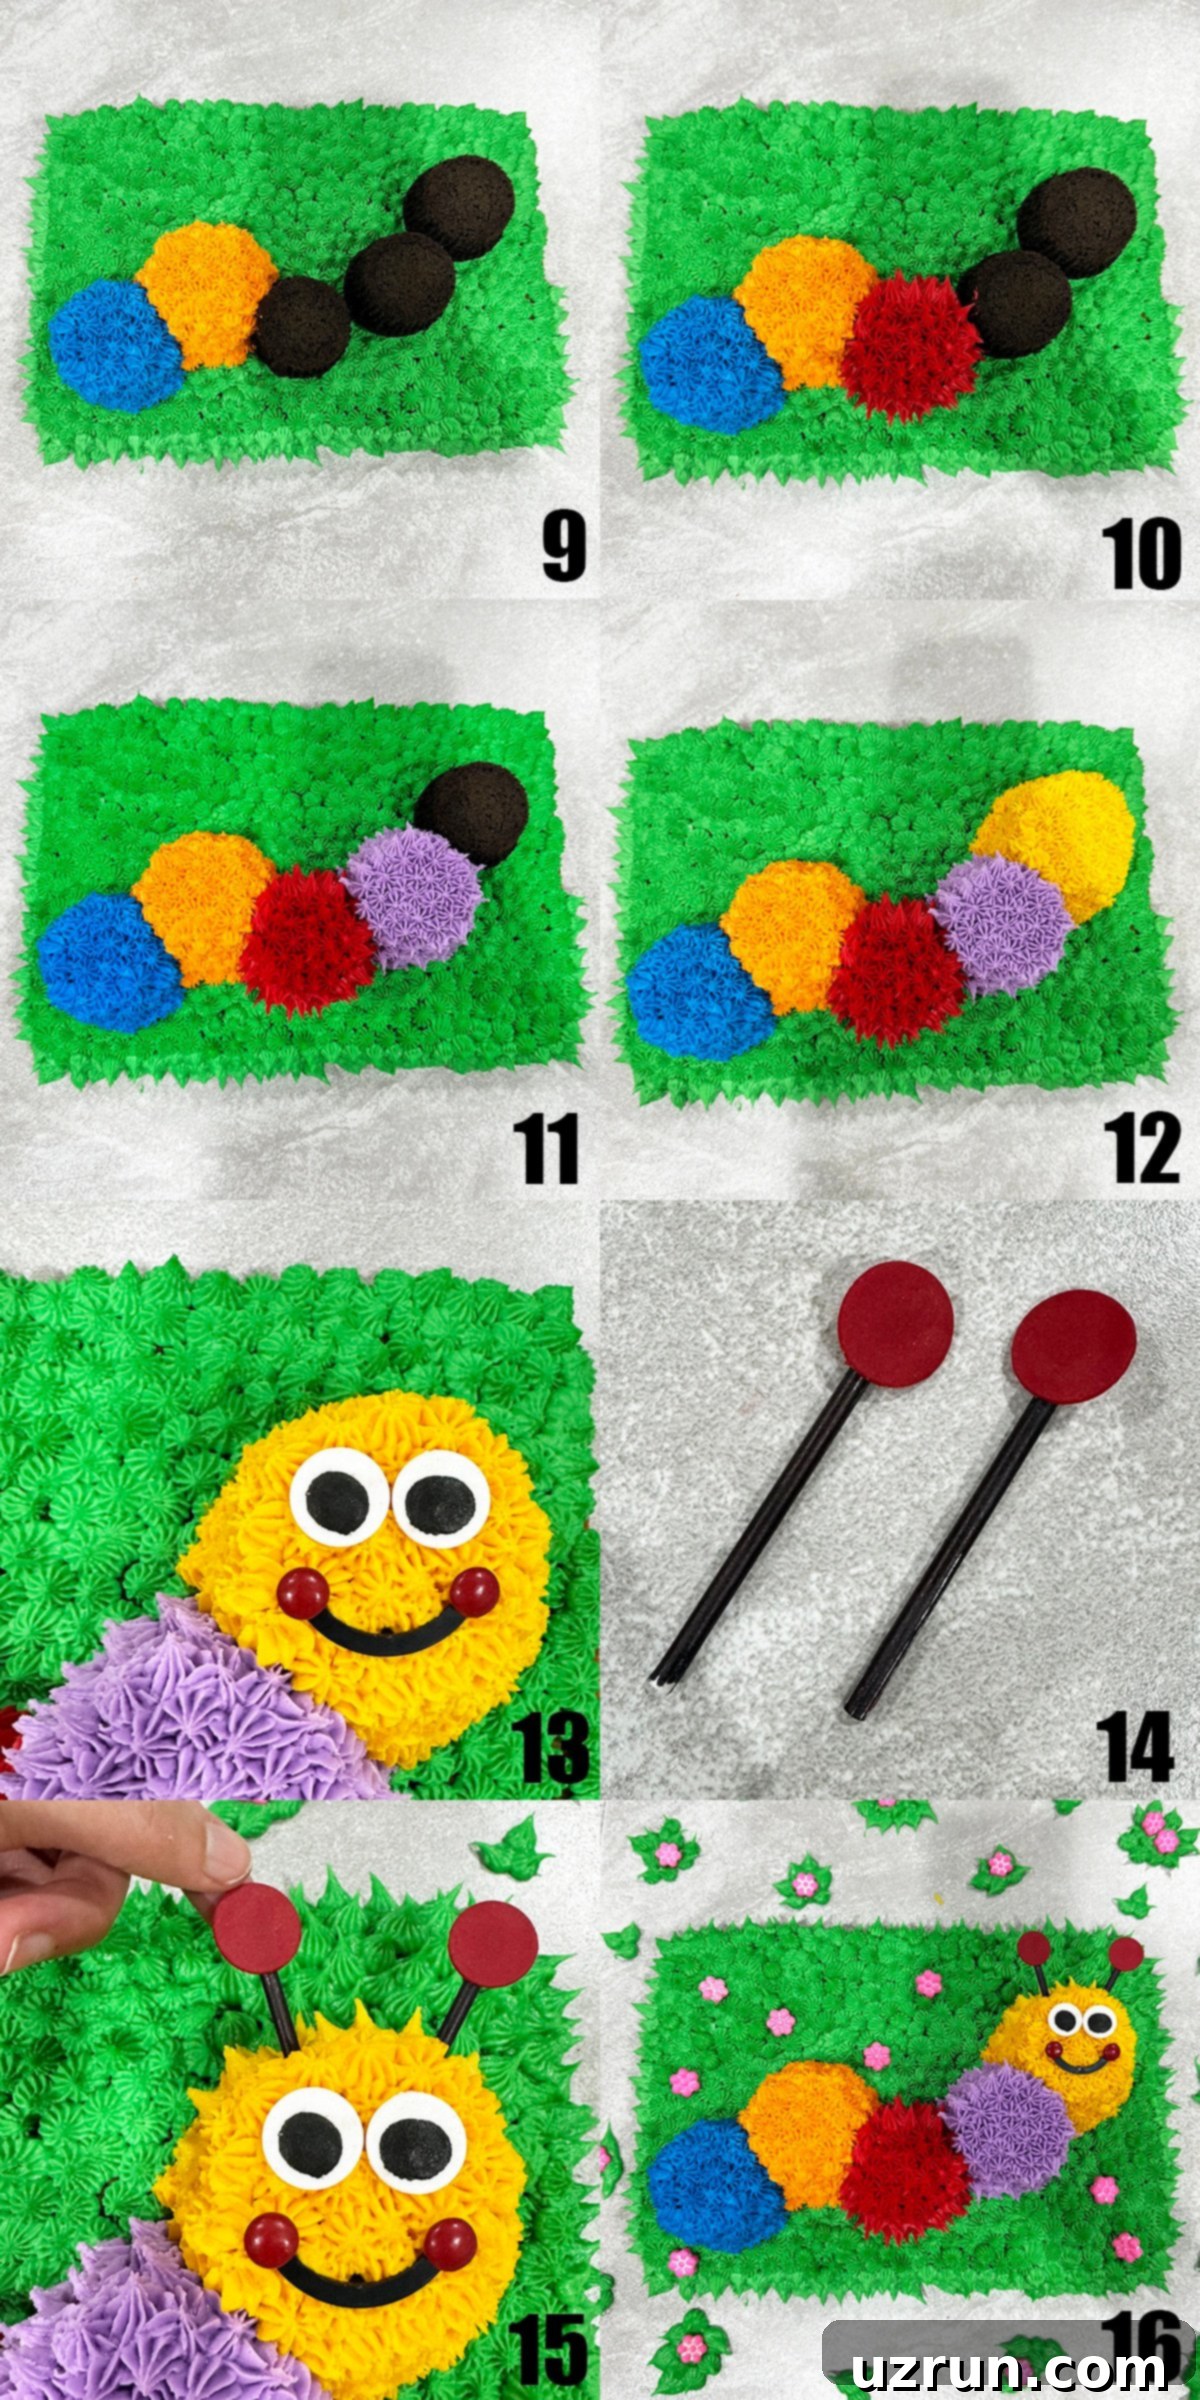
- Pipe yellow frosting: Switch to another clean piping bag with yellow frosting and pipe little star shapes all over the second cupcake (Image 9).
- Pipe little stars of red frosting: Continue the colorful pattern by piping red stars all over the third cupcake (Image 10).
- Pipe little stars of purple frosting: Next, pipe purple stars all over the fourth cupcake (Image 11).
- On the last cupcake: For the head, pipe yellow stars all over the fifth cupcake. This vibrant yellow will make the face stand out (Image 12).
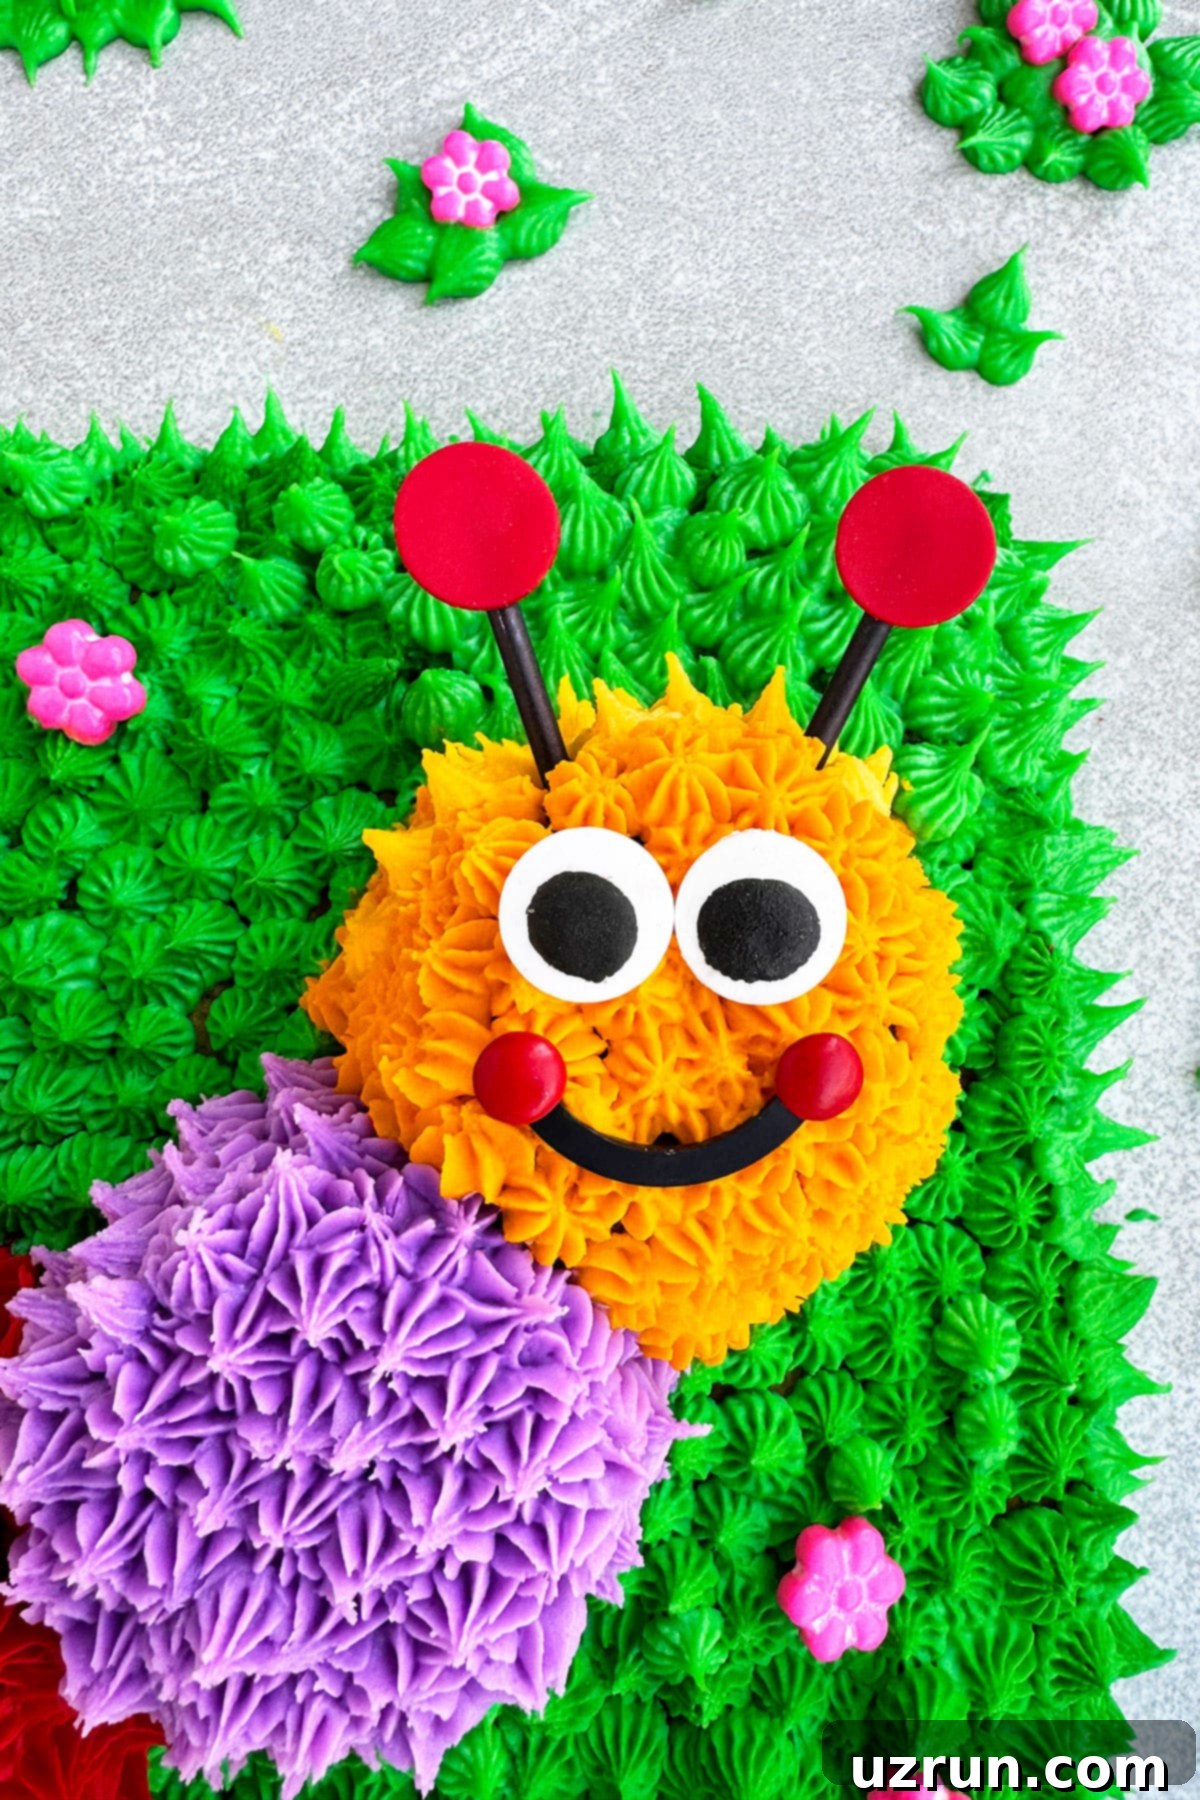
- Stick two eyes: Carefully place two edible eyeball candies on top of the yellow cupcake, giving your caterpillar its adorable gaze (Image 13).
- Make a smile and add cheeks: Fill a piping bag with black icing and a small round tip. Pipe a happy smile below the eyes. Then, stick two mini red M&M candies on either side of the smile to create rosy cheeks (Image 13).
- Cut out antennas: Take thick red cardstock and cut out two small circles. Adhere each circle securely to the top of a lollipop stick using a dab of frosting, hot glue, or clear tape (Image 14).
- Push these sticks onto the head: Gently insert the lollipop sticks with the red circles into the top of the yellow cupcake, positioning them as the caterpillar’s antennas (Image 15).
- Pipe patches of green icing grass: Use the remaining green icing and a grass piping tip (if you have one, or just the star tip) to pipe patches of “grass” on any empty spaces on the cake board, enhancing the garden scene (Image 16).
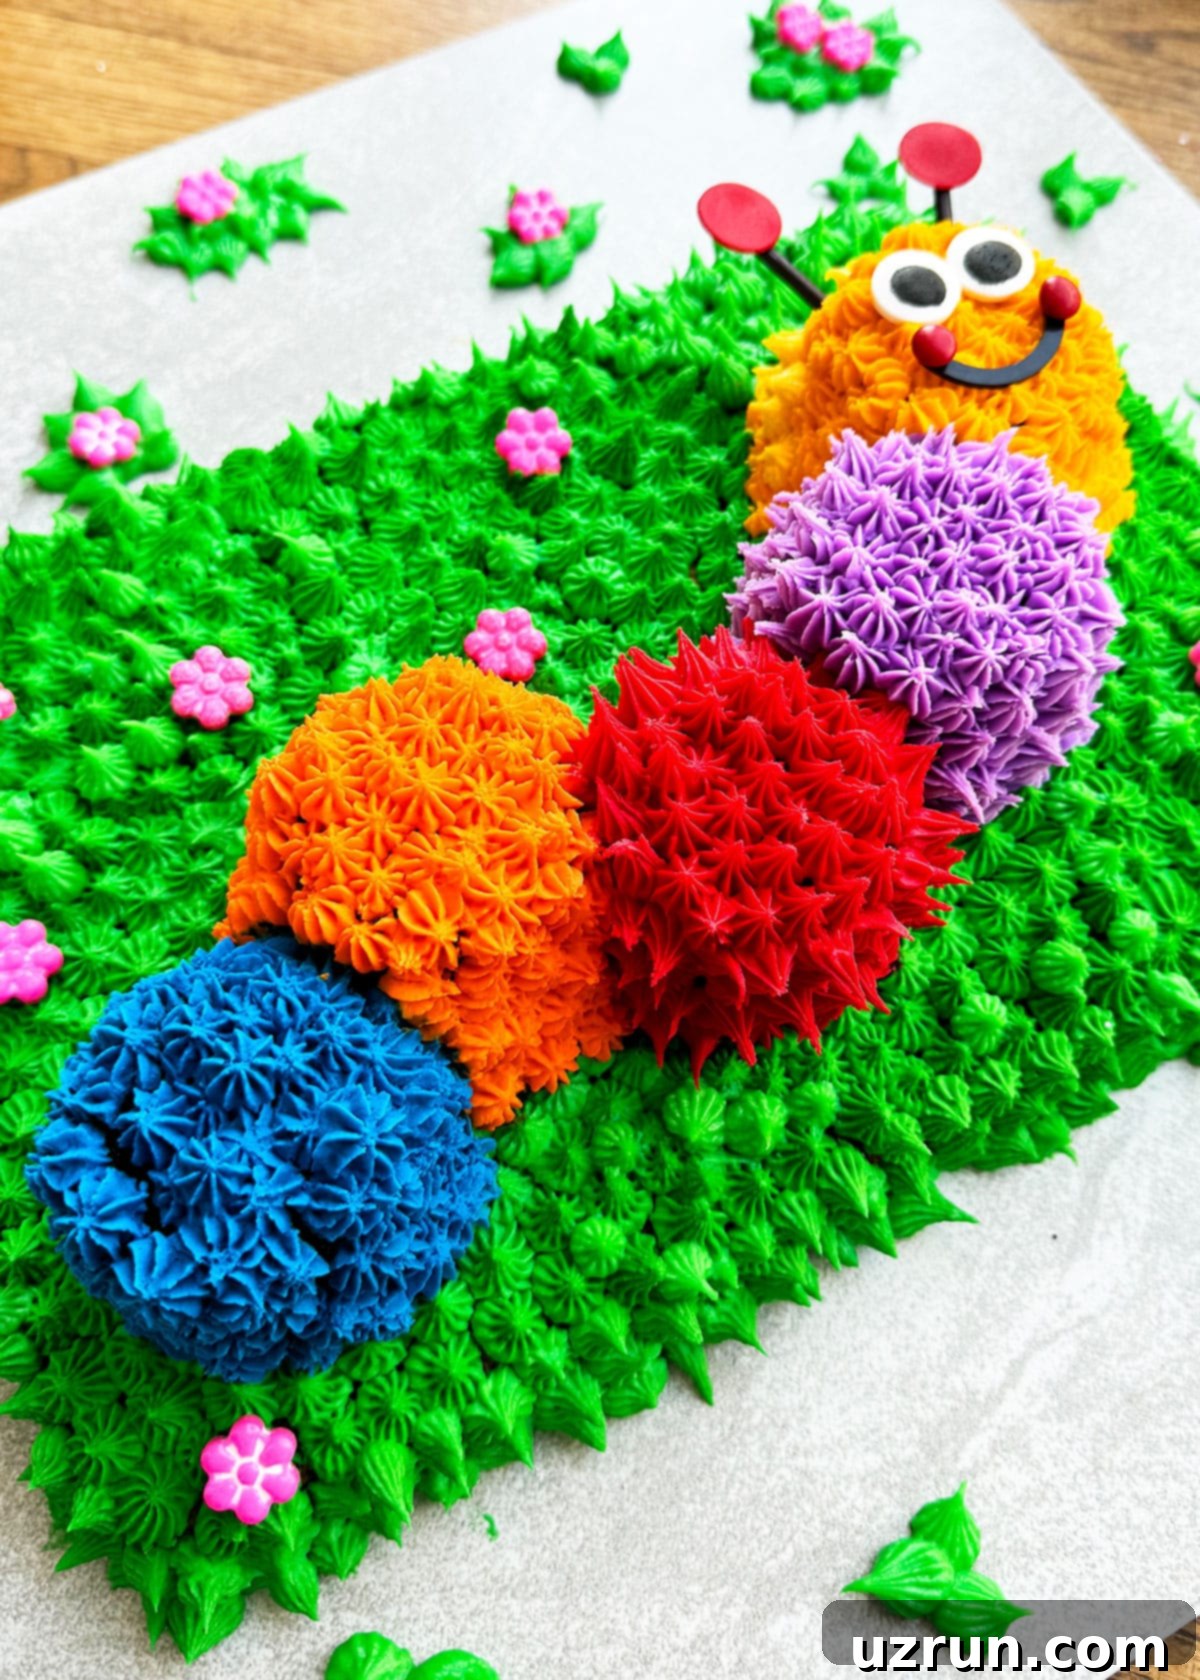
- Stick flower candies on the cake: Finally, strategically place flower candies on both the green sheet cake and the cake board to add a pop of color and complete your whimsical caterpillar landscape (Image 16). Enjoy your beautiful and delicious creation!
Tips and Techniques for a Perfect Caterpillar Cake
Achieving a professional-looking and delicious caterpillar cake is easier with these expert tips and techniques:
- Don’t forget to decorate the cake board: The cake board isn’t just a transport surface; it’s an extension of your creative canvas! Use it to tell a complete story and set the scene for your caterpillar. Pipe extra grass, add more flower candies, or even edible elements like crushed cookies for “dirt” or gummy worms for playful accents. A well-decorated board elevates the entire presentation.
- Never decorate a warm cake: This is arguably the most crucial rule in cake decorating. If your cake or cupcakes are even slightly warm, the buttercream frosting will melt, slide off, and create a gooey, crumbly mess. This leads to immense frustration and wasted effort. Always ensure all baked components are completely cooled to room temperature, or even chilled, before you begin frosting.
- The first green layer doesn’t have to be smooth: When applying the initial layer of green icing to your sheet cake, don’t worry about perfection. This acts as a “crumb coat” – a thin layer that traps any loose crumbs, preventing them from mixing with your final decorative frosting. Since you’ll be covering it entirely with piped frosting stars, an uneven crumb coat is perfectly fine.
- Use a clean piping bag for each frosting color: To maintain the crisp, vibrant colors of your caterpillar and avoid muddying your design, use a separate, clean piping bag for each individual frosting color. This prevents colors from bleeding into one another and keeps your presentation sharp and professional.
- How to put together antennas: For the caterpillar’s antennas, you have a few options for securing the red cardstock circles to the lollipop sticks. A small dab of frosting or melted chocolate can act as a quick edible glue. For a more secure, non-edible bond (if the sticks won’t be eaten), hot glue or clear tape can be used on the part of the stick that won’t touch the cake.
- Use edible markers to color lollipop sticks: If any part of the lollipop stick will be inserted into the cake or come into contact with edible portions, it’s vital to use food-safe edible markers if you wish to color them. Regular markers contain non-food-grade inks that are not safe for consumption. Prioritize food safety in all your cake decorating.
- Large cake board options: Finding a sturdy, food-safe base for such a large cake can be a challenge. We often use large ceramic or porcelain tiles from hardware stores like Home Depot. They come in various sizes, colors, and patterns, offering a beautiful and reusable solution. Just make sure to thoroughly wash and sanitize it with soap and water before placing your cake on it. Alternatively, you can order large cardboard cake boards online, which are often available in beautiful designs and can be covered with grease-proof paper for an extra layer of protection and presentation.
Recipe FAQs
Our caterpillar cake offers a distinctively American twist compared to the iconic British Colin the Caterpillar. The traditional Colin cake is typically made with a rich chocolate sponge cake, frosted with a chocolate buttercream, and encased in a firm chocolate shell. Our version, on the other hand, embraces simplicity and vibrant flavors. It features a cheerful vanilla sheet cake as its base, adorned with a smooth and colorful vanilla buttercream, and notably, it foregoes the hard chocolate shell entirely. Instead of a solid cake for the body, we cleverly use individual chocolate cupcakes, each decorated with a different color of buttercream, to create the segmented, playful caterpillar shape. This makes our cake generally easier to make at home and more approachable for beginner bakers, while still delivering a delightful and eye-catching dessert.
Absolutely! While our tutorial uses buttercream, this caterpillar cake design is very adaptable for fondant. Instead of piping buttercream frosting, you can use rolled fondant to cover both the sheet cake base and the individual cupcake segments. Fondant offers a smooth, sculpted look and allows for very precise detailing. You can even create fondant decorations for the caterpillar’s features, like its eyes, smile, and antennas, as well as charming fondant flowers for the cake board. For assistance with fondant techniques, make sure to consult our comprehensive guides on How to Color Fondant and How to Make Marshmallow Fondant. You can also gain further inspiration and tips for working with fondant from our New Year’s Cake tutorial.
Storage Tips for Your Homemade Cake
Proper storage is key to keeping your homemade caterpillar cake fresh and delicious. Here’s how to manage leftovers and prepare components ahead of time:
- Make ahead instructions: To reduce stress on party day, you can bake and decorate this cake up to 3 days in advance. Store the finished cake in a sealed, airtight container in the refrigerator to maintain its freshness and prevent it from drying out. For even longer preparation, you can bake the cake and cupcakes and prepare the frosting up to a month ahead. Store the cooled cake layers and cupcakes in separate sealed containers in the freezer. Freeze the buttercream in an airtight container as well. Thaw all components in the refrigerator overnight (at least 24 hours) before decorating as per the instructions.
- Room temperature: If your cake does not have any perishable fillings (like fresh fruit or cream cheese frosting), a frosted buttercream cake can safely remain at room temperature for 8-10 hours. However, always consider your climate; in very warm or humid conditions, refrigeration is always the safer choice to prevent melting or spoilage.
- Refrigerate: Any leftover slices or the entire cake should be stored in a sealed, airtight container in the fridge. This will keep it fresh and moist for up to 3 days. Ensure the container is truly airtight to prevent the cake from absorbing odors or drying out.
- Freeze: For longer storage, the undecorated sheet cake and cupcakes can be frozen in separate sealed containers for up to 1 month. Make sure they are well-wrapped to prevent freezer burn. The buttercream frosting can also be frozen in an airtight container for up to 1 month. You have the option to tint the frosting before freezing it in separate containers for each color, or you can freeze it as a single batch and tint it after thawing. Always thaw frozen cake components and frosting in the refrigerator for at least 24 hours before attempting to decorate, ensuring they return to a workable temperature and consistency.
More Easy Decorated Cakes for Inspiration
If you loved creating this caterpillar cake, you might enjoy exploring other simple yet impressive decorated cake ideas:
- Easy Teddy Bear Cake (And Party)
- Pink Ombre Mother’s Day Cake (And Party)
- Summer Cake (Kids Backyard Summer Party)
- Easy Baby Cake
- Homemade Wedding Cake
- Easy Camping Cake
Our Caterpillar-Themed Party Details
Once the concept for our son’s first birthday – inspired by his beloved Baby Einstein Caterpillar toys – was firmly in place, the fun of party planning truly began. I was thrilled with how the party invites turned out, each a vibrant reflection of our theme. Designing them was a fantastic learning experience, pushing me to master several Photoshop tools I hadn’t used before. This design continuity was key; I extended the same cheerful caterpillar motif to create matching cupcake toppers, party favor labels, and even labels for all the delicious desserts, tying everything together seamlessly.
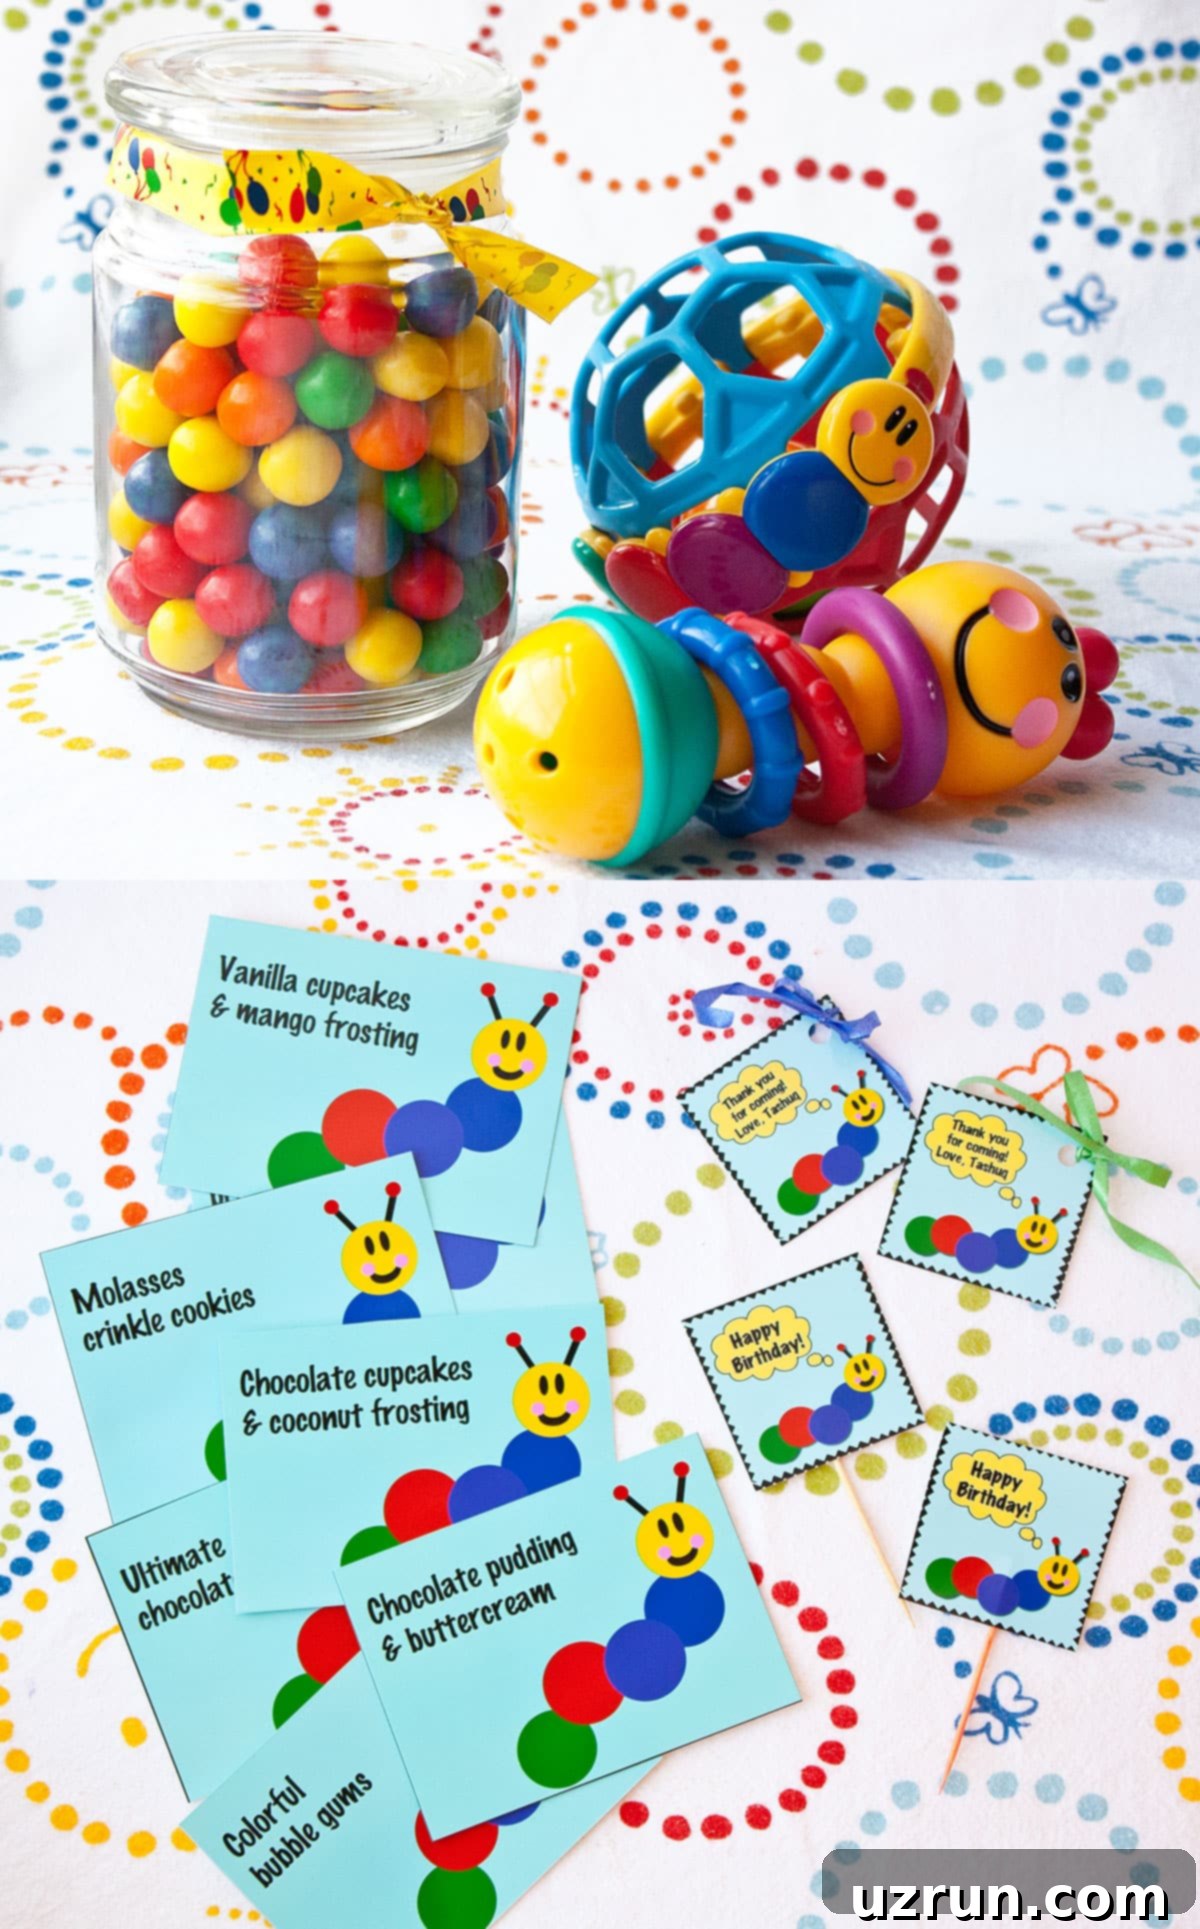
The entire party ambiance was designed to be incredibly colorful and fun, perfectly matching the whimsical nature of a caterpillar. The area around the food station was transformed with an array of balloons in cheerful hues and whimsical decorative panels, creating an inviting and festive atmosphere. While the main celebration cake was quite grand, measuring about 30 inches wide, I also prepared a similar, but smaller, version specifically for my son’s smash cake photoshoot. The detailed tutorial for that smaller, more manageable version is precisely what you’ll find shared above, making it perfect for your own home celebration or photoshoot!
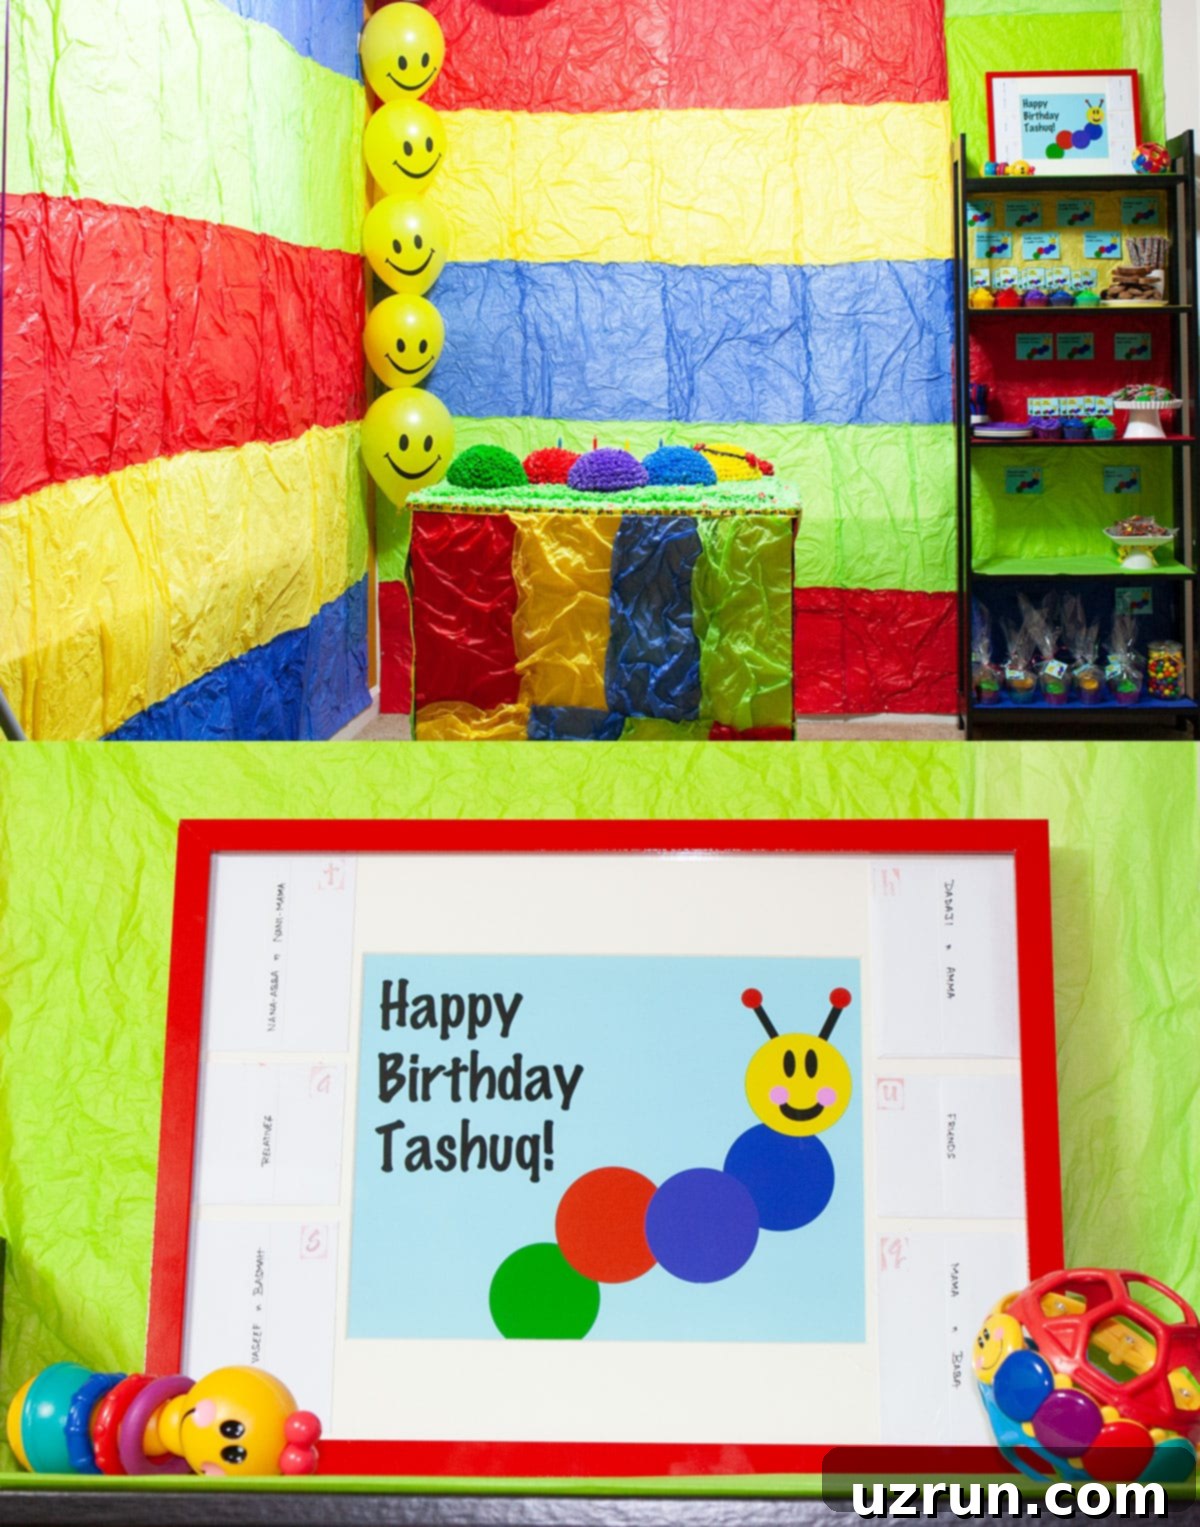
Delicious Party Food Ideas for Your Caterpillar Celebration
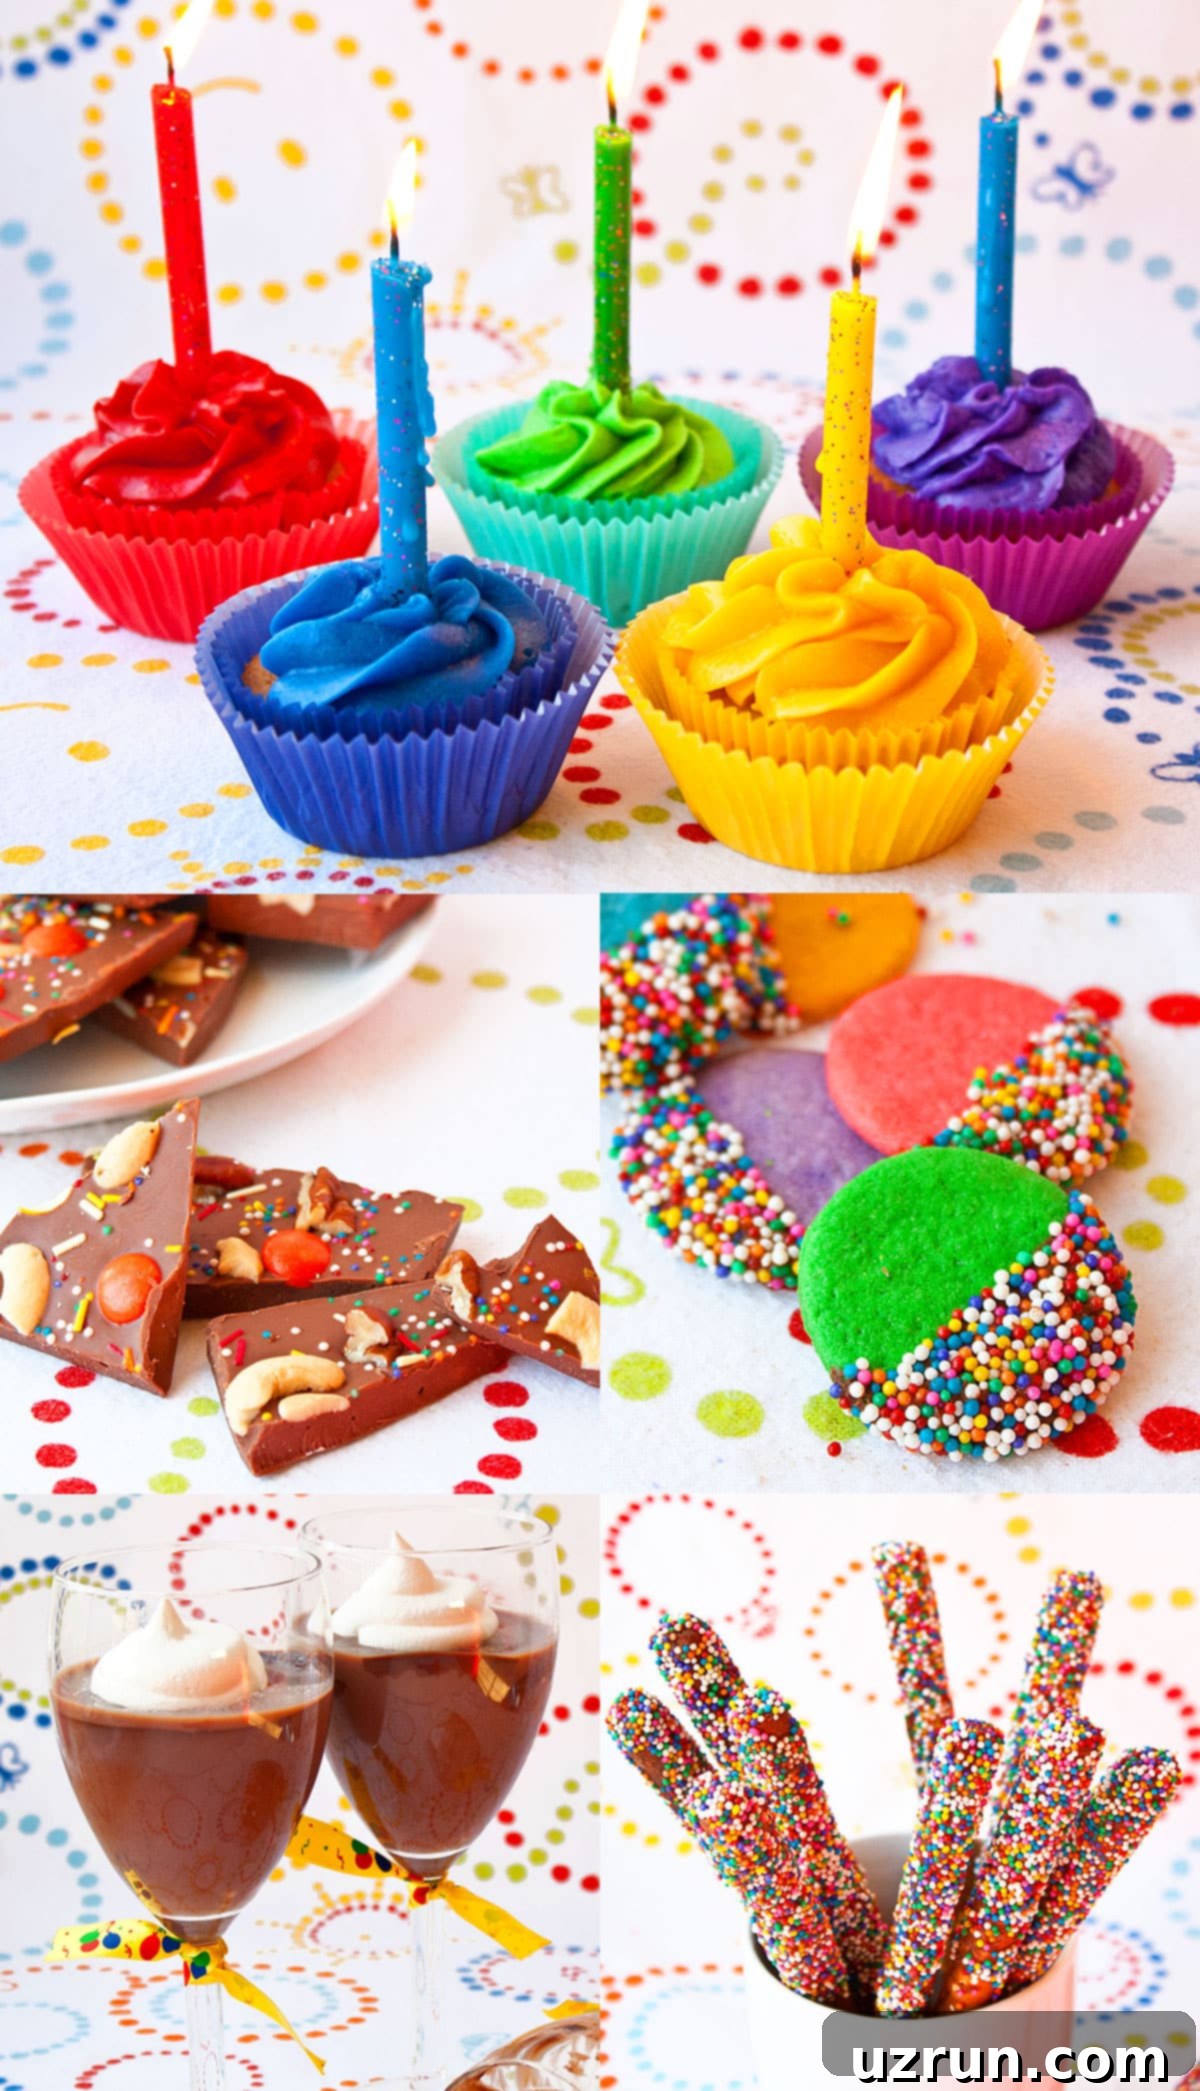
Instead of the traditional sprawling dessert table, I opted for a more space-efficient dessert shelf. This was primarily driven by the available space in our home, which simply couldn’t accommodate a large table. The dessert shelf proved to be a charming and practical solution, displaying a delightful array of treats. As a special thank you to our guests, at the end of the party, I provided everyone with small boxes and encouraged them to pack a selection of their favorite desserts as a party favor to take home.
- Chocolate Covered Pretzels: A simple, sweet-and-salty treat that’s easy to make in advance.
- Vegan Chocolate Pudding: A thoughtful option to ensure our vegan guests had a delicious dessert to enjoy.
- Rainbow Cookies (Sugar Cookies): Colorful and fun, these sugar cookies perfectly matched the vibrant caterpillar theme.
- Vegan Chocolate Cupcakes: Another inclusive option for guests with dietary preferences, these were just as delicious as their traditional counterparts.
- Vanilla Cupcakes: A classic favorite that appeals to everyone, offering a lighter option amidst the chocolate.
- Chocolate Bark: Versatile and customizable, chocolate bark is quick to prepare and can be broken into festive pieces.
- Variety of candies: A colorful assortment of candies added to the festive feel and offered guests even more sweet choices.
Essential Party Planning Tips for a Stress-Free Celebration
Hosting a memorable party doesn’t have to be overwhelming. With a little foresight and organization, you can enjoy the celebration as much as your guests. Here are my top party planning tips:
- Plan ahead! This is the golden rule of successful party hosting. Start planning well in advance – weeks or even months for a big event. This buffer allows you to tackle tasks gradually and leaves room to address any unexpected challenges without last-minute panic. You never know when you might encounter a delayed delivery or a forgotten ingredient.
- Get organized: A well-structured approach will save you countless headaches. Create a central hub for all your party-related information, whether it’s a dedicated notebook, a digital document, or a Pinterest board. Keep track of RSVPs, vendor contacts, décor ideas, and budget details.
- Make lists for everything! Lists are your best friend. Segment your planning into categories: a master list for dinner recipes, another for desserts, a comprehensive grocery list, a detailed chore list (who does what and when), and a timeline for tasks. Checking items off provides a satisfying sense of progress and ensures nothing is overlooked.
- Know the exact number of guests that would be coming: Accurate headcount is critical. It directly impacts your food quantities, seating arrangements, party favor counts, and overall budget. Knowing the precise number helps you determine if a recipe needs to be doubled or tripled, preventing both shortages and excessive waste.
- Always have extra ingredients on hand: Learn from my experience! Halfway through decorating my cake, I unexpectedly ran out of green icing. Thankfully, I had all the necessary ingredients to whip up another batch quickly. If I hadn’t, a trip to the grocery store would have been a significant waste of precious time and momentum. Always buy a little extra of non-perishable staples like sugar, flour, butter, and food coloring.
- Also, always have some extras for everything you have made: Accidents happen. A dropped cupcake, a broken cookie, or an imperfect cake slice can quickly deplete your planned servings. Make a few extra cookies, cupcakes, or even a small backup dessert. This small buffer prevents last-minute scrambling and ensures you have enough perfect items for your display and guests.
- Food items like cookies, frostings, and pretzels can be made a few days beforehand: Capitalize on make-ahead opportunities. Many desserts, like sugar cookies, chocolate bark, and even buttercream frosting, can be prepared several days in advance and stored properly. This frees up your time on the day of the party for fresh preparations and last-minute decorating, significantly reducing stress.
- Finally, expect the unexpected but don’t forget to have fun! Despite all your careful planning, something might go awry. Embrace flexibility, find creative solutions, and most importantly, remember the true purpose of the party: to celebrate and create joyful memories. Your attitude sets the tone, so relax and enjoy the fruits of your labor!
Recipe
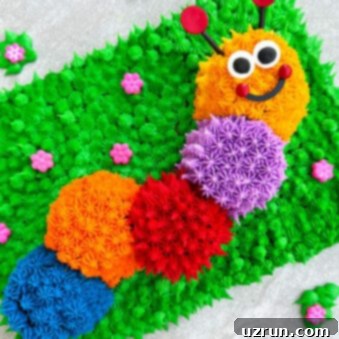
Easy Caterpillar Cake (With Buttercream Icing)
Abeer Rizvi
Pin Recipe
10 minutes
40 minutes
30 minutes
1 hour
20 minutes
Dessert
American
15
Slices
556
kcal
Want to Save This Recipe?
Enter your email & I’ll send it to your inbox. Plus, get great new recipes from me every week!
By submitting this form, you consent to receive emails from CakeWhiz
Ingredients
-
1
Yellow sheet cake
I also mixed in some sprinkles in the batter to make a funfetti version. -
5
Chocolate cupcakes -
6
cups
American buttercream frosting
Green, purple, red, yellow, orange, blue -
¼
cup
Black icing -
2
Eyeball candy -
2
Mini red m&m candies -
¼
cup
Flower candies
Instructions
-
Bake the cake and cupcakes and allow them to cool fully.
-
While they are baking and cooling, prepare the frosting and tint it with gel food coloring.
-
Place the sheet cake on a large cake board.
-
Use a spatula to spread a thin layer of green icing on the top and sides of the cake. It does not have to be smooth.
-
Fill a piping bag with green icing and attach Wilton Tip # 21 (star).
-
Pipe little stars all over the cake until fully covered.
-
Remove liners from cupcakes. Place these cupcakes on top of the green icing in the formation of a caterpillar.
-
Fill a piping bag with blue icing and attach Wilton Tip # 21 (star). Pipe little stars all over the first cupcake. This will be the caterpillar’s rear end.
-
Fill a piping bag with orange icing and attach Wilton Tip # 21 (star). Pipe little stars all over the second cupcake.
-
Fill a piping bag with red icing and attach Wilton Tip # 21 (star). Pipe little stars all over the third cupcake.
-
Fill a piping bag with purple icing and attach Wilton Tip # 21 (star). Pipe little stars all over the fourth cupcake.
-
Fill a piping bag with yellow icing and attach Wilton Tip # 21 (star). Pipe little stars all over the fifth cupcake. This will be the caterpillar’s face.
-
Stick two eyes on top of the yellow cupcake.
-
Fill a piping bag with black icing and attach a small round tip. Pipe a smile below the eyes. Stick two red m&m candies on both sides of the smile.
-
For the antennas, cut out 2 small red circles out of thick cardstock paper and stick each to a lollipop stick. Push these sticks on top of the yellow cupcake.
-
Pipe patches of green icing grass on the empty space of the cake board.
-
Stick flower candies on the cake as well as the cake board. Enjoy!
Notes
- Try different colors of icing for the caterpillar. You can even make a pastel version.
- Don’t decorate a warm cake.
- Omit the sheet cake and make 5 large dome cakes. Arrange them on a large sturdy board in the shape of a caterpillar and decorate in a similar manner.
- Read additional tips and variations above.
- Leftovers can be stored in a sealed container in the fridge for up to 3 days.
Nutrition
Calories:
556
kcal
Carbohydrates:
98
g
Protein:
2
g
Fat:
17
g
Saturated Fat:
4
g
Polyunsaturated Fat:
8
g
Monounsaturated Fat:
5
g
Trans Fat:
0.1
g
Cholesterol:
0.3
mg
Sodium:
464
mg
Potassium:
61
mg
Fiber:
1
g
Sugar:
77
g
Vitamin A:
7
IU
Vitamin C:
0.03
mg
Calcium:
94
mg
Iron:
1
mg
An automated tool is used to calculate the nutritional information. As such, I cannot guarantee the accuracy of the nutritional information provided for any recipe on this site.
Tried this recipe?
Leave a comment below or rate and tag @cakewhiz on social
