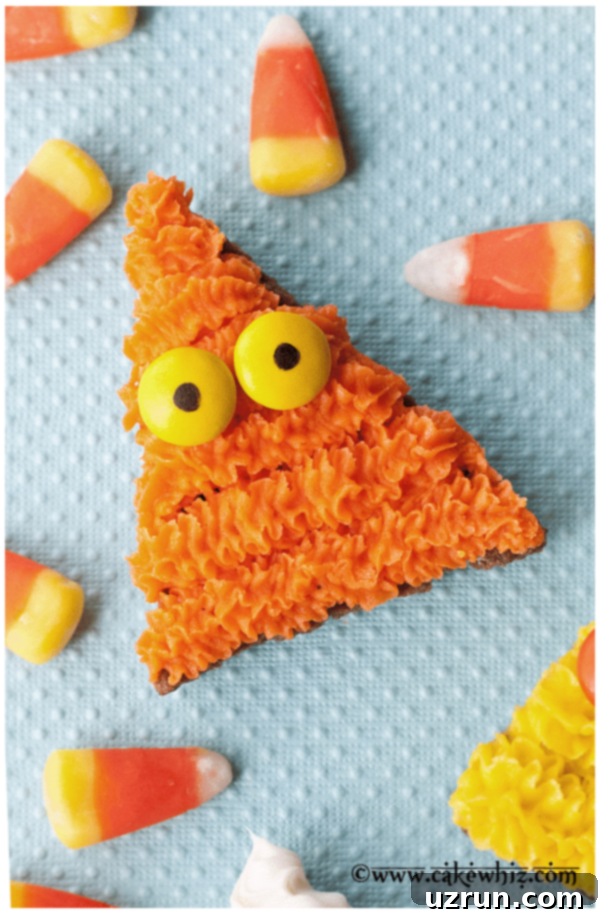
Easy Monster Cookies: Fun, Candy Corn-Inspired Halloween Treats
Get ready to conjure up some magic in your kitchen this Halloween with these absolutely adorable and incredibly easy monster cookies! Homemade with love and simple ingredients, these triangular, candy corn-inspired chocolate sugar cookies are transformed into whimsical little monsters with vibrant buttercream icing. They’re the perfect festive treat to celebrate the spookiest season of the year.
The inspiration for these delightful Halloween cookies came straight from my recent Candy Corn Cake. I was captivated by the iconic colors and distinct triangular shape of candy corn, which happens to be one of the most classic Halloween candies out there. Many of us (and by “us,” I mostly mean “me”!) eagerly await its return to store shelves all year long. So, when those cheerful yellows, oranges, and whites reappeared, they sparked the idea for these simple yet unique cookies. Imagine a Halloween tablescape brought to life with these vibrant monsters, alongside other fun creations like Easy Ghost Cookies and no-bake Oreo Spider Cookies. It’s an effortless way to create the ultimate spooky-yet-sweet display that everyone will adore!
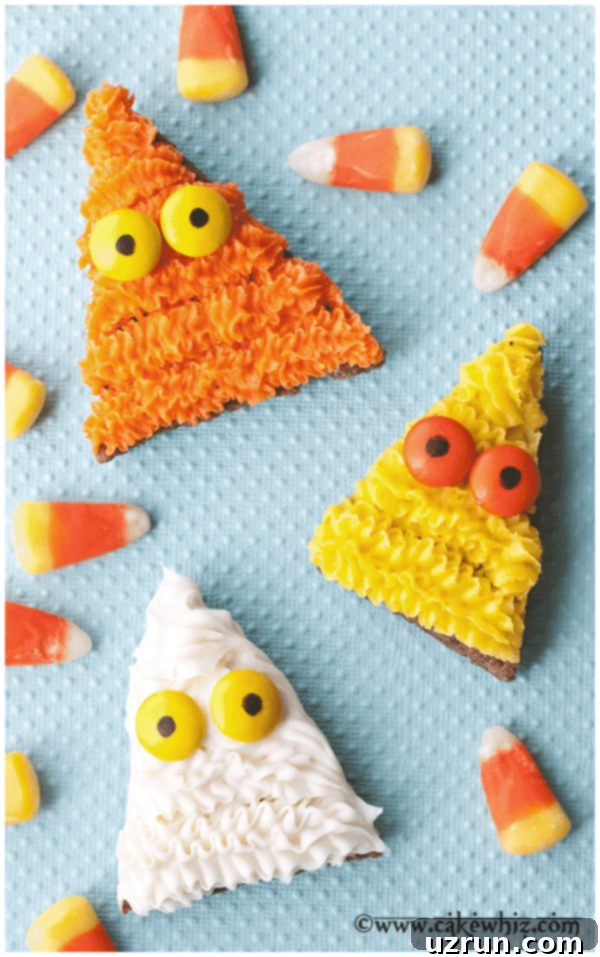
How to Make Easy Monster Cookies: A Step-by-Step Guide
Creating these charming monster cookies is a fun and straightforward process, making it perfect for bakers of all skill levels, including those who want to involve little helpers. Follow these simple steps to bring your candy corn-inspired monsters to life.
- Prepare the Cookie Dough: Start with your favorite chocolate sugar cookie dough. Roll it out to an even thickness on a lightly floured surface. Using a knife or a triangular cookie cutter, carefully cut out triangle shapes, mimicking the classic candy corn silhouette. For best results, chill your dough for about 15-20 minutes before cutting to ensure crisp edges.
- Bake Until Firm: Arrange your cut-out cookie dough triangles on a baking sheet lined with parchment paper. Bake them in a preheated oven until the edges are firm and the centers are just set. Avoid overbaking to keep them soft and chewy. Once baked, let them cool completely on a wire rack before moving on to the decorating stage. This is crucial for the icing to set properly.
- Prepare Icing Bags: While your cookies cool, prepare your buttercream icing. Divide your buttercream icing into three separate bowls and color them orange, white, and yellow using gel food coloring for vibrant hues. Fill three individual piping bags, each fitted with a small star tip (like Wilton’s Tip #21), with the different colored icings. Ensure the icing is at a good piping consistency – not too stiff, not too runny.
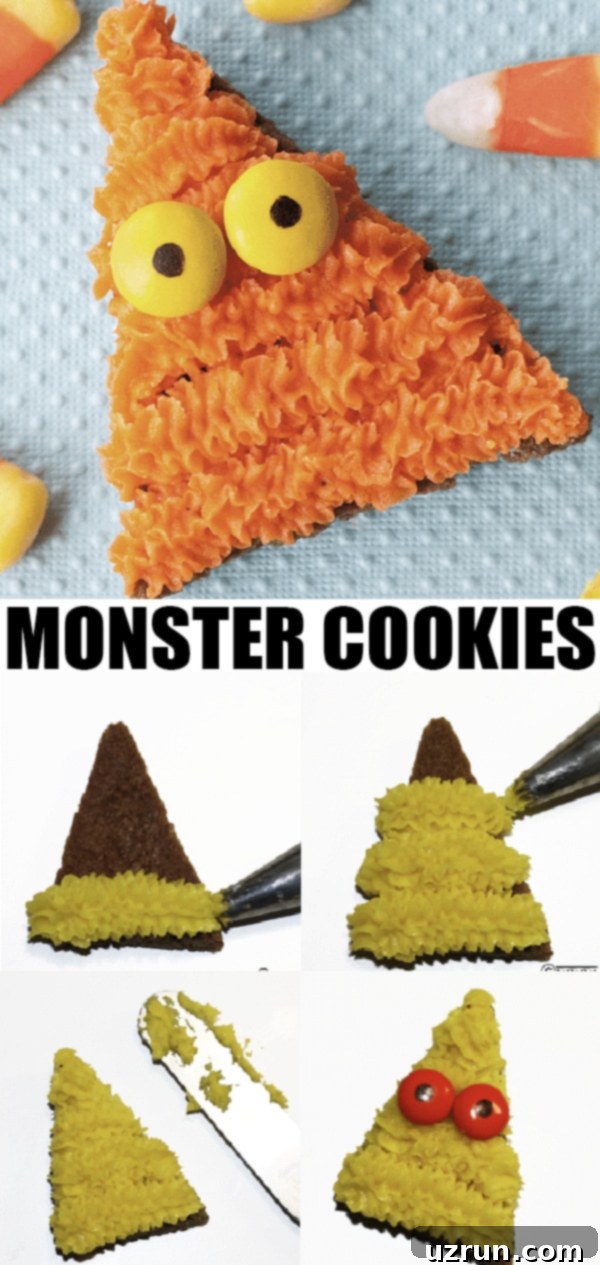
- Pipe Squiggly Ruffle Lines: Hold your piping bag at a 45-degree angle near the widest base of your triangular cookie. Gently squeeze the bag to start the flow of icing. Then, move your hand rapidly in a continuous right-left motion as you pipe a line. This technique creates a beautiful, ruffled, squiggly texture. Continue piping rows, alternating colors (yellow, orange, white, or any combination you prefer), moving upwards towards the cookie’s point.
- Create Whimsical Eyes: For the monster eyes, gather your M&M candies. Using a black edible food marker, draw pupils onto the M&M’s. You can vary the size and placement of the pupils to give each monster a unique expression – some silly, some surprised, some sleepy!
- Stick the Eyes onto the Cookies: While the buttercream is still fresh and soft, gently press the decorated M&M eyes onto the cookie. Place them near the top pointed section of each cookie, allowing them to peek out from the colorful ruffles. The soft buttercream will help them adhere securely. Allow the cookies to set for a bit, and then they’re ready to be enjoyed!
Creative Variations for Halloween Candy Corn Monster Cookies
These monster cookies are incredibly versatile, offering endless possibilities for customization. Don’t be afraid to unleash your creativity and make each monster unique! Here are some fun variations to inspire your decorating:
- Embrace a Multitude of Frosting Colors: Instead of traditional candy corn colors, experiment with a rainbow palette for truly vibrant monsters. Pipe alternating rows of red, blue, green, and purple icing ruffles, or create ombre effects by blending similar shades. Let your imagination run wild – there’s no limit to the colorful monster creations you can design!
- Add a Spooky Mouth: Give your monsters a voice (or a scream!) by adding a mouth. Use black buttercream icing in a piping bag with a small round tip (like Wilton’s Tip #3) to draw jagged smiles, menacing frowns, or even a simple line for a minimalist monster. A red edible marker can also be used for a bloody effect on a simple line mouth.
- Change Eyeball Placement for Character: The placement of the eyeballs can dramatically alter your monster’s personality. To make them look silly, cross-eyed, or deep in thought, simply dot the eyes up to the right, down to the left, or give them a googly, off-kilter look. Use different sized M&Ms for a more comical effect, or even edible candy eyes found at most craft stores.
- Substitute with Skittles: If you’re looking for an alternative to M&M candies, Skittles offer a fantastic burst of fruity flavor and a slightly different texture. Their vibrant colors can also add another layer of visual appeal to your monster’s eyes.
- Experiment with Different Icing Tips: While a star tip creates beautiful ruffles, using different piping tips can give your cookies varied textures and designs. Try a round tip for smooth, puffy lines, a petal tip for delicate, layered effects, or even a basketweave tip for a more intricate monster skin. Each tip will result in a distinct look, adding major cuteness appeal to your cookie collection.
- Sprinkle on More Fun: No monster is complete without a little extra pizzazz! Add sprinkles, edible glitter, or small nonpareils over your wet buttercream for an extra festive touch. You can use Halloween-themed sprinkles (bats, ghosts) or simply go for a mix of vibrant colors to enhance the monster vibe.
- Consider Different Cookie Bases: While chocolate sugar cookies are delicious, don’t hesitate to try other cookie dough flavors. A classic vanilla sugar cookie provides a blank canvas for the colorful icing, or a pumpkin spice cookie could add an autumnal twist to your Halloween treats.
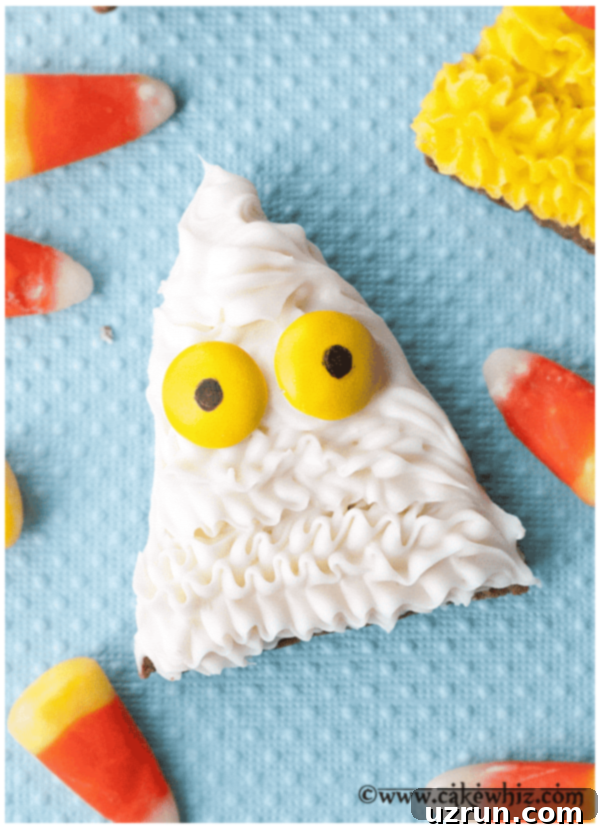
Expert Tips and Techniques for Perfect Monster Cookies
Achieving perfectly decorated cookies requires a few insider tricks. Here are some invaluable tips and techniques to ensure your easy monster cookies turn out beautifully every time:
- How to Cut Cookies for Uniform Shapes: I often cut the triangular shapes freehand, but for those who prefer precision or are making a large batch, a triangle cookie cutter will make things much easier and ensure uniform sizes. If cutting freehand, it helps to lightly score the dough first to guide your knife. Ensure your cookie dough is properly chilled before cutting, as this prevents it from spreading too much during baking and helps maintain those crisp edges.
- Choosing the Right Icing: Buttercream vs. Royal Icing: I used buttercream icing to decorate these cookies because, personally, I find its rich, creamy flavor superior to royal icing. Buttercream also offers a soft, pleasant texture that melts in your mouth. However, if you’re planning on packaging these cookies as gifts or party favors, or if you need them to be stackable for transport, I highly recommend using royal icing or glace icing. These icings dry hard, creating a protective shell that prevents smudging and keeps your designs intact. Understand your purpose before you start icing!
- Mastering the Art of Piping Ruffles: To create those beautiful squiggly ruffles, hold your piping bag at a 45-degree angle near the base of the cookie. Apply steady, even pressure, and as the icing comes out, move your hand rapidly in a right-left motion. The speed of your hand movement will determine the tightness of the ruffles. Practice on a piece of parchment paper first to get a feel for the technique before decorating your actual cookies. Consistency in your buttercream is also key here; if it’s too soft, your ruffles will droop, and if it’s too stiff, it will be hard to pipe smoothly.
- Easily Fix Messy Ruffles: Don’t worry if your first few rows of ruffles look a bit messy or droopy on one side. This is a common occurrence, often due to inconsistent pressure or angle. The good news is, it’s easily fixable! Simply take a small, clean spatula or the back of a knife and gently run it along the side of the cookie downwards. This will smooth out any imperfections and create a clean edge.
- Why These Cookies Cannot Be Stacked (with Buttercream): Due to the soft, creamy nature of buttercream, these cookies cannot be stacked directly on top of each other once decorated. The icing will smudge and stick. If you must stack them, place a piece of parchment paper between each cookie layer in an airtight container. However, for best presentation, arrange them in a single layer. This is where royal icing shines if stackability is a priority.
- Optimal Dough Preparation: Don’t overwork your cookie dough; mix until just combined to ensure tender cookies. After mixing, chilling the dough for at least 30 minutes (or longer) is crucial. This helps prevent spreading during baking, resulting in cookies that hold their shape perfectly and are easier to handle when cutting.
- Baking to Perfection: Keep a close eye on your cookies while they bake. Sugar cookies are best when they are just lightly golden around the edges and still slightly soft in the center. Overbaking can lead to dry, crumbly cookies.
- Cooling Completely: Patience is a virtue when it comes to decorating! Ensure your cookies are entirely cooled to room temperature before applying any icing. Warm cookies will melt the buttercream, creating a messy situation.
- Choosing Vibrant Food Colors: For the most vivid orange, yellow, and white, opt for gel food coloring instead of liquid dyes. Gel colors are concentrated, so a little goes a long way, and they won’t alter the consistency of your buttercream as much as liquid colors.
- Involve the Kids: These cookies are a fantastic project for kids! Let them help with mixing the dough, cutting out shapes (with supervision), choosing M&M colors, and even placing the eyes. It’s a fun and engaging activity that creates lasting Halloween memories.
- Make Ahead Tips: You can prepare the cookie dough a day or two in advance and store it wrapped tightly in the refrigerator. Baked, un-iced cookies can also be stored in an airtight container at room temperature for up to 3 days, or frozen for longer. The buttercream can be made ahead and stored in the fridge, then brought to room temperature and re-whipped before piping.
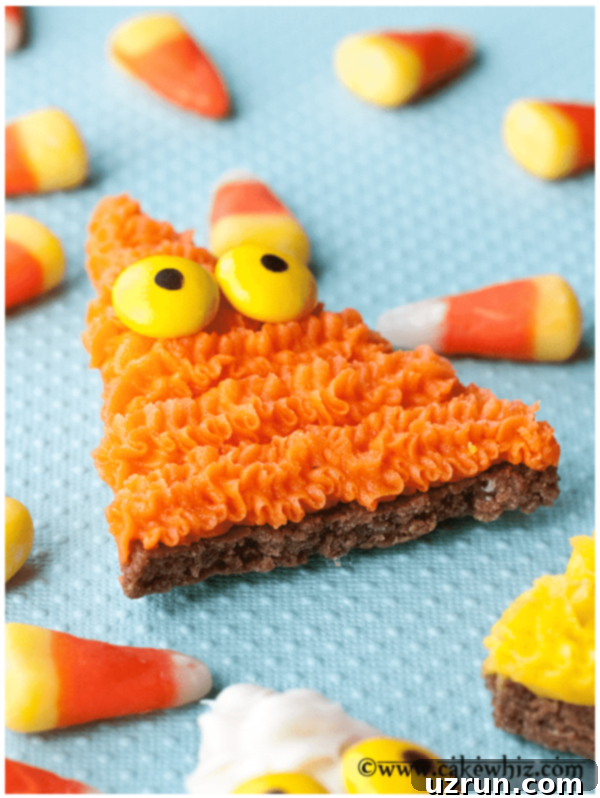
Storage Solutions for Your Monster Cookies
Proper storage is essential to keep your delicious monster cookies fresh and tasty for as long as possible. Here’s how to best store them:
- Refrigerate Decorated Cookies: Because these cookies are decorated with buttercream icing, they are best stored in a sealed, airtight container in the refrigerator for up to 3 days. If you need to layer them, place a piece of parchment paper between each layer to prevent the icing from sticking or smudging.
- Freezing for Longer Shelf Life: I generally don’t recommend freezing *iced* cookies, especially with buttercream, as the icing can become soggy or alter in texture upon thawing. For longer storage, freeze the *un-iced* baked cookies and the buttercream icing separately. Wrap the cooled, un-iced cookies tightly in plastic wrap, then place them in an airtight freezer bag or container for up to 1 month. The buttercream can be stored in a separate airtight container in the freezer for up to 1 month as well. When you’re ready to assemble, simply thaw the cookies and icing overnight in the refrigerator, bring the icing to room temperature (re-whip if needed), and then follow the decorating instructions in the recipe card below.
- Room Temperature (Un-iced): If you have un-iced cookies, they can be stored in an airtight container at room temperature for 2-3 days before decorating.
More Easy Halloween Desserts to Explore
If you’re looking to expand your Halloween treat repertoire, here are some other delightful and easy recipes that will complement your monster cookies perfectly:
- Rolo Chocolate Monsters
- Halloween Donuts (Spider and Monster)
- Easy Mummy Cake {Halloween Cake}
- Halloween Candy Corn Cake
- Halloween Pudding Cups
Recipe
Easy Monster Cookies (Candy Corn Cookies)
Abeer Rizvi
Pin Recipe
Want to Save This Recipe?
Enter your email & I’ll send it to your inbox. Plus, get great new recipes from me every week!
By submitting this form, you consent to receive emails from CakeWhiz
Ingredients
- 20 Chocolate sugar cookies
- Buttercream icing Colored orange, white and yellow. Can use royal icing instead if you prefer a harder cookie icing
- ¼ cup M&M candies
Instructions
-
Prepare the cookie dough. Roll it out and cut out traingle shapes. Bake and let the cookies cool completely.
-
Fill three individual piping bags with different colored icings. Attach Wilton’s Tip #21 (small star tip).
-
Hold your bag at a 45 degree angle near the base of the cookie. Squeeze your bag util icing comes out. Now, start moving your hand in a right-left motion rapidly. This should result in a beautiful row of swiggly ruffles.
-
Continute doing this until the entire cookies is covered in rows of ruffles.
-
You will notice that one side of the cookie will have some messy and droopy ruffles.That can be fixed easily. Just run a spatula along the side of the cookie downwards and no more mess.
-
To make the eyes, use a a black edible marker to draw eyeballs on m&m candies.
-
Stick them near the top of each cookie and enjoy!
Notes
- Read all my tips above.
- Leftovers can be stored in a covered container in the fridge for up to 3 days.
Nutrition
An automated tool is used to calculate the nutritional information. As such, I cannot guarantee the accuracy of the nutritional information provided for any recipe on this site.
