Easy Homemade Cookie Monster Cake: Your Ultimate Sesame Street Birthday Treat
Get ready to unleash your inner baker with this incredibly quick and easy Cookie Monster cake recipe! Crafted from scratch using simple, readily available ingredients, this delightful Sesame Street-themed chocolate cake is not just a dessert, but a joyous centerpiece. Adorned with vibrant blue and contrasting black buttercream icing, complete with iconic chocolate chip cookies, it promises to bring smiles and excitement to any celebration, especially children’s birthday parties.
If you’ve ever dreamt of trying your hand at cake decorating but felt intimidated, this is your moment! Our Cookie Monster cake is designed to be incredibly beginner-friendly, offering a straightforward path to creating the most adorable and hilariously goofy monster face. Imagine the sheer delight on a child’s face when they see their favorite cookie-loving character brought to life on their special day! It’s the best of both worlds – delicious cake and delightful cookies, all rolled into one magnificent treat. For an even grander birthday extravaganza, consider serving these charming Cookie Monster Cupcakes {Sesame Street} right alongside this show-stopping cake.

Why Choose This Easy Cookie Monster Cake Recipe?
Beyond its undeniable charm, this particular Cookie Monster cake recipe stands out for several reasons. It simplifies the process of creating an elaborate-looking cake, making it accessible to everyone. The use of a classic chocolate cake base ensures universal appeal, while the vivid blue buttercream truly captures Cookie Monster’s iconic look. It’s a project that brings joy not only in the eating but also in the making, providing a rewarding experience for any home baker.
- Simplicity: No advanced baking or decorating skills required.
- Iconic Design: Instantly recognizable and beloved by all ages.
- Delicious Combination: The pairing of rich chocolate cake with creamy buttercream and crunchy cookies is irresistible.
- Versatile: Easily customizable with different cake and frosting flavors.
- Perfect for Parties: A fantastic centerpiece for children’s birthdays and themed events.
How to Make an Easy Cookie Monster Cake Recipe from Scratch?
Creating your very own Cookie Monster cake is a fun and straightforward process. Follow these simple steps to transform a basic chocolate cake into a beloved Sesame Street character:
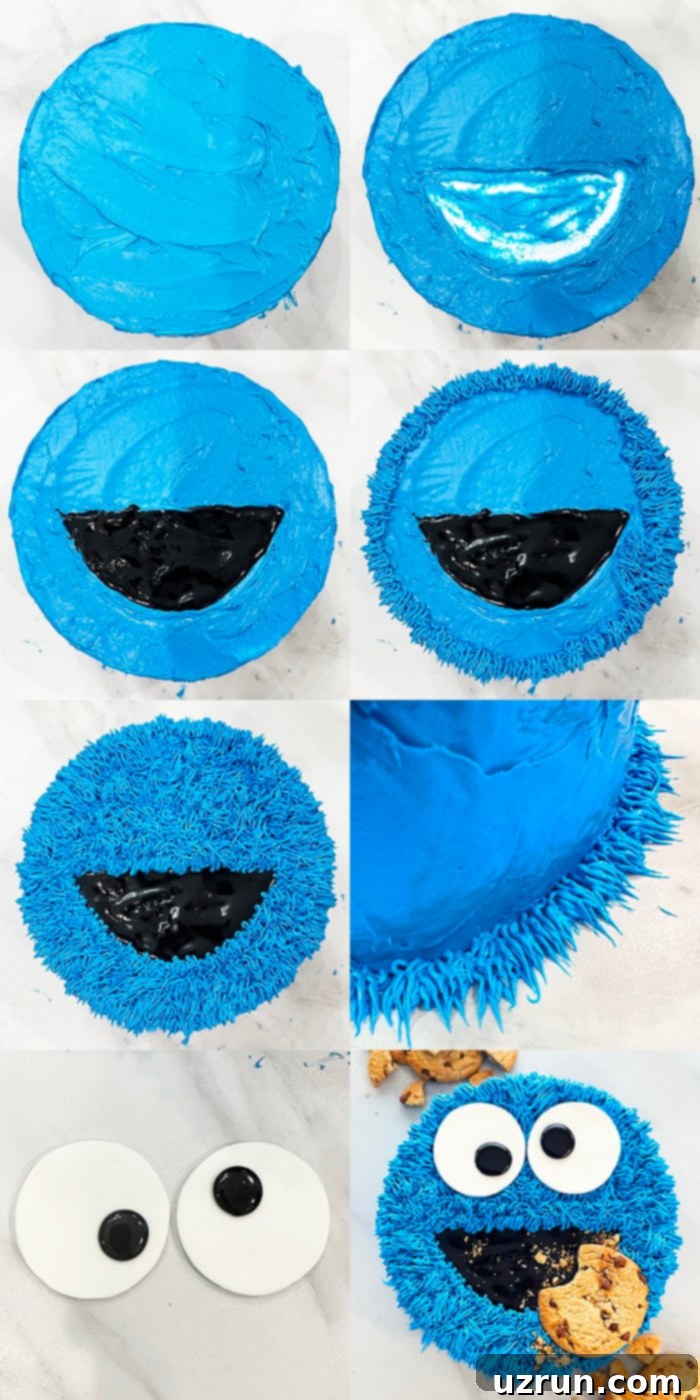
- Bake, Cool, Ice, and Stack Cakes: Begin by baking your two round chocolate cakes. Allow them to cool completely on a wire rack before attempting any frosting. Once cool, place the first cake layer on your chosen serving dish. Apply a generous layer of blue buttercream, then carefully place the second cake layer on top, gently pressing to secure.
- Frost Cake Smoothly: Using an offset spatula, apply a thin, even layer of blue frosting all over the stacked cake. This initial “crumb coat” helps to trap any loose crumbs, ensuring a smooth finish for the final layer of fur. Chill briefly if needed, then apply a second, slightly thicker layer, aiming for as smooth a finish as possible.
- Mark Mouth Area: With a toothpick, gently draw the outline of Cookie Monster’s wide, characteristic mouth on the front of the cake. This guideline will help you place the black icing accurately.
- Spread Black Icing: Using a spoon or a small offset spatula, carefully remove some of the blue frosting from within the marked mouth area. Then, fill this space with black icing. Don’t worry too much about perfect neatness here; Cookie Monster’s mouth has a wonderfully organic, slightly messy look!
- Add Blue “Fur”: This is where the magic happens! Load a piping bag fitted with a Wilton grass tip (#233) with your blue buttercream. Holding the bag at a 45-degree angle, gently squeeze and pull away to create short, spiky “fur” strands. Start from the bottom edge of the cake and work your way up and around, covering every blue surface. Avoid piping over the black mouth area.
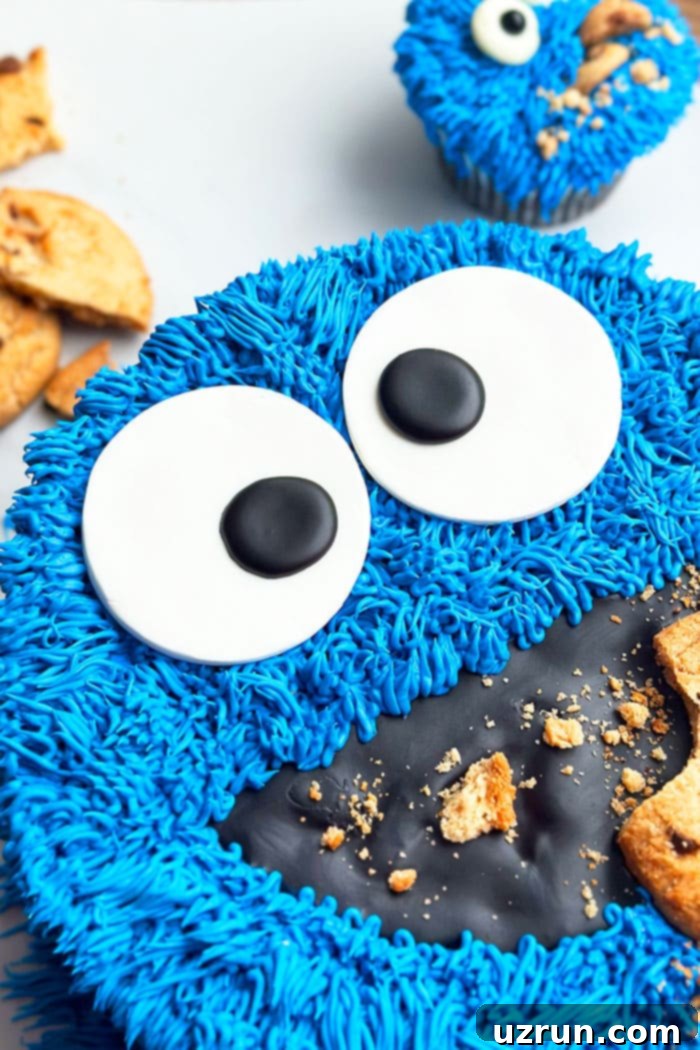
- Make Eyes: Roll out white fondant and use a small round cookie cutter to cut out two equal circles for the eyes. For the pupils, either pipe small black circles onto the white fondant with black icing or cut tiny black fondant circles and attach them. Position these adorable eyes near the top of the cake, above the mouth.
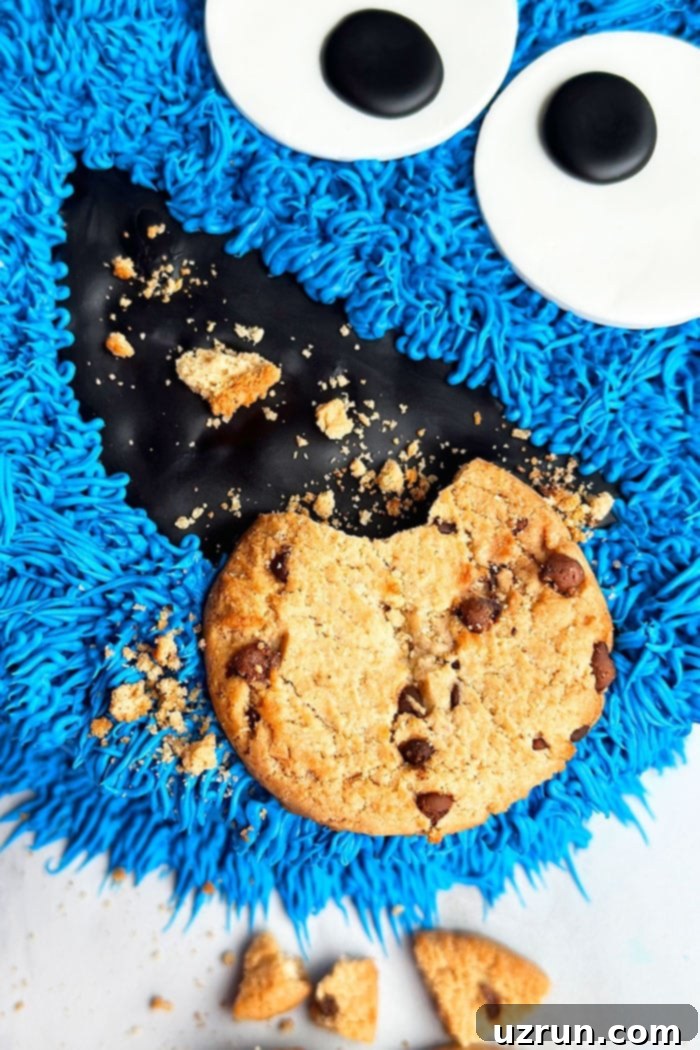
- Add Cookies: Gently press a partially broken chocolate chip cookie (or a whole one!) near the mouth to give the impression of Cookie Monster mid-munch. You can scatter a few cookie crumbs around the mouth area for an extra touch of authenticity and fun.
- Pipe Around the Base: For a clean and polished look, use any remaining blue buttercream and your grass tip (or a star tip) to pipe a neat border around the very base of the cake. This finishes the design beautifully. Enjoy your masterpiece!
Key Ingredients for Your Cookie Monster Birthday Cake
Success starts with quality ingredients. Here’s what you’ll need to gather for your homemade Cookie Monster masterpiece:
- Cakes: You will need two round 8×2 inch cakes. A classic chocolate cake provides a delicious base that pairs perfectly with the sweet buttercream and cookies. Ensure they are completely cooled before frosting to prevent melting.
- Frosting: This recipe calls for a generous amount of blue buttercream, crucial for Cookie Monster’s signature fur. You’ll also need black icing for the mouth and white and black fondant (or alternative options) for the eyes.
- Cookies: Essential for Cookie Monster! Classic chocolate chip cookies are preferred, as they are instantly recognizable. You can use store-bought or homemade ones.
Essential Tools for Cookie Monster Cake Decorating
Having the right tools can make all the difference in achieving a professional-looking finish with minimal effort. Here’s a list of equipment that will be helpful:
- Round Cake Pans (8-inch): For baking your cake layers evenly.
- Parchment Paper: To line your cake pans, ensuring easy release.
- Wire Cooling Rack: Essential for cooling cakes completely and preventing condensation.
- Offset Spatula: For spreading frosting smoothly and easily.
- Piping Bags: Disposable or reusable, for applying the “fur” and eye details.
- Wilton Grass Tip #233: The key to Cookie Monster’s furry texture.
- Toothpicks: For marking the mouth outline.
- Small Round Cookie Cutter: For cutting fondant eyes.
- Serving Plate or Cake Stand: To display your finished cake.
How to Make Cookie Monster’s Eyes for the Cake?
Creating Cookie Monster’s signature googly eyes is simpler than you might think, and you have several options depending on your preference and skill level:
- Fondant: The most popular choice for a clean, sculpted look. You can use pre-made white and black fondant, or make your own Marshmallow Fondant for a delicious, pliable option. Simply roll out white fondant and cut two circles with a cookie cutter. Then, roll tiny balls of black fondant for the pupils and attach them to the white circles with a tiny dab of water or edible glue.
- Modeling Chocolate: Similar to fondant, modeling chocolate (or candy clay) offers a fantastic medium for sculpting. Try this How to Make Modeling Chocolate {Candy Clay} recipe. It’s slightly more forgiving than fondant and has a delicious chocolatey taste.
- Icing: For the easiest approach, simply pipe black and white icing directly onto the cake for the eyes. You can pipe a large white circle, then a smaller black circle on top for the pupil. This method is quick and requires no special tools beyond piping bags and round tips.
What Icing Nozzle or Piping Tip to Use for Cookie Monster’s Fur?
The iconic furry texture of Cookie Monster is achieved with a specific piping tip, but there are alternatives if you don’t have the exact one:
- Grass Tip #233: This is the ideal tip for creating that shaggy, realistic fur effect. It has multiple small holes that create many fine strands simultaneously, perfectly mimicking fur. To use it, fill a piping bag, attach the tip, hold the bag at a 45-degree angle close to the cake, and squeeze the bag while pulling away gently to create short bursts of “fur.” Repeat this motion all over the cake until it’s fully covered.
- Small Star Tip (e.g., Wilton Tip #18): If you don’t have a grass tip, a small star tip can create a similar, albeit slightly different, textured look. Pipe small stars or rosettes close together to build up the furry texture.
- Small Round Tip (e.g., Tip #10): A small round tip can also work by piping very short lines close together, but it will require more effort to achieve a dense, fur-like appearance.
Remember, the key is to pipe small, individual bursts or dots of frosting close together to build up the furry texture effectively. Don’t press too hard or pipe long lines, as this won’t create the desired effect.
Delicious Variations to Customize Your Cookie Monster Cake
While the classic Cookie Monster cake is truly special, don’t hesitate to get creative with these delightful variations to make it uniquely yours:
Add a Filling: Enhance the flavor and texture of your cake by adding a scrumptious filling between the layers. Chocolate Chip Cookie Dough Truffles (Eggless), or even just the cookie dough from these Peanut Butter Cookie Dough Bars (Eggless), would be an absolutely perfect and on-theme choice. Imagine cutting into a slice to reveal a hidden layer of gooey cookie dough!
Try Other Cake Flavors: While chocolate is a classic, you can certainly experiment with other cake bases. Consider a vibrant Funfetti Cake / Confetti Cake {From Scratch} for an extra festive touch, a moist Best Vanilla Cake Recipe {From Scratch}, or an Easy Rainbow Cake {With Cake Mix} for a surprise pop of color inside. Just ensure the exterior is frosted blue!
Try Other Frosting Flavors: The blue color is key, but the flavor of the buttercream can vary. You could opt for a rich White Chocolate Buttercream Frosting, a tangy Best Cream Cheese Frosting, or a fluffy Marshmallow Frosting Recipe. The crucial tip here is to start with a white or very light-colored frosting base so it can be easily dyed blue with gel food coloring.
Add More Cookies in the Mouth: Go wild and truly embrace Cookie Monster’s insatiable appetite! Stuff the mouth area with extra chocolate chip cookies, making it look like it’s fully overflowing. This not only enhances the visual appeal but also gives your guests an extra treat – two desserts in one!
Make a Smaller 4-inch or 6-inch Cake: A smaller version of this adorable cake is perfect as a “smash cake” for a baby’s first birthday celebration. It’s also ideal if you’re serving a smaller crowd or want individual mini Cookie Monsters.
Add a Body: To create an even grander Cookie Monster, simply add a larger circle cake beneath the face to form a body. This technique is similar to my Easy Snowman Cake {Frosting & Fondant}. This substantial version will feed a large crowd and make an even bigger statement!
Use Other Decorating Options Instead of Piping: If piping isn’t your strong suit or you’re looking for an alternative texture, consider using blue-colored shredded coconut, blue sprinkles, or even blue fondant cut into small strips or shapes to create the fur effect. Modeling chocolate can also be colored blue and used to create a smoother, more sculpted monster face.
Use Another Cookie Instead of Chocolate Chip Ones: While the classic chocolate chip cookie is undeniably Cookie Monster’s favorite, feel free to experiment with other cookie varieties. Oreos, Small Batch Peanut Butter Cookies {With Chocolate Chips}, or even Best Oatmeal Raisin Cookies – Soft and Chewy could make delightful (and delicious) alternatives.
Expert Tips and Techniques for a Perfect Cookie Monster Cake
Achieving a flawless and fun Cookie Monster cake is easier with these valuable tips and techniques:
Homemade vs. Store-Bought Black Frosting: You can opt for either. If you choose to make my homemade black icing, be aware that it needs to be made a few days in advance. This allows the color to fully develop and deepen, preventing any grayish tones. Store-bought black icing is a convenient shortcut if you’re short on time.
Homemade vs. Store-Bought Chocolate Chip Cookies: Both options work perfectly for this cake. If you have a favorite bakery cookie, feel free to use it. For a truly homemade touch, consider baking a batch of my best chocolate chip cookies.
Work in a Cool Kitchen: This is a crucial tip for successful cake decorating, especially when working with buttercream. If your kitchen is too warm, the buttercream frosting will soften and melt, making it incredibly difficult to pipe the “fur” and achieve crisp details. Aim for a cool, comfortable environment for the best results.
Cool Cakes Completely Before Frosting: Patience is a virtue in baking! Frosting a warm or even slightly warm cake is a recipe for disaster. The heat will melt the frosting, causing it to slide right off the cake and create a messy crumb-filled nightmare. Ensure your cakes are completely chilled, preferably in the refrigerator for a short period, before you begin decorating.
Store-Bought Buttercream vs. Homemade: The choice is yours and depends on your preference and available time. Homemade buttercream often offers a superior flavor and consistency for piping. However, good quality store-bought buttercream can be a convenient option. If using store-bought, make sure it’s a stable consistency for piping.
Add a Flat Layer of Blue Frosting Before Piping the Fur: Before you start piping the furry texture, apply a smooth, even layer of blue frosting over the entire cake (after the crumb coat). This provides a solid, uniform blue base, ensuring that no bare spots of cake show through the “fur” and helps the piped strands adhere better.
Use Gel Food Coloring: For vibrant and intense colors, always opt for gel food coloring over liquid food coloring. Liquid food coloring is not as potent and can significantly alter the consistency of your frosting, making it too thin and runny to pipe effectively. Gel colors provide rich hues without adding excess moisture.
Making Ahead of Time & Troubleshooting Tips
Planning ahead can make cake decorating less stressful. Here are some pointers:
Making Components Ahead:
- Bake Cakes: Cake layers can be baked 1-2 days in advance, cooled completely, wrapped tightly in plastic wrap, and stored at room temperature or in the refrigerator. For longer storage, freeze them for up to a month.
- Prepare Frosting: Buttercream can be made up to a week in advance and stored in an airtight container in the refrigerator. Before use, let it come to room temperature and re-whip until fluffy. Black icing that needs to deepen in color should be made days in advance.
- Fondant Eyes: Fondant pieces can be made several days ahead. Store them in an airtight container at room temperature (not in the fridge, as this can cause condensation).
Common Troubleshooting:
- Frosting Too Soft/Runny: If your buttercream is too soft to pipe, chill it in the refrigerator for 15-30 minutes, then re-whip. Add a tablespoon of powdered sugar if needed for thickness.
- Crumb Issues: Ensure you apply a thin crumb coat first and chill the cake until firm before applying the final layer of frosting or piping fur.
- Uneven Cake Layers: Use a serrated knife or a cake leveler to trim your cake tops flat before stacking. This ensures a stable and level cake.
Storage of Homemade Decorated Cake
Proper storage ensures your Cookie Monster cake stays fresh and delicious:
Refrigerate: Once decorated, this cake is best stored in a sealed, airtight container in the refrigerator. It will stay fresh for up to 3 days. Allow it to come to room temperature for about 30-60 minutes before serving for the best texture and flavor.
Freeze: I do not recommend freezing this cake with the cookies and fondant eyes already on it. Both elements will not thaw well; cookies can become soggy, and fondant can get sticky or lose its shape due to condensation. However, you can freeze the undecorated cake layers and the buttercream separately for up to 1 month. To do this, wrap the cooled cake layers tightly in plastic wrap and then foil. Store buttercream in an airtight container. Thaw both to room temperature before assembling and decorating. Then, add the fresh cookies and fondant eyes just before serving.
More Easy Decorated Cakes You’ll Love
If you enjoyed making this Cookie Monster cake, you might also like to try these other fun and easy decorated cake recipes:
- Easy Penguin Cake {Buttercream Icing}
- Easy Dinosaur Cake {Dino Cake}
- Easy Construction Cake {Excavator Cake}
- Easy Pig Cake {Fondant Pig Topper}
- Easy Lamb Cake {With Marshmallows}
Recipe

Easy Cookie Monster Cake (Sesame Street Cake)
Abeer Rizvi
Pin Recipe
Want to Save This Recipe?
Enter your email & I’ll send it to your inbox. Plus, get great new recipes from me every week!
By submitting this form, you consent to receive emails from CakeWhiz
Ingredients
- 2 Chocolate cakes Round, Dimensions: 8×2 inches each (cooled)
- 5 cups Buttercream icing Colored vibrant blue (use gel food coloring for best results)
- ½ cup Black icing Can use homemade or store-bought black icing
- ½ cup White fondant And a tiny amount of black fondant or black icing for pupils
- 10-12 Chocolate chip cookies Plus extra for decorating the mouth
Instructions
-
Bake your two round chocolate cakes according to your chosen recipe (or use a box mix). Allow them to cool completely on a wire rack before proceeding. This step is critical to prevent frosting from melting.
-
While the cakes are baking and cooling, prepare your buttercream frosting. Ensure it’s a stable consistency for piping and dye it a vibrant blue using gel food coloring. Prepare your black icing as well.
-
Place your first cooled cake layer onto your desired serving dish or cake stand. If necessary, trim the top of the cake to create a flat, even surface using a serrated knife.
-
Using an offset spatula, spread a generous and even layer of blue buttercream on top of the first cake. You can optionally add a filling here for extra flavor.
-
Carefully place the second cake layer directly on top of the blue icing. Press gently to secure it into place, ensuring the layers are aligned.
-
Apply a thin “crumb coat” of blue icing over the entire cake (top and sides) to trap any loose crumbs. Chill the cake in the refrigerator for 15-20 minutes until the crumb coat is firm. Then, apply a second, smooth layer of blue icing as a base for the fur.
-
Use a toothpick to gently mark the distinctive wide, curved mouth area on the front of the cake. This will be your guide for the black icing.
-
With a small spoon or spatula, carefully remove some of the blue icing from within the marked mouth portion. This creates a slight indentation for the black icing.
-
Use a spatula or small piping bag to spread the black icing evenly into the mouth area. It doesn’t need to be perfectly neat – a slightly textured, open-mouth look adds to the monster’s charm!
-
Fill a clean piping bag with your remaining blue icing and attach the grass tip (Wilton Tip #233). This tip is key for Cookie Monster’s fur.
-
Starting from the outer edge of the cake and working your way inwards, begin piping short bursts of blue “fur” all over the cake. Ensure you cover all blue-frosted surfaces, but avoid piping over the black mouth portion. Work methodically to ensure even coverage.
-
To make the eyes, roll out white fondant and cut out two circles of equal size using a round cookie cutter. For the pupils, pipe small black circles onto the white fondant using black icing, or cut tiny black fondant circles and attach them.
-
Carefully stick these completed fondant eyes near the top of the cake, above the mouth, positioning them slightly off-center for that classic googly-eyed look.
-
Place one or more partially broken chocolate chip cookies near the mouth opening to create the illusion of Cookie Monster eagerly eating. Toss a few cookie crumbs around the mouth area for an authentic, messy touch.
-
For a neat and professional finish, pipe a simple border around the base of the cake using any remaining blue icing and your grass tip or a star tip. Your incredible Cookie Monster cake is now complete! Enjoy the cheers and delight it brings.
Notes
- Read all my tips above, especially regarding cake cooling and frosting consistency, for the best results.
- Leftovers can be stored in a sealed airtight container in the fridge for up to 3 days. Bring to room temperature before serving for optimal taste and texture.
Nutrition
An automated tool is used to calculate the nutritional information. As such, I cannot guarantee the accuracy of the nutritional information provided for any recipe on this site.
