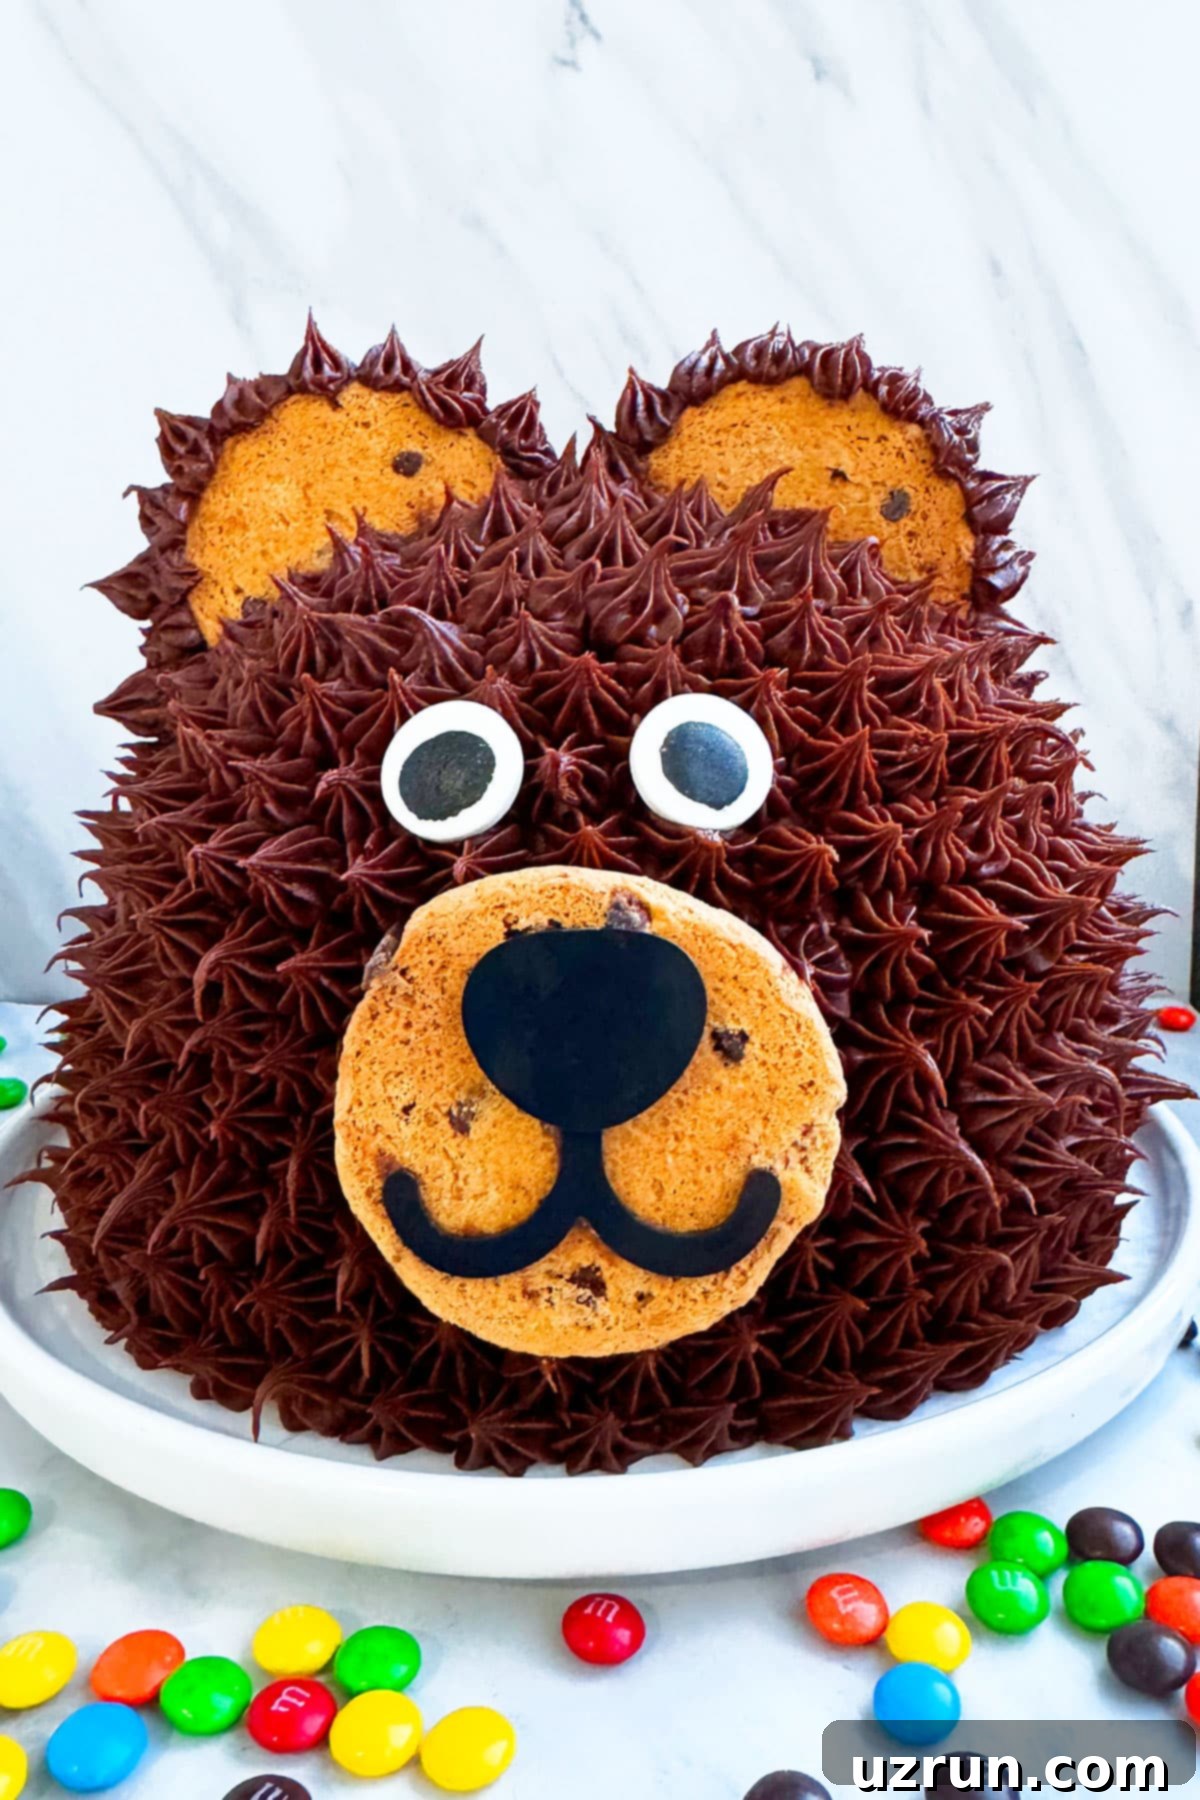
Easy Teddy Bear Birthday Cake: A Step-by-Step Guide for Adorable Celebrations
Discover the joy of creating a delightful **teddy bear cake** right in your own kitchen! This comprehensive tutorial provides an easy-to-follow, homemade recipe using simple, accessible ingredients. Perfect for a child’s happy birthday celebration or a charming baby shower, this cake is beautifully decorated with rich chocolate buttercream icing, giving it a cozy, “furry” appearance. Beyond the cake, we’ll also share creative party and dessert table details to make your event truly unforgettable.
*Thank you Baskin-Robbins for sponsoring this post. As always, all opinions are my own.*
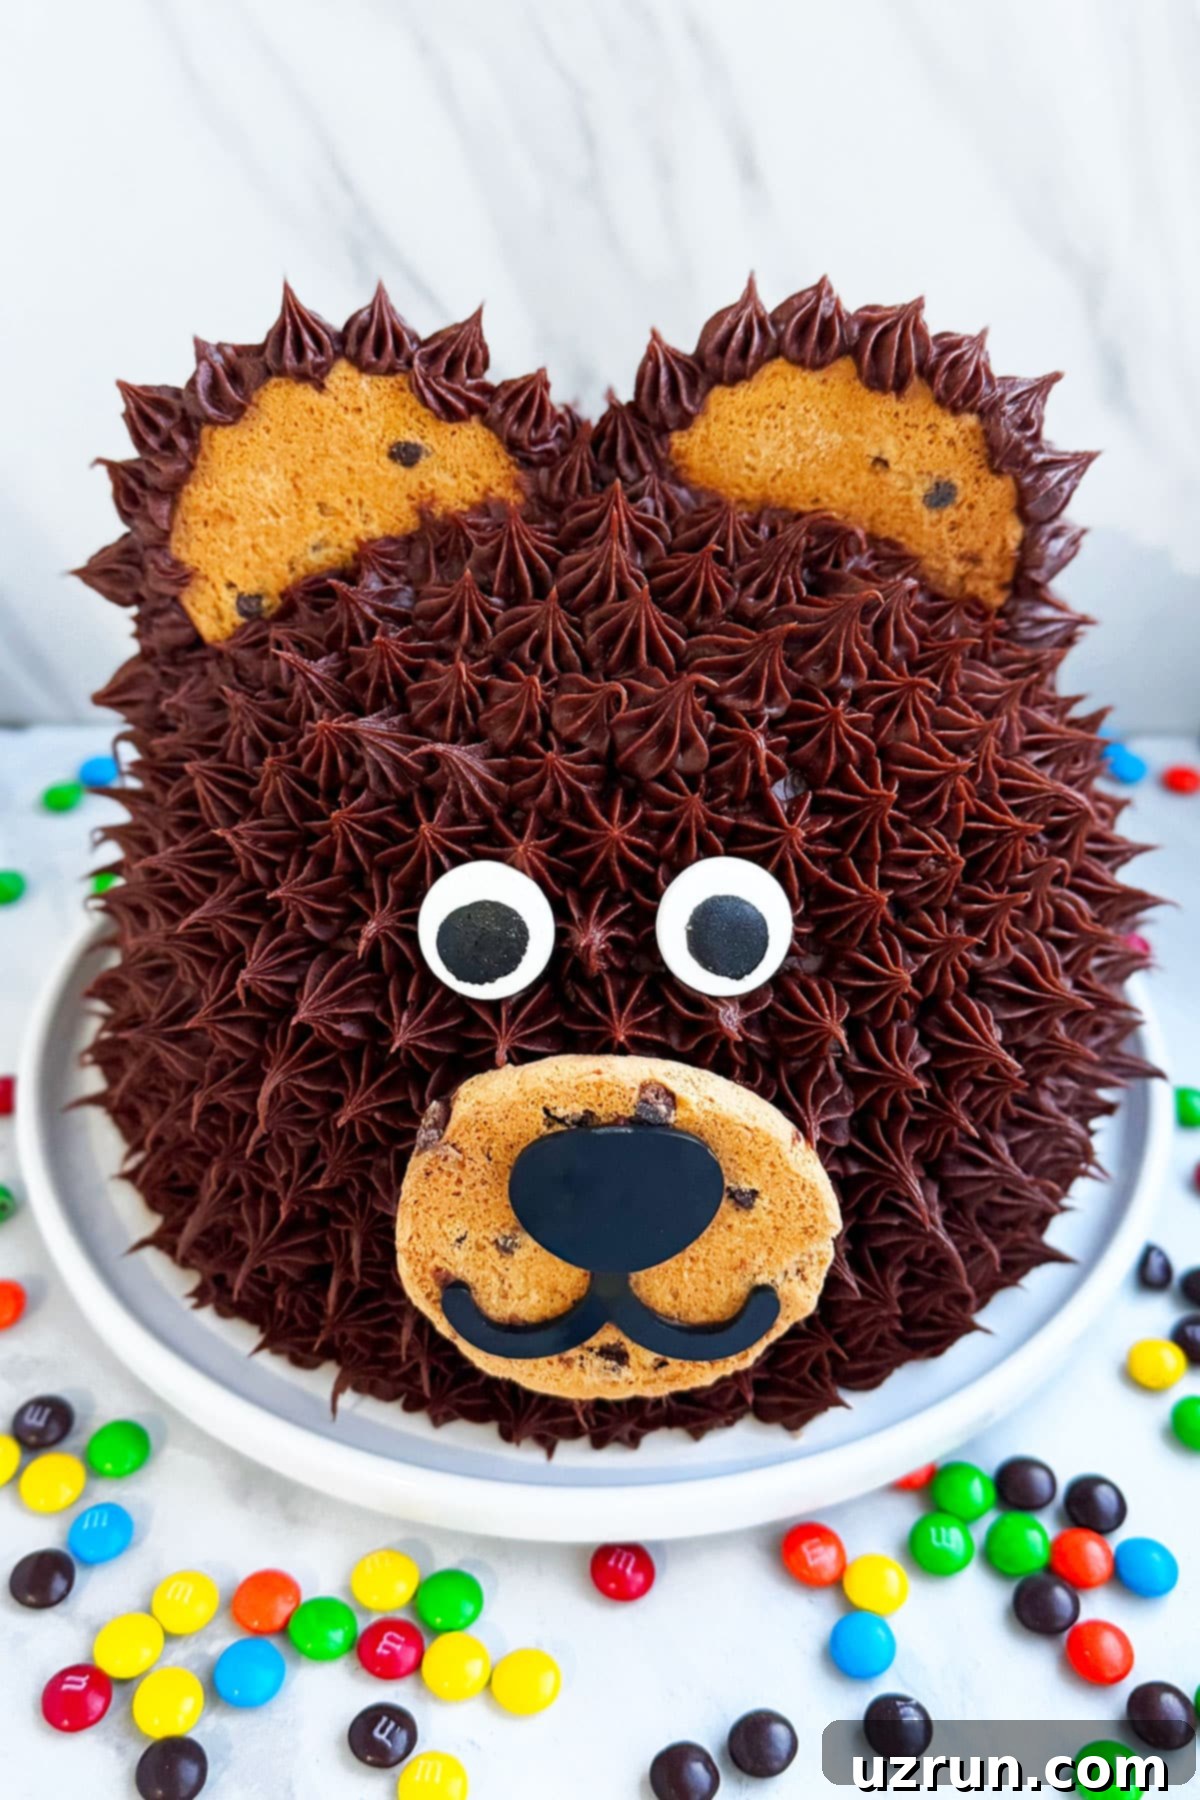
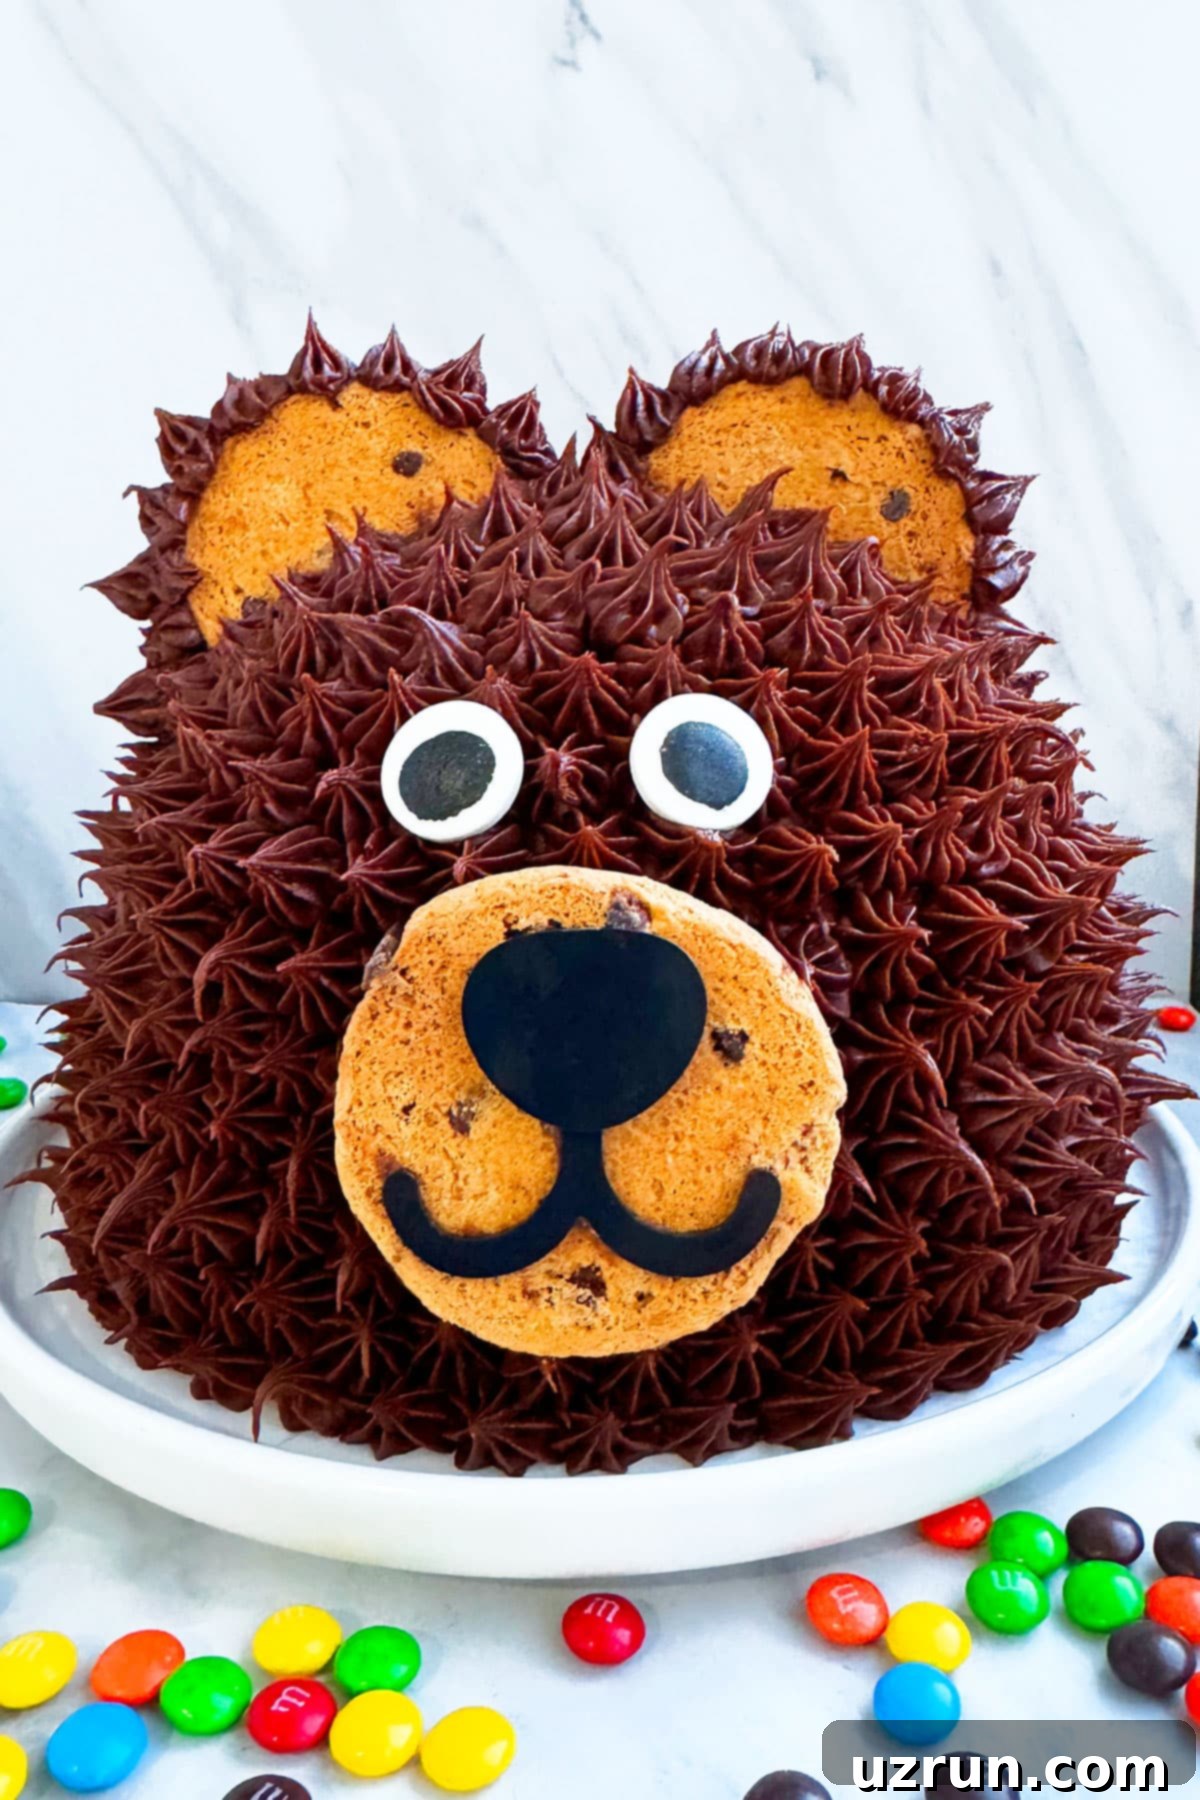
I recently created this incredibly cute teddy bear cake for my son’s birthday party, and it was an absolute hit with everyone, from the littlest guests to the adults! It’s a versatile design that’s wonderful for 1st and 2nd birthday parties, equally charming for both boys and girls. Imagine the smiles this sweet bear cake would bring to a baby shower too! What makes this cake truly special is its accessibility: it employs simple cake decorating techniques that even those with no prior experience can master. If you’re looking for more fun and easy cake ideas, be sure to explore these Easy Cake Decorating Ideas for Beginners and a collection of fantastic Birthday Cake Ideas.
Table of contents
- Key Ingredients for Teddy Bear Birthday Cake Design
- Creative Variations for Your Teddy Bear Cake
- How to Make an Easy Teddy Bear Cake (No Special Pan Needed!)
- Essential Tips and Techniques for Success
- Teddy Bear Cake Recipe FAQs
- Storage Best Practices
- More Easy Decorated Cake Ideas
- Teddy Bear Party Theme Details
- Adorable Dessert Table Ideas
- Our Special Party Cake
Key Ingredients for Teddy Bear Birthday Cake Design
Crafting this adorable cake requires a few essential ingredients that come together to form the perfect teddy bear. Here’s what you’ll need:
- Chocolate Cakes: The foundation of our bear! You’ll need two round cakes, typically one standard round and one dome-shaped, to create the bear’s body and head.
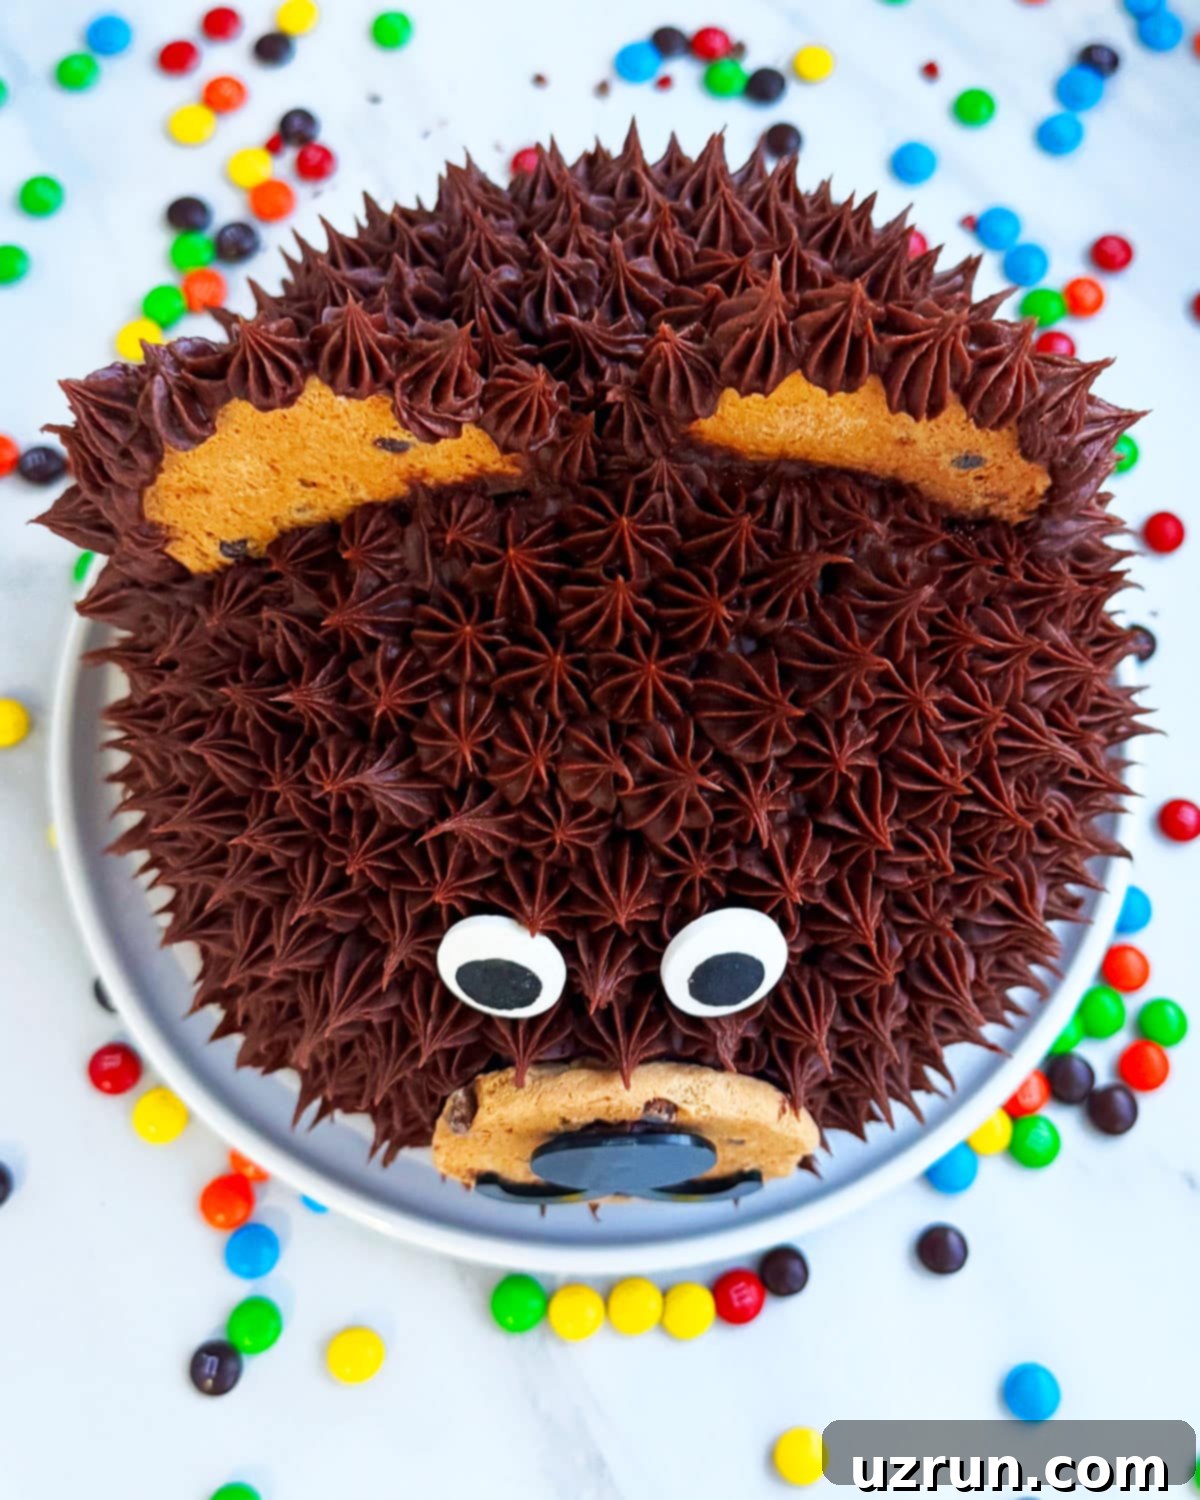
- Chocolate Buttercream Icing: This is the magic ingredient for efficient and beautiful cake decorating. Its rich flavor pairs perfectly with chocolate cake, and its texture is ideal for piping the bear’s “fur.”
- Black Icing: Essential for bringing your teddy bear to life! This is used to add crucial facial details like the nose and mouth, giving your bear character.
- Chocolate Chip Cookies: These versatile treats serve as the perfect base for the bear’s ears and snout. You can use homemade cookies for an extra touch of love or store-bought ones for convenience.
- Eyeball Sprinkles: To give your bear a friendly gaze! Be sure to choose large eyeball sprinkles to ensure they stand out proportionally on your big, cuddly cake.
Creative Variations for Your Teddy Bear Cake
While the chocolate teddy bear cake is classic and delightful, there are many ways to customize it to fit your specific theme or preference. Get creative with these variations:
- Make a Simple Round Cake: If you’re short on time or prefer a minimalist look, simply ice a single round cake smoothly in white or beige frosting. Then, add a charming teddy bear cake topper, which you can easily craft from Homemade Marshmallow Fondant for a clean and elegant finish.
- Decorate with Brown Fondant: For seasoned cake decorators looking to express their creativity, consider covering the cake with brown fondant. This allows for a smooth, sculpted look, applying the same overall design ideas for the ears, snout, and eyes, but with a different texture and finish.
- For a Girl Version: To transform your teddy bear into a little girl, simply add a pretty red or pink bow to one of its ears. This bow can be made from real ribbon for a soft touch, or you can craft it from gum paste or fondant for an edible decoration. Alternatively, print a bow onto grease-proof thick cardstock paper, cut it out, and attach it to the cake. You can also swap the brown frosting for pink to create an even more feminine look.
- Use a Different Piping Tip: The type of piping tip you use can dramatically change the bear’s “fur” texture and overall appearance. Experiment with different tips; for example, a French tip would create a different curl, or a grass tip, like the one used for this Cookie Monster Cake and Easy Grinch Cake, would give a shaggier, more playful fur effect.
- Use White Icing: Embrace a different species! By using white icing for the fur, you can easily transform your teddy bear into an adorable polar bear or a charming panda bear. Simply adjust the facial features accordingly with black icing.
- Add Delicious Cake Fillings: Elevate the flavor profile of your cake by incorporating a delightful filling between the layers. Consider options like rich Chocolate Ganache, sweet Caramel Sauce, light Whipped Cream, decadent Chocolate Whipped Cream, fruity Strawberry Jam, tart Raspberry Pie Filling, comforting Crockpot Apple Butter, or even creamy Homemade Vanilla Custard or Pudding.
- Use Fondant Instead of Cookies and Frosting: For a smoother, more refined look, create the bear’s ears, nose, and mouth entirely out of fondant. This allows for precise shaping and a polished finish.
- Use Different Cake Flavors: Don’t limit yourself to chocolate! This design works beautifully with various cake flavors. Try a classic Best Vanilla Cake, a rich Moist Chocolate Cake, an elegant Pink Champagne Cake, a vibrant Red Velvet Cake, or a zesty Lemon Cake.
- Make Individual Cakes or Cupcakes: Scale down the cuteness! Apply the same decorating techniques to individual mini cakes or cupcakes. For smaller treats, you’ll need to use mini chocolate chip cookies or small fondant cutouts for the ears and nose.
How to Make an Easy Teddy Bear Cake (No Special Pan Needed!)
Creating this adorable teddy bear cake is simpler than you might think, even without a specialty bear-shaped pan. We’ll use a combination of round and dome cakes to form the body and head, then bring our bear to life with frosting and a few clever details. Follow these steps:
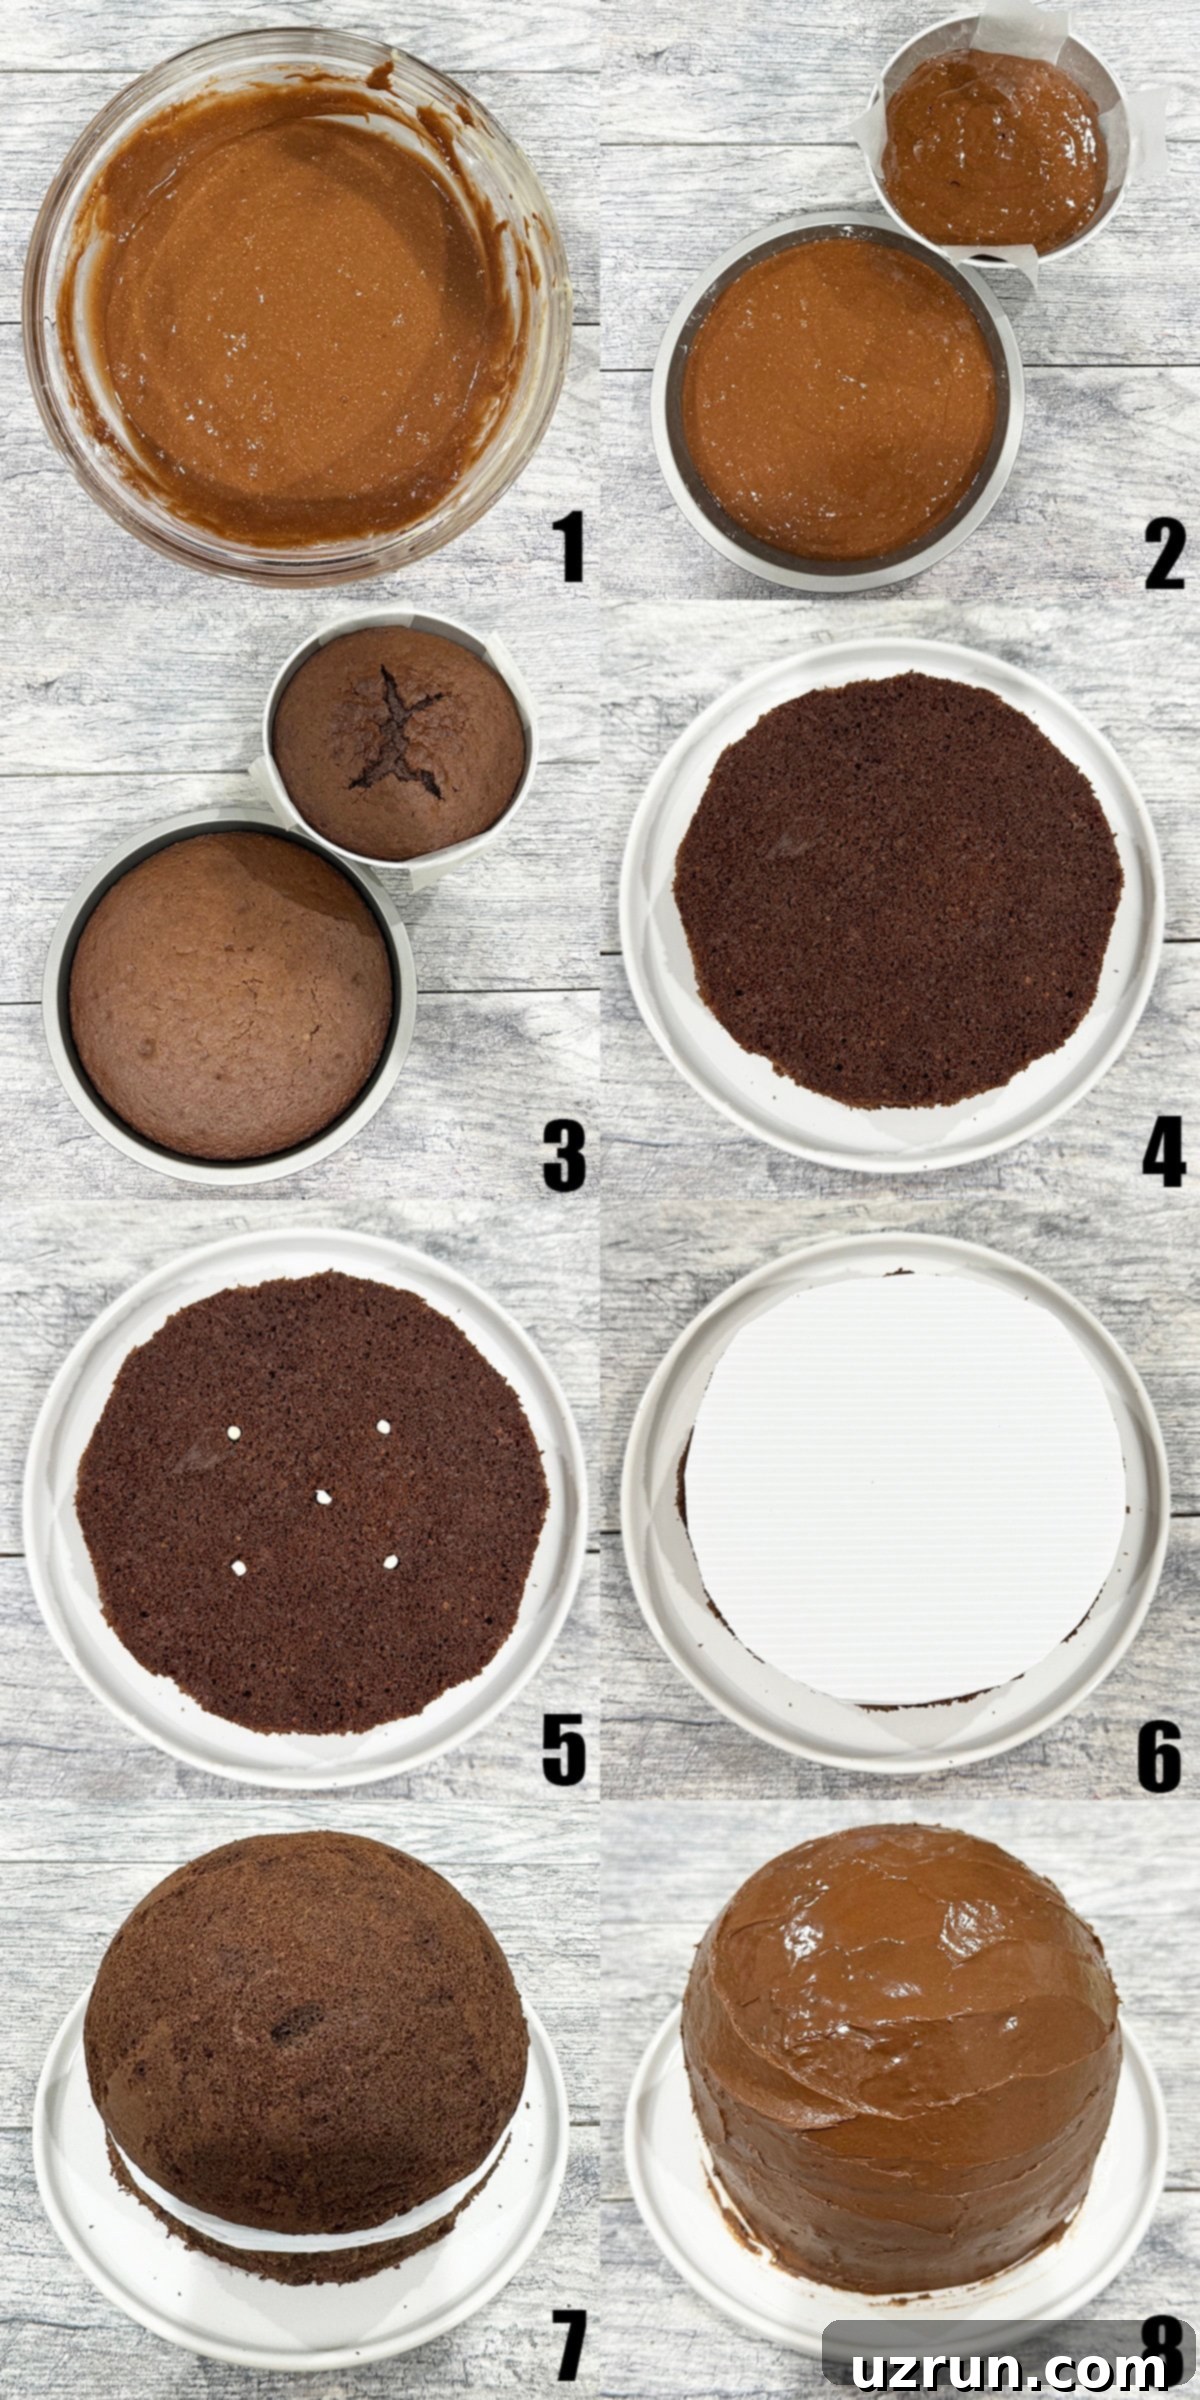
- Prepare Cake Batter: Begin by preparing your favorite chocolate cake batter. Divide and pour the batter into two separate prepared pans: one standard round cake pan and one dome-shaped pan. (See Image 1 and 2 for visual guidance).
- Bake and Cool Cakes: Bake your cakes according to the recipe instructions. Once baked, allow them to cool completely on a wire rack while you prepare your delicious frosting. This prevents the frosting from melting. (Image 3).
- Trim Cakes for Uniformity: Using a sharp serrated knife, carefully trim the sides of both cakes if necessary. The goal is to ensure the overall width or diameter of both the round and dome cakes is the same for a stable and proportional structure.
- Position the Base Cake: Place the larger round cake securely in the center of your chosen cake stand or serving platter. This will form the body of the teddy bear. (Image 4).
- Add Structural Support: For stability, especially with a layered cake, gently push five wooden dowels or bubble tea straws into the middle of the round cake. Cut these supports to the exact height of the cake to bear the weight of the layer above. (Image 5).
- Apply First Icing Layer: Spread a generous layer of chocolate buttercream icing evenly over the top surface of the round cake. This will act as an adhesive and a base for the next layer.
- Place Cake Board: Carefully place a cake board (the same width as your cake) directly on top of the iced round cake, pressing gently to secure it. This board provides additional support for the dome cake. (Image 6).
- Apply Second Icing Layer: Spread another layer of icing on top of the cake board. This will secure the dome cake.
- Add the Dome Cake: Gently place the cooled dome cake on top of the icing-covered cake board, pressing down lightly to ensure it adheres well. This dome will form the teddy bear’s head. (Image 7).
- Crumb Coat and Chill: Cover the entire assembled cake with a thin, smooth layer of chocolate buttercream icing using a spatula. This is known as a crumb coat, which traps any loose crumbs. Chill the cake in the refrigerator for at least 20 minutes to set the crumb coat. This makes the final decorating much easier. (Image 8).
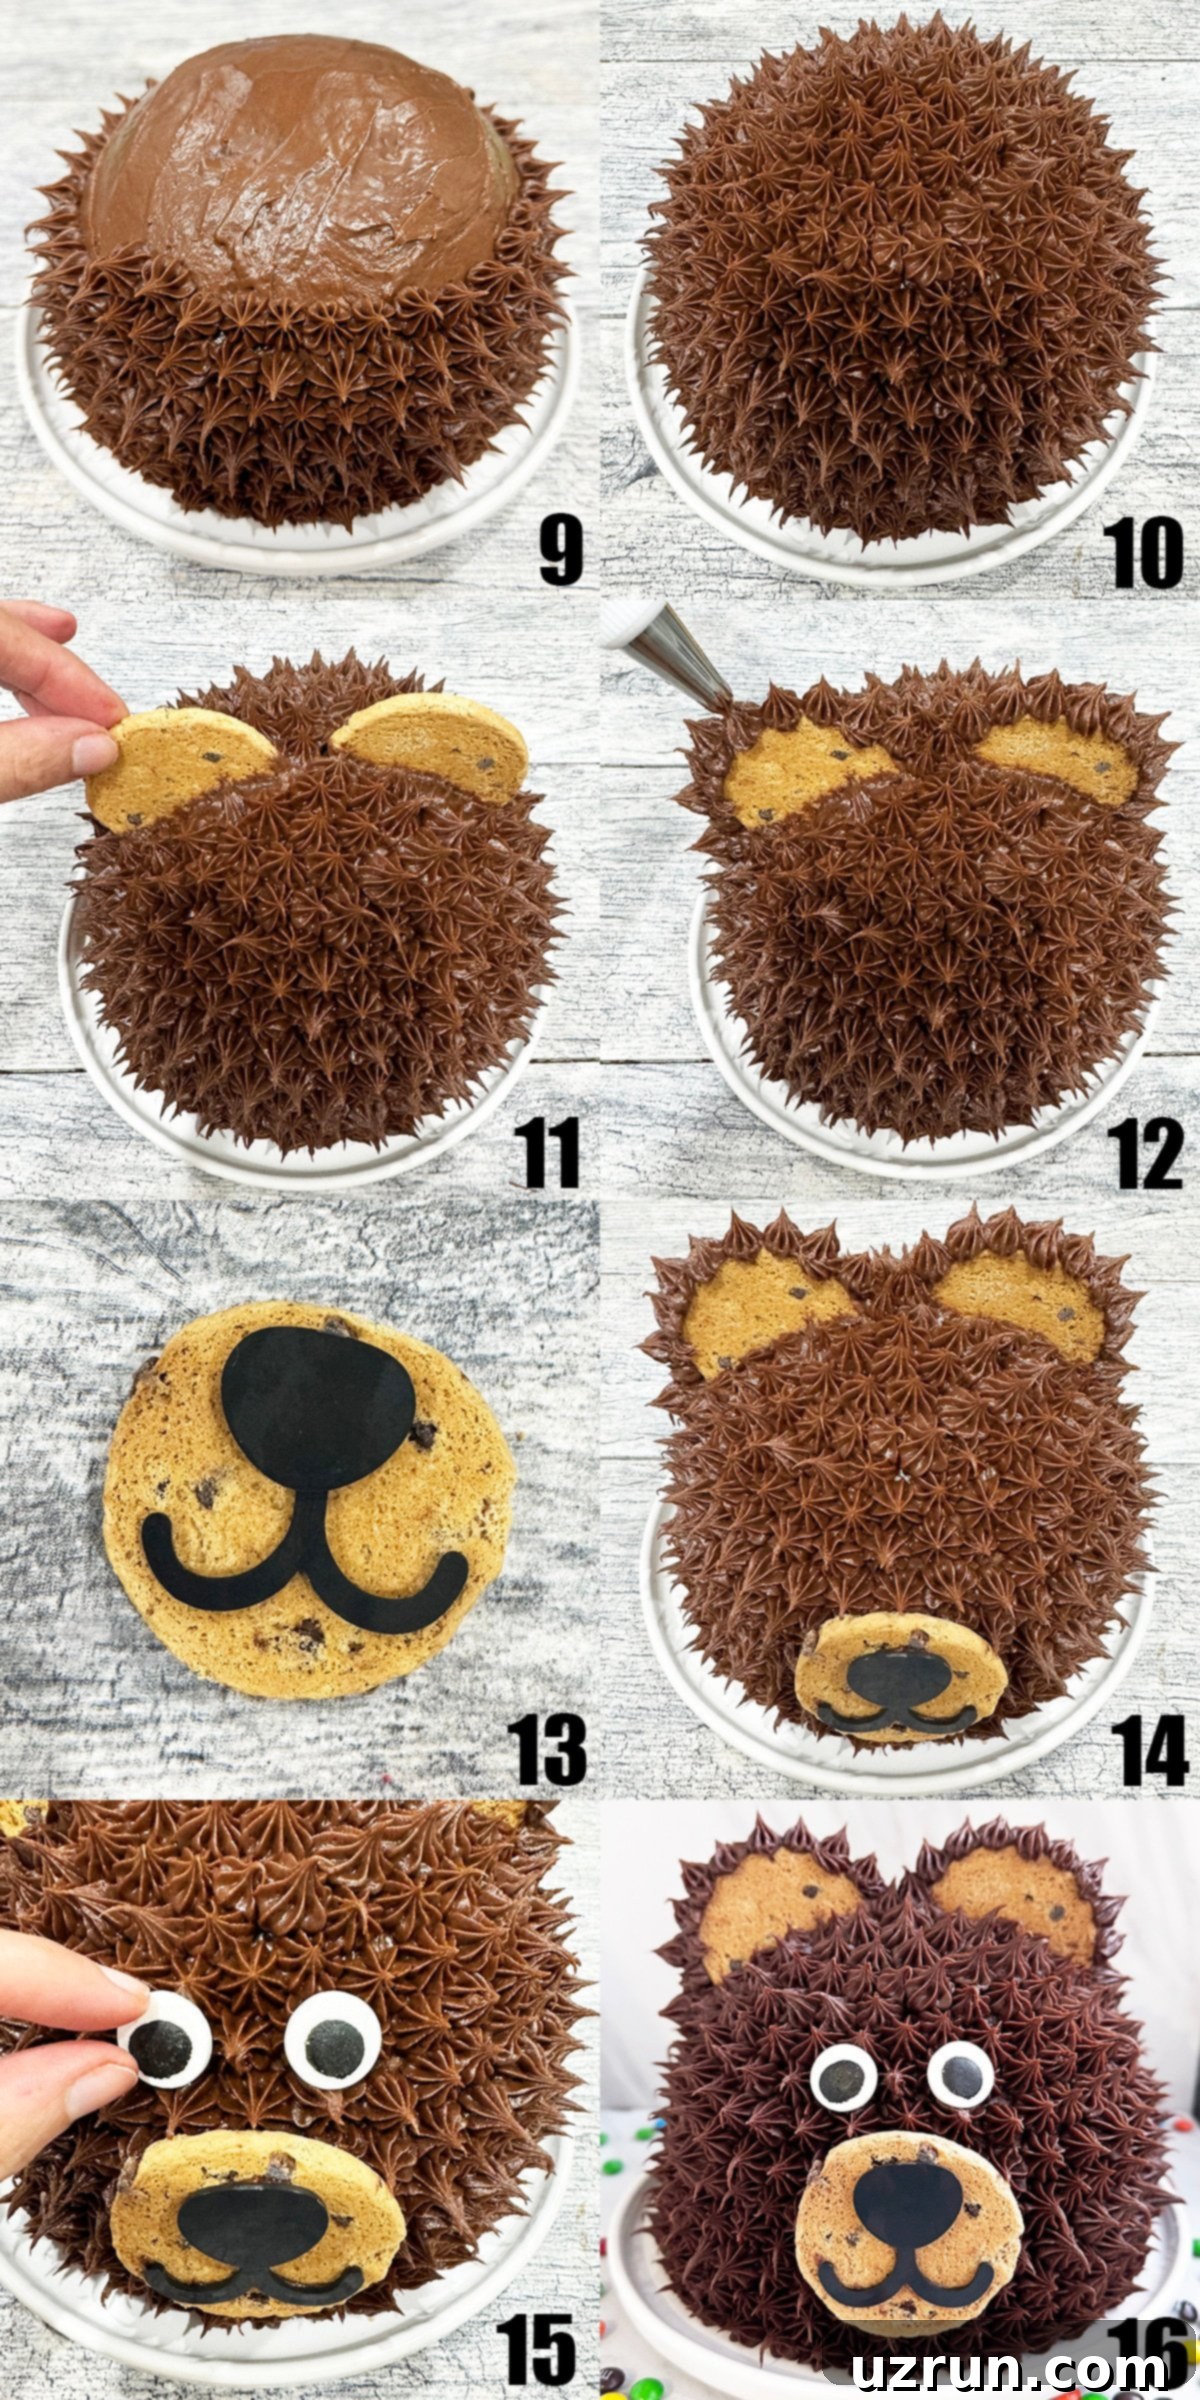
- Pipe the “Fur” Effect: Prepare your piping bag with chocolate icing and a star tip (Wilton #18 or #21 works well). Begin piping small, pointy stars from the bottom edge of the cake, working your way upwards and around. Hold the piping bag at a 45-degree angle, squeeze until the icing sticks to the cake, and then gently pull away while releasing pressure. Continue this process until the entire cake is covered in buttercream stars, creating a beautiful “fur” texture. (Image 9 and 10).
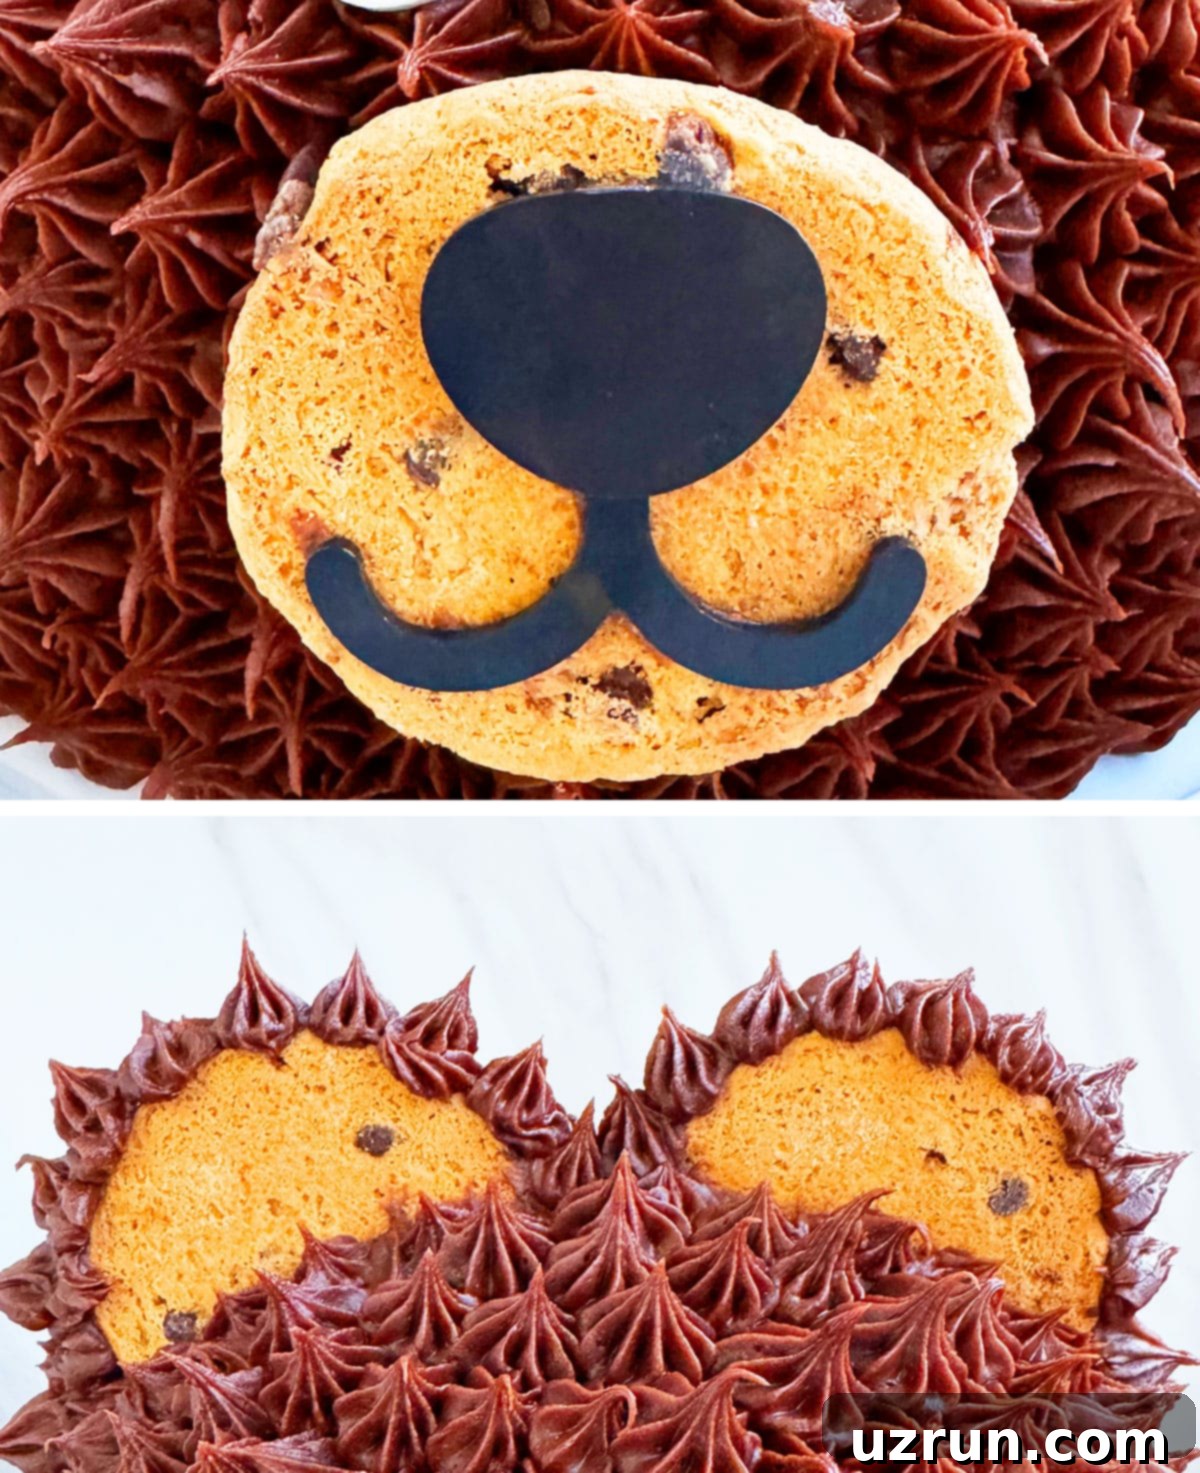
- Form the Bear’s Ears: For the ears, take two chocolate chip cookies and gently push them into the top of the cake, near the sides of the dome, where the ears would naturally be. Once in place, pipe buttercream stars along the edges of the cookies to blend them seamlessly into the bear’s fur. (Image 11 and 12).
- Create the Nose and Mouth: Fill a separate piping bag with black frosting and a small round tip. On a third chocolate chip cookie, pipe a charming nose and a small, smiling mouth. This cookie will serve as the bear’s snout. (Image 13).
- Attach the Snout: Carefully stick the decorated cookie onto the frontal area of the dome cake, positioned where the bear’s nose and mouth should be. (Image 14).
- Place the Eyes: Finally, complete your teddy bear’s face by placing the two large eyeball sprinkles above the nose, giving your bear an expressive and friendly look. Now, your adorable teddy bear cake is ready to be enjoyed! (Image 15 and 16).
Essential Tips and Techniques for Success
Creating a beautiful and stable teddy bear cake involves a few key tips and techniques. Pay attention to these details to ensure your cake turns out perfectly:
- Prioritize Cake Support: This is critically important, especially for stacked cakes like our teddy bear. Without proper support, the upper cake layers can sink into the lower ones, causing structural collapse. Use sturdy wooden dowels or bubble tea straws cut to the exact height of the bottom round cake. Insert them carefully into the middle of the cake to create a robust foundation.
- Don’t Rush the Process (Work in Stages): Cake decorating can be time-consuming, and rushing often leads to mistakes and stress. Break down the process over a few days: bake the cakes one day, prepare the icing the next, and then dedicate the third day to the fun part—decorating! This approach makes the experience more enjoyable and less daunting.
- Choose Your Cookies Wisely: You have the flexibility to use either homemade or store-bought chocolate chip cookies for the ears and snout. For ultimate convenience, store-bought cookies are a great time-saver. However, if you have the time and desire for a truly homemade touch, consider baking a batch of these Best Chocolate Chip Cookies (Soft and Chewy) or Small Batch Peanut Butter Cookies (With Chocolate Chips).
- Adjust Recipe Quantities: The recipe linked in the card typically yields enough batter for one standard cake. To fill both the round and domed pans required for this teddy bear design, you will very likely need to double the cake batter recipe. Always check your pan sizes and batter yield.
- Smooth Frosting for the Base: Before piping the “fur,” use an offset spatula to apply a smooth, even crumb coat of frosting over the entire cake. This creates a clean canvas for your piped details and ensures no crumbs show through.
- Chill the Cake Before Decorating: Always ensure your cakes are completely cooled, and even lightly chilled, before applying frosting. Frosting on a warm cake will inevitably melt and slide off, ruining your hard work. Chilling after the crumb coat also helps set the foundation.
- Master the “Fur” Piping Technique: For that signature teddy bear “fur,” hold your piping bag fitted with a star tip at a 45-degree angle to the cake’s surface. Apply steady pressure to squeeze out the icing until it adheres to the cake, then gently pull the bag away while simultaneously releasing pressure. This motion creates a distinct, pointy star shape. Repeat this process methodically until the entire cake is covered, giving your bear its charming, textured coat.
- Opt for Shortcuts When Needed: If you find yourself truly pressed for time, don’t hesitate to utilize store-bought components. High-quality pre-made frostings and cookies can significantly cut down on preparation time without compromising the adorable outcome of your teddy bear cake.
Teddy Bear Cake Recipe FAQs
To cut a bear cake effectively, especially one with a dome top, use a sharp serrated knife. Start by cutting straight down through the dome (head) portion, then continue through the round (body) cake. Ensure both sections have the same diameter for clean, even slices that are easy to serve to your guests.
For that classic, fluffy teddy bear “fur” look, a Wilton star tip is highly recommended. Specifically, a #18 or #21 star tip will create beautiful, well-defined stars that mimic a furry texture. Comparable star tips from other brands will also work perfectly.
Achieving perfect buttercream stars requires a firm to medium-firm frosting consistency. Hold your piping bag, fitted with a star tip, at a 45-degree angle to the cake. Apply steady pressure to squeeze out the icing until a star forms and firmly sticks to the cake. Then, gently pull the piping bag away while simultaneously reducing pressure to create a distinct, pointy peak on your star.
Storage Best Practices
Proper storage ensures your teddy bear cake stays fresh and delicious, whether you’re making it ahead or saving leftovers:
- Make-Ahead Instructions: An assembled and fully decorated cake can be prepared 2-3 days in advance and stored in the refrigerator. For longer preparation, bake the cake layers and make the frosting separately. Store cakes and frostings in airtight containers in the fridge for up to 3 days, or freeze them separately for up to one month. Thaw overnight in the refrigerator before decorating.
- Room Temperature: Avoid leaving your decorated cake at room temperature for more than one day, especially in warm climates, as the buttercream can melt and slide. For optimal taste and appearance, it’s best served within 2-3 hours of being at room temperature. If your cake contains perishable fillings like whipped topping, always refrigerate and do not leave out for more than a few hours.
- Refrigerate Leftovers: Any leftover cake should be stored in a sealed, airtight container in the fridge. It will remain fresh and delicious for up to 3 days. This prevents the cake from drying out and absorbing other odors from the refrigerator.
- Freezing: Unfrosted cake layers and prepared frosting can both be frozen in separate airtight containers for up to 1 month. To use, thaw them overnight in the refrigerator. Once thawed, you can assemble and decorate the cake according to the instructions, ensuring a fresh-tasting result even weeks later.
More Easy Decorated Cake Ideas
If you loved creating this teddy bear cake, you’ll surely enjoy exploring these other fun and easy decorated cake projects:
- Easy Caterpillar Cake (And Party)
- Football Cupcakes Cake (And Party)
- Pink Ombre Mother’s Day Cake (And Party)
- Easy New Year Cake (Clock Cake)
- Easy Karate Cake (Black Belt Cake)
Teddy Bear Party Theme Details
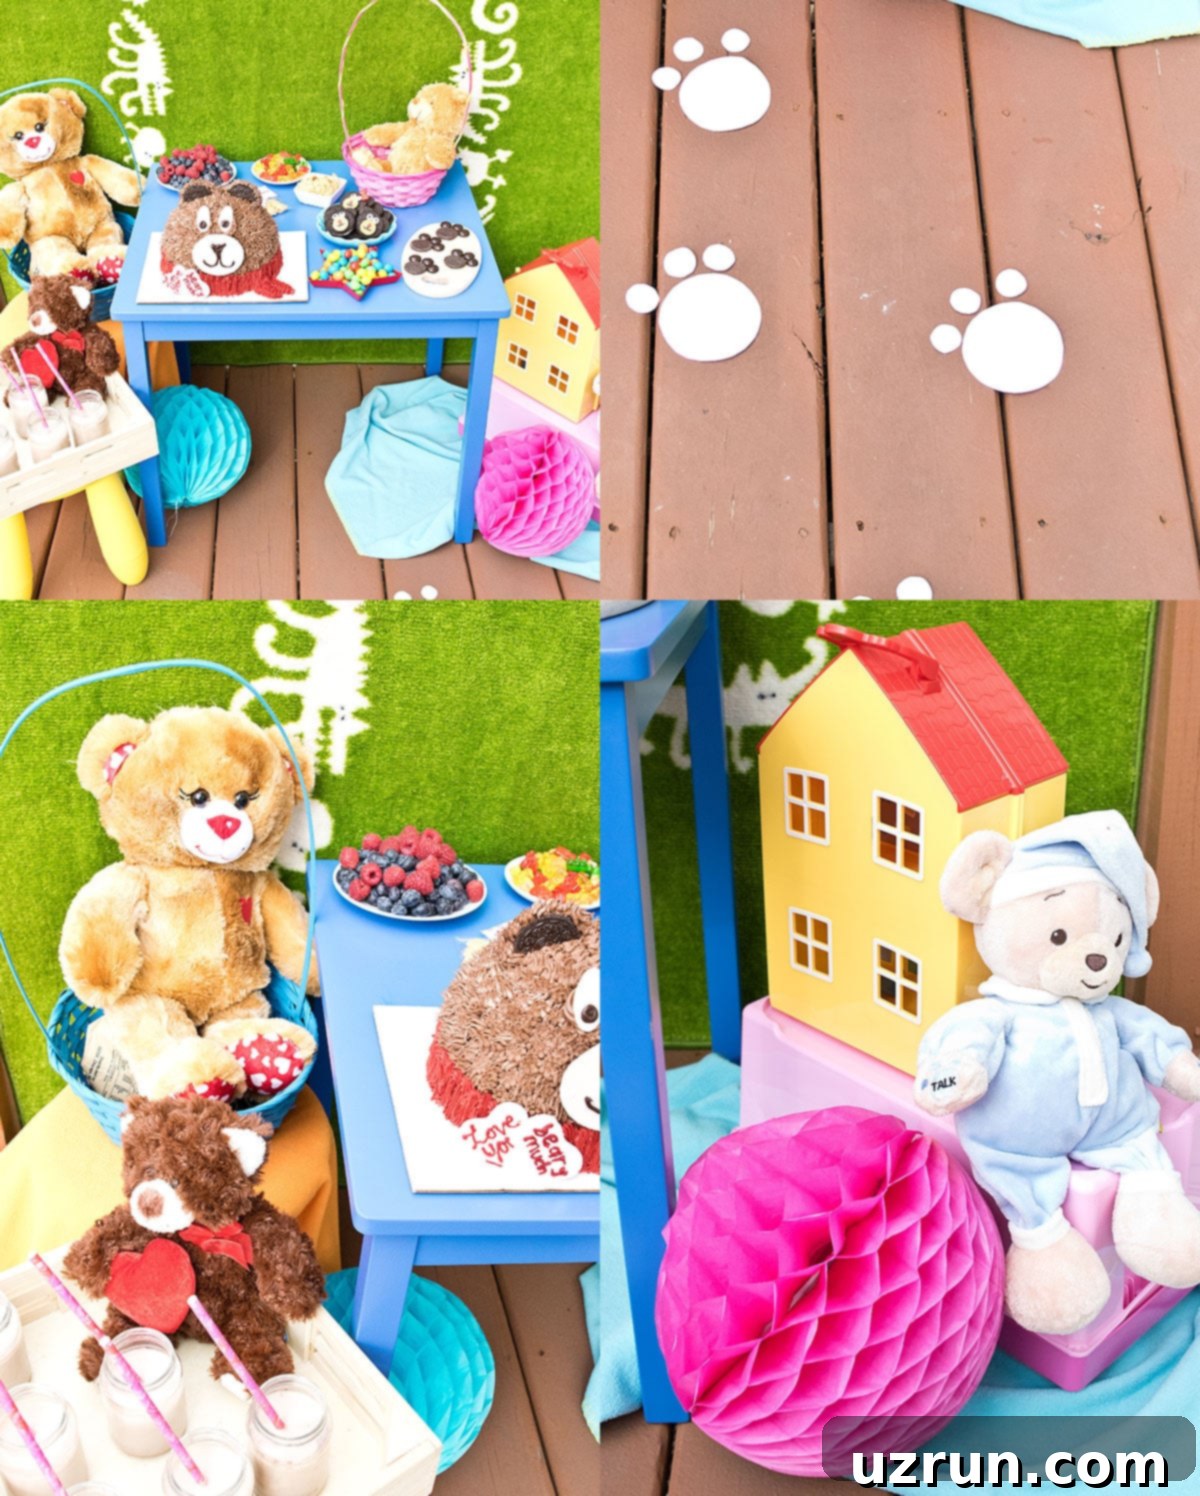
Every memorable celebration deserves a delightful dessert table, and I had so much fun setting up mine outdoors in the backyard, against a lovely green backdrop. My little one, full of excitement, eagerly contributed his own teddy bears, his favorite toy house, and his small blue table and yellow stool. I incorporated all of these cherished items to create a truly personalized and whimsical dessert display. To add a vibrant pop of color, I scattered a few colorful poofy pompoms near the table. The teddy bears found their places nestled in baskets, arranged charmingly around the table, inviting guests into a cozy, playful atmosphere. As an extra special touch, I cut out adorable paw prints from white paper and taped them onto the floor, creating a magical path leading all the way from the main door to the enchanting dessert table.
Adorable Dessert Table Ideas
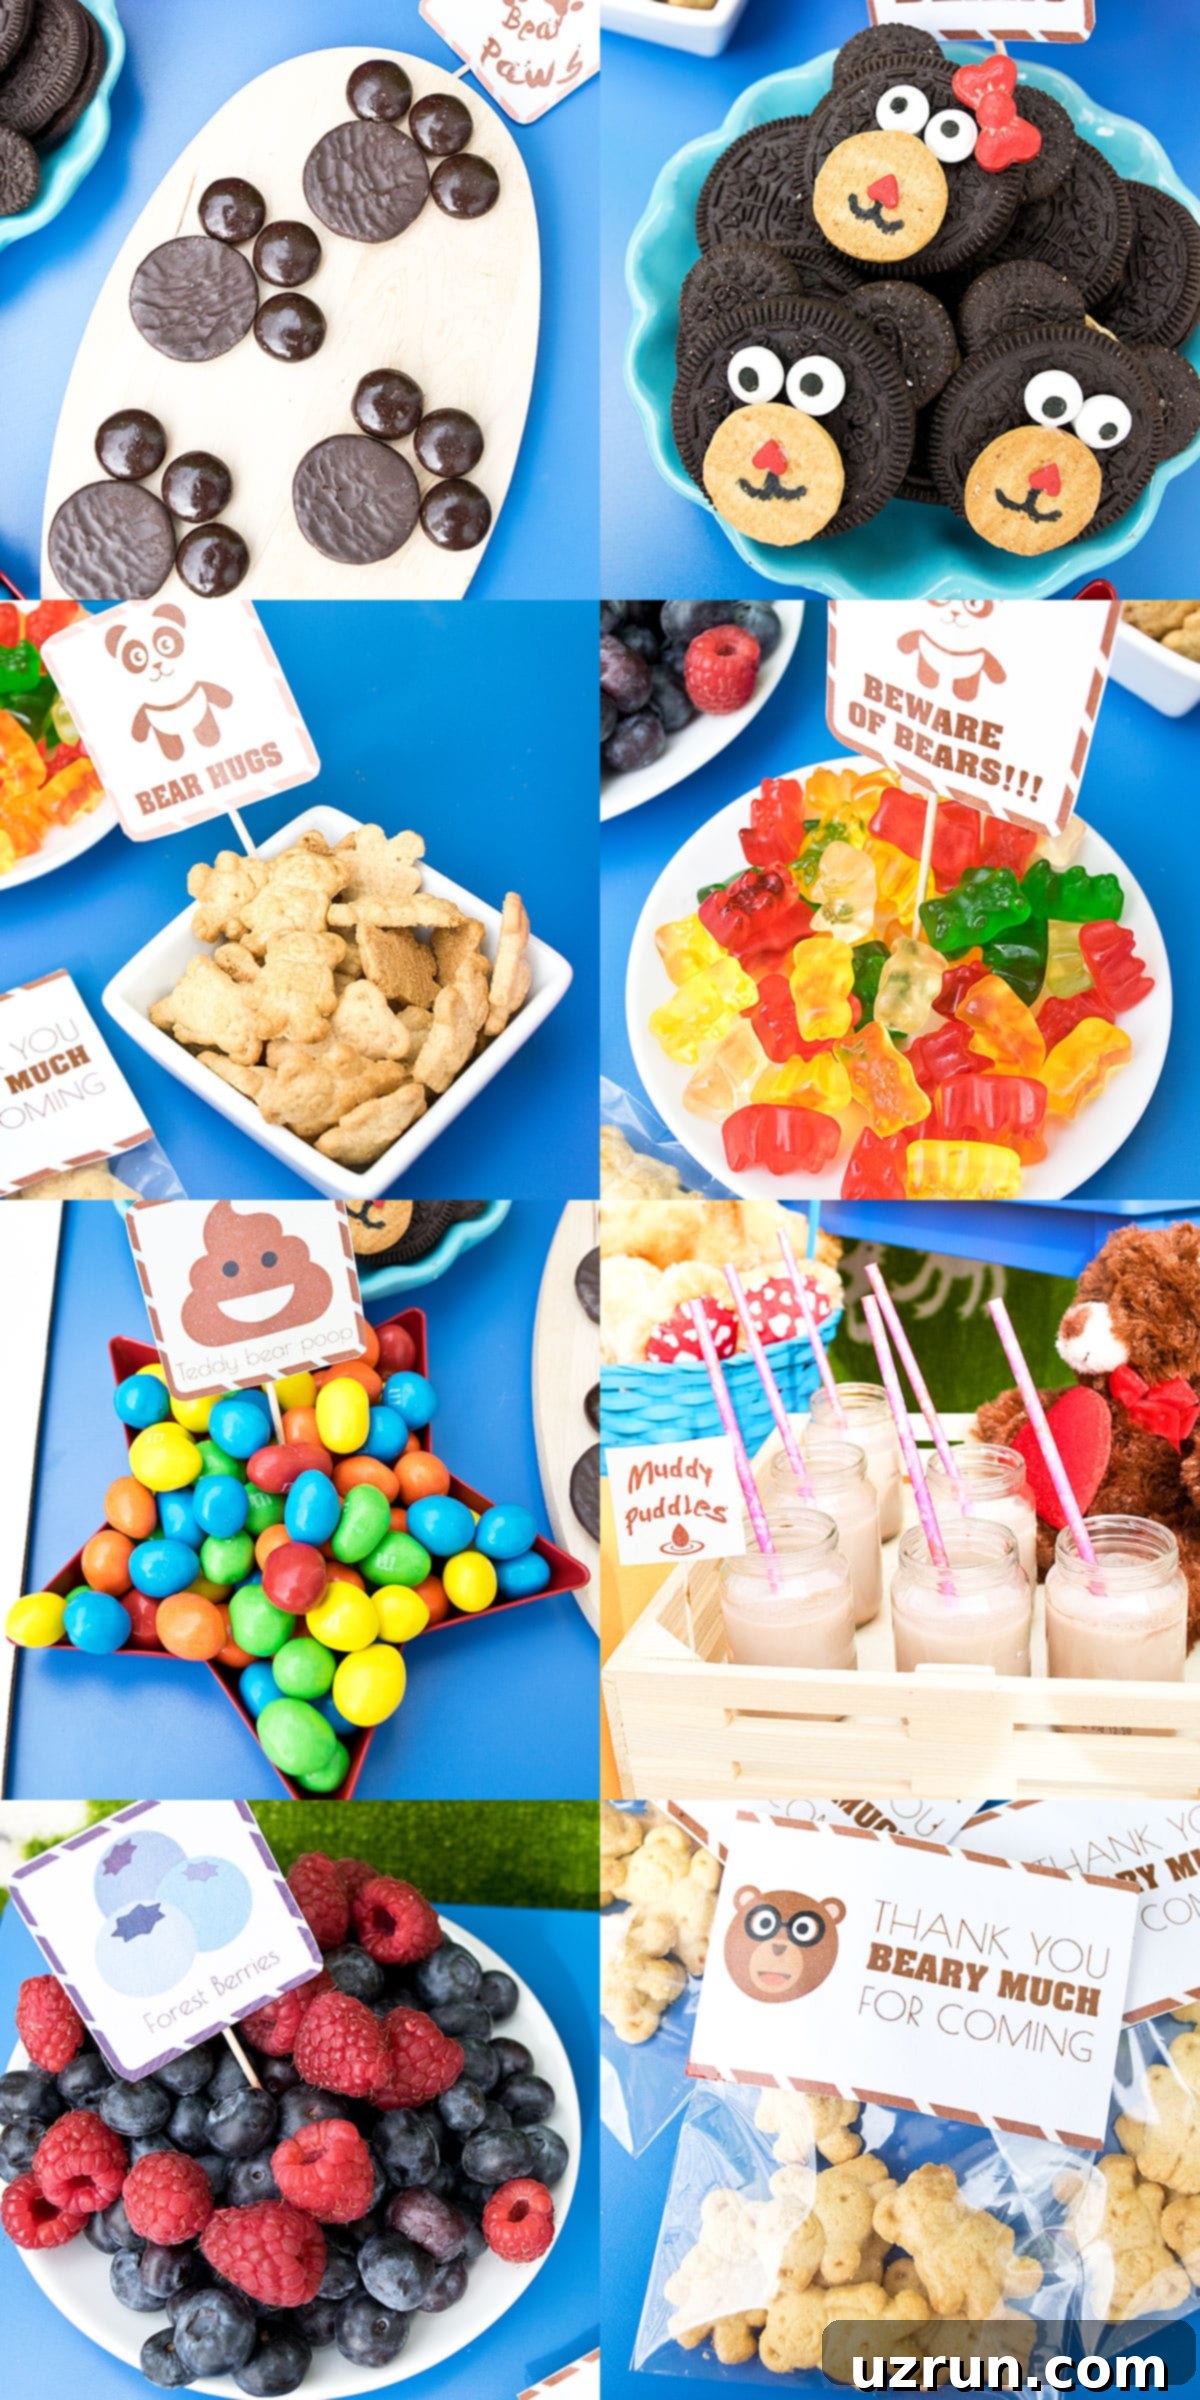
A party simply isn’t complete without a spread of delightful treats, and my teddy bear-themed dessert table was no exception! Here’s a peek at some of the creative and delicious goodies I prepared, all playing on the charming bear theme:
- Teddy Bear Poop: These were playfully labeled bowls of colorful M&M candies, a guaranteed giggle-inducer for the kids!
- Muddy Puddles: Small bottles of chocolate milk were cleverly named “muddy puddles,” a refreshing and thematic drink for little adventurers.
- Gummy Bears: A classic favorite, I simply offered a generous bowl of vibrant, colorful gummy bears, a sweet and easy addition.
- Bear Paws: These were creatively arranged Thin Mint and Junior Mint candies, carefully placed to resemble adorable paw prints – a visually appealing and tasty treat.
- Bear Hugs: Simple, comforting teddy graham crackers were branded as “bear hugs,” perfect for little hands and a sweet, crunchy snack.
- Forest Berries: To add a touch of freshness and natural color, I presented a beautiful bowl overflowing with fresh raspberries and blueberries, reminiscent of a bear’s forest feast.
- Teddy Oreos: A fun and interactive treat, I decorated Oreos to look like little teddy bears, crafting both boy bears and girl bears. The “girl” bears even sported tiny red bows for an extra cute detail.
Of course, no party is complete without favors! I filled small, charming bags with teddy graham crackers and attached a sweet, punny note that read: “Thank you beary much for coming!” These little gestures add a memorable touch to your celebration.
Our Special Party Cake
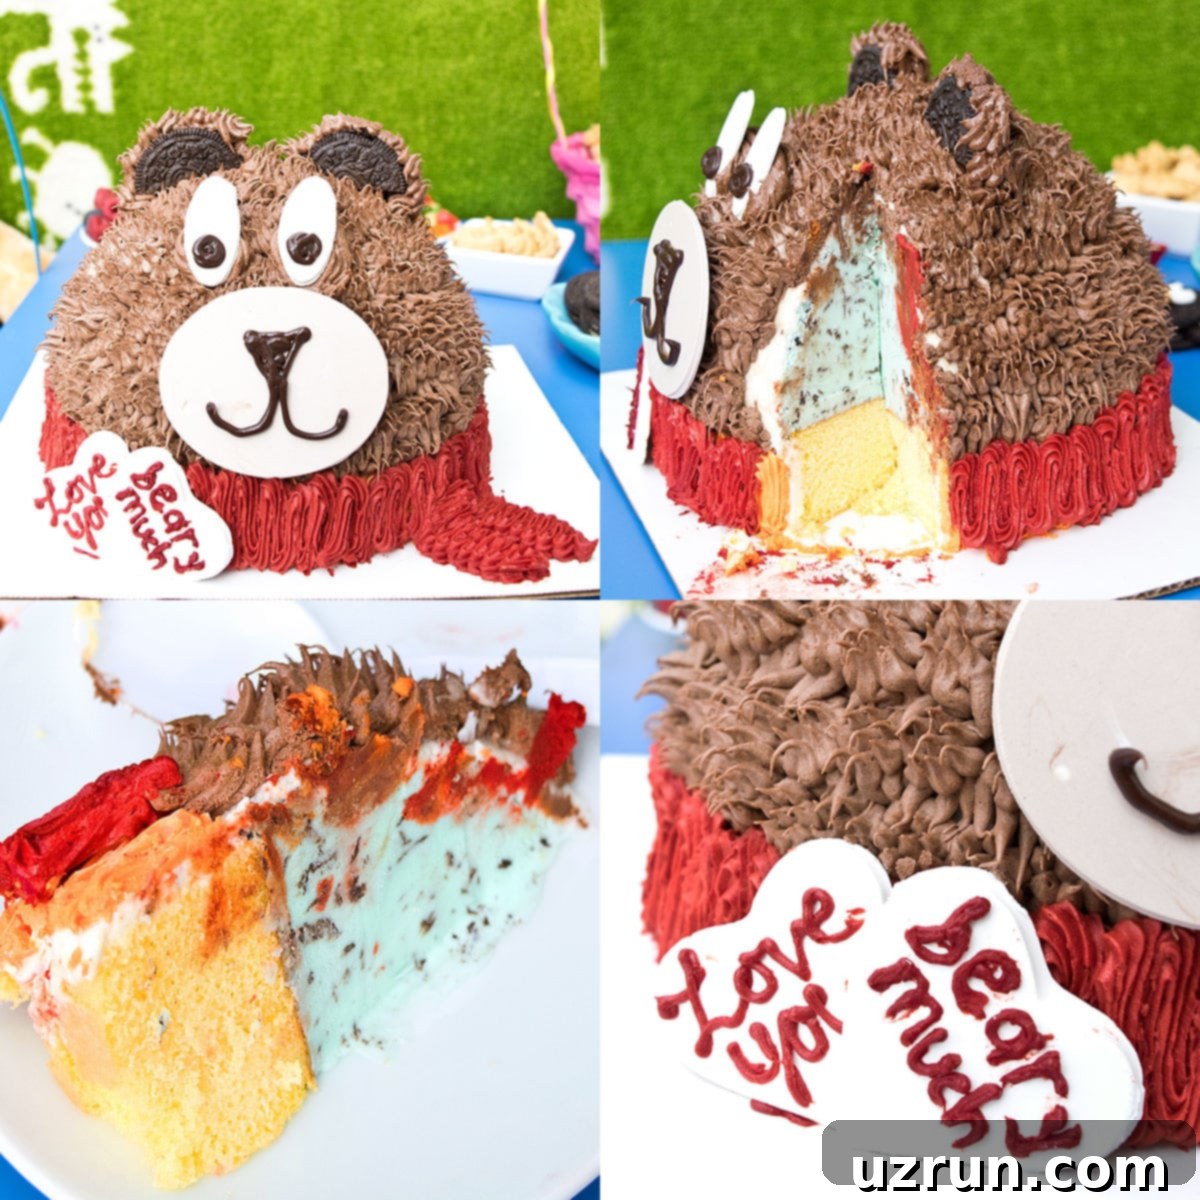
While I love making homemade cakes, a party just wouldn’t be complete without a truly show-stopping center-piece cake, especially for a busy host! For this special occasion, I decided to simplify things and ordered an incredible ice cream teddy cake from Baskin-Robbins. To make it even more personal, I requested a customized message on the cake that read: “Love your beary much.” The convenience was fantastic; you can easily order this cake online with your own personalized message, and it’s typically ready for pickup within 24 hours. Our chosen flavor was a scrumptious mint chocolate chip ice cream cake, perfectly complemented by a classic vanilla cake base. The adorable ears were crafted from Oreo cookies, and the bear even wore a charming red scarf, adding to its sweet appeal. It’s worth noting that if you prefer to bake, you can create a very similar-looking cake by following the detailed tutorial I’ve shared earlier in this post.
Recipe
Easy Teddy Bear Cake (With Chocolate Frosting)
Abeer Rizvi
Pin Recipe
Want to Save This Recipe?
Enter your email & I’ll send it to your inbox. Plus, get great new recipes from me every week!
By submitting this form, you consent to receive emails from CakeWhiz
Ingredients
- 2 Chocolate cake Round 8×3 and 8 inch dome
- 4 cups Chocolate buttercream icing
- ⅓ cup Black icing
- 3 Chocolate chip cookies Can be homemade or store-bought
- Large eyeball sprinkles
Instructions
-
Prepare cake batter and pour in an 8×3 cake pan and an 8 inch dome pan. You may need to double the recipe that’s linked in the recipe card.
-
Bake cakes and allow them to cool completely.
-
While the cakes and baking the cooling, prepare the chocolate buttercream icing and black frosting.
-
Use a sharp serrated knife to trim the sides of the cake (if necessary) to ensure the overall width or diameter of both cakes is the same.
-
Place the round cake on a cake stand.
-
Push 5 dowels around the middle of the cake for support.
-
Spread icing on top of the cake.
-
Place a cake board (same width as the cake) on top and press gently to secure into place.
-
Spread icing on top of the board.
-
Place the dome cake on top of the icing and press gently to secure into place.
-
Use a spatula to frost the entire cake smoothly in icing.
-
Chill cake in the refrigerator for 20 minutes.
-
Fill a piping bag with chocolate icing and attach Wilton star tip # 18 or 21.
-
You will start piping from the bottom of the cake and work your way upwards. Hold the piping bag at a 45 degree angle along the base of the cake. Squeeze bag until icing comes out and sticks to the cake and gently pull away to pipe a pointy star. Continue doing this until the entire cake is covered is buttercream stars.
-
To make ears, push two chocolate chip cookies on top on the cake. Pipe buttercream stars along the edges of the cookies.
-
Fill a piping bag with black icing and a small round tip. Pipe a nose and mouth on top of a cookie.
-
Stick this cookie on the frontal area of the cake.
-
Finally, stick the two large sprinkle eyes above the nose and enjoy.
Notes
- A cake like this will get heavy and can collapse. That’s why wooden dowels are very important for support.
- Don’t decorate a warm cake.
- Instead of using chocolate chip cookies to make ears, nose and mouth, you can use fondant too.
- If you are short on time, use store-bought frostings.
- Read additional tips and variations above.
- Leftovers can be stored in a sealed container in the fridge for up to 3 days.
Nutrition
An automated tool is used to calculate the nutritional information. As such, I cannot guarantee the accuracy of the nutritional information provided for any recipe on this site.
We hope this guide inspires you to create your very own adorable teddy bear cake! It’s a project that combines the joy of baking with the fun of simple decorating, resulting in a show-stopping dessert that will bring smiles to any occasion. Whether it’s a first birthday, a baby shower, or just a special treat, this charming cake is sure to be a memorable centerpiece. Happy baking and decorating!
