Easy Vintage Easter Bunny Cake: A Charming No-Fondant Recipe for a Delightful Celebration
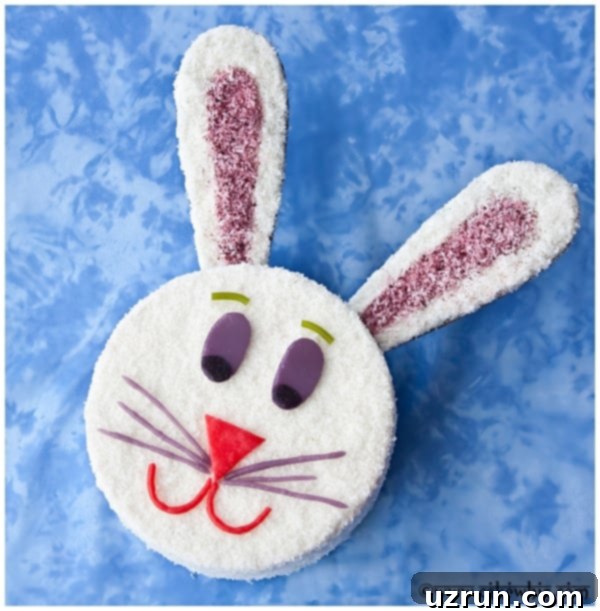
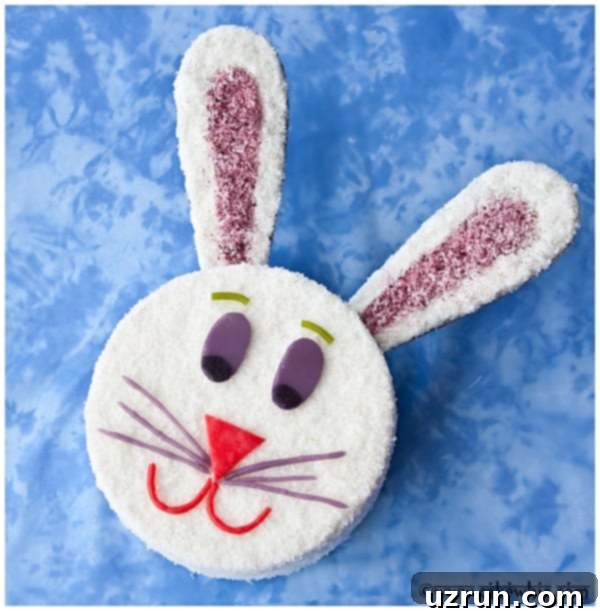
Get ready to bake a truly enchanting dessert this Easter with our simple yet adorable vintage Easter bunny cake tutorial. This delightful recipe guides you through creating a charming, old-fashioned bunny cake, perfect for your spring celebrations. What makes it truly special? All the whimsical details – from the fluffy “fur” to the expressive facial features – are crafted entirely with smooth frosting, soft shredded coconut, and colorful jelly candies. That means no need for special tools, intricate piping skills, or the often-daunting task of working with fondant. It’s a beautifully approachable project that even beginners can master, promising a stunning centerpiece that tastes as good as it looks.

I first encountered this iconic bunny cake design years ago in a Country Living magazine, and it instantly captured my heart. It had that timeless, nostalgic appeal that makes you want to recreate it year after year. For a long time, I promised myself I’d make it “someday,” and I’m thrilled to say that day finally arrived! This cake exceeded all my expectations – it’s surprisingly easy and straightforward to prepare. In fact, it’s simple enough that even little ones can lend a helping hand in the kitchen, making it a wonderful family activity for the Easter season.
One of the biggest advantages of this recipe is that it’s ideal for anyone who prefers to avoid fondant. Instead, we achieve all the intricate details using soft, fluffy coconut and pliable jelly candies. You won’t even need a special bunny template or intricate pattern, which is fantastic news for spontaneous bakers! While you’ve likely seen many pictures of bunny rabbit cakes and various rabbit cake decorating ideas online, I truly believe this vintage-inspired version holds a unique charm and cuteness that stands out. It’s absolutely perfect for Easter parties, school bake sales, or simply as a joyous treat for your loved ones.
If you’re looking for more delightful Easter party inspiration, be sure to explore these other fantastic recipes: our Easy Lamb Cake, which requires no mold for a surprisingly simple finish, or our vibrant Easter Egg Cake, sure to bring a burst of color to your dessert table. These recipes, combined with our adorable bunny cake, will ensure your Easter celebration is filled with sweet memories and delicious treats!
Why You Will Love This Easy Bunny Cake
- Effortlessly Adorable: Achieve a stunning, professional-looking cake without needing advanced decorating skills.
- Kid-Friendly Project: Simple steps make it a fun baking activity for the whole family.
- No Fondant Required: Perfect for those who dislike working with or eating fondant, as all decorations are made with coconut and candies.
- Nostalgic Appeal: This vintage design evokes a classic, heartwarming Easter feel.
- Customizable Flavor: Easily adapt with your favorite cake and frosting flavors.
- Memorable Centerpiece: It’s guaranteed to be the star of your Easter dessert spread.
Key Ingredients for Your Bunny Cake
Creating this charming bunny cake requires just a few key components, many of which you likely already have in your pantry. The beauty of this recipe lies in its simplicity and the readily available ingredients.
- Cake: For my version, I opted for a classic carrot cake, which pairs beautifully with cream cheese frosting and adds a lovely seasonal touch. However, the choice is entirely yours! Feel free to pick any other cake flavor that your family loves, such as vanilla, chocolate, or a festive lemon cake. The important thing is to use a round, two-layer cake to form the base of our bunny’s head.
- Frosting: I used a rich, white cream cheese icing, which provides the perfect canvas for the coconut “fur” and offers a delightful tangy sweetness. You can certainly use your favorite flavor of buttercream, ganache, or any other frosting you like. Ensure it’s thick enough to hold its shape and provide good adhesion for the coconut.
- Coconut: This is crucial for our bunny’s fluffy texture. Make sure to use shredded white coconut, not toasted, as we want to achieve that fresh, soft fur appearance. Desiccated coconut can also be used for a slightly finer, more uniform texture, if preferred.
- Candies: For the facial features, I used a variety of colorful jelly candies. These are fantastic because they are soft, easy to cut with scissors, and can even be gently rolled out and shaped to create eyes, noses, whiskers, and mouths. Gummy candies or even licorice can also work well.
- Gel Food Coloring: This is primarily used for coloring a small portion of the shredded coconut pink for the inner ears. Gel colors are highly concentrated, so a little goes a long way and won’t thin out your coconut.
How to Make an Easy Easter Bunny Cake (Step-by-Step)
Follow these simple steps to bring your adorable bunny cake to life. The process is straightforward and incredibly rewarding!
- Bake Your Cake: Start by baking your chosen cake flavor. This recipe typically uses a round, two-layer cake, approximately 8-9 inches in diameter, which will form the main body of the bunny’s face. Allow your cake layers to cool completely on a wire rack before moving on. A fully cooled cake is essential to prevent your frosting from melting and sliding.
- Frost It Smoothly: Once your cake layers are cool, assemble and frost them with your chosen icing. Apply a generous, even layer of frosting over the entire cake – top and sides. This layer of frosting not only adds delicious flavor but also acts as the “glue” for our fluffy coconut. Aim for a smooth finish, but don’t worry too much about perfection since it will be covered.
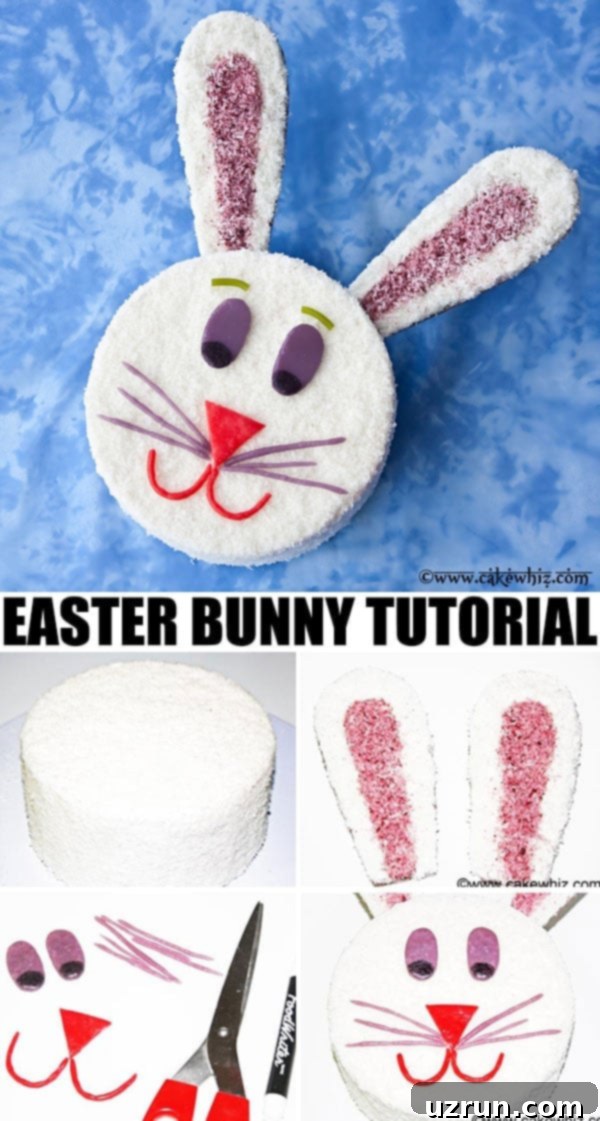
- Cover in Coconut “Fur”: Now for the fun part! Gently press shredded white coconut all over the frosted cake. Use your hands to pat and adhere the coconut firmly, ensuring complete coverage. This creates the charming, fluffy texture that makes our bunny so endearing. Make sure no frosting peaks are showing through.
- Craft the Bunny Ears: For sturdy ears, cut out two ear-shaped pieces from cardboard. These should be roughly proportional to your cake size. For easy insertion, you can attach a popsicle stick or a skewer to the base of each cardboard ear with a bit of tape or extra frosting. Spread a thin layer of frosting over both sides of each cardboard ear, then coat them with white shredded coconut, just like the cake. For the characteristic pink inner ear, color a small amount of coconut with pink gel food coloring and press it onto the center of each ear.
- Attach the Ears: Carefully insert the prepared ears into the top of the cake, positioning them appropriately for a cute bunny look. If you used popsicle sticks, they will help stabilize the ears within the cake. Ensure they are firmly placed so they stand upright.
- Add Facial Details with Candies: This is where your bunny truly comes to life! Use your colorful jelly candies to create the eyes, nose, whiskers, and mouth. Jelly candies are fantastic because they can be easily cut with kitchen scissors into desired shapes (e.g., small circles for eyes, a triangle for a nose, thin strips for whiskers) or even flattened with a rolling pin for a smoother finish. You can also use edible markers to draw finer details onto the candies if you wish.
- Final Touches and Enjoy!: Use a small dab of frosting on the back of each candy piece to gently stick all the facial features onto the coconut-covered cake. Take a step back, admire your adorable creation, and then get ready to enjoy this charming, homemade Easter bunny cake with everyone!

Variations for Bunny Birthday Cake and Other Occasions
While this cake is a quintessential Easter treat, its charm and versatility mean it can be adapted for various celebrations, including birthdays or baby showers. Here are some creative ways to customize your bunny cake:
- Embrace Fondant (If You Dare!): If you enjoy working with fondant and wish to create a bunny cake without coconut, you can certainly decorate this cake with a smooth layer of marshmallow fondant. This allows for incredibly precise details and a sleek finish. You could even use edible paints or markers on the fondant to add intricate patterns or expressions.
- Utilize an Easter Bunny Cake Topper: For an even quicker decorating solution or a different aesthetic, consider using a pre-made Easter bunny cake topper. These toppers are often crafted from fondant or modeling chocolate and can be simply placed on top of a frosted and perhaps green-tinted coconut cake, resembling grass. It’s another delightful spin on this cute concept without the full carving or detailing effort.
- Create Mini Bunny Cakes: Scale down the charm by applying the same decorating steps to individual cupcakes or small, round mini cakes. These make adorable single-serving treats, perfect for kids’ parties, school events, or as part of a larger dessert buffet. Each guest gets their own tiny, personalized bunny!
- Indulge in Chocolate: While classic carrot cake with cream cheese frosting is a traditional Easter favorite, you can absolutely transform this into a decadent chocolate bunny cake. Opt for a rich Moist Triple Chocolate Cake base and pair it with a luscious Chocolate Buttercream Frosting. The dark chocolate will offer a different, equally appealing “fur” texture and a rich flavor profile.
- Explore Different Cake Flavors: Don’t limit yourself to carrot or chocolate! This design works wonderfully with almost any round cake. Experiment with vibrant options like a cheerful Funfetti/Confetti Cake (From Scratch), a whimsical Easy Rainbow Cake, or a sophisticated Chocolate Raspberry Cake (with Cake Mix). The key is a sturdy cake that can hold the frosting and decorations.
- Make it a Piñata Cake: For a delightful surprise, transform your bunny cake into a piñata cake! After baking and cooling, carefully hollow out a portion of the center of your cake layers before frosting. Fill this cavity with small egg candies, colorful sprinkles, mini chocolate eggs, or other small treats. When sliced, the candy cascade will bring an extra layer of joy and excitement to your celebration.
Tips and Techniques for a Perfect Bunny Cake
Achieving a picture-perfect and delicious bunny cake is easy with these helpful tips and techniques. From baking to decorating, these insights will ensure your creation is a success.
- Cool Down Cake Completely Before Frosting: This is perhaps the most crucial tip! Ensure your cake layers are absolutely cooled to room temperature, or even slightly chilled, before you begin frosting. If the cake is even slightly warm, the icing will melt, become runny, and make for a very messy and frustrating decorating experience. Patience here pays off.
- Choosing the Right Coconut: You have a couple of options for the coconut. Shredded coconut (like the kind used in baking aisle bags) provides a more distinct, fur-like texture with longer strands. Desiccated coconut, which is much finer, can create a smoother, more uniform “fur” that might look a bit more polished. Both work beautifully; it’s a matter of preference for the desired visual effect.
- Understanding 3D Cakes: If you’re wondering how to make a truly three-dimensional bunny cake, know that it typically involves more advanced techniques. This often means carving a cake into a specific bunny shape or using a specialized 3D bunny cake pan. These methods generally require more time, experience with cake carving, and often a lot of fondant to smooth out the sculpted features. Our vintage bunny cake, however, offers a charming, simplified approach that achieves a lovely effect with less effort.
- Simplifying with Round Cake Pans: Our recipe focuses on using standard round cake pans, making it incredibly accessible. You can stack multiple round cake layers, frosting them in between, and then use your imagination to carve the top layer slightly to hint at a bunny’s face shape if you desire. However, the simplest and most adorable way, as demonstrated here, is to frost a basic round cake, cover it completely in fluffy shredded coconut, and then add all the charming facial details using candies and the stand-up ears.
- Preventing Cakes from Sticking to Pans: To ensure your cake releases perfectly every time, always line your cake pans with parchment paper on the bottom. Additionally, grease and flour the sides of the pans very well. For chocolate cakes, you can grease and then ‘flour’ with cocoa powder to avoid white residue.
- Crafting Sturdy Ears: As mentioned in the steps, cardboard ears are recommended for stability. When cutting the two ear-shaped cardboard pieces, aim for symmetrical sizes to ensure a balanced look. Sticking a popsicle stick or skewer securely to the back of each ear (using tape or a dab of frosting) provides a sturdy anchor point for inserting them into the cake. Remember to spread a thin, even layer of frosting on the cardboard before covering it with coconut, ensuring good adhesion for the “fur” and the pink inner ear.
- Creating Expressive Facial Features: Jelly candies are incredibly versatile for facial details. For eyes, cut small circles or ovals. For the nose, a small triangle or heart shape works well. Thin strips can be cut for whiskers and a curved line for the mouth. Don’t be afraid to experiment with different candy colors for a playful look. If you want even finer details, an edible marker can be used to draw pupils on the eyes or outlines on the mouth.
- Coloring Coconut: To achieve vibrant colors for coconut (like the pink for the inner ears), place the shredded coconut in a zip-top bag with a few drops of gel food coloring. Seal the bag and shake and knead it until the color is evenly distributed. Add more coloring if a deeper hue is desired.
Storage for Your Bunny Cake
Proper storage will help keep your Easter bunny cake fresh and delicious for days after your celebration.
- Refrigerate: Any leftover cake should be stored in an airtight, sealed container in the refrigerator. This will keep the cake fresh for up to 3 days. Ensure it’s well-covered to prevent it from drying out or absorbing other food odors.
- Freeze (Unfrosted Cake): If you want to prepare parts of your cake in advance, unfrosted cake layers can be wrapped tightly in plastic wrap (saran wrap) and then again in aluminum foil. Store them in the freezer for up to 1 month. When you’re ready to decorate, simply thaw the cake layers at room temperature and then proceed with frosting and decorating as usual.
More Festive Easter Desserts
Round out your holiday menu with these other enchanting Easter-themed treats, perfect for spring gatherings:
- Birds Nest Cookies: Adorable chocolate and coconut treats resembling birds’ nests, complete with candy eggs.
- Easter Chick Cupcakes: Bright and cheerful cupcakes decorated to look like fluffy little chicks.
- How To Make Butterfly Cake: A beautiful and elegant cake design, perfect for spring.
- How To Make Pavlova Cake: A light, airy, and impressive dessert with fresh fruit.
- Church Window Cookies: Colorful no-bake cookies with a stained-glass effect, great for kids.
Recipe

Easter Bunny Cake
Abeer Rizvi
Pin Recipe
Want to Save This Recipe?
Enter your email & I’ll send it to your inbox. Plus, get great new recipes from me every week!
By submitting this form, you consent to receive emails from CakeWhiz
Ingredients
- 1 Carrot cake Dimensions: 8×3 (or any 2-layer round cake)
- 4 cups Cream cheese frosting (or your favorite white frosting)
- 4 cups Coconut Shredded, white, not toasted
- ½ cup Jelly candies Various colors, soft and pliable
- Gel food coloring Pink (for ear details)
Instructions
-
Bake your favorite round, two-layer cake (approx. 8-9 inches) and ensure it cools down completely to room temperature before proceeding.
-
Fill the layers and then frost the entire cake (top and sides) smoothly with your preferred white frosting.
-
Gently press shredded white coconut all over the frosted cake until it is fully covered, creating the bunny’s fluffy “fur.”
-
To make the ears: Cut out two ear-shaped pieces from cardboard and secure a popsicle stick or skewer to the base of each. Spread a thin layer of frosting on each cardboard ear. In a separate bag, tint a small amount of shredded coconut pink with gel food coloring, then press it onto the center of each ear. Cover the remaining edges of the ears with regular white coconut.
-
Carefully push these prepared ears into the top sides of the coconut-covered cake, ensuring they stand upright.
-
Now, bring your bunny to life by creating its facial features. Use colorful jelly candies to form the eyes, nose, whiskers, and mouth. These candies are easy to cut with scissors into desired shapes or can be flattened with a rolling pin for precision. An edible marker can also be used for finer details.
Tip: Jelly candies are really easy to cut with scissors and you can even flatten them with a rolling pin. You can also draw on them with edible markers for added detail.
-
Attach all these charming facial features to the bunny cake using small dabs of frosting as adhesive. And just like that, your cute, vintage Easter bunny cake is complete and ready to be enjoyed!
Notes
- Refer to the “Tips and Techniques” section above for detailed advice on ensuring your cake is perfect.
- Leftover Easter bunny cake should be stored in a sealed container in the refrigerator for up to 3 days to maintain freshness.
Nutrition
An automated tool is used to calculate the nutritional information. As such, I cannot guarantee the accuracy of the nutritional information provided for any recipe on this site.
