Easy Fondant Flowers: Your Beginner-Friendly Guide to Stunning Cake Decorations
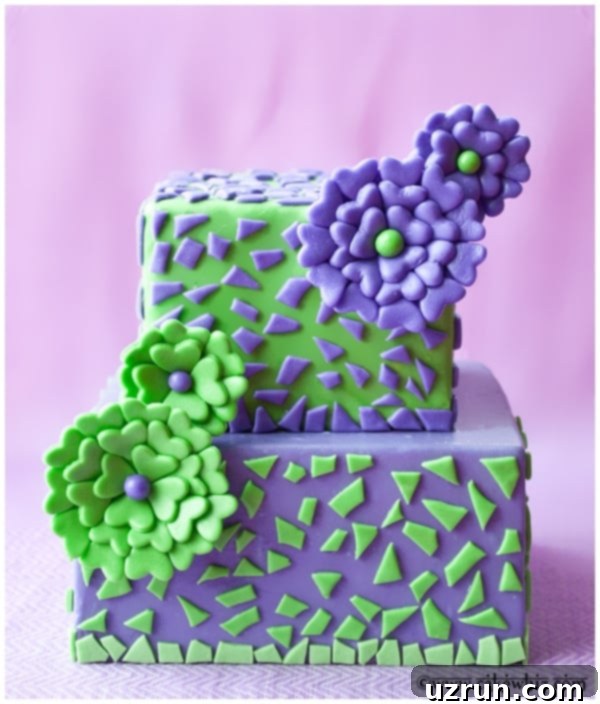
Unlock the secret to creating truly enchanting cakes and cupcakes with these surprisingly easy-to-make fondant flowers! This comprehensive, step-by-step tutorial is designed specifically for beginners, proving that you don’t need a professional baker’s toolkit or years of experience to craft edible works of art. We’ll show you how to transform simple fondant into beautiful, fantasy-based blooms that will elevate any dessert from ordinary to extraordinary.
Imagine adorning your homemade cakes, cupcakes, cookies, brownies, or any other sweet treat with delicate, handcrafted flowers in a rainbow of colors and sizes. These edible decorations are not only stunning but also incredibly versatile, allowing you to customize them to perfectly match any occasion or theme. Whether you’re planning a birthday party, a baby shower, or just want to add a touch of elegance to your everyday baking, these simple fondant flowers are your go-to solution.
If you’re eager to explore more creative ways to decorate with edible flowers, be sure to check out our other simple tutorials. Dive into the art of creating lifelike Easy Fondant Roses (Ribbon Roses), master the delicate touch of Royal Icing Flowers (Sugar Flowers), or learn the art of piping with our guide on Buttercream Flowers (Russian Piping Tips). For more specific fondant designs, don’t miss these charming Fondant Daisies and the ethereal beauty of Easy Wafer Paper Flowers.
Why Choose Fondant Flowers for Your Desserts?
Fondant is a dream material for crafting edible decorations, especially for flowers. Unlike some other mediums, fondant offers a smooth, pliable texture that’s easy to shape and sculpt without cracking. Once dry, it holds its form beautifully, allowing for intricate details and stable decorations that can be prepared well in advance. Fondant flowers are also completely edible, making them a delicious and safe addition to any dessert. Their vibrant colors and clean lines add a polished, professional look to your baking projects, making you feel like a master decorator!
Essential Tools and Simple Ingredients You’ll Need
The beauty of this tutorial is its simplicity, requiring minimal tools. Here’s what you’ll gather:
- Fondant: You can use homemade marshmallow fondant, which tastes fantastic, or opt for convenience with store-bought fondant. We recommend having purple and green, or any colors that match your theme.
- Rolling Pin: A standard rolling pin will do the trick to get your fondant to the right thickness.
- Cookie Cutters: For these specific fantasy flowers, we use heart-shaped and circular cutters. Don’t worry if you don’t have these exact shapes; you can experiment with oval or even simple geometric shapes for unique designs.
- Small Paintbrush: This is for applying a tiny amount of water, which acts as your edible glue.
- Flower Forming Cups (or alternatives): These help your flowers dry with a beautiful, natural curve. If you don’t have them, small bowls, egg cartons, or even crumpled aluminum foil can serve a similar purpose.
- Water: Just a little bit to adhere your fondant pieces.
- Gel Food Colors (optional): If you’re using white fondant and want to color it yourself, gel colors are highly recommended over liquid dyes for better results.
Step-by-Step: How to Make Easy Fondant Flowers
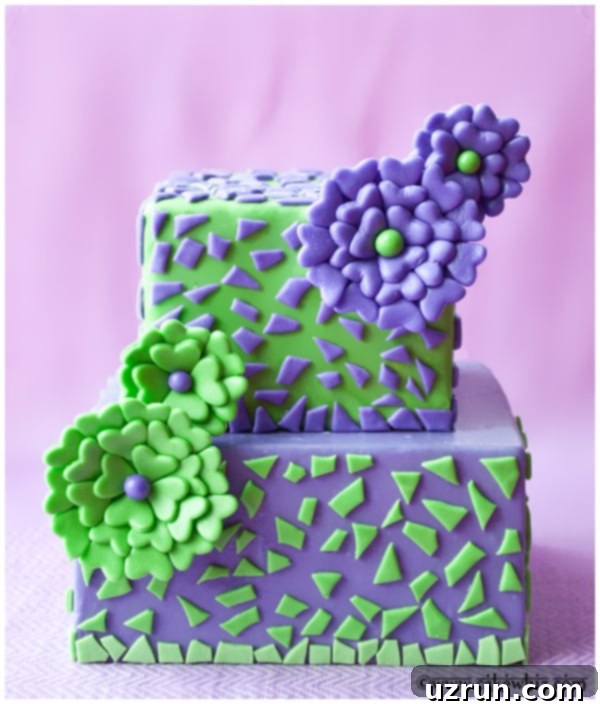
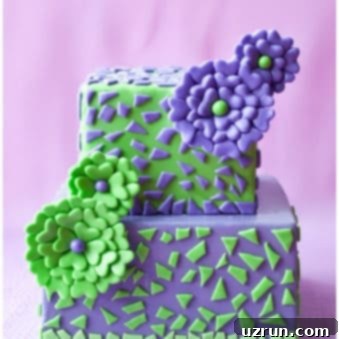
Let’s get started on creating these lovely edible blooms. The following steps will guide you through making the fantasy flowers that adorn our beautiful tiered cake.
- Prepare Your Fondant: Knead your desired color of fondant until it’s pliable and smooth. If it’s too stiff, warm it slightly in your hands or microwave for a few seconds. If it’s too sticky, dust your surface lightly with cornstarch or powdered sugar.
- Roll Out Fondant: On a clean, lightly dusted surface (using cornstarch or powdered sugar), roll out your fondant to an even thickness, about 1/8 inch (3mm) thick. Avoid rolling it too thick, as this will make your flowers heavy, or too thin, which can make them fragile.
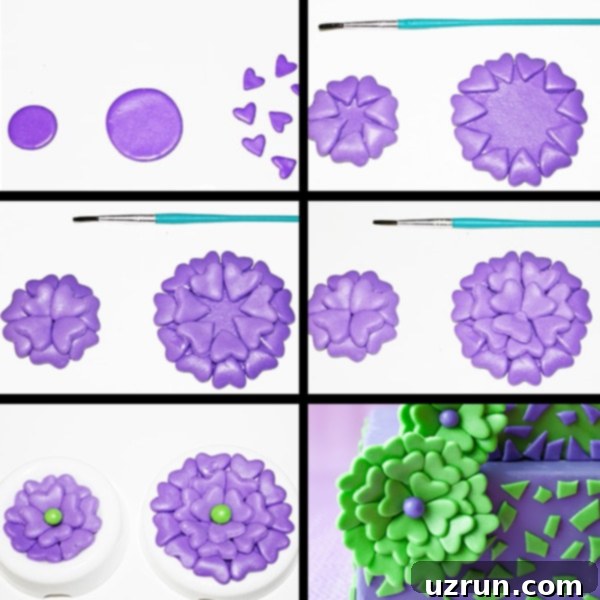
- Cut Out Shapes: Using your chosen cookie cutters, cut out one large circular piece and one small circular piece for the base of each flower. Then, cut out numerous small heart shapes – these will be your petals!
- Assemble the First Layer of Petals: Take your larger circular fondant piece. Lightly brush a tiny amount of water along its outer edge using your paintbrush. Carefully begin attaching the heart-shaped fondant pieces in a circular formation, aligning their pointed ends towards the center of the circle, creating your first row of petals.
- Add the Second Layer of Petals: Once the first row is complete, brush a little more water on the inner edge of the same circular base, inside the first row of hearts. Now, attach another row of heart pieces, staggering them slightly in between the first layer’s petals for a fuller, more natural look.
- Create the Inner Petal Layer (Optional): If you desire a very full flower, you can add a third, even smaller row of heart petals closer to the center, repeating the brushing and attaching steps.
- Form the Flower Center: Take a small amount of green fondant (or a contrasting color) and roll it into two tiny balls. These will be the centers of your flowers.
- Attach the Center: Place a tiny dot of water in the very middle of each assembled flower and gently press a green fondant ball into place.
- Dry the Flowers: Carefully transfer your newly formed fondant flowers into flower forming cups. These cups are designed to help the flowers maintain a curved, natural shape as they dry. Allow them to dry overnight, or until they are completely firm and hard. The drying time can vary depending on humidity.
Assembling and Decorating Your Tiered Cake
While your beautiful fondant flowers are drying, you can begin preparing your cake base. Our example features a stunning two-tiered cake with chocolate on the bottom and vanilla on top, but feel free to choose your favorite flavors and sizes.
- Bake and Cool Your Cakes: Ensure your cakes (e.g., two 8×2 inch chocolate squares for the bottom tier and two 6×2 inch vanilla squares for the top) are completely baked and cooled to room temperature. This is crucial to prevent your icing and fondant from melting.
- Prepare Your Frosting: Whip up a batch of your favorite American buttercream frosting. Smooth and stable, it provides the perfect canvas for your fondant.
- Assemble the Bottom Tier: Slice your two chocolate cakes in half horizontally if desired for filling. Place one cake layer on a cake board, spread a generous layer of buttercream, then top with the second cake layer. Crumb coat and then cover the entire tier smoothly with buttercream. Roll out your purple fondant and carefully drape it over the iced cake, smoothing it out with a fondant smoother. Trim any excess fondant at the base with a pizza cutter or sharp knife.
- Assemble the Top Tier: Repeat the process for your vanilla cakes (two 6×2 inch squares). After icing, cover this tier with green fondant, smoothing and trimming as before.
- Final Cake Assembly with Support: Carefully place the prepared green top tier onto the center of the purple bottom tier. It is absolutely essential to insert dowel rods or bubble tea straws into the bottom tier *before* placing the top tier. These supports prevent the upper cake from sinking into and collapsing the lower cake, especially with fondant’s weight.
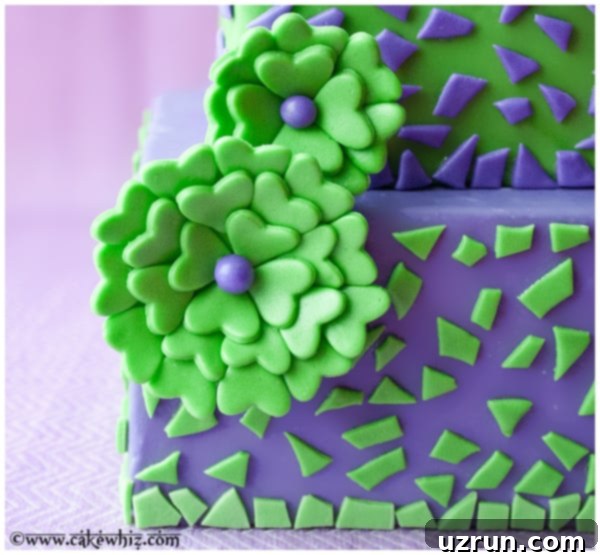
- Initial Cake Decoration: To add a playful touch, cut out small, abstract, and irregular shapes from both your purple and green fondant scraps. Randomly stick these cut-outs onto both cake tiers to create a unique mosaic pattern. This also serves as a clever way to cover any minor imperfections on your fondant-covered cakes!
- Attach the Dry Flowers: Once your fondant flowers are completely dry and firm, they are ready to be attached. Use a strong adhesive like thick royal icing or melted chocolate to secure them to the cake in your desired arrangement. Place them gently but firmly and allow the adhesive to set. Now, step back and admire your beautiful creation!
Fondant Flowers FAQs
Can you make fondant flowers ahead of time? Are they edible?
Absolutely, making fondant flowers ahead of time is not only possible but highly recommended! This practice allows them ample time to dry and harden completely, which can take up to 24 hours or even longer in humid conditions. Preparing them in advance reduces stress on your cake-decorating day and ensures your flowers maintain their perfect shape when handled and placed on the cake. Simply store the dried flowers in an airtight container at room temperature away from direct sunlight and humidity. And yes, they are completely edible, making them a delightful (and delicious) part of your dessert!
Is it better to use gum paste or fondant?
Both gum paste and fondant can be used for making edible flowers, and each has its distinct advantages. Fondant, being softer and more pliable, is excellent for simpler flower designs and is generally easier for beginners to work with. It also has a more pleasant taste and texture when eaten. Gum paste, on the other hand, is specifically formulated to dry much harder and quicker than fondant. This makes it ideal for more delicate, intricate, and realistic floral designs, as it can be rolled incredibly thin without tearing and holds its shape very well. For the easy, fantasy-based flowers in this tutorial, fondant is perfect. However, if you plan to create very fine petals or highly detailed botanical flowers, gum paste would be the preferred choice due to its superior drying and shaping properties.
Creative Variations for Your Sugar Paste Flowers
These simple fondant flowers offer a fantastic base for endless creativity. Don’t be afraid to experiment!
- Try Other Color Combinations: While we chose a vibrant purple and green, the possibilities are truly infinite. Consider pastels for a baby shower, bright primary colors for a child’s birthday, or elegant metallics for a sophisticated event. Ombre effects, where petals transition from light to dark, can also be stunning.
- Use Other Cutters: The heart shape gives a unique, playful look. But you can easily swap them out! Oval cutters can create more traditional, rounded petals, while circle cutters can lead to simple, abstract blooms. Leaf cutters can be used to add realistic foliage around your flowers. The fundamental instructions for layering and drying will remain the same regardless of your cutter choice.
- Try Other Cake Flavors: These flowers complement a vast array of cake flavors. Beyond chocolate and vanilla, consider rich German Chocolate Cake, refreshing Cherry Cake, or perhaps a zesty lemon or a cozy red velvet.
- Try Other Frosting Flavors: Match your frosting to your cake for a harmonious flavor profile. Explore options like sweet Maraschino Cherry Frosting, the silky smooth texture of Cooked Flour Buttercream (Ermine Frosting), or a classic cream cheese frosting.
- Fill Cake for Extra Indulgence: Enhance your cake’s flavor by adding delicious fillings between the layers. Jams and preserves, rich Homemade Caramel Sauce, decadent Dulce De Leche, or various nut butters make excellent choices. You can also incorporate fresh berries or chopped nuts and candy bars for added texture and flavor.
- Flavor Your Fondant: For an extra layer of sensory delight, flavor your fondant directly with food-grade extracts. Vanilla, almond, lemon, or even a subtle floral extract can be wonderful. Just ensure the flavor you choose harmonizes well with your cake and frosting flavors.
- Consider a Different Cake Shape: Our tutorial features stylish square cakes, but these fondant flowers look equally stunning on classic round cakes, elegant sheet cakes, or even individual mini cakes and cupcakes. Adapt the scale of your flowers to suit the size of your cake.
- How to Fix Fondant Bubbles, Bumps, and Tears? Even experienced decorators face these. If you find your fondant covering isn’t perfectly smooth, don’t fret! A clever trick is to cut out some whimsical, irregular shapes of fondant (perhaps in contrasting colors) and randomly stick them onto your cake. This creates a charming “mosaic” or “patchwork” effect that beautifully covers any imperfections, turning a flaw into a design feature.
Advanced Tips and Techniques for Perfect Fondant Flowers
Achieving flawless fondant flowers and a beautifully decorated cake involves a few key techniques and considerations:
- Homemade Marshmallow Fondant vs. Store-bought Fondant: Both options are viable. Homemade marshmallow fondant generally boasts a superior taste and a more pliable texture, making it a favorite for many. However, store-bought fondant offers unparalleled convenience, often coming pre-colored and ready to use, saving you time and effort, especially for beginners. Choose based on your priorities for taste vs. convenience.
- Don’t Decorate Warm Cakes: This is a golden rule! Always ensure your cakes are completely cooled to room temperature, or even slightly chilled, before applying any icing or fondant. Warm cakes will cause your buttercream to melt and soften, making it impossible to apply fondant smoothly. The heat can also make fondant sticky and difficult to work with.
- Don’t Roll Fondant Too Thick: While you need enough thickness for durability, rolling fondant too thick will make your flowers excessively heavy. This can cause them to fall off the cake, or worse, weigh down and damage the delicate structure of your cake. Aim for approximately 1/8 inch (3mm) thickness for most flowers.
- Add Support for Tiered Cakes: When constructing a tiered cake, structural support is non-negotiable. Use sturdy dowels or bubble tea straws inserted into the bottom tier(s) to bear the weight of the upper tier(s). This prevents the cakes from collapsing into each other, ensuring your masterpiece remains stable and intact.
- Use Gel Colors for Coloring Fondant: If you’re coloring white fondant, opt for gel-based food colorings over liquid ones. Gel colors are highly concentrated and thicker, meaning you’ll need less to achieve vibrant hues. Liquid colors, conversely, can introduce too much moisture into the fondant, making it sticky, difficult to handle, and increasing drying time.
- Drying Time for Flowers May Vary: Environmental factors play a significant role in how quickly your fondant flowers dry. High humidity or moisture in the air will considerably slow down the drying process. To speed things up, place your flowers in a dry room, possibly with a dehumidifier, or position a small table fan to gently blow air over them. Ensure they are completely dry before handling or attaching them to the cake.
- Don’t Use Too Much Water (as glue): Water acts as a powerful adhesive for fondant pieces. However, moderation is key. Applying too much water will create puddles, make the fondant overly sticky and messy to work with, and significantly prolong the drying time. A light brush stroke is all you need.
- Flowers Must Be Completely Dry Before Being Glued onto the Cake: This point cannot be stressed enough. If you attempt to attach partially dry fondant flowers to your cake, they will likely lose their shape, bend, sag, or even break. Allow them to harden fully to ensure they maintain their crisp, beautiful appearance when placed on your finished creation.
Storage Solutions for Your Masterpiece
Proper storage ensures your beautiful cake and its decorations stay fresh and delicious.
- Room Temperature: A decorated cake, especially one covered in fondant with no perishable fruit fillings, can safely remain at room temperature for up to 24 hours. Keep it covered in a cake box or under a cake dome to protect it from dust and air.
- Refrigerate Leftovers: Any leftover cake can be stored in a sealed, airtight container in the refrigerator for up to 3 days. Be aware that fondant decorations might become slightly sticky or tacky due to the moisture and condensation within the fridge environment. To minimize this, you can place the cake in a box and then into the fridge.
- Freezing Components: Unfrosted cake layers and buttercream frosting can be stored separately in sealed, freezer-safe containers for up to 1 month. When you’re ready to enjoy this delightful dessert, thaw the cake layers and frosting overnight in the fridge. Once thawed, you can assemble and decorate as per the instructions above. Fondant flowers, once completely dry, can also be stored in an airtight container at room temperature for several weeks, ready to be used at a moment’s notice.
- Make Ahead Instructions: This entire cake can be baked, assembled, and decorated up to 1 day in advance. Store it at room temperature (if no perishable fillings are used) in a cool, dry place until you are ready to serve, allowing you to enjoy your event without last-minute stress.
More Decorated Cakes for Inspiration
Looking for more show-stopping cake ideas? Explore these other fantastic tutorials to spark your imagination and expand your decorating skills:
- Peacock Cake (And Cupcakes) – A magnificent cake adorned with intricate peacock designs.
- Lord of The Rings Cake (Sauron Eye Cake) – For the fantasy lovers, a dramatic Sauron eye cake.
- Easy Emoji Cake (Poop Cake) – A fun, quirky cake that’s surprisingly easy to make.
- Erupting Volcano Cake (With Dry Ice Smoke) – A truly spectacular cake that will amaze your guests.
- Easy Shoe Cake (Sneaker Cake) – Perfect for celebrations, this cake is shaped like an adorable shoe.
Recipe
Easy Fondant Flowers
Abeer Rizvi
Pin Recipe
Want to Save This Recipe?
Enter your email & I’ll send it to your inbox. Plus, get great new recipes from me every week!
By submitting this form, you consent to receive emails from CakeWhiz
Ingredients
- 2 Chocolate cakes For bottom tier, Two 8×2 inch square cakes
- 2 Vanilla cakes For top tier, Two 6×2 inch inch square cakes
- 6 cups American buttercream frosting
- 4-5 cups Marshmallow fondant Purple, Green
Instructions
-
Bake cakes and allow them to cool completely.
-
While cakes are baking and cooling, prepare frosting.
-
Trim the domes and sides of the cakes, if necessary.
-
Prepare bottom tier: Place one chocolate cake on a cake board. Use a spatula to spread icing on top. Place the other cake on top and press gently to secure into place. Use a spatula to cover the entire cake smoothly in frosting. Roll out purple fondant and spread it smoothly over the iced cake. Cut off excess along the bottom with a pizza cutter. Keep aside.
-
Prepare top tier: Place one vanilla cake on a cake board. Use a spatula to spread icing on top. Place the other cake on top and press gently to secure into place. Use a spatula to cover the entire cake smoothly in frosting. Roll out green fondant and spread it smoothly over the iced cake. Cut off excess along the bottom with a pizza cutter. Keep aside.
-
Assemble both tiers: Place the prepared vanilla cake on top of the prepared chocolate cake. Make sure to stick dowels or bubble tea straws into the bottom tier for support. Cut out small random shapes of green and purple fondant and stick them on the cakes to create a mosaic pattern. Keep this whole cake aside as you work on the flowers.
-
Roll out purple fondant. Cut out 1 big and 1 small circular piece. Also, cut out many small heart pieces.
-
Brush water on the outer edge of the circle pieces. Stick the heart pieces in a circular formation until you have a row of hearts.
-
Brush some water on the inside of the circle.Stick more heart pieces here, until you have another row of hearts.
-
Brush water on the inside of the circle again. Stick more heart pieces here, until you have another row of hearts.
-
Make two little balls of green fondant. Stick them in the center of each flower with some water.
-
Place these fantasy flowers in flower forming cups and let them dry overnight or until they harden.
-
Stick them on the cake with thick royal icing or melted chocolate. Enjoy!
Notes
- Read all my tips above.
- Leftovers can be stored in a sealed container in the fridge for up to 3 days.
Nutrition
An automated tool is used to calculate the nutritional information. As such, I cannot guarantee the accuracy of the nutritional information provided for any recipe on this site.
