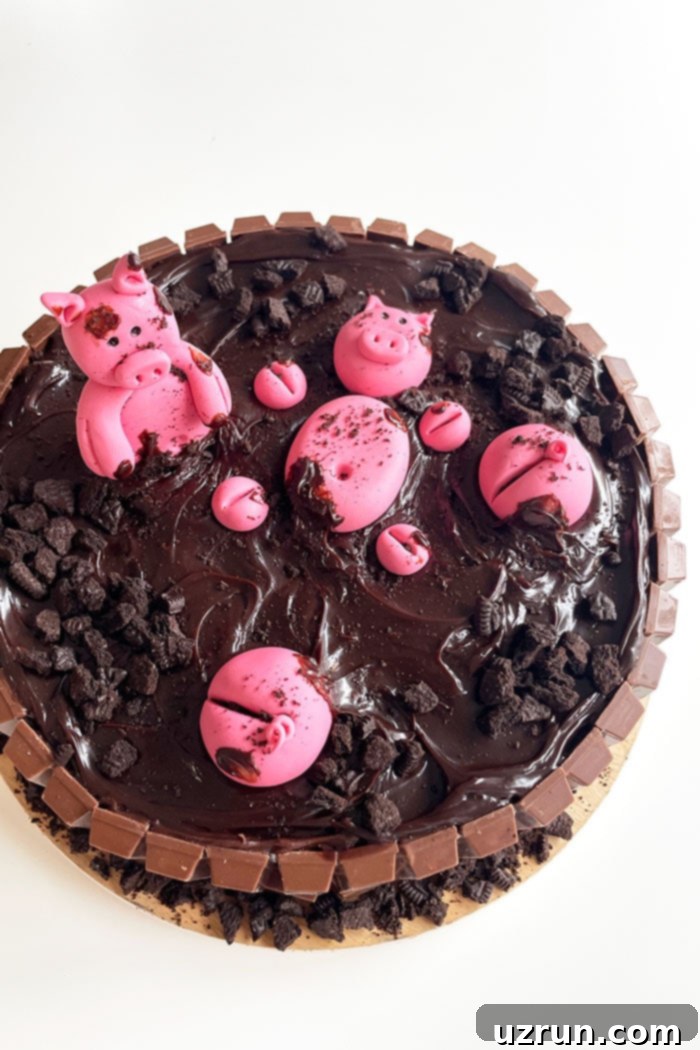
Easy Pig Cake Recipe: A Fun Kit Kat & Fondant Chocolate Delight (No Special Molds Needed!)
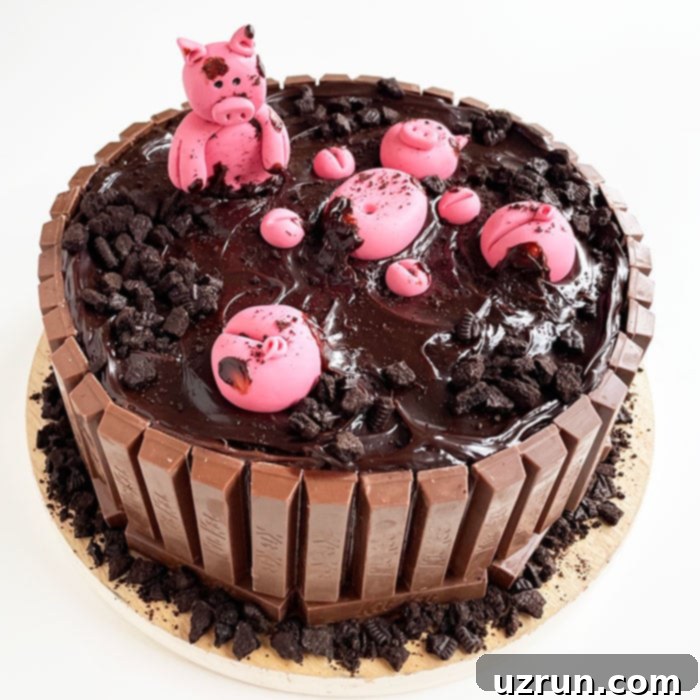
Get ready to unleash your inner artist and delight your guests with this incredibly adorable and surprisingly easy-to-make pig cake! This charming dessert proves that you don’t need fancy molds or complicated techniques to create a show-stopping cake. Crafted from simple, homemade ingredients, this chocolate cake features a rich chocolate frosting and a luscious ganache, all wrapped with a fun Kit Kat ‘fence’ and adorned with playful fondant pig toppers. It’s a whimsical masterpiece that promises both visual appeal and a delicious experience.
This playful pig cake is guaranteed to spark joy and bring smiles to any event, from children’s birthday parties to farm-themed celebrations or even a quirky baby shower. The best part? It’s much easier to assemble than its impressive appearance suggests. Think of the decorating process like playing with edible clay – just like making decorations out of play dough, but using delicious fondant instead. Embracing this creative mindset makes the entire process enjoyable and stress-free. Beyond its cute exterior, this dessert is as delightful to eat as it is to look at, thanks to its layers of moist chocolate cake, creamy frosting, and generous cover of rich chocolate ganache and crunchy Kit Kat candy bars!
If you’re looking for more whimsical cake inspiration to charm your guests, be sure to explore other fun creations like the Easy Lamb Cake without a mold, the majestic Peacock Cake, and the delicate Butterfly Cake. Each offers a unique blend of creativity and deliciousness, perfect for any special occasion.
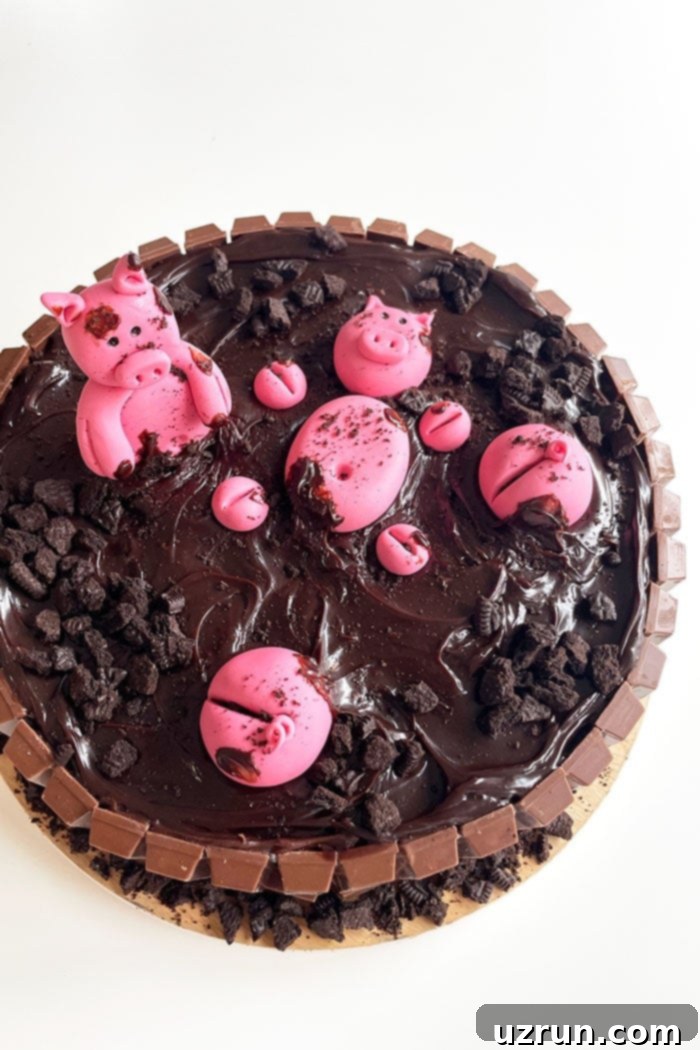
How To Make This Easy Pig Cake From Scratch? A Step-by-Step Guide
Creating this adorable pig cake is a straightforward process that breaks down into several manageable steps. Follow these instructions to bring your muddy pig masterpiece to life, ensuring each component is perfectly prepared for an unforgettable dessert:
- Bake and cool cakes completely: Start by baking your two 8×2 inch round chocolate cakes. Whether you use your favorite homemade recipe or a high-quality cake mix, ensure they are thoroughly baked. This step is critical: allow the cakes to cool *completely* on a wire rack before attempting any frosting or decoration. Working with warm cakes will inevitably cause your frosting and fondant to melt, turning your beautiful creation into a sticky, frustrating mess. For best results, once cooled to room temperature, you can even chill them in the refrigerator for 20-30 minutes to make them firmer and easier to handle.
- Prepare frosting and ganache: While your cakes are baking and cooling, take advantage of the time to prepare your chocolate buttercream frosting and chocolate ganache. Having these components ready ensures a smooth and efficient assembly process once the cakes are cool. Ensure your ganache is at a pourable yet slightly thickened consistency – it shouldn’t be too hot, as it could melt the frosting.
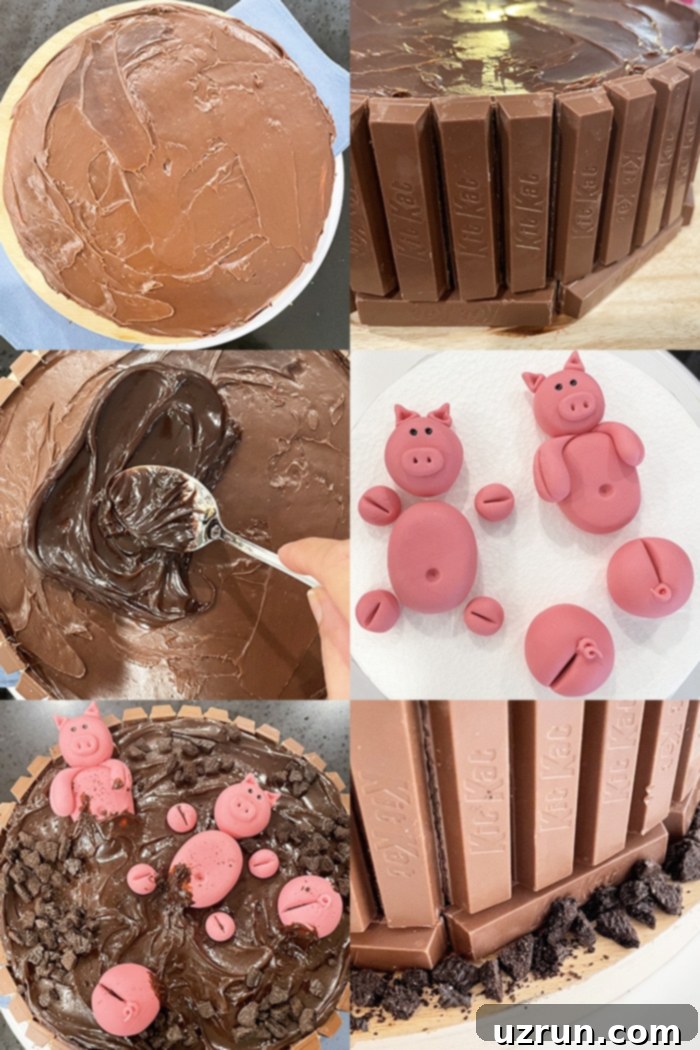
- Assemble the cake: Begin by placing one cooled cake layer on your chosen cake stand or serving platter. Using an offset spatula, generously ice the top of this first layer with your chocolate buttercream frosting, spreading it evenly. Carefully place the second cake layer directly on top, aligning it perfectly. Once the layers are stacked, proceed to ice the entire cake – sides and top – with the remaining buttercream, creating a smooth canvas for your Kit Kats and ganache. A thin crumb coat followed by a final, thicker layer often yields the neatest finish.
- Wrap the cake in Kit Kats: This is where the magic begins! Unwrap your Kit Kat bars and gently press them vertically around the entire circumference of the frosted cake. The frosting acts as a natural adhesive, holding the chocolate bars in place. Arrange them snugly next to each other to create a charming ‘fence’ effect, giving the impression that your little pigs are playing in a muddy pen.
- Spread ganache for the ‘mud’: Now, generously pour or spread your prepared chocolate ganache over the top of the cake. Allow it to drip artfully down the sides of the Kit Kat fence, creating the perfect illusion of a rich, muddy pigsty. The slight imperfection of the ganache drips adds to the rustic, playful aesthetic of the cake.
- Make the pig parts from fondant: This is the most creative and fun part! Using pink fondant (or modeling chocolate), sculpt your adorable pig heads, bodies, ears, snouts, and curly tails. You don’t need specialized tools; your hands and a small knife for details are usually sufficient. To save time and ensure your fondant pieces are firm and hold their shape, consider making these charming toppers a day in advance and letting them dry.
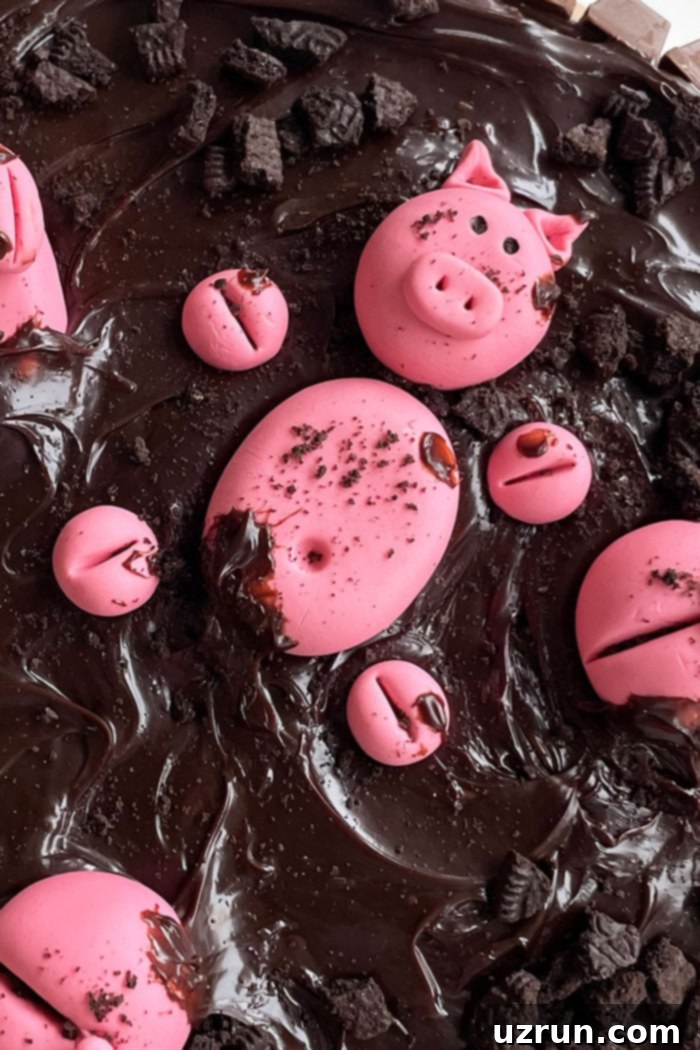
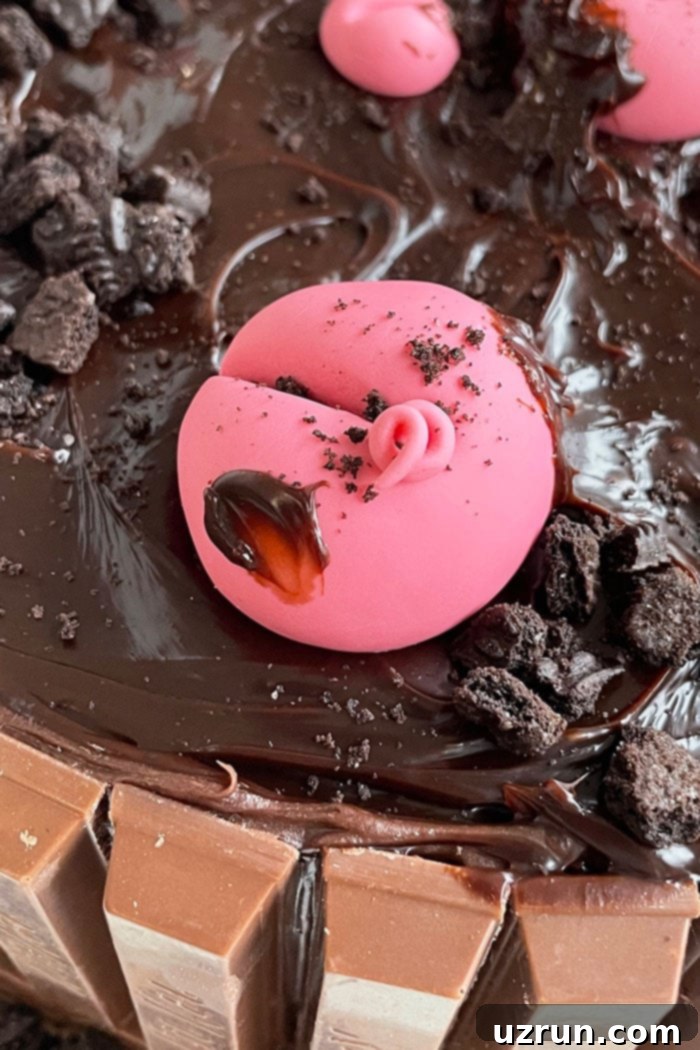
- Top the cake with fondant pieces: Carefully arrange your fondant pig toppers onto the ganache ‘mud.’ Gently press them into the ganache so they appear to be frolicking and wallowing in the delicious chocolate. Play around with different positions – some pigs could be peeking out, others fully submerged, and don’t forget a cute pig butt sticking out of the mud!
- Sprinkle crushed Oreos: To enhance the ‘muddy’ effect and add a delightful texture, sprinkle crushed Oreo cookies (without the cream filling, just the dark cookie parts) generously over the ganache on top of the cake and along the bottom perimeter. This mimics chunky, realistic mud, adding to the charm and deliciousness.
- Spread some ganache on pigs for a messy look: For the final touch, take a small amount of extra ganache and lightly dab or smear it onto your fondant pigs. This gives them a wonderfully messy, “just been playing in the mud” appearance, truly bringing your farm scene to life and making them look like they’re having the time of their lives! Enjoy your delightful and easy-to-make pig cake!
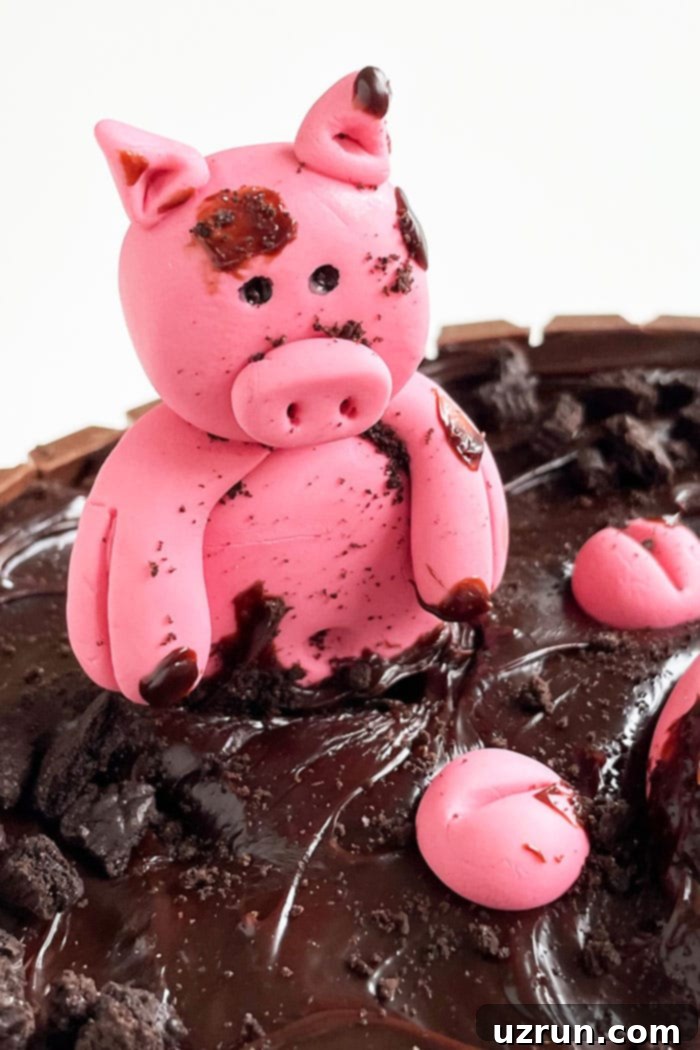
Creating Your Adorable Pig Cake Toppers
The pig cake toppers are the heart and soul of this charming dessert, and thankfully, they are incredibly simple to create! You have the flexibility to make these with either vibrant pink fondant or with a soft pink Modeling Chocolate (Candy Clay). Both options offer great workability and a delicious finish. The beauty of these pigs lies in their handmade charm – there’s no need for any fancy tools or specialized cutters.
Simply use your hands and fingers to sculpt the basic shapes of the pig’s body, head, ears, and snout. You can add delightful details like the nostrils on the snout or the creases in the ears using just the tip of a knife or a toothpick. For the eyes, an edible black marker works perfectly to give your pigs a lively expression. To ensure the pig’s head and body stay securely together, you can lightly dampen the joining surfaces with a tiny bit of water to act as a glue, or use a dab of Royal Icing for stronger adhesion. For larger or more precarious poses, inserting a small piece of a toothpick into the body and then attaching the head can provide additional, essential support, just be sure to inform your guests about any non-edible supports.
Creative Variations for Your Farm Animal Cake
While a pig cake is undeniably charming, this concept can easily be adapted to create a variety of other delightful farm animal or even safari-themed cakes. Here are some ideas to spark your creativity and customize your cake:
- Use a different cake flavor: Don’t feel limited to chocolate! This cake can be equally delicious with other popular flavors. Consider a classic yellow cake for a vibrant contrast, a delicate white cake, or a festive Funfetti Cake for an extra sprinkle of joy. Each flavor can offer a unique base for your animal theme.
- Create different animals: The technique for sculpting fondant animals is versatile. Instead of pigs, imagine crafting adorable sheep, fluffy lambs, or even playful cows for a complete farm scene. For a wilder twist, venture into a safari theme by making rhinos, hippos, or elephants to wallow in your chocolate ganache ‘mud.’
- Add a delicious filling: Elevate your cake’s flavor profile by incorporating a delightful filling between the layers. Fresh fruits like raspberries or sliced strawberries can add a burst of freshness, but remember that a fruit-filled cake will require refrigeration. Alternatively, indulge in a rich Homemade Caramel Sauce, a creamy Dulce De Leche, or a smooth nut butter of your choice for an extra layer of decadence.
- Experiment with other buttercream frostings: While chocolate buttercream is a perfect choice, feel free to substitute it with another favorite frosting. An American Buttercream Frosting offers a classic, buttery flavor, while a White Chocolate Buttercream Frosting can provide a lighter, sweeter counterpoint to the rich chocolate cake and ganache.
- Consider a different cake shape: This recipe utilizes a round cake, which works beautifully for the Kit Kat fence. However, your creativity isn’t bound by shape! Feel free to bake a square or rectangle cake if you prefer, adapting the Kit Kat placement to suit the new dimensions. A square cake could even create a larger “mud pit” for more animals.
- Change the color of the pigs: While pink is traditional, you can easily change the color of your fondant pigs for a more realistic touch or a whimsical fantasy look. Consider using a grey fondant for a true wild boar or a light brown for a different breed.
Essential Tips and Techniques for a Perfect Pig Cake
Achieving a professional-looking and delicious pig cake is all about mastering a few key techniques and knowing some handy tips. These insights will help you avoid common pitfalls and ensure your cake is a resounding success:
- Don’t frost or decorate warm cakes: This cannot be stressed enough! The warmth from a freshly baked cake will cause your beautiful buttercream icing and delicate fondant decorations to melt, slump, and create an unappealing, sticky mess. Always ensure your cakes are completely cooled, ideally even slightly chilled, before you begin applying frosting or placing fondant figures. Patience here is truly a virtue!
- Homemade fondant vs. Marshmallow fondant: You have a choice between traditional homemade fondant or the popular marshmallow fondant. Both have their unique advantages and disadvantages. I personally lean towards homemade fondant because its taste is often superior, and it can have a wonderful aroma. However, store-bought, pre-colored fondant offers unparalleled convenience, saving you time and effort in coloring. Marshmallow fondant is also a fantastic homemade option, known for its pliability and pleasant taste.
- Why is my fondant pig shiny? If your fondant creations develop a shiny or sticky surface, it’s usually because they’ve come into contact with too much water or moisture. Even slight humidity in the air can affect fondant. If it happens, try to blot gently with a paper towel or let it air dry in a less humid environment. Prevention is key: work with dry hands and minimize contact with water.
- Do you only use the cookie part of the Oreo? Yes, for the best “muddy” effect, I recommend scraping out the cream filling from the Oreos. The dark, crumbly cookie portion creates a more realistic, chunky mud texture that beautifully complements the chocolate ganache, making your pigs look truly submerged and playful.
- Make the pigs a day in advance: This is a game-changing tip for reducing stress and improving the final look of your cake. Sculpting your fondant pigs a day ahead allows them ample time to harden and hold their shape much better. This prevents them from drooping or deforming when placed on the cake, giving you more flexibility and a sturdier decoration. Store them in an airtight container at room temperature.
- Use gel colors for coloring fondant: If you’re coloring plain white fondant, always opt for gel-based food coloring over liquid colors. Gel colors are much thicker and more concentrated, meaning you need less to achieve vibrant hues. Liquid colors, conversely, can make your fondant wet, sticky, and difficult to work with, compromising its texture and drying time.
- Don’t use a lot of water as glue: While water is an excellent edible adhesive for sticking fondant pieces together, use it sparingly. Applying too much water will create puddles, make the fondant overly sticky, and significantly increase the drying time. A tiny dab applied with a fine brush or a toothpick is usually all you need for effective adhesion.
- For additional Kit Kat support: If you’re concerned about your Kit Kat fence holding up, especially in warmer environments or if your cake is tall, consider tying a pretty ribbon around the entire perimeter of the cake, just below the ganache line. This adds a decorative touch while providing extra structural support for the Kit Kats.
Storage Solutions for Your Decorated Pig Cake
Proper storage ensures your beautiful pig cake remains delicious and visually appealing for as long as possible. Here’s how to best store your decorated masterpiece:
- Room temperature: If your decorated cake does not contain any fresh fruit fillings or other ingredients that require refrigeration (such as dairy-based cream fillings), it can typically be left at cool room temperature for 8-10 hours. Keep it covered loosely to protect it from dust and air.
- Refrigerate: For any leftovers or if your cake contains perishable fillings, store it in a sealed, airtight container in the refrigerator for up to 3 days. It’s important to note, however, that fondant decorations tend to become slightly sticky and tacky when exposed to the moisture within a refrigerator. This is a common occurrence but doesn’t affect the taste.
- Freeze: If you wish to prepare components in advance or save leftover unfrosted cake layers, they (and frostings) can be stored in sealed, freezer-safe containers for up to 1 month. When you’re ready to enjoy or assemble the cake, transfer it to the fridge overnight to thaw slowly, then proceed with decorating as per the instructions above.
- Make ahead instructions: This cake is perfect for preparing in advance! The entire cake can be baked and fully decorated 1 day before your event, allowing you to relax and enjoy the celebration without last-minute baking stress. The fondant pigs, as mentioned, can even be made several days ahead.
Discover More Creative Decorated Cakes
If you loved creating this whimsical pig cake, you’ll surely enjoy exploring other unique and beautifully decorated cakes that bring imagination to life. From fantasy themes to seasonal delights, these recipes offer endless possibilities for your next baking adventure:
- Lord Of The Rings Cake {Sauron Eye Cake}
- Erupting Volcano Cake {With Dry Ice Smoke}
- Flower Basket Cake {Basketweave}
- Easy 4th Of July Cake
- Father’s Day Cake {Tool Box Cake}
- Easy Beach Cake
- Bumblebee Cake {Spring Cake}
- Rainbow Sprinkle Cake
Recipe
Easy Pig Cake
Abeer Rizvi
Pin Recipe
Want to Save This Recipe?
Enter your email & I’ll send it to your inbox. Plus, get great new recipes from me every week!
By submitting this form, you consent to receive emails from CakeWhiz
Ingredients
- 2 Chocolate cakes Round, 8×2 each
- 3-4 cups Chocolate buttercream frosting
- 30 Kit Kats
- 1 cup Chocolate ganache
- 2 cups Marshmallow fondant Colored pink
- ⅓ cup Crushed Oreos
Instructions
-
Bake cakes and allow them to cool completely.
-
While the cakes and baking and cooling, prepare the frosting and ganache.
-
Place one cake on a serving dish.
-
Use a spatula to spread icing on top of the cake.
-
Place the other cake on top of the icing and press gently.
-
Cover the entire cake smoothly in icing.
-
Unwrap Kit Kats and stick them along the side of the cake fully.
-
Spread thick ganache on top of the cake. This will look like fake mud.
-
Make the pink pig and other body parts out of fondant. You could even do this a day in advance and save time.
-
Place these pieces on top of the cake and press them gently into the ganache mud.
-
Sprinkle some crushed Oreos on top of the cake and along the bottom of the cake.
-
Spread some ganache randomly on top of the pigs to make them look messy like they are truly enjoying themselves in the mud. Enjoy!
Notes
- Read all my tips above for best results.
- Leftovers can be stored in a sealed container in the fridge for up to 3 days. Please note that the fondant figures will become a little sticky due to the moisture in the refrigerator, which is normal.
Nutrition
An automated tool is used to calculate the nutritional information. As such, I cannot guarantee the accuracy of the nutritional information provided for any recipe on this site.
