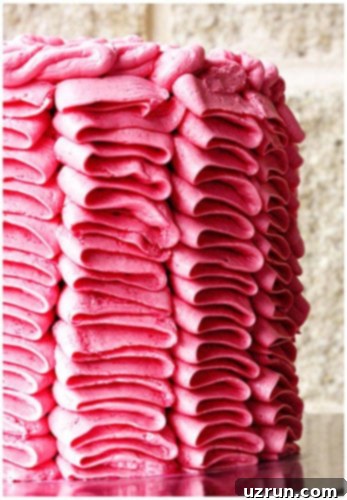
Effortless Elegance: The Ultimate Guide to Crafting Buttercream Ruffle Cakes with Tip 104
Welcome to this delightful and surprisingly simple cake decorating tutorial where you’ll master the art of creating a beautiful buttercream ruffle cake using just one versatile tool: Wilton’s Tip 104. This elegant design is perfect for adding a touch of sophistication to any celebration, from romantic Valentine’s Day gatherings to festive birthday parties and even elegant weddings. Get ready to impress your guests with a cake that looks complex but is incredibly easy to achieve!
My first encounter with this stunning cake design was through Martha Stewart’s exquisite creations, and I was immediately captivated. The sheer elegance that could be achieved with a single decorating tip was truly astounding. If you share my passion for visually appealing cakes, you might also enjoy exploring these Easy Cake Decorating Ideas, discovering creative Bundt Cake Decorating Ideas, and finding inspiration with these delightful Birthday Cake Ideas. While this ruffle cake can be made with either buttercream frosting or fondant, I strongly advocate for the buttercream technique. It’s not only quicker and simpler but also far more forgiving, making it an ideal choice for beginners and even those who have never attempted cake decoration before.
A little cautionary tale from my own experience: I once started decorating this cake when my kitchen was uncomfortably hot due to a malfunctioning air conditioner. This was a critical mistake! The buttercream softened considerably, making it incredibly challenging to pipe the delicate ruffles. Lesson learned – always ensure your workspace is cool for optimal frosting consistency. This humble experience reinforced the importance of proper preparation, a key factor we’ll dive into in our tips section.
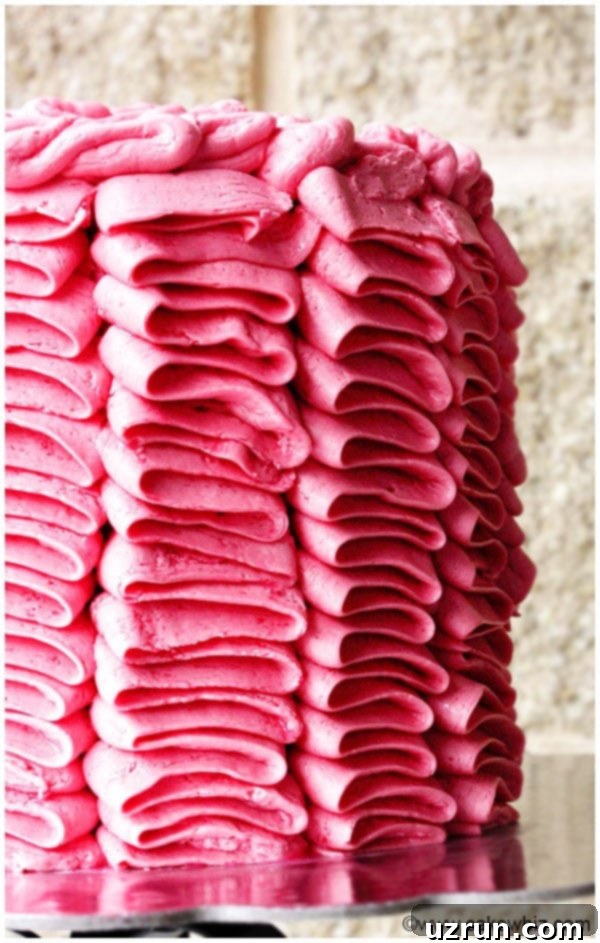
Table of contents
- This Easy Ruffle Cake Design is Perfect For:
- Key Ingredients for Your Ruffle Cake
- How to Make Buttercream Ruffle Cake (Step-by-Step)
- What is the Best Tip to Use for Piping Ruffles?
- Buttercream vs. Fondant Ruffle Cake
- Expert Tips and Techniques for Perfect Ruffles
- Creative Variations for Your Ruffle Cake
- Storage Tips for Your Decorated Ruffle Cake
- More Romantic Valentine’s Day Desserts
This Easy Ruffle Cake Design is Perfect For:
The beauty of the buttercream ruffle cake lies in its versatility and charming aesthetic. Its soft, flowing texture and elegant appearance make it suitable for a wide array of special occasions. Here’s why this cake is a fantastic choice for:
- Valentine’s Day: The delicate ruffles evoke a sense of romance and tenderness, making it a truly heartfelt treat for your loved ones. Consider pairing it with these enchanting Pink Desserts (Valentine’s Day Desserts).
- Mother’s Day: A beautiful and homemade ruffle cake is a wonderful way to show appreciation for mothers, grandmothers, and mother figures, symbolizing the soft, nurturing love they provide.
- Anniversary Parties: Celebrate enduring love and cherished milestones with a cake that exudes classic charm and timeless elegance.
- Birthday Parties for Girls: The whimsical and pretty ruffles are a dream come true for any girl’s birthday, adding a fairytale touch to the celebration.
- Weddings: While often associated with grandeur, a simpler tiered ruffle cake can offer a rustic yet sophisticated centerpiece, especially for smaller or more intimate ceremonies.
- Gender Reveal Parties: Use pastel blue or pink buttercream (or even both for a playful swirl!) to create a stunning reveal cake that is both delicious and visually exciting.
- Baby Showers: The soft, gentle appearance of the ruffles perfectly complements the sweet innocence of a baby shower, welcoming new life with grace.
Key Ingredients for Your Ruffle Cake
Creating a beautiful buttercream ruffle cake starts with the right foundation. While the decorating technique is the star, the quality and preparation of your cake and frosting are equally important for a successful outcome.
- Cake: You can choose any flavor you adore – vanilla, chocolate, red velvet, or even the classic Pink Velvet Cake suggested in our recipe. The most crucial detail is that your cake layers must be completely cooled to room temperature before you begin decorating. A warm cake will melt your frosting, making it impossible to pipe neat ruffles.
- Frosting: American buttercream frosting is the ideal choice for this design due to its stability and ease of piping. It can be easily colored with food coloring to match your party theme – pink for Valentine’s Day, pastels for a baby shower, or vibrant hues for a rainbow effect. The key is to ensure your frosting has a firm, yet workable consistency. It should hold its shape when piped but still be smooth enough to flow evenly from the tip. If it’s too soft, the ruffles will collapse; if too stiff, it will be hard to pipe smoothly. We’ll cover consistency adjustments in the tips section.
How to Make Buttercream Ruffle Cake (Step-by-Step)
Achieving those gorgeous, flowing buttercream ruffles is simpler than you might imagine. This technique transforms a plain cake into a work of art with minimal effort. Follow these steps for a stunning finish:
- Prepare Your Cake: Start with a two-layer, 8-inch round cake that has been completely cooled. Place your first cake layer on your chosen serving plate or cake stand.
- Fill and Stack: Spread a generous layer of your prepared American buttercream frosting evenly over the top of the first cake. Gently place the second cake layer on top, pressing down lightly to secure.
- Crumb Coat (The Secret Weapon): Apply a thin, even layer of frosting over the entire cake – top and sides. This is known as a “crumb coat” and is essential for trapping any loose crumbs and providing a smooth, stable base for your ruffles. Don’t worry about neatness at this stage; imperfections will be hidden.
- Chill the Cake: Refrigerate the crumb-coated cake for at least 30-45 minutes. This allows the frosting to firm up, creating a solid foundation that helps the piped ruffles adhere perfectly and prevents them from sliding.
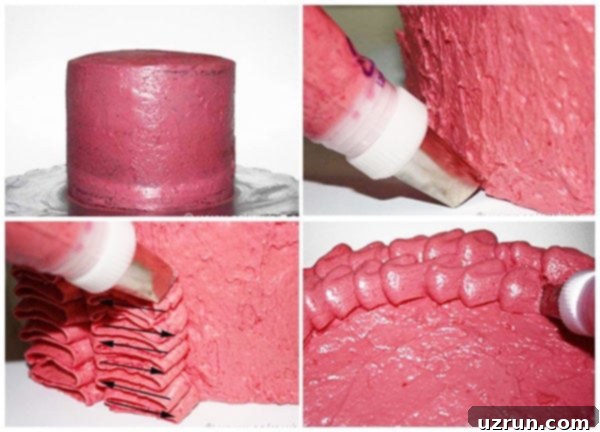
- Prepare for Piping: Once chilled, place your cake on a turntable for ease of rotation. Fill a piping bag fitted with Wilton Tip 104 with your desired colored buttercream. Ensure the broad end of the tip faces the cake, and the narrow end is facing you. Hold the piping bag at a 45-degree angle to the cake’s surface.
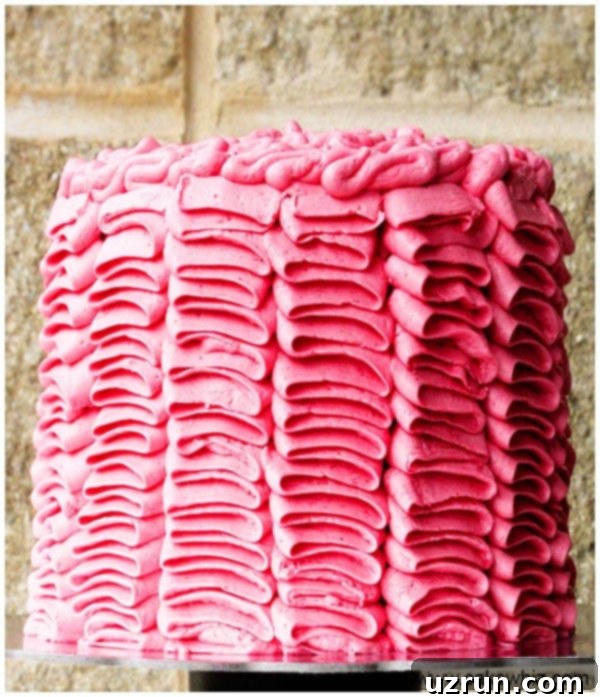
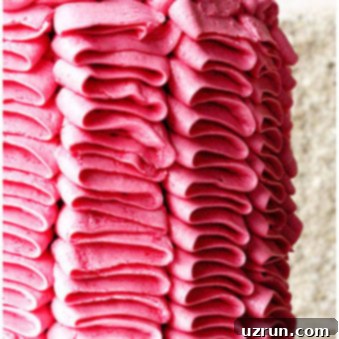
- Pipe the Ruffles: Starting at the very bottom edge of the cake, gently squeeze the piping bag and move it in a quick, controlled right-to-left motion (or left-to-right, depending on your dominant hand). As you pipe, slowly move your hand upwards, creating vertical columns of delicate, undulating ruffles. Continue this motion, piping column after column, until the entire side of the cake is covered. Work in sections, maintaining a steady pace.
- Decorate the Top: For the top of the cake, use the same technique. Start piping ruffles along the outer edge, working your way inwards in a spiral or concentric circles until the entire surface is adorned with beautiful ruffles.
- Clean Your Tip: A professional trick: before starting each new column of ruffles, quickly wipe the piping tip with a clean paper towel or Kleenex. This prevents frosting buildup and ensures each ruffle column is crisp and defined.
- Chill Again (Optional but Recommended): For maximum stability, especially in warmer environments, briefly chill the finished cake before serving.
What is the Best Tip to Use for Piping Ruffles?
The secret weapon behind these beautiful buttercream ruffles is a specific piping tip: Wilton’s Tip 104. This tip is also commonly known as the “petal tip” or “leaf tip.” Its unique design, featuring one broad, rounded opening and one narrow, tapered opening, is what allows you to create the characteristic wavy, ruffled effect with ease. When piping, the broad end should be closer to the cake surface, laying down a wider band of frosting, while the narrow end creates the delicate, folded edge that gives the ruffle its distinctive look. Mastering the angle and pressure with this tip is key, but with a little practice, you’ll be piping perfect ruffles in no time.
Buttercream vs. Fondant Ruffle Cake
While both mediums can achieve a ruffled look, the process and results differ significantly. A fondant ruffle cake typically involves rolling out fondant very thinly, cutting it into strips, and then meticulously ruffling the edges (often by hand or with a special tool) before attaching them to the cake with edible glue or a thin layer of icing. This method can be incredibly time-consuming and often requires a higher level of precision and patience. The resulting look is usually very sharp, structured, and architectural. In contrast, buttercream ruffles, created with Tip 104, offer a softer, more organic, and whimsical appearance. They are significantly quicker to create, much more forgiving for beginners, and generally preferred for their delicious flavor and texture compared to fondant, which some find less palatable. For ease, speed, and taste, buttercream ruffles are often the preferred choice.
Expert Tips and Techniques for Perfect Ruffles
Even though this cake is beginner-friendly, a few insider tips can elevate your decorating experience and ensure flawless results every time. Pay close attention to these techniques:
Don’t Work in a Hot Kitchen: As I learned the hard way, ambient temperature plays a crucial role. Heat causes butter in your frosting to soften and melt, losing its structure. This makes it incredibly difficult to pipe anything with definition, as the ruffles will simply collapse. Ensure your kitchen is cool and comfortable before you begin your decorating session.
Chill Your Crumb-Coated Cake Thoroughly: The crumb coat is more than just a crumb trap; it’s the anchor for your ruffles. By frosting the entire cake (top and sides) roughly and then chilling it in the fridge for 30-45 minutes, you create a firm, stable surface. This solid foundation allows the buttercream stacks to stick firmly along the sides of the cake without slipping or tearing, making the piping process much smoother.
Time-Saving Convenience Tip: Life can get busy, and there’s no shame in taking shortcuts! To save valuable time, feel free to use a high-quality cake mix for your layers and even store-bought frosting. If you opt for store-bought frosting, remember to chill it in the fridge for about 30 minutes. This will help it firm up to the ideal consistency required for piping detailed ruffles, as store-bought frostings are often softer than homemade versions.
Keep the Decorated Cake Refrigerated: Once your masterpiece is complete, it’s essential to keep it refrigerated until just before serving. This is especially crucial for buttercream ruffles, which can become too soft and lose their elegant shape, or even worse, slide down the cake, creating a messy situation, if left at room temperature for too long. Buttercream, particularly American buttercream, contains butter that needs to stay firm.
Aim for Evenly Sized Ruffles: To achieve a consistent and professional look, aim for ruffles of similar width. A simple trick is to gently mark vertical guidelines on your chilled, crumb-coated cake using a butter knife or a ruler. Use these marks as a guide for each column of ruffles, ensuring they are all approximately the same width and height. This little bit of pre-planning makes a big difference.
DON’T Rush, Go Slow and Steady: Cake decorating is an art that rewards patience. Resist the urge to rush through the piping process. Take your time, focus on each column, and maintain a consistent pressure on your piping bag. A slow and steady approach ensures that each ruffle column is neat, well-defined, and aligned properly, contributing to the overall beauty of your cake.
Perfect Frosting Consistency is Key: This is perhaps the most critical tip. Your buttercream should not be so firm that you struggle to squeeze the piping bag, causing hand cramps and jagged ruffles. Conversely, it must not be so soft that it oozes uncontrollably from the tip or fails to hold its shape, resulting in collapsed ruffles. The ideal is a “medium consistency” – it should be pliable enough to pipe smoothly with moderate pressure but firm enough to retain sharp edges and hold its form. If your frosting is too soft, add a tablespoon of powdered sugar at a time and mix well. If it’s too stiff, add a teaspoon of milk or cream and mix until desired consistency is achieved.
Creative Variations for Your Ruffle Cake
Once you’ve mastered the basic buttercream ruffle technique, the possibilities for customization are endless. Get creative with colors, flavors, and embellishments to make your ruffle cake truly unique:
Rainbow Pattern: Don’t let leftover colored frostings go to waste! Use them to create a vibrant and cheerful rainbow-themed ruffle cake. You can pipe alternating colored columns, or create distinct bands of color around the cake for a stunning visual effect. This is a fantastic way to utilize small batches of leftover buttercream from previous projects.
Do an Ombre Design: For an elegant and sophisticated touch, try an ombre effect. This involves using varying shades of the same colored frosting, gradually transitioning from dark to light (e.g., dark pink at the bottom, graduating to medium pink, and then light pink at the top). This creates a beautiful, gradient appearance that is incredibly eye-catching. Our Blue Ombre Cake provides excellent inspiration for this technique.
Make a Tiered Wedding Cake: This versatile ruffle technique isn’t limited to single-layer cakes. For grander occasions like weddings or large celebrations, you can apply this same decorating method to a tiered cake. Start by crumb coating and chilling each tier separately, then apply the ruffles. Assemble the tiers carefully once all ruffles are complete for a truly magnificent display.
Try Other Frostings: While American buttercream is fantastic, don’t hesitate to experiment with different frosting flavors and textures once you’re comfortable with the piping. Consider using a refreshing Easy Mint Frosting for a cool twist, or a fruity Blackberry Buttercream Frosting for a burst of flavor. Just ensure your chosen frosting has the right consistency to hold the ruffle shape.
Decorate the Top: While a simple swirl of icing on top is perfectly lovely, you can further enhance your ruffle cake by adding extra decorations to the top. Consider arranging fresh edible flowers for a natural, romantic look, or adorn it with seasonal fresh fruits, especially berries, for a pop of color and freshness. Sprinkles, chocolate shavings, or even a personalized cake topper can also add a delightful finishing touch.
Storage Tips for Your Decorated Ruffle Cake
Proper storage is essential to keep your buttercream ruffle cake fresh and beautiful. Here’s how to ensure your masterpiece lasts as long as possible:
Refrigerate: For optimal freshness and to maintain the integrity of the buttercream ruffles, store your decorated cake in a sealed, airtight container in the refrigerator. It will stay delicious for up to 3 days. Allowing it to come to room temperature for about 30 minutes before serving will ensure the cake is soft and the frosting is creamy.
Freeze (Undecorated Components Only): While decorated cakes generally do not freeze well (as the frosting can change texture upon thawing), you can freeze individual components. Undecorated cake layers can be wrapped tightly in plastic wrap and then foil, and stored in a sealed container for up to 1 month. Similarly, excess buttercream frosting can be stored in an airtight container for up to 1 month. Thaw both in the refrigerator overnight before assembling and decorating your fresh cake.
Room Temperature (Not Recommended): Due to the dairy content in buttercream frosting (milk, butter), leaving a decorated cake at room temperature for more than a few hours is not recommended. The frosting can soften significantly, causing the ruffles to collapse, and it poses a food safety risk as dairy products can spoil quickly. Always err on the side of caution and refrigerate.
More Romantic Valentine’s Day Desserts
If you’re looking to expand your dessert repertoire for Valentine’s Day or other romantic occasions, consider these other delightful recipes that are sure to capture hearts:
- Raspberry Mousse Cake
- Chocolate Marshmallow Cake
- Mini Love Letter Cakes
- Easy Love Cake
Recipe
Buttercream Ruffle Cake
Abeer Rizvi
Pin Recipe
Want to Save This Recipe?
Enter your email & I’ll send it to your inbox. Plus, get great new recipes from me every week!
By submitting this form, you consent to receive emails from CakeWhiz
Ingredients
- 2 Pink velvet cake Both cakes should be round and 8 inches
- 6-8 cups American buttercream frosting Colored pink
Instructions
-
Bake two 8-inch round cakes of your preferred flavor and allow them to cool completely on a wire rack. This is crucial to prevent the frosting from melting.
-
Once cooled, place one cake layer on your desired cake stand or serving dish.
-
Using an offset spatula, spread a generous and even layer of American buttercream frosting over the top surface of this first cake layer.
-
Carefully place the second cake layer directly on top of the frosting, gently pressing down to ensure it is secure and level.
-
Next, apply a thin layer of icing all over the top and sides of the stacked cake. This is your “crumb coat,” which traps any loose crumbs. Don’t worry about making it perfectly smooth; the ruffles will beautifully hide any imperfections!
-
Chill the crumb-coated cake in the refrigerator for about 30-45 minutes. This allows the crumb coat to firm up, creating a stable base for the intricate ruffles.
-
Once chilled, place your cake on a turntable. This will make rotating the cake while piping significantly easier.
-
Fill a piping bag with your pink-colored buttercream frosting and attach Wilton Tip 104. Remember, the tip has a broad end and a narrow end. The broad end should consistently face the cake, while the narrow end should be pointing towards you. Hold the piping bag at a 45-degree angle to the cake. Now, apply steady pressure and begin squeezing the bag, moving your hand quickly from right to left (or left to right, depending on your comfort). As you make these horizontal movements, gently move the tip upwards to create beautiful vertical columns of ruffles.
-
PRO TIP: Before piping each new column of ruffles, use a clean tissue or paper towel to wipe off any excess frosting from the tip. This simple step ensures that every column you pipe looks crisp, clean, and perfectly defined.
-
For the top of the cake, apply the same piping technique. Start along the outer edge of the cake’s top surface and continue working your way inwards in a spiral motion until the entire top is elegantly covered in ruffles. Your gorgeous buttercream ruffle cake is now ready to be enjoyed!
Notes
- For best results, review all the detailed tips and techniques provided in the article above before you start decorating.
- Leftover cake can be stored in a sealed, airtight container in the fridge for up to 3 days, maintaining its freshness and flavor.
Nutrition
An automated tool is used to calculate the nutritional information. As such, I cannot guarantee the accuracy of the nutritional information provided for any recipe on this site.
