How to Make Royal Icing: The Ultimate Guide for Perfect Sugar Cookies & Cake Decorations
Welcome to your comprehensive guide on mastering royal icing! This tutorial will walk you through creating a quick, easy, and reliable royal icing recipe that dries hard, tastes fantastic, and is perfect for piping intricate details and decorating beautiful sugar cookies. Whether you’re a beginner or looking to refine your technique, this recipe and our expert tips will help you achieve professional-looking results every time.
When I first ventured into the world of cake and cookie decorating, royal icing was a complete mystery. I remember trying to use it for cupcakes, only to be met with bizarre, crusty tops – a rather comical learning experience! Thankfully, I’ve learned a tremendous amount since then, and today, I’m thrilled to share all my knowledge, answering the most common questions and demystifying this versatile frosting.
This quick and easy royal icing recipe is ideal for piping and decorating sugar cookies. It dries hard and tastes great, making your decorated treats perfect for any occasion.
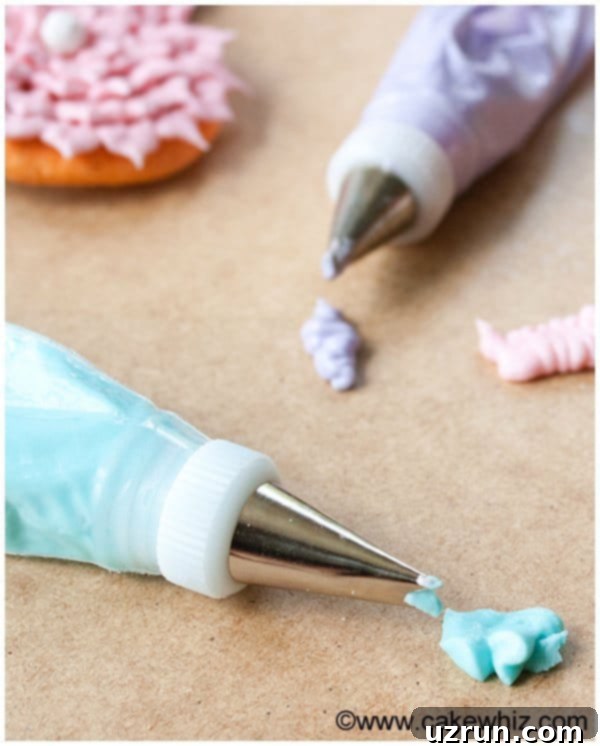
Royal icing is a decorator’s best friend, especially during the festive holiday season. Its ability to dry completely hard means your beautifully decorated cookies can be stacked, packed, and even shipped to friends and family without fear of smudging or damage. This durability makes them excellent party favors or gifts that truly impress.

The Secret to Flavorful Royal Icing: High-Quality Extracts
The quality of your ingredients significantly impacts the final taste of your royal icing. I am a huge admirer of Rodelle extracts and incorporate them frequently into my baking, particularly in frostings. Their products boast high quality with strong, authentic flavors and aromas that truly elevate any recipe.
While classic royal icing typically calls for vanilla extract, Rodelle offers a delightful array of other amazing extracts that can transform your creations. Imagine the warm, inviting scent of their pumpkin spice extract – it’s absolutely heavenly and perfect for Thanksgiving and fall-themed cookies! Beyond extracts, you can also experiment with spices like turmeric or cinnamon powder for unique flavor profiles and natural coloring. Just remember, turmeric will naturally tint your icing a beautiful yellow hue.
Understanding Royal Icing: What it is, Tastes Like, and Its Primary Uses
So, what exactly is royal icing? It’s a type of frosting renowned for its smooth finish and exceptional hardness once dry. It’s primarily composed of meringue powder (or egg whites), powdered sugar, and liquid (usually water), often flavored with extracts. It tastes distinctly sweet and typically carries a prominent vanilla flavor, though this can be customized with other extracts as mentioned above. When dry, it has a crisp texture that melts delightfully in your mouth.
Royal icing is the go-to choice for decorating sugar cookies, creating intricate piped designs, delicate scrollwork on cakes, and even forming edible flowers. Its quick-drying and hard-setting properties make it indispensable for achieving detailed, structured, and transport-friendly baked goods.
If you’re looking for the perfect canvas for your royal icing art, here are two of my most popular cut-out cookie recipes that pair wonderfully with this icing:
- Perfect Sugar Cookies (a small batch recipe that can easily be doubled)
- Perfect Chocolate Sugar Cookies
How to Make Royal Icing with Meringue Powder: A Step-by-Step Guide
Making royal icing might seem daunting, but with meringue powder, it’s incredibly straightforward. This method combines dried egg whites (meringue powder) with powdered sugar (also known as icing sugar or confectioners’ sugar) and water, then beats the mixture until stiff peaks form. Flavoring and coloring are then added to complete the process.
The use of meringue powder makes this recipe safe and convenient, eliminating concerns about raw egg whites while still providing the essential structure needed for royal icing’s signature hard finish. The key is proper mixing and careful attention to consistency, which we’ll cover in the recipe section.
Why Choose Royal Icing? Applications and Benefits
Royal icing is chosen for its unique properties that other frostings simply cannot replicate. It’s used for any cake, cupcake, or cookie decoration that requires a dry, hard, and non-spreading finish. This makes it ideal for:
- Cookie Decorating: From simple flooded designs to complex patterns, royal icing creates beautiful, durable decorated cookies perfect for gifts or party favors.
- Intricate Piping: Its ability to hold fine lines makes it perfect for detailed scrollwork, lace designs, and delicate borders on cakes and cookies.
- Edible Decorations: You can pipe flowers, figures, or other decorative elements onto wax paper, let them dry, and then apply them to your baked goods.
- Gingerbread Houses: It acts as a powerful edible glue, holding together the structural components of gingerbread houses.
- Durability and Transport: Once dry, items decorated with royal icing are resistant to smudging and can be safely stacked, packaged, and shipped.
Coloring Royal Icing for Vibrant Creations
Achieving vibrant and consistent colors in your royal icing is crucial for stunning decorations. The best way to color royal icing is by using gel food coloring. Unlike liquid food coloring, gel colors are highly concentrated and won’t significantly alter the consistency of your icing, which is vital for proper drying and stability.
When aiming for dark colors, especially black royal icing, patience is key. Add black gel color gradually, mix thoroughly, and then allow the icing to sit for at least 6 hours, or even overnight. This resting period allows the color to develop and deepen to a rich, true black. Rushing this step might result in a gray or muted black instead of the intense shade you desire.
Royal Icing on Cakes: Decoration vs. Covering
It’s important to clarify a common misconception: you should **never** use royal icing to completely cover an entire cake. Royal icing dries very hard, creating an unappealing, crusty texture that is not enjoyable for a whole cake. For covering cakes, soft buttercream frosting is the appropriate choice.
However, royal icing is absolutely excellent for adding decorative elements onto your cakes, such as delicate piped flowers, intricate lace patterns, or decorative borders. These elements can be piped directly onto a buttercream-covered cake or created as royal icing transfers (more on this below) and then affixed to the cake.
For luscious, soft cakes, here are some of my favorite buttercream frosting recipes that will never dry hard:
- Classic American Buttercream Frosting
- Best Cream Cheese Frosting
- Seven Minute Frosting
- Healthy Coconut Cream Chocolate Frosting
- Mocha Frosting
- Mango Frosting
- Seedless Strawberry Frosting
- Easy Orange Buttercream Icing
- Cooked Buttercream Icing (with flour)
- Cooked Chocolate Buttercream Icing (with flour)
Crafting Beautiful Royal Icing Flowers
Royal icing is a fantastic medium for creating stunning edible flowers. Any flower design you can pipe with buttercream can also be made with thick royal icing. The significant advantage of royal icing flowers is their durability. Once dried and hardened, these delicate creations can be stored for months in a cardboard box at room temperature, protected from moisture, humidity, and direct sunlight. This allows you to prepare decorations well in advance, saving time for special occasions.
For a detailed guide, check out this tutorial on how to make easy royal icing flowers.
Troubleshooting Royal Icing: Common Issues and Solutions
Even experienced decorators can encounter issues with royal icing. Here are the most common problems and how to resolve them:
Why is my Royal Icing not hardening?
If your royal icing isn’t drying properly, it could be due to one of these four reasons:
- Grease Contamination: Royal icing is extremely sensitive to grease. Any oily residue from oil, shortening, or butter on your mixing bowl or utensils can interfere with the egg whites or meringue powder, preventing the icing from setting. Always ensure all your equipment is squeaky clean and grease-free.
- Old or Compromised Ingredients: If your egg whites aren’t fresh (if using fresh) or your meringue powder is old, it might not whip up correctly or dry hard. Always check expiration dates and consider replacing your ingredients if you suspect they are the cause.
- Oil-Based Extracts: While many extracts are alcohol-based, some are oil-based. Oil-based extracts can significantly delay the drying time of royal icing and, in some cases, prevent it from hardening altogether. Stick to water or alcohol-based extracts for best results.
- High Humidity: Living in a very humid climate can be challenging for royal icing. The excess moisture in the air can significantly delay the drying process, making it difficult for the icing to set hard. Using a dehumidifier or directing a fan towards your decorated items can help speed up drying in such conditions.
Why is my Royal Icing too runny?
If your royal icing is too runny, it almost always means you’ve added too much liquid to your recipe. The solution is simple: gradually add more powdered sugar, about a tablespoon at a time, mixing well after each addition, until you reach the desired consistency.
Is Royal Icing Safe to Eat?
Yes, royal icing made with meringue powder or pasteurized egg whites is absolutely safe to eat. Concerns about raw egg whites are alleviated by using meringue powder, which is dried, pasteurized egg white, or by ensuring you use pasteurized liquid egg whites if opting for fresh.
Common Royal Icing Additives: Lemon Juice, Glycerin, and Cream of Tartar
Some royal icing recipes include additional ingredients like lemon juice, glycerin, or cream of tartar, each serving a specific purpose:
- Glycerin: This is sometimes added in small amounts to prevent the royal icing from becoming excessively hard or brittle, giving it a slightly softer bite.
- Lemon Juice or Cream of Tartar: These acidic ingredients are often included to help stabilize the egg whites, contributing to a stronger and more stable icing structure and sometimes enhancing the whiteness.
However, it’s worth noting that a well-balanced, easy royal icing recipe can still work perfectly without these additives, as demonstrated by the recipe shared here. My simple recipe achieves excellent stability and hardness without the need for additional stabilizers or softeners.
Understanding Royal Icing Consistencies: Thick vs. Flood
One of the keys to successful royal icing decorating is understanding and mastering different consistencies:
- Thick Royal Icing (Outline Consistency): This consistency is similar to toothpaste. It’s firm enough to hold its shape, making it ideal for piping outlines on cookies, creating intricate details, and forming sturdy royal icing flowers.
- Flood Royal Icing (Filling Consistency): Also known as “runny” or “10-20 second” consistency, this is a thinner version of royal icing. It’s used to fill in the areas outlined by thick icing, creating a smooth, even surface. To achieve flood consistency, you simply add small amounts of water (about ¼ teaspoon at a time) to your thick royal icing, mixing until it reaches a consistency similar to corn syrup or until a line drawn through the icing disappears within 10-20 seconds.
Proper Storage for Royal Icing and Decorations
Proper storage is essential to maintain the quality and usability of your royal icing.
Where to Store Prepared Royal Icing:
Once mixed, royal icing must be stored in an airtight, sealed container. To prevent it from drying out on the surface, I always recommend pressing a layer of plastic wrap (saran wrap) directly onto the surface of the icing before sealing the container with a tight-fitting lid. Store it at room temperature, away from excessive humidity and direct sunlight. Exposure to air will cause it to dry out very quickly and form a crust.
Where to Dry and Store Royal Icing Flowers:
Royal icing flowers and other piped decorations need to dry completely to harden. They can be dried at room temperature on parchment paper or a non-stick mat. Using a small fan can significantly speed up the drying process. Once fully dried and hardened, these durable decorations can be carefully placed in a cardboard box (which allows for air circulation while protecting from dust) and stored away from moisture, humidity, and direct sunlight. Stored correctly, they will last for months, ready to be used to adorn cakes, cupcakes, and cookies as needed.
Royal Icing vs. Other Frostings: Clearing Up the Confusion
It’s common to confuse royal icing with other popular cake and cookie decorating mediums, but they are distinctly different:
- Royal Icing vs. Fondant: No, they are not the same. Royal icing is a frosting that dries hard and brittle. Fondant, on the other hand, is a thick, pliable sugar dough that is soft and elastic. It’s primarily used to cover entire cakes, creating a smooth, sculptural finish, or for making molded decorations.
- Royal Icing vs. Buttercream Frosting: Again, no, these are not interchangeable. Buttercream icing is made by creaming butter (or shortening) with powdered sugar, often with milk/cream and flavorings. It’s known for its soft, creamy texture and is used for filling, frosting, and piping soft decorations on cakes and cupcakes. Unlike royal icing, buttercream does not dry hard; it remains soft and creamy.
- Royal Icing vs. Glaze Icing: While both are used for cookie decorating and dry hard, they are different. Glaze icing (sometimes called “powdered sugar glaze”) typically uses powdered sugar and milk/water, and crucially, it is egg-free. It dries with a lovely glossy finish. Glaze icing is an excellent alternative for those with egg allergies and can even be made vegan by using dairy-free milk. Some refer to it as “royal icing without eggs,” which captures its egg-free nature and similar application. You can find my glaze icing recipe here.
What Are Royal Icing Transfers?
Royal icing transfers are an ingenious cake and cookie decorating technique that allows you to create intricate designs with precision and efficiency. The process involves piping a design onto a sheet of wax paper, parchment paper, or a clear plastic sheet. You then allow the royal icing to dry completely and harden. Once dry, you can carefully peel the hardened design off the surface and then attach it to your cookies, cakes, or cupcakes using a small dab of fresh royal icing. This method is fantastic for creating multiple identical designs, complex freehand patterns, or delicate elements that might be challenging to pipe directly onto your final product.
Can You Make Royal Icing Without an Electric Mixer?
Unfortunately, no. Royal icing requires significant beating to incorporate air and achieve the necessary stiff peaks and volume. Trying to do this by hand would be an exhaustive and likely unsuccessful endeavor. A stand mixer or an electric hand mixer is essential for properly aerating the mixture and developing the correct consistency.
How Much Royal Icing is Needed for a Gingerbread House?
Royal icing serves as the perfect “mortar” for gingerbread houses, providing a strong, edible adhesive that dries hard and holds all the pieces together. The exact amount of icing you’ll need truly depends on the size and complexity of your gingerbread house. For basic small to medium-sized gingerbread houses, the small batch royal icing recipe I’m sharing today should be more than sufficient. For larger, more elaborate structures, you may need to double or triple the recipe.
For a detailed guide on creating festive edible structures, be sure to check out my gingerbread house tutorial, especially as Christmas approaches!
Recipe

How to make Royal Icing (For Cookie Decorating)
Abeer Rizvi
Pin Recipe
Want to Save This Recipe?
Enter your email & I’ll send it to your inbox. Plus, get great new recipes from me every week!
By submitting this form, you consent to receive emails from CakeWhiz
Ingredients
- 1 ½ tablespoon Meringue powder
- 3 tablespoon Warm water NOT hot
- ½ tablespoon Light corn syrup
- 2 cups Powdered sugar
- 1 teaspoon Vanilla extract
Instructions
-
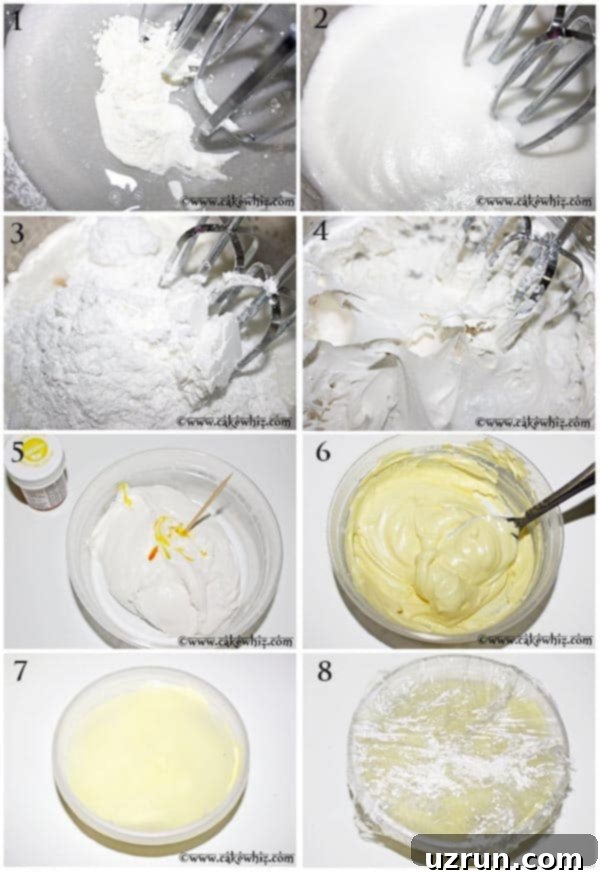
In a deep bowl, add meringue powder and warm water.
-
Beat this for about 1 minute until you have a white and frothy mixture.
-
Add powdered sugar, corn syrup and vanilla extract and start mixing at medium to medium-high speed.
-
Continue mixing until your icing becomes thick and peaks start forming, as shown in this picture. This usually takes about 5 minutes of mixing at high speed.
Note: This icing is at the “thick consistency stage.” You can add some water to thin it out if you need your icing to be thinner. Please remember that a little water goes a LONG way. Add only ¼ teaspoon water at a time and make sure to mix properly again.
-
You can now color your icing with gel colors. Use a toothpick to add gel colors into your icing.
-
Mix with a spoon until the color is fully blended into your icing.Note: The color of your icings will get deeper and better the longer they sit.
-
This icing dries very quickly, if exposed to air. Make sure you store it in a plastic container with a tight lid.
-
Also, cover your entire container in saran wrap.
Video
Notes
- Use this icing immediately for your decorations OR allow it to sit at room temperature (fully sealed) until needed.
- Use within 1 week. But, remember that you will have to whip it again because this icing has a tendency to separate into sugar and water, the longer it sits.
- This is a small batch royal icing recipe and yields about 1 ½ cups of icing. It’s great for times when you just need to decorate a few cookies.
- Recipe can easily be doubled or tripled.
- Outline icing should be the consistency of toothpaste and filling or flooding icing should be the consistency of corn syrup.
- For true white icing, use clear extract to avoid discoloration OR use white gel coloring.
Nutrition
An automated tool is used to calculate the nutritional information. As such, I cannot guarantee the accuracy of the nutritional information provided for any recipe on this site.
