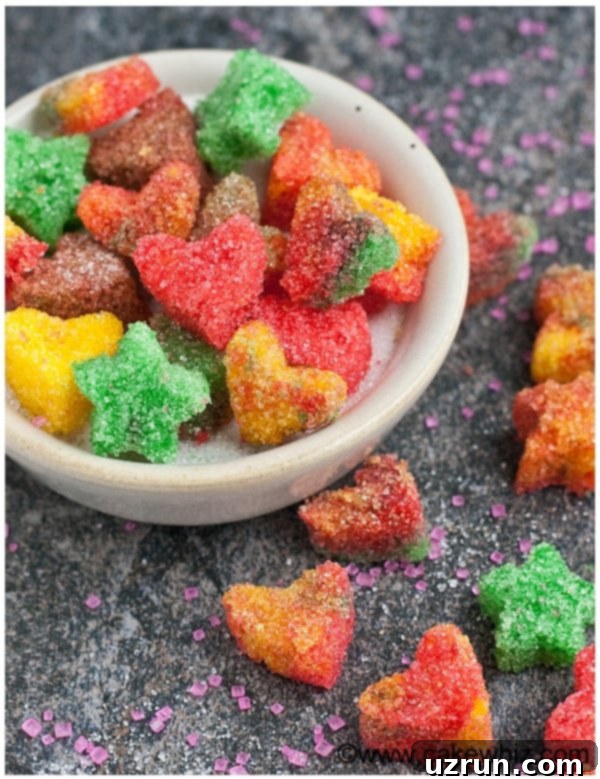
The Ultimate Guide to Homemade Sugar Cubes: Easy DIY Recipe for Any Shape, Size & Color
Imagine effortlessly adding a touch of personalized elegance to your next tea party, sweetening your coffee with a custom-shaped sugar gem, or decorating your desserts with dazzling, edible art. This comprehensive guide will show you how to master the simple craft of making homemade sugar cubes using just three basic ingredients. Whether you desire classic white cubes, vibrant colored shapes, or delightfully flavored pieces, the possibilities are endless!
For many of us, sugar cubes were a nostalgic staple readily found in grocery stores during our childhood. However, their presence on modern shelves has become increasingly rare. This simple shift has inspired a delightful return to DIY kitchen projects, and learning how to make your own sugar cubes from scratch is incredibly rewarding. It’s a fun and easy sugar craft, much like creating intricate Royal Icing Flowers (Sugar Flowers), shimmering Sugared Cranberries (Candied Cranberries), or even playful Homemade Sprinkles. Get ready to impress your guests and elevate your sweet treats with these charming, custom-made sugar creations!
Just 3 Simple Ingredients for DIY Sugar Cubes
The beauty of crafting your own sugar cubes lies in its simplicity. You won’t need an extensive list of obscure ingredients; in fact, you likely have everything you need in your pantry right now. Precision in measurement, especially with water, is the key to success. Here’s a closer look at the essential components:
- Granulated Sugar: This is the cornerstone of your sugar cubes. Standard white granulated sugar works perfectly due to its fine texture and ability to bind when moistened. It provides a clean canvas for coloring and flavorings. While brown sugar can be used for a different flavor profile, it won’t take on vibrant colors. Powdered (confectioners’) sugar or artificial sweeteners are not suitable for this recipe as they won’t form stable cubes.
- Water: The magical binder! Water activates the sugar crystals, allowing them to stick together and harden into solid shapes. The exact amount is crucial: too little, and your mixture will be too crumbly to mold; too much, and the sugar will dissolve into a syrup. We recommend starting with a small amount and adding it gradually.
- Food Coloring (Optional): For adding a pop of color and personalizing your sugar cubes, food coloring is your best friend. We highly recommend using gel food colors. These are more concentrated and vibrant than liquid food colorings, requiring only a tiny amount to achieve rich hues. Liquid food coloring can add too much moisture, making the sugar mixture overly wet and difficult to shape.

How to Make Sugar Cubes from Scratch: A Detailed Step-by-Step Guide
Crafting your own sugar cubes is a straightforward and enjoyable process that takes minimal active time. The key is to achieve the right consistency for your sugar mixture and allow ample drying time. Follow these steps carefully for perfect, durable sugar creations:
- Prepare the Sugar Mixture: In a small bowl, combine your granulated sugar with the initial recommended amount of water. Mix everything thoroughly, ideally with a fork or your fingertips, until you achieve a consistency resembling damp sand. It should be crumbly but, when squeezed in your hand, it should hold its shape. If it’s too dry, add water one drop at a time; if too wet, mix in a little more sugar. This “wet sand” texture is vital for successful molding.
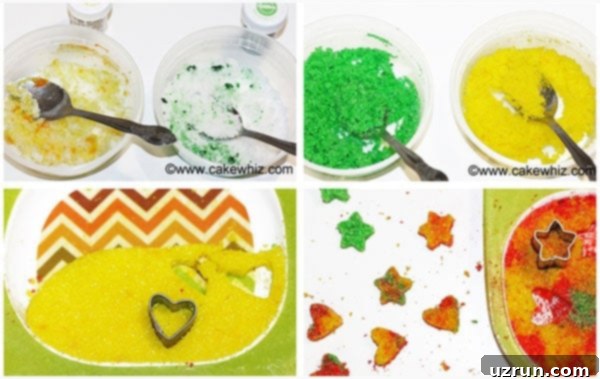
- Color the Mixture (Optional): If you plan to make colored sugar cubes, now is the time to add your gel food coloring. Divide the prepared sugar mixture into separate small bowls for each color you wish to create. Add a tiny drop of gel coloring to each bowl and mix vigorously with a spoon until the color is evenly distributed throughout the sugar. Remember, gel colors are highly concentrated, so start with very little and add more as needed to reach your desired shade.
- Shape Your Sugar Cubes: This is where your creativity shines! You have a couple of fantastic options for shaping:
- Using Mini Cutters: For intricate designs like hearts or stars, spread the sugar mixture evenly onto a flat surface, such as a cookie tray lined with parchment paper. Use your hands to press the mixture down very firmly and tightly, ensuring there are no air pockets. Then, press your small cookie cutters into the compacted sugar to create individual shapes. Carefully lift the cutter and gently tap it to release the sugar piece onto a separate sheet of wax paper.
- Using Candy Molds: For classic cube shapes or other consistent designs, silicone candy molds are incredibly easy to use. Simply fill each cavity of the mold with the crumbly sugar mixture, pressing it down firmly with your fingers or the back of a spoon. Ensure the sugar is tightly packed into every corner of the mold for well-defined shapes.
- Allow to Dry and Harden: This is arguably the most important step for durability. If using cutters, leave the delicate sugar pieces undisturbed on the wax paper where you placed them. If using molds, leave the sugar mixture in the molds. Let them dry completely at room temperature, away from any moisture or humidity. This process typically takes at least 6-8 hours, but for best results, allow them to dry overnight or even for 24 hours, especially in humid climates. They should be rock-hard before handling or removing.
- Enjoy and Store: Once fully hardened, gently release the sugar cubes. If they were made with cutters, they should lift easily from the wax paper. If using molds, carefully flip the mold over onto a sheet of wax or parchment paper, and the cubes should fall out effortlessly. Your beautiful homemade sugar cubes are now ready to be used! Store them in an airtight container or a covered box away from heat, moisture, and direct sunlight. They can be stored at room temperature for up to one month, or even longer, maintaining their perfect shape and freshness.

Creative Uses for Your Homemade Sugar Cubes
Beyond their traditional role, homemade sugar cubes offer a delightful way to personalize and elevate various culinary experiences. Their customizable nature makes them incredibly versatile:
- Sweetening Beverages with Style: This is their most iconic application. Offer an array of your custom sugar cubes alongside hot beverages like tea, coffee, lattes, or hot chocolate. For a more sophisticated touch, present them with champagne, sparkling wine, or cocktails. Guests will appreciate the charming presentation and the ability to sweeten their drinks to their personal preference. Imagine a holiday tea party with star-shaped sugar cubes or a bridal shower with heart-shaped ones.
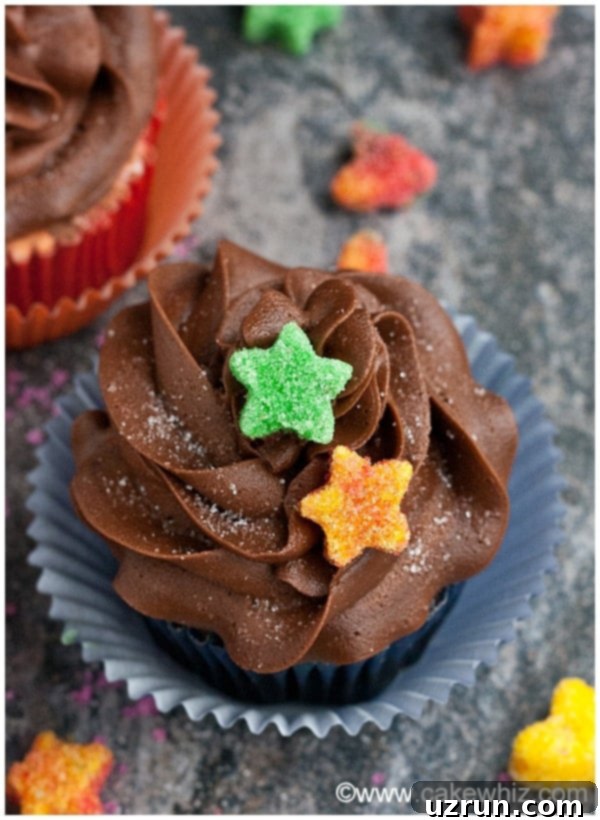
- Decorating Desserts with Edible Art: Elevate your baked goods from simple treats to stunning showstoppers. Place small, colorful sugar cubes on top of frosted cakes, cupcakes, brownies, or cookies. They add a beautiful textural element and a pop of color, making your desserts even more appealing. For themed parties, use corresponding sugar shapes – think tiny ghosts for Halloween cupcakes or festive trees for Christmas cookies.
- Thoughtful Homemade Gifts: Handcrafted gifts carry a special charm, and homemade sugar cubes are no exception. Package an assortment of your uniquely shaped and colored sugar cubes in a decorative jar, cellophane bag, or small gift box. They make a wonderfully personal and edible present for hostesses, teachers, neighbors, or as party favors for any special occasion.
- Serving at Elegant Parties and Gatherings: Whether it’s a sophisticated afternoon tea, a baby shower, a wedding reception, or a festive cocktail hour, a beautiful display of homemade sugar cubes instantly adds an element of refined charm. Arrange them on a pretty tiered tray or in small, elegant dishes to enhance your table setting and impress your guests.
Exciting Variations to Customize Your Sugar Cubes
One of the most enjoyable aspects of making sugar cubes at home is the freedom to experiment and customize them to suit any occasion, taste, or aesthetic. Unleash your creativity with these fantastic variations:
- Experiment with Shapes and Sizes: Your imagination is the only limit! While classic cubes are always an option, mini cookie cutters allow for endless possibilities. We love making charming sugar hearts and sugar stars, but you can also try tiny flowers, leaves, letters, numbers, or seasonal shapes like snowflakes, pumpkins, or bunnies. Silicone molds offer even more intricate and consistent shapes.
- Play with Colors: Create stunning visual effects by using a variety of gel food colorings. Beyond single colors, try creating ombre sets (graduated shades of one color) or mixing partially for a marbled effect. Remember, gel colors are highly recommended for their intensity and minimal liquid content, ensuring your sugar mixture remains the right consistency.
- Infuse with Extracts for Flavor: Add a drop or two of your favorite food-grade extract to the sugar mixture along with the water for a burst of flavor. Popular choices include:
- Classic: Vanilla, almond, peppermint (especially for holiday treats).
- Citrus: Lemon, orange, lime.
- Floral: Rosewater, lavender.
- Spiced: Cinnamon, ginger.
- Gourmet: Coffee, rum, maple.
This elevates the taste experience of any beverage or dessert they accompany.
- Incorporate Citrus Zests: For a fresh and aromatic touch, finely grate the zest of an orange, lemon, or lime directly into your granulated sugar before adding water. The natural oils in the zest will infuse the sugar with a delightful fragrance and a subtle, bright flavor, perfect for enhancing teas or cocktails.
- Craft Rainbow or Marbled Cubes: To achieve a beautiful rainbow or marbled effect, prepare several small batches of sugar mixture, each colored differently. Then, combine small portions of these different colored mixtures on your work surface, gently swirling them together without fully blending. Press this partially mixed sugar firmly into molds or onto a flat surface for cutting. The result will be stunning multi-colored sugar pieces.
- Decorate Desserts Effectively: When using your custom sugar cubes to decorate cakes, cupcakes, or other moist desserts, it is absolutely crucial that the sugar pieces are completely dry and firm. If they are still soft, the moisture from the frosting or dessert can cause them to soften further, lose their shape, or even dissolve, ruining your decoration.

Essential Tips and Techniques for Perfect Sugar Cubes
While making homemade sugar cubes is simple, a few expert tips can ensure your success and help you achieve perfectly formed, durable, and beautiful results every time. Pay close attention to these techniques to avoid common pitfalls:
- Measure Ingredients Properly: This cannot be stressed enough, especially for the water. Precision is paramount. Do not estimate or eyeball the water quantity. If you add too much water, the sugar will dissolve rather than bind, resulting in a sticky, syrupy mess instead of a crumbly, packable mixture. Always use measuring spoons for accuracy.
- Choosing Between Cutters and Molds:
- Molds: Silicone candy molds are generally easier to use, especially for beginners. They provide consistent shapes and are less prone to breakage during shaping.
- Cutters: Mini cookie cutters offer more intricate design options. However, the sugar pieces will be more fragile immediately after cutting, requiring very gentle handling.
- Water Quantity May Vary: Environmental factors like humidity play a significant role. In high-humidity areas, you might need slightly less water than indicated, while in very dry climates, you might need a tiny bit more. Always start with the recommended amount (e.g., 1 tablespoon per cup of sugar) and use a dropper to add additional water, one drop at a time, until you reach that ideal crumbly, “wet sand” consistency that holds its shape when pressed.
- Let Them Dry Completely: This is crucial! Shaped sugar pieces are very delicate when fresh. If using cutters, don’t try to move them too much before they harden, or they will break. If using a mold, allow the sugar mixture to dry entirely within the mold (overnight is usually best, or even 24 hours in humid conditions). Once completely dry and firm, gently flip the mold over onto a sheet of wax paper or parchment paper, and the hardened cubes should fall out effortlessly.
- How to Adjust Sugar Mixture Consistency:
- To thicken a too-thin mixture (too wet): Gradually mix in a small amount of additional granulated sugar until the mixture reaches the desired crumbly, yet packable, consistency.
- To make a too-thick mixture thinner (too dry): Add water one tiny drop at a time, mixing thoroughly after each addition until the sugar is just moist enough to hold its shape when compressed.
- Granulated Sugar vs. Other Sugars:
- Granulated Sugar: Best for these cubes due to its crystal structure and ability to hold shape.
- Brown Sugar: Can be used for a different flavor profile, but its natural color means it cannot be dyed effectively.
- Powdered Sugar (Confectioners’ Sugar) & Artificial Sweeteners: These are not suitable for this recipe. Their fine texture or chemical composition prevents them from binding and hardening into solid cubes.
- For Classic Cube Shapes: A small silicone cube candy mold is your best tool. It ensures uniformity and makes the shaping process incredibly simple.
Proper Storage for Longevity
Once your homemade sugar cubes are perfectly formed and thoroughly dried, proper storage is paramount to ensure they maintain their beautiful shape, firm texture, and overall freshness. These delicate sugar creations can last for a considerable amount of time if kept in the right conditions:
- Room Temperature is Ideal: The best way to store your sugar cubes is in a clean, airtight container or a covered box. Keep this container in a cool, dry place, away from any direct heat sources, sunlight, or fluctuations in temperature. Most importantly, protect them from moisture and humidity. Stored correctly at room temperature, your homemade sugar cubes can remain in perfect condition for up to 1 month, and often even longer.
- Avoid Refrigeration: It is strongly advised not to refrigerate homemade sugar cubes. The environment inside a refrigerator typically contains significant moisture and condensation. This humidity can cause the sugar to absorb water, leading to softening, loss of shape, and potentially partial dissolution, completely ruining your meticulously crafted cubes.
- Do Not Freeze: Similarly, freezing is not recommended. The moisture content within a freezer, combined with the process of thawing, will have a detrimental effect on the sugar cubes’ delicate structure. They will likely become soft, sticky, and lose their integrity once brought back to room temperature.
By adhering to these simple storage guidelines, you can ensure that your charming homemade sugar cubes remain pristine and ready to use whenever you need to add a special touch of sweetness or a decorative flourish to your culinary creations.
More Fun and Kid-Friendly Dessert Ideas
If you’ve enjoyed the creative process of making these delightful sugar cubes, you’ll surely love exploring other easy and engaging dessert recipes that are perfect for involving the whole family. These treats are simple to make and guaranteed to bring smiles to faces:
- Rainbow Cereal Balls: A colorful, no-bake, and incredibly fun treat that’s as vibrant as it is delicious.
- Pokemon Donuts (Pikachu Donuts): Craft adorable character-themed donuts that are a hit with fans of all ages.
- Marshmallow Kabobs: Simple to assemble, these sweet skewers are perfect for parties or a quick, customizable dessert.
Recipe: Homemade Sugar Cubes (Hearts and Stars)
Homemade Sugar Cubes (Hearts and Stars)
Abeer Rizvi
Pin Recipe
Want to Save This Recipe?
Enter your email & I’ll send it to your inbox. Plus, get great new recipes from me every week!
By submitting this form, you consent to receive emails from CakeWhiz
Ingredients
- 1 cup Sugar Granulated
- 1 tablespoon Water
- Gel coloring Optional
Instructions
-
Add sugar and water in a small bowl and mix everything until you have a rough,chunky mixture.
-
Divide the sugar mixture into separate small bowls and add different gel colorings into each bowl.
-
Mix the color thoroughly into the sugar mixture with a spoon.
-
Spread the sugar mixture on a
cookie tray. Use your hands to really push down the mixture tightly. Then, press your small cutters into this mixture.
-
Now, remove the cutter from the mixture and gently place it on a sheet of wax paper. Tap the cutter lightly and the sugar piece will just come out.
-
Let the pieces dry overnight on the sheet of wax paper or until they harden. Once they are hard, you can store them in a plastic container away from moisture, humidity and sunlight.
-
Instead of cutters, you can use a small candy mold. Fill the molds with crumbly sugar mixture and let it dry completely (overnight is best) at room temperature. Then, flip it over gently onto a sheet of wax paper/ parchment paper and the cubes should fall out easily. Enjoy!
Notes
- Read all my tips above.
Nutrition
An automated tool is used to calculate the nutritional information. As such, I cannot guarantee the accuracy of the nutritional information provided for any recipe on this site.
