Spooky & Easy Halloween Pudding Cups: Fun Treats for Kids’ Parties
Get ready for a frightfully fun Halloween with these adorable and incredibly easy Halloween pudding cups! Perfect for kids’ parties, school events, or just a festive family treat, these homemade (or semi-homemade!) delights bring a touch of spooky charm to any celebration. Learn how to transform simple pudding into creative characters like Ghost, Jack O’Lantern, Frankenstein, a One-Eyed Monster, and even Dracula with minimal effort and maximum impact.
*Thank you Snack Pack for sponsoring today’s post so that I could share these fun and simple Halloween dessert ideas with you. As always, all opinions are mine.*
This sweet treat holds a special place in my heart, evoking cherished childhood memories. My mom and I would craft these playful pudding cups every Halloween, a tradition I’m now thrilled to continue with my own son. This year, we’re diving into five classic yet simple designs: the grinning Jack O’Lantern, the stitched Frankenstein, a whimsical One-Eyed Monster, the classic Dracula, and a ghostly apparition! These creative cups are just as simple and enjoyable to create as my Halloween Candy Eyes (Eyeballs) or these delightful Easy Chocolate Spiders. Prepare for an unforgettable Halloween with these charming, spooky desserts that are sure to be a hit!

Why These Halloween Pudding Cups Are a Must-Make
These Halloween pudding cups are a fantastic choice for several reasons. Firstly, they are incredibly customizable – you can get wonderfully creative with your designs, letting your imagination run wild. Kids especially love contributing their own wacky and unique monster ideas! Secondly, they are remarkably quick to assemble, making them ideal for last-minute party preparations. And perhaps most importantly, they are universally loved by children and adults alike, offering a delicious and visually appealing treat that perfectly captures the spirit of Halloween.
How to Make Easy Halloween Pudding Cups
Crafting these spooky dessert cups is simpler than you might think! Whether you opt for a fully homemade approach or prefer the convenience of store-bought options, the magic happens in the decoration. Here’s a quick overview of the process:
- Choose Your Pudding: Start by preparing your favorite homemade pudding recipe, or simply open a few convenient Snack Pack cups for an even quicker start.
- Coloring (Optional for Homemade): If making homemade pudding, divide it into separate bowls and use gel food coloring to achieve vibrant Halloween hues like orange, green, blue, or simply leave it white for ghosts.
- Decorate the Cups: For homemade puddings, pour the colored pudding into small, clear plastic containers. Before filling, use a non-toxic Sharpie marker to draw your desired monster faces, spooky eyes, or other Halloween designs on the *outside* of the cups.
- Add Final Touches: The real fun begins with garnishing! Use a variety of candies, cookies, pretzels, and other edible decorations to bring your characters to life. Think pretzel rods for Jack O’Lantern stems, crushed Oreos for Frankenstein’s hair, or candy eyeballs for your monster.
- Chill and Serve: Refrigerate your decorated pudding cups until serving to ensure they are perfectly cool and set.
This creative process allows for endless possibilities, letting you design a unique array of Halloween creatures for your party guests!
Variations and Essential Tips for the Spookiest Pudding Cups
Making these Halloween pudding cups is simple, but a few expert tips can elevate your spooky treats to the next level. Consider these variations and advice for the best results:
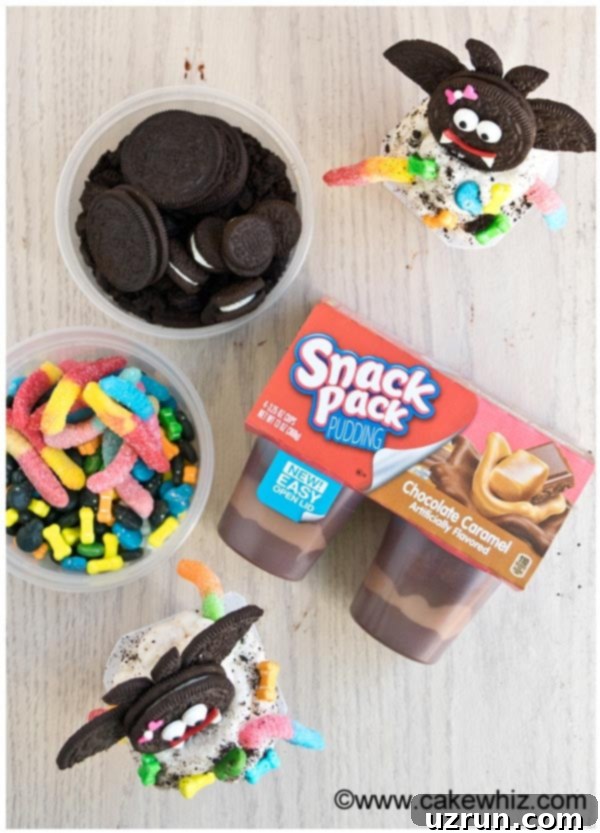
- Opt for Store-Bought Pudding for Speed: When time is of the essence, pre-made pudding cups are a lifesaver. Many brands, like Snack Pack, come in various flavors and are even pre-colored, saving you valuable prep time. They’re a fantastic shortcut for busy hosts!
- Stick to Gel Food Coloring for Homemade Pudding: If you’re whipping up homemade pudding, always use gel food coloring instead of liquid dyes. Liquid coloring can alter the consistency of your pudding, making it thinner and less appealing. Gel colors offer vibrant hues without affecting the texture.
- Garnish Just Before Serving: To prevent decorations from becoming soggy or limp, add any crunchy or fresh garnishes – such as pretzels, cookies, or mint leaves – right before you’re ready to serve. This ensures everything looks and tastes its best.
- Embrace Small Disposable Plastic Cups: For homemade puddings, small disposable plastic cups are incredibly convenient. They not only make portion control easy but also simplify cleanup, allowing you to toss them once the treats are devoured, meaning less dishwashing!
- Decorate with Sharpie Markers on the “Outside” Only: When drawing faces and designs on your cups, always use Sharpie markers on the *exterior surface* of the plastic cups. Marker ink is non-edible and should never come into direct contact with the pudding.
- Experiment with Different Fillings: While pudding is a classic, don’t hesitate to try other delightful fillings! Consider a healthier Chia Seed Pudding, a comforting Easy Rice Pudding, a creamy Homemade Banana Pudding, or a tropical Coconut Rice Pudding. Colorful jelly is another fun alternative that adds a wiggly, jiggly element to your spooky creations.
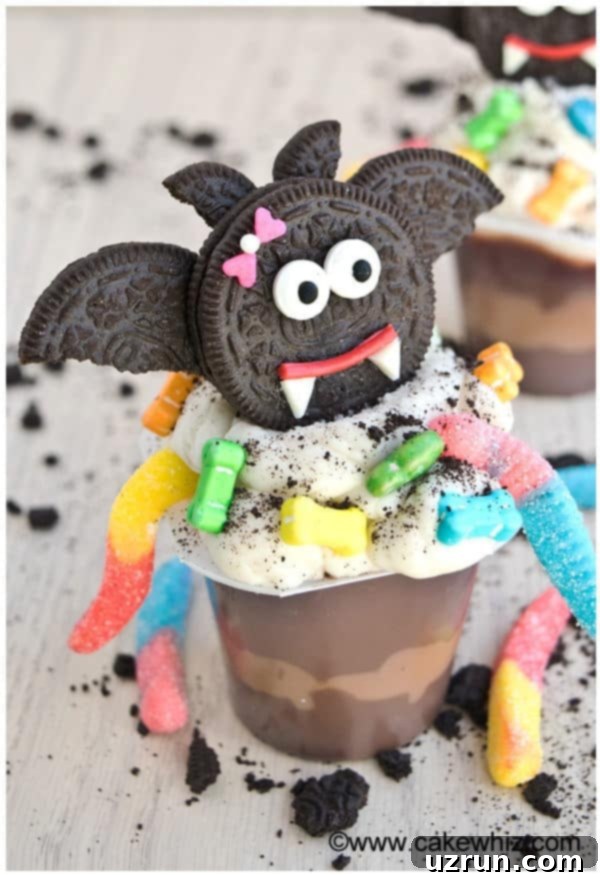
For some of my creations, I particularly enjoyed using the caramel-flavored Snack Pack cups because of their appealing light and dark brown swirled pattern, which added an extra layer of visual interest to the spooky designs. However, the possibilities are endless with the wide variety of flavors available. For a truly elaborate presentation, I decorated these particular cups with a dollop of frosting, my custom Oreo Draculas (instructions below!), some wiggly gummy worms, and eerie bone candies. Feel free to mix and match with any other candies or toppings you desire to make your Halloween pudding cups uniquely yours!
Crafting the Ultimate Dracula Snack Pack Pudding Cups
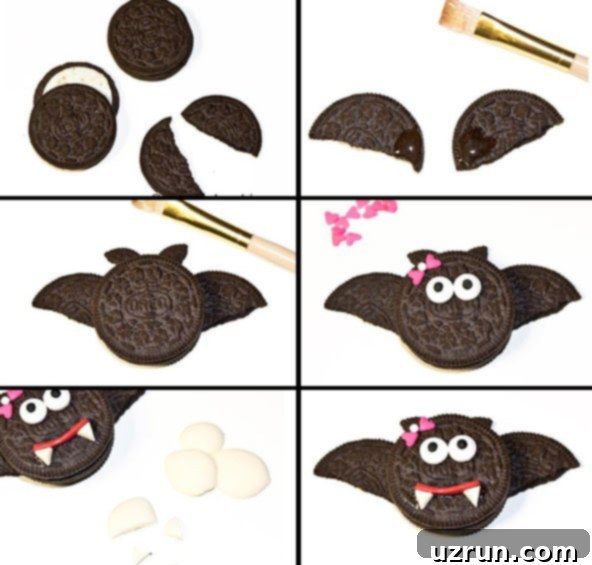
The Dracula pudding cup is a showstopper, and the star of this dessert is undoubtedly the detailed Oreo Dracula topper. Follow these steps to create your own edible vampire royalty:
- Prepare Dracula’s Wings: Carefully separate a regular-sized Oreo cookie. Break one of the non-creamy cookie halves into two semicircles. These will form Dracula’s majestic wings.
- Attach the Wings: Brush a tiny amount of corn syrup onto the flat ends of the broken cookie halves. Gently press these onto the sides of the remaining cream-filled Oreo, positioning them slightly upwards to resemble outstretched wings.
- Form Dracula’s Face: Place another whole, round Oreo cookie on top of the joined wings. This will serve as Dracula’s head.
- Create the Ears: Take a mini Oreo cookie and separate it. Break one of the non-creamy halves into two small pieces. These will be Dracula’s pointy ears.
- Attach the Ears: Using a dab of corn syrup or melted chocolate, stick these two “ears” behind the “face” Oreo.
- Add Spooky Eyes: Secure two edible candy eyeballs onto Dracula’s face with a tiny bit of corn syrup.
- Craft the Mouth: Using clean kitchen scissors, cut a thin strip from a Twizzler candy. Shape it into a slight curve for Dracula’s signature smirk. Attach it below the eyes with corn syrup.
- Insert Fang-tastic Teeth: With a small, sharp knife, carefully cut out two tiny triangular pieces from a white chocolate bar or candy melt. These will be Dracula’s iconic fangs. Use a touch of corn syrup to adhere them just below the Twizzler mouth.
- Add a Dapper Bow (Optional): For a final touch of sophistication, stick a small bow-shaped candy or a piece of a licorice string on Dracula’s head, like a tiny bow tie.
- Assemble the Pudding Cup: Now, take your chosen Snack Pack pudding cup. Frost a generous layer of buttercream icing on top, creating a soft, eerie “mist.”
- Decorate the Scene: Sprinkle some crushed Oreos over the frosting to mimic dirt or night soil. Stick in a few bone candies and some gummy worms to create a spooky graveyard scene.
- Place Dracula: Finally, carefully place your magnificent Oreo Dracula creation on top of the decorated pudding cup. And voilà, your Dracula Snack Pack Pudding Cup is complete and ready to impress!
Storage Tips for Halloween Pudding Cups
Proper storage ensures your festive treats remain delicious and safe to eat:
- Refrigerate: Any leftover Halloween pudding cups should be covered tightly with plastic saran wrap and stored in the refrigerator. They will maintain their freshness and texture for 2-3 days.
- Freeze: Freezing pudding is generally not recommended. Pudding can separate and develop an unappealing curdled texture upon thawing, especially homemade varieties. It’s best to enjoy these fresh!
More Spooktacular Halloween Desserts to Try
If you’re looking for more creative and delicious treats to complete your Halloween festivities, be sure to check out these other fantastic ideas:
- Halloween Treat Bags (Candy Goodie Bags) – Fun, personalized bags for trick-or-treaters.
- Leftover Halloween Candy Cookies – A great way to use up all that extra candy!
- Halloween Donuts (Spider and Monster) – Easy and adorable breakfast or dessert idea.
Recipe: Easy Halloween Pudding Cups
Easy Halloween Pudding Cups
Abeer Rizvi
Pin Recipe
Want to Save This Recipe?
Enter your email & I’ll send it to your inbox. Plus, get great new recipes from me every week!
By submitting this form, you consent to receive emails from CakeWhiz
Ingredients
- 4 cups Homemade vanilla pudding or store-bought Snack Pack cups
- Gel colors Orange, green, blue, black (for coloring pudding if homemade)
- Black Sharpie marker to decorate outside of plastic cups
- 4-5 small Disposable plastic cups
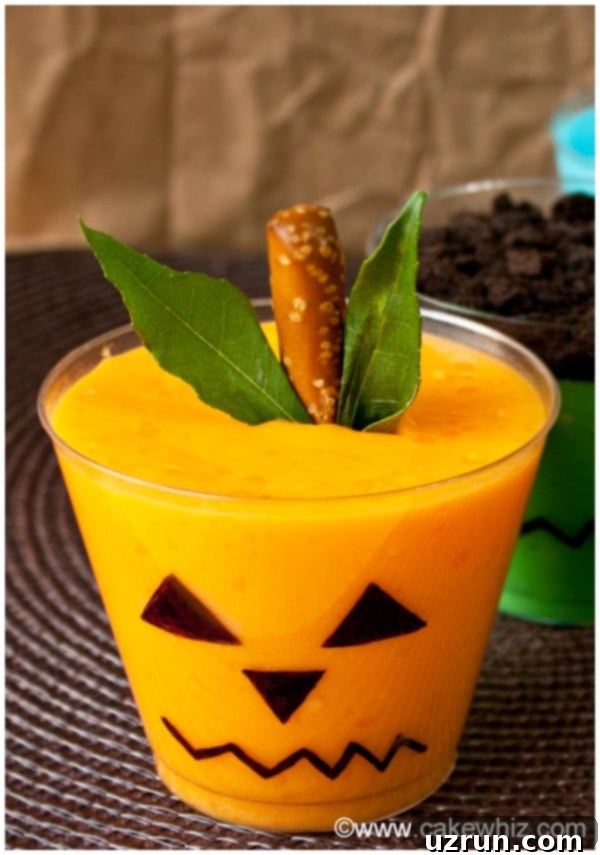
- 1 Pretzel rod for Jack O’Lantern stem
- 2-3 Mint leaves or curry leaves, for Jack O’Lantern leaves
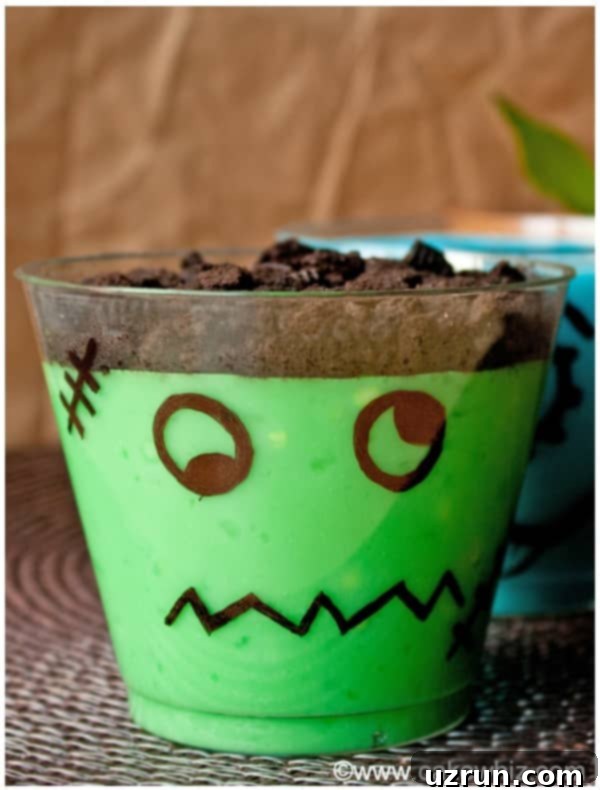
- 2-3 tablespoons Crushed Oreos for Frankenstein’s “hair”
- Assorted candies/cookies e.g., candy eyeballs, gummy worms, bone candies, mini Oreos for Dracula
- Corn syrup or melted chocolate for adhering decorations
- White chocolate or candy melts for Dracula’s fangs
- Twizzlers for Dracula’s mouth
- Buttercream icing for Dracula pudding cup base
Instructions
Preparing the Cups:
-
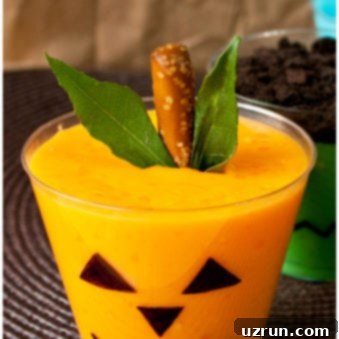
For the Jack O’Lantern cup, use a black Sharpie marker to draw two triangle eyes, an upside-down triangle nose, and a zig-zag line for the mouth on the *outside* of a clean plastic cup.
-
For the Frankenstein cup, use a black Sharpie marker to draw two “googly” eyes, a zig-zag line for a mouth, and a few stitch marks here and there on the *outside* of a plastic cup.
-
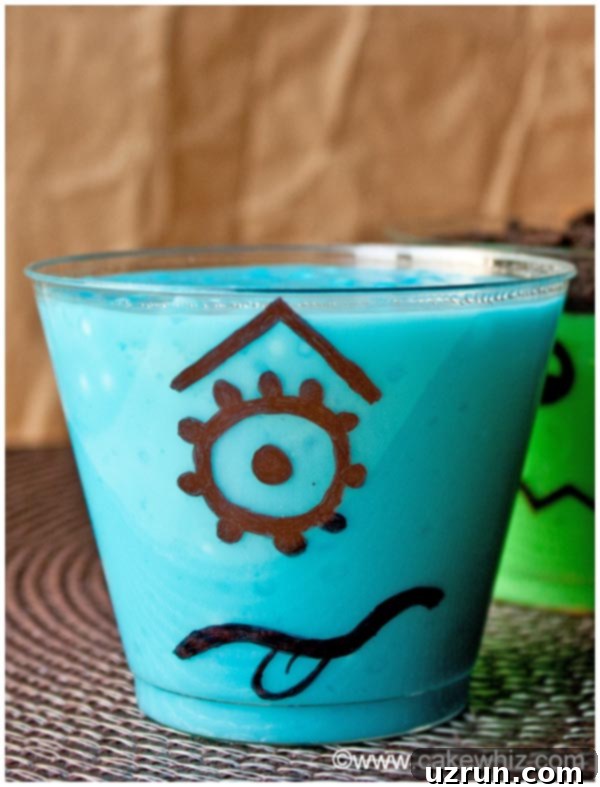
To make the Monster cup, use a black Sharpie marker to draw one large round eye with little dots around it (for texture) on the *outside* of a plastic cup. Also, draw a triangular arch for the eyebrow and a wavy line for the mouth, and even a little tongue if you like!
-
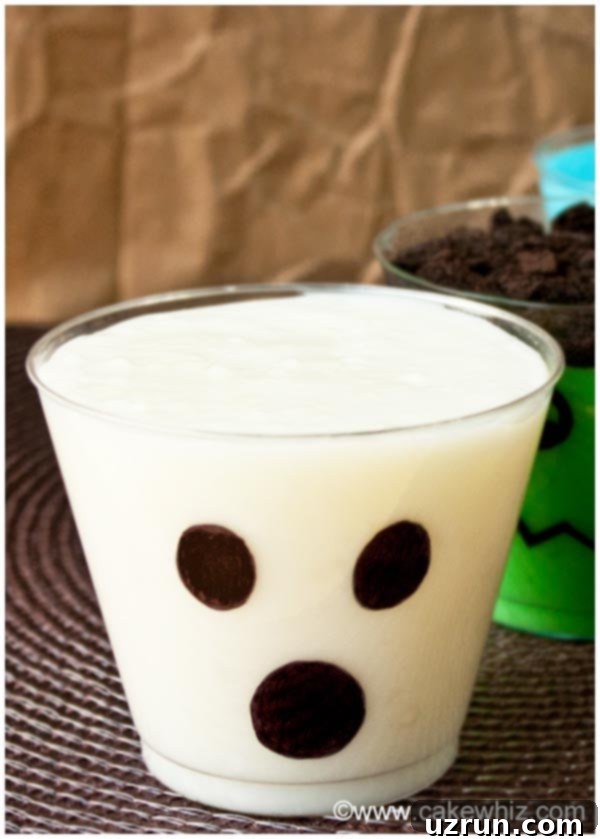
To make the Ghost cup, use a black Sharpie marker to draw two simple ovals for the eyes and one big oval for the mouth on the *outside* of a plastic cup.
Assembling the Pudding Cups:
-
If using homemade pudding, prepare it according to your recipe and divide it into 4 equal portions.
-
Use gel food coloring to color one portion orange (for the Jack O’Lantern), another portion blue (for the One-Eyed Monster), another portion green (for Frankenstein), and leave one pudding portion white (for the Ghost). If using Snack Pack cups, you can skip coloring the pudding itself.
-
Carefully pour or spoon the appropriately colored pudding into its relevant pre-decorated cup (e.g., orange pudding into the Jack O’Lantern cup).
-
Chill these assembled pudding cups in the refrigerator for at least 30 minutes, or until you are ready to serve.
Adding Final Decorations (just before serving):
-
For the Jack O’Lantern cup, gently push a pretzel rod into the center of the pudding to act as a stem. Stick 2 small curry leaves or mint leaves on the sides of the pretzel rod for pumpkin leaves.
-
For the Frankenstein cup, sprinkle a generous amount of crushed Oreos on top of the green pudding to create messy “hair.”
-
You now have 4 different, adorable Halloween pudding cups: A One-Eyed Monster, Frankenstein, Jack O’Lantern, and a Ghost. Serve immediately and enjoy these fun spooky treats!
Notes
- Leftovers, if covered tightly with saran wrap, can be stored in the fridge for up to 2 days.
- For the Dracula pudding cup, refer to the detailed instructions provided in the main blog post above for crafting the Oreo Dracula topper and assembling the cup.
Nutrition
An automated tool is used to calculate the nutritional information. As such, I cannot guarantee the accuracy of the nutritional information provided for any recipe on this site.
We hope these easy and creative Halloween pudding cups bring immense joy and a touch of spooky fun to your celebrations. They’re a cherished tradition in my family, and I’m sure they’ll become one in yours too! Until next time, tata my lovelies, and happy haunting!
