Easy Homemade Marshmallow Pops: Fun & Festive Treats for Every Occasion
Looking for a quick, simple, and utterly charming treat that can be customized for virtually any celebration? Look no further than these fantastic homemade marshmallow pops! Crafted with just a few basic ingredients, these delightful confections are perfect for brightening up holidays like St. Patrick’s Day and Valentine’s Day, adding a playful touch to birthday parties, or simply making a fun activity for kids on a rainy afternoon. Their effortless creation means less stress for you and more joy for everyone involved.
The beauty of marshmallow pops lies in their boundless potential for creativity. Whether you’re planning a themed event, a seasonal gathering, or just a whimsical dessert, these pops can be adapted to fit almost any concept you can imagine. They instantly elevate the cuteness factor of any party spread. What’s more, they are an excellent project to undertake with children. While traditional baking with kids can sometimes be a messy or stressful endeavor, these no-bake marshmallow pops promise a wonderfully enjoyable and low-pressure experience for the whole family. They are truly versatile, serving as perfect teacher gifts, charming party or shower favors, a delightful addition to any dessert table, or even unique cupcake and cake toppers. While Cake Pops and Cake Balls offer a similar presentation, they typically demand more time and effort, making marshmallow pops the ideal choice for quick and impactful treats.
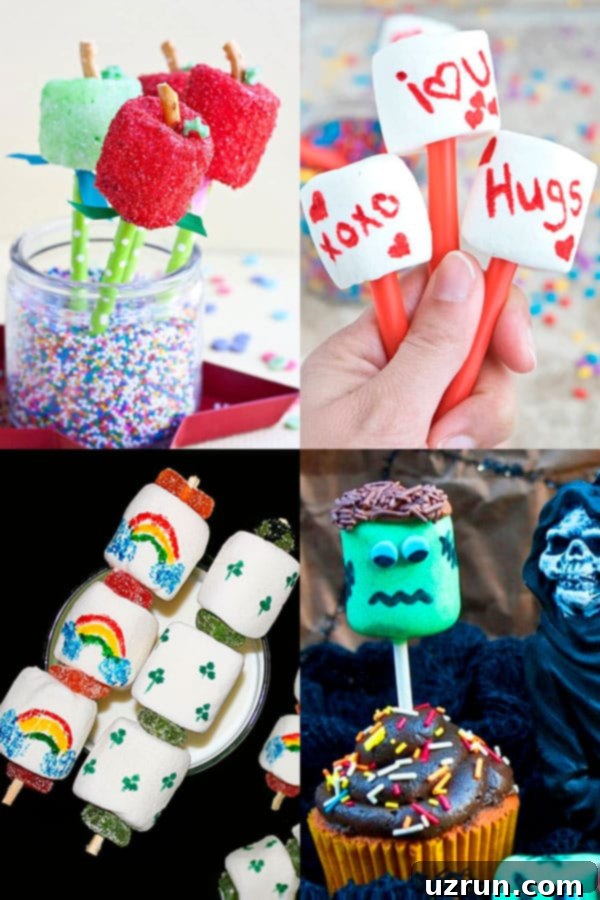
Table of Contents
- How to Make Easy Homemade Marshmallow Pops?
- Key Ingredients for Marshmallow Pops
- Endless Variations for Your Marshmallow Pops
- Essential Tips and Techniques for Perfect Marshmallow Pops
- St. Patrick’s Day Marshmallow Pops
- Valentine’s Day Marshmallow Pops
- Apple Marshmallow Pops for Fall/Autumn or Back to School
- Halloween Marshmallow Pops
- Storage Tips for Marshmallow Pops
- More Delightful Marshmallow Desserts
- Easy Marshmallow Pops Recipe
How to Make Easy Homemade Marshmallow Pops?
Crafting your own marshmallow pops is wonderfully straightforward. Follow these simple steps for perfect, customizable treats every time:
- Add Sticks: Gently push your chosen stick (wooden skewers, paper straws, or lollipop sticks work great) into the bottom center of each marshmallow. Ensure it’s secure enough for handling.
- Create “Kabob” Style Pops: For a visually appealing skewer, alternate pushing marshmallows and small jelly candies (or other soft candies) onto the stick in a desired pattern. This adds texture and color.
- Draw Details: Unleash your inner artist! Use fine-tipped edible markers to draw faces, patterns, letters, or intricate designs directly onto the marshmallows. This is where the magic happens for themed pops.
- Apply Other Toppings: If you want to coat your pops in sprinkles, crushed cookies, or sanding sugar, first brush the marshmallow with a thin layer of corn syrup or melted chocolate. This acts as an edible glue, helping your chosen toppings adhere perfectly. Then, roll or dip the marshmallow into your topping until fully coated. Let them set, and enjoy your beautifully decorated treats!
Key Ingredients for Marshmallow Pops
The beauty of these pops lies in their simplicity. Here are the core ingredients you’ll need, along with suggestions for best results:
- Marshmallows: Large or jumbo marshmallows are highly recommended. Their generous size provides ample surface area for creative decorating and creates a better visual balance with the sticks. Mini marshmallows are too small to truly showcase your decorative efforts.
- Decorations: This is where your imagination can truly shine! Stock up on edible markers (fine-tip ones are best for detailed work), a variety of colorful candies, festive sprinkles, or even small pieces of chocolate or fondant. The possibilities are endless for bringing your themes to life.
- Corn Syrup: A small amount of corn syrup is your secret weapon for adhering toppings. It acts as a transparent, edible glue, ensuring your sprinkles and other decorative elements stay firmly in place without altering the flavor of the marshmallow.
- Melted Chocolate: Beyond being a delicious coating, melted chocolate (white, milk, or dark) can also serve as an effective edible glue, especially for heavier toppings or when you desire a richer base flavor for your decorations.
- Sticks: Don’t forget the essential component that makes them “pops”! Wooden skewers, sturdy paper straws, plastic straws, or classic lollipop sticks all work perfectly. Choose based on your aesthetic preference and stick length needs.
Endless Variations for Your Marshmallow Pops
One of the most exciting aspects of marshmallow pops is how easily they can be transformed. Get inspired with these creative variations to suit any taste or theme:
- Experiment with Different Marshmallow Flavors: Go beyond traditional vanilla! Look for strawberry, peppermint, or other fruity-flavored marshmallows to add an extra layer of taste to your creations. Imagine peppermint chocolate pops for winter holidays!
- Play with Marshmallow Colors: Many brands offer colored marshmallows, such as green, orange, pink, or yellow. These can be a fantastic shortcut for themed pops, instantly adding vibrancy without needing food coloring.
- Try Different Marshmallow Shapes: Keep an eye out for seasonal or novelty marshmallows that come in various shapes like stars, Peeps, hearts, shamrocks, bunnies, or Christmas trees. These pre-shaped marshmallows provide an instant thematic base for your decorations.
- Make S’mores Pops: Capture the classic campfire treat in a convenient pop! Dip half of a marshmallow in melted chocolate, then immediately roll it in crushed graham crackers. A tiny piece of chocolate bar pressed into the side completes the s’mores experience.
- Design Festive Birthday Pops: For birthdays, dip marshmallows into slightly warmed (but not hot enough to melt the marshmallow) frosting of any color, then generously coat them in a mix of colorful sprinkles. This creates a quick and festive party favor.
- Creative Coatings: The sky’s the limit for coatings! Try chopped Oreos for a cookies-and-cream vibe, crushed candy bars for an extra sweet crunch, chopped pretzels for a salty-sweet contrast, or mini chocolate chips for a classic finish.
- Delicious Drizzles: After your pops are decorated and set, add a final touch with a drizzle of homemade caramel sauce or contrasting melted chocolate. A zig-zag pattern adds elegance and extra flavor.
- Whimsical Ballerina Pops: For an incredibly cute and unique design, attach an upside-down pink mini cupcake liner to the skewer just below a marshmallow. Dip the marshmallow in pink sanding sugar, creating a delicate “tutu” effect. These are perfect for dance-themed parties or baby showers.
- Refreshing Thin Mint Pops: If you love the classic cookie, this variation is for you! Use peppermint-flavored marshmallows and dip them completely in dark melted chocolate for a cool and satisfying treat.
- Magical Unicorn Pops: Transform plain marshmallows into enchanting unicorns. Draw cute sleeping eyes using edible markers. Then, carefully attach tiny fondant ears and a fondant horn to the top. Finish by adding a colorful “mane” of sprinkles between the ears.
Essential Tips and Techniques for Perfect Marshmallow Pops
Achieving beautifully crafted marshmallow pops is easy with a few insider tricks. Keep these tips in mind to make your decorating process smooth and your results stunning:
- Opt for Regular or Jumbo Marshmallows: These larger sizes are much easier to handle and decorate. They also provide a better canvas for your designs and a more proportionate look on the sticks. Avoid mini marshmallows for decorating purposes.
- Why Avoid Mini Marshmallows: While adorable in other contexts, mini marshmallows are simply too small to allow for any detailed decorating. Your artistic efforts would be lost, and they can be challenging to secure on a stick.
- Choosing the Right Sticks: You have several options! Wooden skewers offer a rustic look, paper straws add a pop of color and pattern, plastic straws are sturdy, and classic lollipop sticks are specifically designed for confectionery. Choose based on your theme and desired aesthetic.
- For Intricate Details, Use Edible Markers: When drawing facial features, intricate patterns, or personalized messages, fine-tip edible markers are your best friend. They offer precision and ease of use, making complex designs achievable even for beginners.
- Insert Sticks Before Decorating: This is a crucial step! Always push the marshmallows onto their sticks *before* you begin any drawing or coating. Attempting to insert a stick into an already decorated marshmallow will almost certainly smudge your designs or cause sprinkles to fall off, ruining your hard work.
- Work with Slightly Dry Marshmallows: Marshmallows can be quite soft and “squishy” straight from the bag, which can make drawing or coating difficult. For a firmer surface, let your marshmallows air dry for about 15-20 minutes before you start decorating. This makes them less sticky and easier to manage.
- Prevent Marshmallows from Hardening: While a little air drying is good, prolonged exposure to air will cause marshmallows to become hard and stale. Once your decorations are dry and set, it’s essential to wrap or package your marshmallow pops promptly in airtight candy bags or containers to maintain their soft, delicious texture.
St. Patrick’s Day Marshmallow Pops
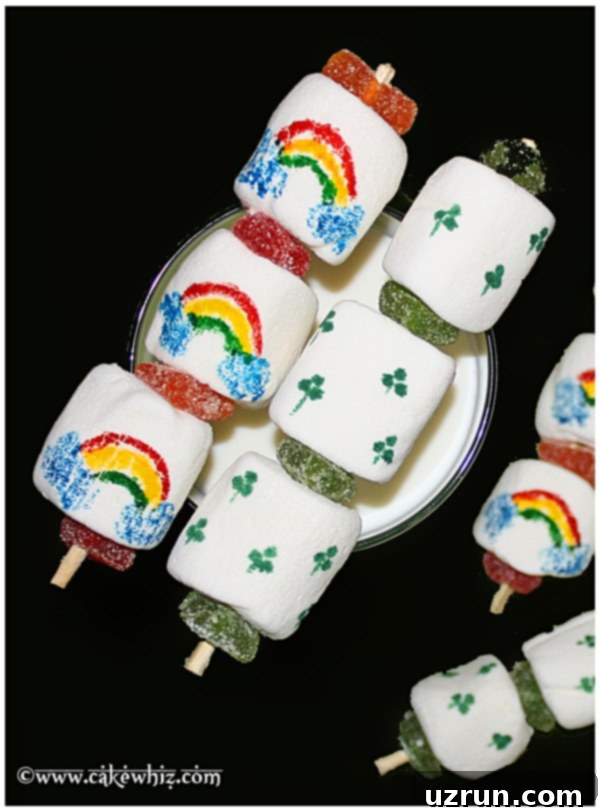
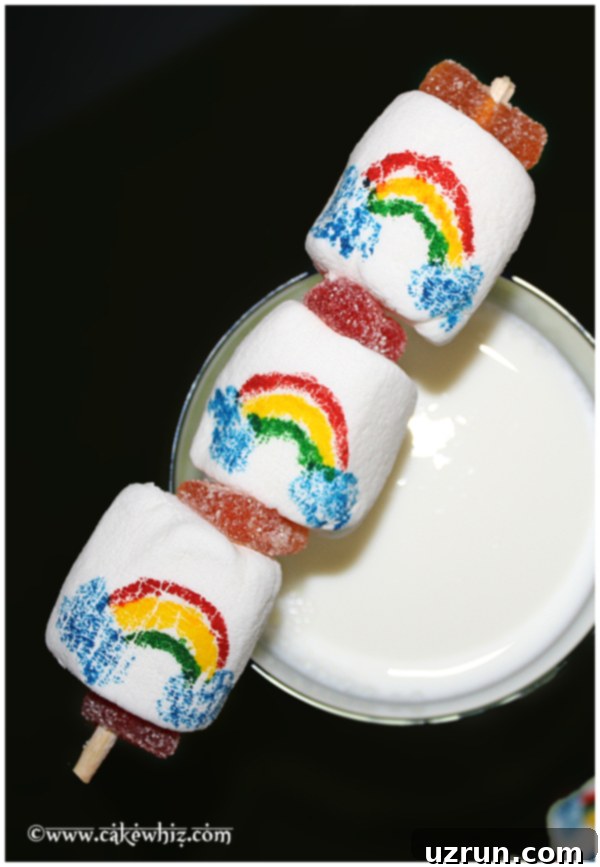
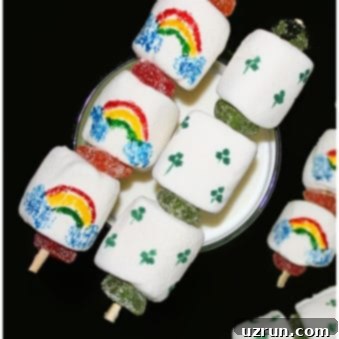
When St. Paddy’s Day rolls around, the key themes that spring to mind are vibrant green, lucky four-leaf clovers, and magical rainbows. I love incorporating these iconic elements into “desserts on a stick” using fluffy marshmallows and colorful jelly candies. These particular pops are designed in a charming “kabob” style, where each marshmallow is separated by a bright candy, all threaded onto a sturdy bamboo skewer. The rainbows and clovers are effortlessly drawn with edible markers, making the process incredibly simple and fun. If you have a very steady hand, you could also use royal icing or edible paint for a similar effect, but for ease and precision, edible markers are undoubtedly the best choice!
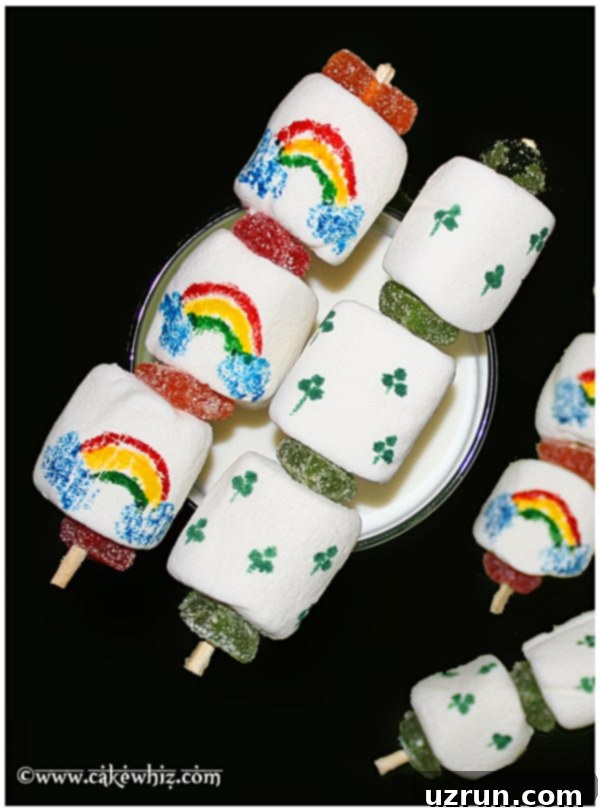
- Assemble the Kabobs: Push marshmallows and various colored jelly candies through bamboo skewers in an alternating, rainbow-inspired pattern. This creates a festive and edible skewer.
- Decorate with Edible Markers: Using edible markers, draw cheerful rainbows cascading over the marshmallows and lucky four-leaf clovers. You can also add gold coins or little leprechaun hats for extra detail.
Valentine’s Day Marshmallow Pops
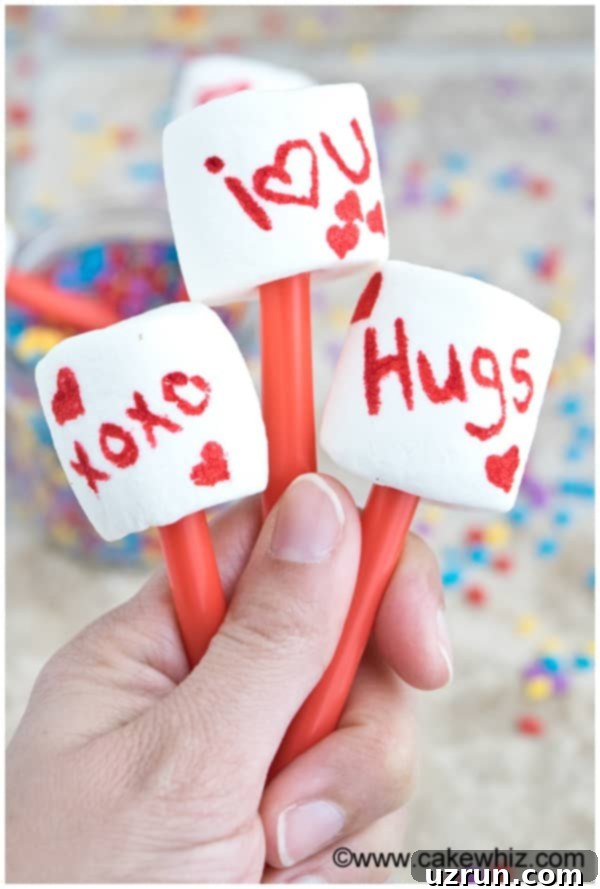
For Valentine’s Day, these marshmallow pops can convey sweet sentiments in the most adorable way. I often use a red edible marker to inscribe charming messages, taking inspiration from classic conversation heart candies. Phrases like “Be Mine,” “XOXO,” or “Sweetheart” look lovely. To complete the romantic styling, use seasonal straws or lollipop sticks featuring hearts or pink/red patterns. Another delightful idea is to dip the tops of each marshmallow in melted white chocolate, then immediately sprinkle them with festive red or pink sprinkles. For an even more thematic approach, consider using naturally pink marshmallows or seek out heart-shaped marshmallows to begin with.
- Prepare the Base: Push thick, decorative straws (or your preferred sticks) into the bottom of each marshmallow, ensuring they are securely placed.
- Add Sweet Messages: With a red or pink edible marker, carefully write endearing messages or draw small hearts onto the marshmallows.
Apple Marshmallow Pops for Fall/Autumn or Back to School
These adorable apple marshmallow pops are a fantastic way to celebrate the autumn season or mark the return to school. Apples naturally come in a beautiful spectrum of colors—vibrant red, sunny yellow, and crisp green, with some varieties even boasting a charming combination of red and yellow. For my apple pops, I used sanding sugar to achieve a sparkling, textured “skin,” but you could easily use red, green, or yellow granulated sugar, fine sprinkles, or even tinted desiccated coconut for similar effects. These are not only delicious but also make a visually stunning display, evoking the cozy feelings of fall.
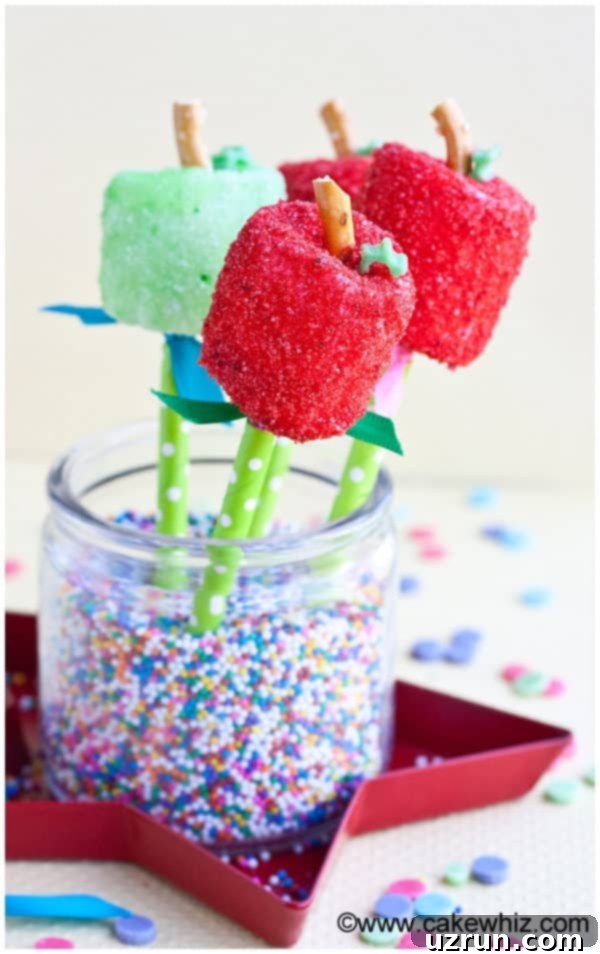
- Insert Sticks: Push lollipop sticks (or other sturdy sticks) firmly into the bottom of each marshmallow.
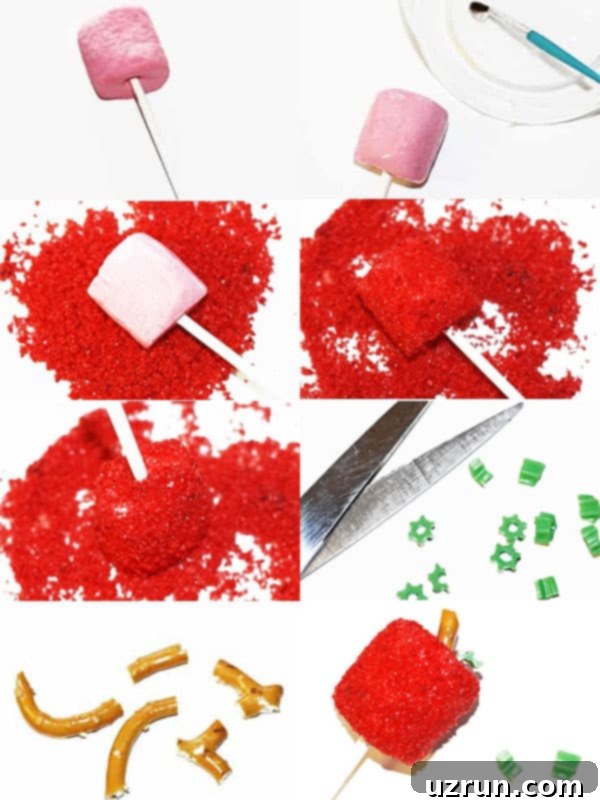
- Apply Adhesive: Lightly brush each marshmallow with corn syrup to create a sticky surface for the coating.
- Coat Completely: Roll or dip the corn syrup-brushed marshmallows fully into red (or green/yellow) sanding sugar until they are evenly coated and sparkling.
- Add Apple Details: For the stem, gently press a small piece of chopped pretzel stick into the top of the marshmallow. For the leaf, cut a small triangle from a green Twizzler or a piece of green fruit leather and attach it near the stem.
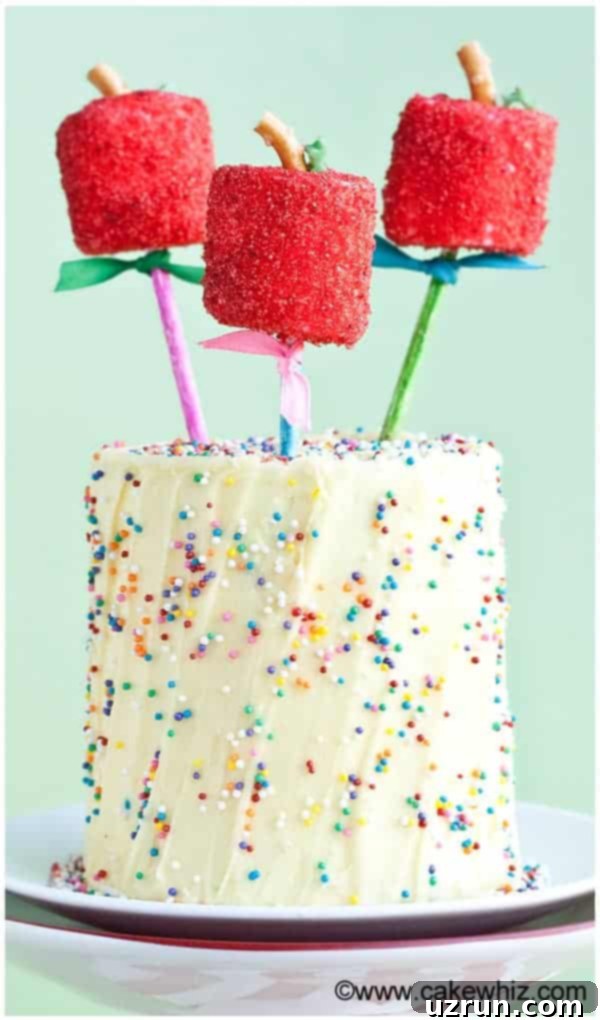
These versatile apple pops can also serve as fantastic cake decorations. Simply push them into the top of an iced cake to create a whimsical, edible topper that perfectly fits a fall harvest or back-to-school theme.
Halloween Marshmallow Pops
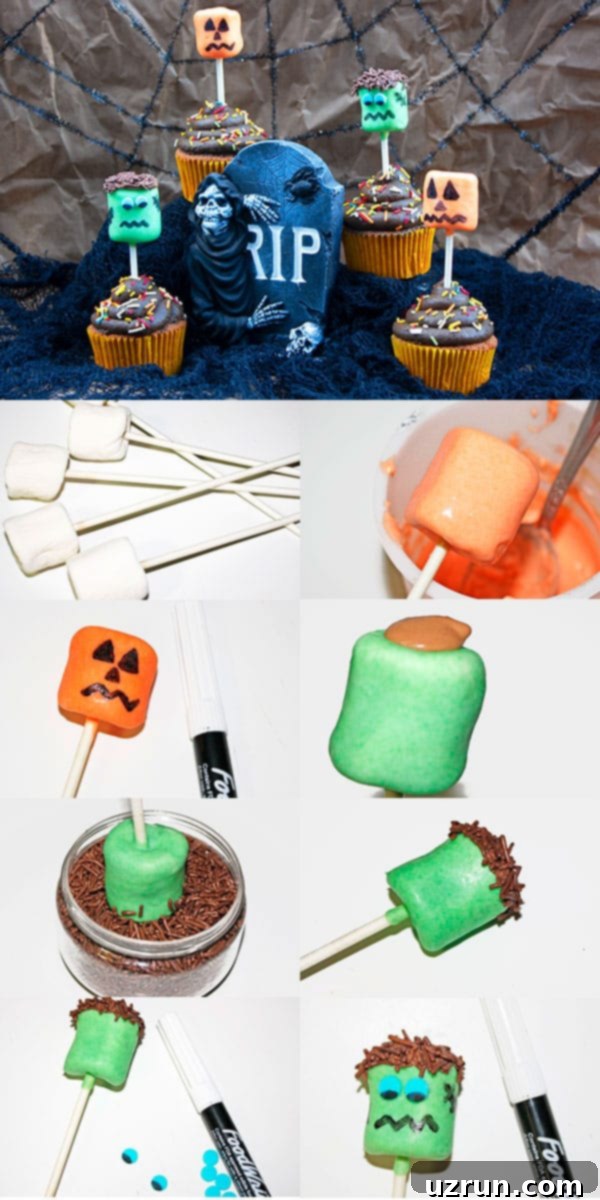
For the spooky season, Halloween marshmallow pops are my absolute favorite to create. The creative possibilities are truly endless – you can craft spooky ghosts, quirky monsters, elegant Draculas, or even gruesome zombies. For this guide, I chose to demonstrate how to make a classic Frankenstein monster and a cheerful Jack O’Lantern. As mentioned before, these aren’t just handheld treats; they can also be used as charming cake or cupcake toppers. Once they’re fully decorated and dry, simply push them into frosted cupcakes to add an instant festive and fun touch to your Halloween dessert spread.
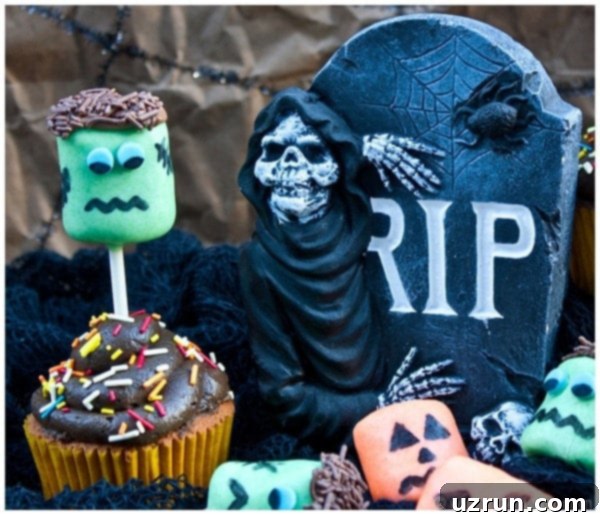
- Prepare the Base: Insert lollipop sticks securely into the bottom of each marshmallow.
- Dip for Color: Dip your marshmallows into melted chocolate—use green-tinted white chocolate for Frankenstein and orange-tinted white chocolate for Jack O’Lanterns. Allow any excess to drip off, and let them set slightly.
- Add Spooky Details: Once the chocolate is set, use edible markers to draw Frankenstein’s stitches and eyes, and Jack O’Lantern’s triangle eyes and jagged smile. For Frankenstein’s “hair,” press chocolate sprinkles onto the top of his head before the chocolate fully sets.
Storage Tips for Marshmallow Pops
Proper storage is key to keeping your marshmallow pops fresh and delicious, preserving both their taste and their beautiful decorations:
- Room Temperature: Once the decorations are completely dry and set, store your marshmallow pops individually wrapped in clear candy bags or in an airtight container at room temperature. They will retain their freshness and soft texture for 2-3 days.
- Avoid Refrigeration or Freezing: It is crucial to avoid refrigerating or freezing marshmallow pops. The moisture in cold environments can cause the marshmallows to become hard and chewy, and more importantly, it can lead to the decorative elements (especially edible marker designs or delicate sprinkles) smearing or bleeding. Always keep them at a stable room temperature for best results.
More Delightful Marshmallow Desserts
If you’ve enjoyed these marshmallow pops and are looking for more ways to incorporate fluffy marshmallows into your desserts, here are some other fantastic recipes to try:
- Chocolate Marshmallow Cake {Heart Cake}
- JELL-O Marshmallow Candy (Pinwheels)
- Rainbow Fruit Loops Marshmallow Bars
- Fantasy Fudge {With Marshmallow Creme}
- Cream Cheese Fruit Dip {With Marshmallow Fluff}
- Easy Lamb Cake {With Marshmallows}
Easy Marshmallow Pops
By Abeer Rizvi
Quick, easy marshmallow pops, homemade with simple ingredients for many holidays (St. Patrick’s Day, Valentine’s Day, Halloween, birthdays). These versatile treats are fun to make and perfect for any celebration.
Pin Recipe
20 mins
20 mins
Dessert
American
20 Pops
99 kcal
Want to Save This Recipe?
Enter your email & I’ll send it to your inbox. Plus, get great new recipes from me every week!
By submitting this form, you consent to receive emails from CakeWhiz
Ingredients
- 30 Marshmallows (Regular sized)
- 1 cup Jelly candies (Various colors, can be cut into smaller pieces)
- ¼ cup Melted chocolate
- 2 tablespoons Corn syrup
Instructions
-
Push plastic or paper straws, wooden skewers, or lollipop sticks into the bottom of each marshmallow securely.
-
If you are making “kabob” style pops, thread marshmallows and jelly candies through the skewer in an alternating pattern for a colorful effect.
-
Draw desired details and designs on the marshmallows with fine-tipped edible markers once sticks are in place.
-
To decorate and cover with sprinkles, shredded coconut, or sanding sugar, brush marshmallows lightly with corn syrup or melted chocolate. Then, coat them fully in your desired topping. Let them set completely before serving. Enjoy your creative treats!
Notes
- Refer to the detailed tips and techniques provided in the article above for best results and creative ideas.
- Leftover marshmallow pops should be stored at room temperature for 1-2 days, ideally packaged individually in candy bags or an airtight container to maintain freshness.
Nutrition
Carbohydrates: 21g
Protein: 0.3g
Fat: 2g
Saturated Fat: 1g
Polyunsaturated Fat: 0.03g
Monounsaturated Fat: 0.3g
Trans Fat: 0.02g
Sodium: 10mg
Potassium: 7mg
Fiber: 0.1g
Sugar: 16g
Vitamin A: 0.1IU
Vitamin C: 7mg
Calcium: 1mg
Iron: 0.1mg
An automated tool is used to calculate the nutritional information. As such, I cannot guarantee the accuracy of the nutritional information provided for any recipe on this site.
Tried this recipe?
Leave a comment below or rate and tag @cakewhiz on social
