Easy Fondant Ladybug Cupcakes: A Delightful Decorating Tutorial for Kids’ Parties
Planning a memorable celebration for your little one? Look no further than these adorable and easy-to-make fondant ladybug cupcakes! Perfect for kids’ birthday parties, spring gatherings, or cheerful summer picnics, this decorating tutorial guides you through creating charming, edible ladybug toppers with simple ingredients and no need for elaborate tools. Get ready to impress your guests with these vibrant, homemade treats that are as delightful to look at as they are to eat.
When you browse online for cupcake ideas, you’ll discover a myriad of creative designs on platforms like Google or Pinterest. However, we believe our method for crafting these ladybug cupcakes stands out for its undeniable cuteness and incredible simplicity. It’s an ideal project for beginners and just as straightforward as our popular Easy Dinosaur Cupcakes or even our delightful Fondant Bumblebee Cupcakes. The joy of homemade treats combined with an effortless decorating process makes this recipe a guaranteed hit!
We specifically chose to make these charming cupcake toppers with marshmallow fondant. While frosting designs can be lovely, they often lead to a messy finish and, let’s be honest, can sometimes look a bit more “rustic” than intended. Fondant, on the other hand, provides a clean, polished look and allows for intricate details that truly bring these ladybugs to life. The entire decorating process is so simple and enjoyable that even children can lend a hand, transforming it into a fun family activity. Plus, fondant toppers hold their shape beautifully, ensuring your creations look perfect from the moment they’re placed on the table until the last bite.
These cheerful ladybug cupcakes would make a fantastic addition to various party themes. Imagine them brightening up a lively Backyard Kids Summer Party or adding a touch of whimsy to an adventurous Indoor Camping Party. Their vibrant red and black hues instantly evoke feelings of warmth, nature, and pure joy, perfectly complementing any spring or summer celebration.
And for those with an eagle eye, did you notice those little red fondant flowers adorning some of the cupcakes? They’re surprisingly easy to craft and add an extra layer of charm to your presentation. You can find a detailed tutorial for making them in our 4th of July Cake post. The best part? These delicate flowers can be made well in advance and stored for months, making party preparations even smoother!
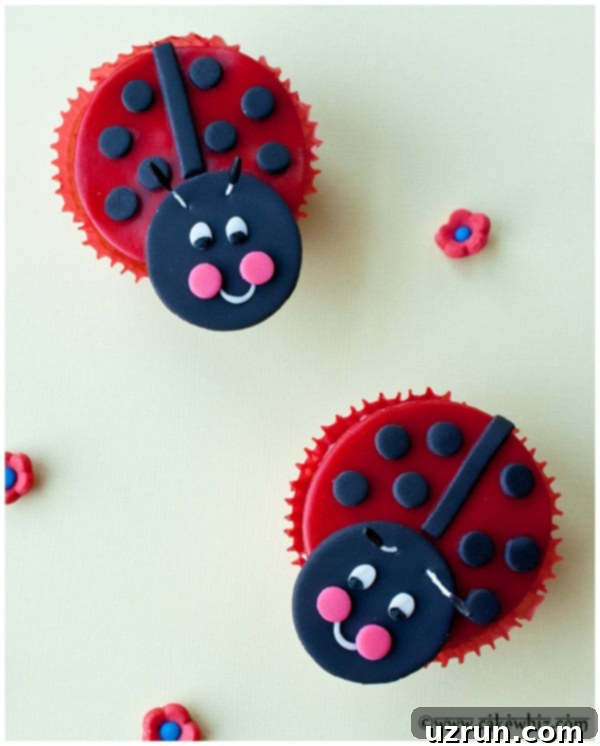
How to Make Easy Ladybug Cupcakes: A Step-by-Step Guide for Beginners
Creating these delightful ladybug cupcakes is a straightforward process that anyone can master, regardless of their decorating experience. Follow these simple steps to bring your charming edible insects to life.
- Bake Your Cupcakes: Start by baking your favorite batch of cupcakes. Whether you prefer vanilla, chocolate, or a more adventurous flavor, ensure they are completely cooled before you begin decorating. Warm cupcakes will melt your icing and fondant, leading to a sticky situation.
- Prepare Your Icing: Whip up a batch of your preferred buttercream icing. While plain white icing works perfectly, feel free to add a pop of color with gel food coloring if you wish. Green, blue, or even light pink icing can provide a lovely base for your red ladybugs.
- Cut Out Fondant Shapes: Roll out red fondant to an even thickness and use a large circle cutter to create the main body of your ladybug. Then, roll out black fondant and use a smaller circle cutter for the ladybug’s head.
- Assemble the Basic Topper: Carefully brush a tiny amount of water onto the top edge of the red fondant circle. This acts as a natural “glue.” Gently place the smaller black circle on top, ensuring it adheres firmly to create the head and body.
- Add Detailed Features: Now comes the fun part – bringing your ladybugs to life! Use black fondant to add classic ladybug spots, a thin strip down the back for the wings, and delicate antennae. You can also craft tiny white fondant circles for the eyes and draw on a sweet smile with an edible marker.
- Allow Toppers to Dry: Once your ladybug toppers are fully assembled with all their charming details, set them aside to dry. This crucial step allows the fondant to harden or partially harden, preventing them from losing their shape when placed on the iced cupcakes.
- Decorate and Display: Finally, ice your cooled cupcakes with your prepared frosting. Once iced, carefully place your dried fondant ladybug critters on top of each cupcake. Arrange them on a platter for a stunning and whimsical presentation!
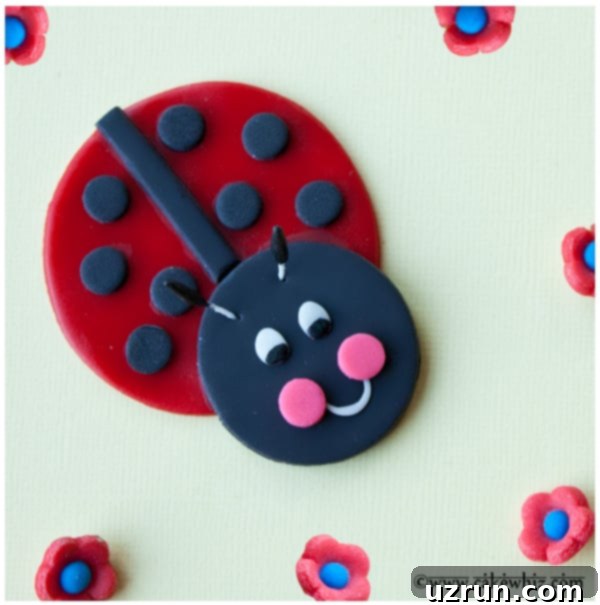
Expert Tips and Creative Variations for Stunning Ladybug Cupcake Toppers
Elevate your ladybug cupcakes with these helpful tips and imaginative variations, ensuring each treat is a masterpiece that perfectly suits your occasion.
Make Mini Cupcakes for Bite-Sized Delights: Don’t limit yourself to standard-sized cupcakes! These ladybug toppers scale down beautifully for mini cupcakes. Simply follow the same decorating instructions, but use smaller circle cutters for your fondant and adjust the size of the spots and other details accordingly. Mini ladybug cupcakes are perfect for dessert platters or when serving a crowd.
Explore Different Color Combinations: While classic red and black is iconic, feel free to experiment with other color palettes! For a girl’s birthday party, consider making black and pink ladybugs, or even whimsical purple and black ones. Green ladybugs with black spots could be a fun twist for a nature-themed party. The possibilities are endless, allowing you to match any party theme or color scheme.
Create a Striking Ladybug Cupcake Cake (Pull-Apart Design): For an impressive centerpiece, arrange your cupcakes closely together in the shape of a large ladybug. Once positioned, decorate the entire surface with icing and fondant, seamlessly connecting the individual cupcakes to form one giant, edible bug. This “pull-apart” cupcake cake is not only visually stunning but also incredibly easy to serve, as guests simply pull off a cupcake.
Consider Diverse Cupcake Flavors: The base cupcake flavor can greatly enhance the overall experience. For spring and summer parties, light and refreshing flavors are ideal. Think about these delightful Easy Orange Cupcakes or vibrant Lemon Cupcakes. Other excellent choices include classic vanilla, strawberry, or even a subtle berry flavor that complements the ladybug theme.
Pair with Complementary Frosting Flavors: The icing layer beneath your fondant topper offers another opportunity to introduce exciting flavors. Beyond traditional buttercream, consider pairing your ladybug cupcakes with a light and fruity Mango Frosting or a zesty Lemon Frosting. Chocolate ganache or a cream cheese frosting could also provide a delicious contrast.
Elevate with Delicious Fillings: Surprise your guests with a burst of flavor by filling your cupcakes! Core out a small center from each cooled cupcake and pipe in a delicious filling. Popular choices include rich chocolate truffles, creamy peanut butter, decadent Nutella, smooth ganache, bright Homemade Lemon Curd, or sweet Homemade Strawberry Jam. This extra step adds a gourmet touch that everyone will appreciate.
Always Decorate with Cooled Cupcakes: This tip is crucial! Never attempt to frost or decorate warm cupcakes. The heat will cause your carefully prepared icing to melt and soften your fondant toppers, turning your beautiful ladybugs into a sticky, unappealing mess. Patience is key – ensure your cupcakes are completely cool to the touch before starting any decoration.
Homemade Fondant vs. Marshmallow Fondant: Both homemade fondant (traditional sugar-based) and marshmallow fondant are excellent choices for these toppers. I personally prefer marshmallow fondant not only because it tastes incredibly good and often has a wonderful aroma, but also because it’s surprisingly easy to make at home. Alternatively, you can purchase pre-colored fondant from most craft or baking supply stores. This can save you a significant amount of time and effort, making the decorating process even quicker, especially if you’re working with multiple colors.
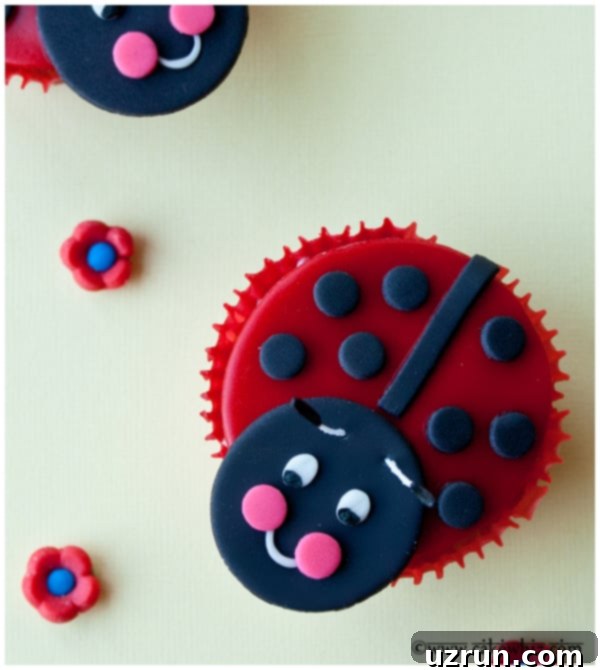
Proper Storage Solutions for Your Ladybug Cupcakes
To keep your delightful ladybug cupcakes fresh and looking their best, proper storage is essential. Here’s how to store them for optimal enjoyment:
Room Temperature: If consumed within 1-2 days, decorated cupcakes can be stored in a covered, airtight container at room temperature. This is ideal for preserving the texture of both the cupcake and the fondant, as refrigeration can sometimes alter their consistency. Ensure they are kept away from direct sunlight or heat sources.
Refrigerate: For longer storage, you can refrigerate your decorated ladybug cupcakes in a covered, airtight box for 3-5 days. While refrigeration helps extend their shelf life, be aware that the fondant toppers might become slightly firmer or develop a bit of condensation when brought back to room temperature. It’s best to let them sit out for 15-30 minutes before serving to allow the flavors and textures to mellow.
Freeze: Unfortunately, decorated cupcakes with fondant toppers are generally not suitable for freezing. When frozen cupcakes thaw, the condensation that forms on the surface causes the fondant decorations to become sticky and often melt or lose their intricate details. If you need to prepare cupcakes in advance and freeze them, it’s best to freeze the plain, unfrosted cupcakes and decorate them fresh on the day of your event.
More Creative Cupcake Decorating Tutorials
If you enjoyed making these ladybug cupcakes and are looking for more fun and easy decorating ideas, explore these other fantastic tutorials:
- Rainbow Flower Cupcakes
- Pull Apart Watermelon Cupcakes
- Easy Poinsettia Cupcakes
- Snowflake Cupcakes (Winter Wonderland Theme)
- How to Make Fondant Daisies
- How to Make Fondant Pansies
Recipe for Easy Fondant Ladybug Cupcakes

Easy Ladybug Cupcakes
Abeer Rizvi
Pin Recipe
Want to Save This Recipe?
Enter your email & I’ll send it to your inbox. Plus, get great new recipes from me every week!
By submitting this form, you consent to receive emails from CakeWhiz
Ingredients
- 24 Yellow cupcakes
- 3 cups Buttercream icing
- 2 cups Marshmallow fondant (1 cup each of black and red colors recommended)
Instructions
-
Bake your chosen cupcakes according to your recipe and ensure they are completely cooled before proceeding with decoration.
-
Prepare your buttercream frosting. You can tint it with gel food colors to match your theme, or leave it white.
-
Roll out the red marshmallow fondant to an even thickness (about 1/8 inch) and use a large round cutter to cut out the ladybug bodies.
-
Next, roll out the black marshmallow fondant and use a smaller round cutter to cut out pieces for the ladybug heads.
-
Lightly brush a tiny amount of water onto the top edge of each red fondant circle. Carefully place the smaller black circle on top to create the ladybug’s head, pressing gently to secure.
-
Using Wilton’s Tip #12 or a similar small round cutter, cut out tiny black circles from fondant for the spots. Also, use a knife to cut thin strips of black fondant for the wing division.
-
Brush a thin line of water down the center of the red body of each ladybug. Carefully place the thin black fondant strip along this line, trimming any excess with a knife for a neat finish.
-
Lightly moisten the back of the tiny black circles with water and stick them onto the red body to create the iconic ladybug spots.
-
To craft the antennae, take two pieces of flower stamen and carefully color their tips black using an edible marker. Then, cut each stamen in half to create four shorter antennae pieces.
-
Gently attach these prepared antennae to the top of the ladybug’s black fondant face, using a tiny dab of water if needed to help them adhere.
-
For the eyes, you can either create two small white fondant circles and add black pupils with an edible marker, or simply use store-bought candy eyeball sprinkles for an even quicker method. Attach with a tiny bit of water.
-
Using a black edible marker, draw a sweet, upturned smile on the ladybug’s face to complete its endearing expression.
-
For an extra touch of cuteness, add rosy cheeks by sticking two small, round pink sprinkles on either side of the mouth.
-
Allow these charming ladybug toppers to dry for 1-2 hours at room temperature. This will help them firm up and prevent them from smudging when handled.
-
Finally, once your cupcakes are iced and the fondant toppers are dry, carefully place one ladybug topper on top of each cupcake. Serve and enjoy the smiles!
Notes
- For best results and creative ideas, please refer to all the detailed tips and variations provided above in the article.
- Leftover decorated cupcakes, if stored correctly in a covered, airtight box at room temperature, will remain fresh for up to 2 days.
Nutrition
An automated tool is used to calculate the nutritional information. As such, I cannot guarantee the accuracy of the nutritional information provided for any recipe on this site.
