Spooktacular No-Bake Halloween Donuts: Easy Spider & Monster Treats for Kids’ Parties
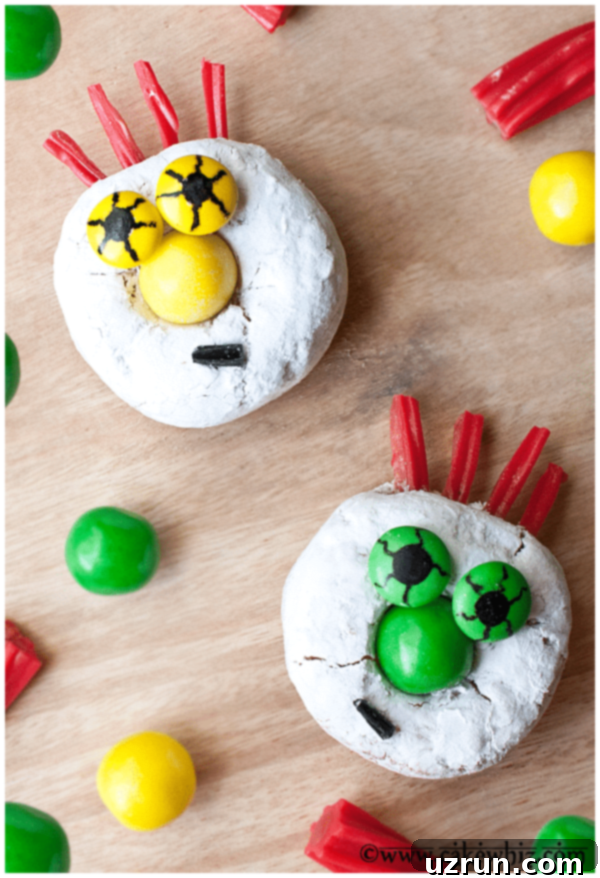
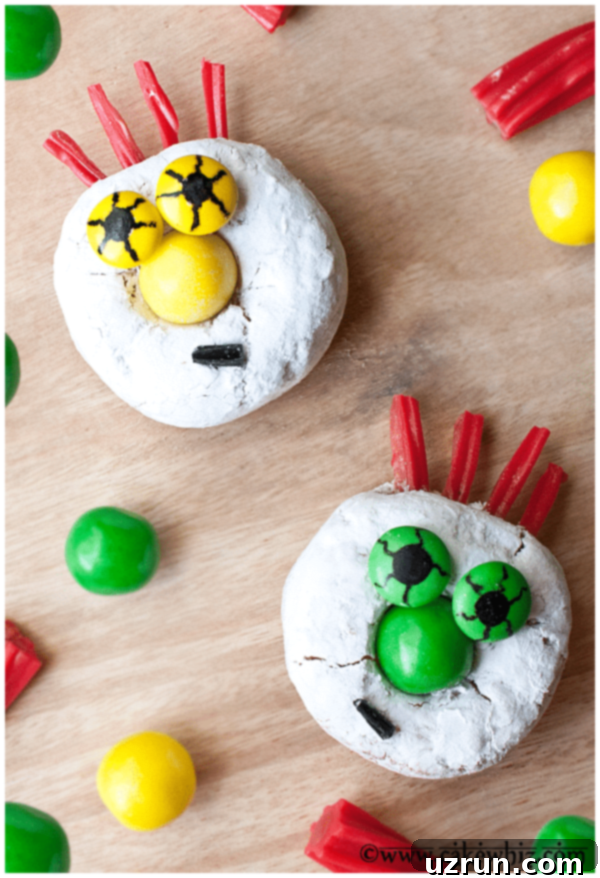
Get ready to add a touch of playful spookiness to your Halloween festivities with these incredibly simple, no-bake Halloween donuts! Crafted from readily available ingredients, these adorable spider and monster-themed treats are perfect for last-minute party preparations or a fun, edible craft activity with the kids. Forget the oven and complicated techniques; these decorated donuts focus purely on creative fun and delicious results, making them an instant hit for any Halloween gathering.
The idea for these little monster donuts sprang to life during a casual snack time. While munching on mini donuts, inspiration struck, leading to a delightful, if slightly chaotic, crafting session. My little helper (who was mostly focused on taste-testing the candies!) and I aimed for “cutesy” but ended up with something charmingly creepy instead – and that’s perfectly okay for Halloween! These monstrously easy treats require no baking whatsoever and zero complicated assembly, which is a huge win for busy parents and party planners. They are absolutely ideal for serving at Halloween parties, class events, or simply as a fun afternoon activity that results in an edible reward. If you’re looking for even more fantastic Halloween party ideas, be sure to explore our collection of Kids Halloween Party Ideas and this treasure trove of Easy Halloween Desserts {Cute & Spooky} to ensure your celebration is truly amazing.
How To Make Easy Halloween Donuts For Parties
Creating these festive Halloween donuts is incredibly straightforward, perfect for involving little hands or for those who prefer quick, no-fuss decorating. We’ll walk you through two classic spooky designs: creepy-crawly spiders and wacky, whimsical monsters. You’ll be amazed at how quickly these come together!
Spider Donuts: Step-by-Step Guide
These eight-legged delights are a Halloween staple, and making them couldn’t be easier. With just a few simple ingredients and minimal effort, you’ll have a whole colony of edible spiders ready to creep out (and delight!) your guests.
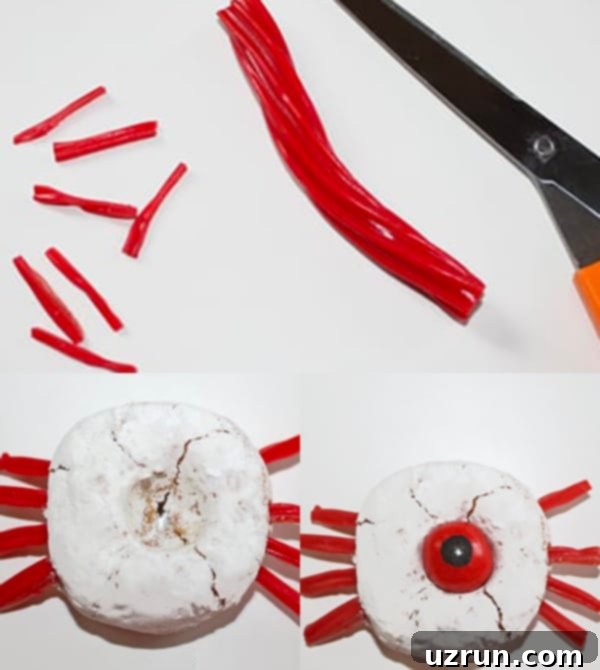
- Prepare the “Legs”: Take your Twizzlers and use clean kitchen scissors to cut them into thin strips, approximately 2 inches long. The flexibility of Twizzlers makes them perfect for creating bendable spider legs.
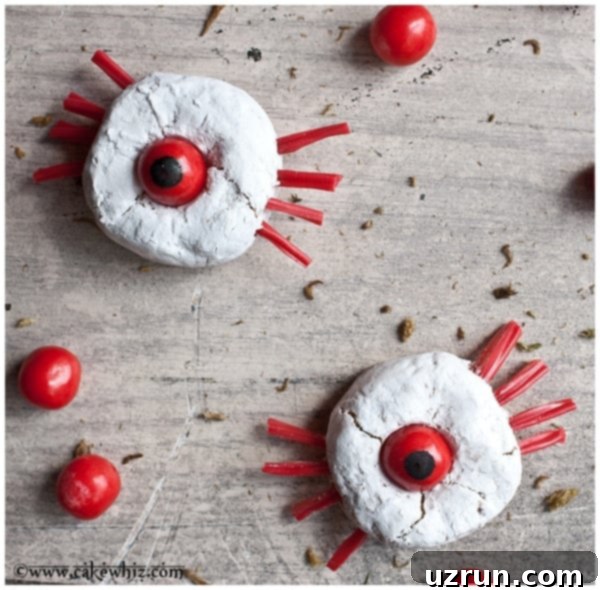
- Attach the Legs: Gently push three of these Twizzler strips onto one side of each mini donut, then repeat on the opposite side. Arrange them slightly to resemble spider legs. A tiny dab of melted chocolate (see tips below) can help secure them if they feel loose.
- Add the Eyeball: For that signature spider look, push a red gumball right into the center of the donut. The gumball should sit snugly, acting as the prominent single eye of your spooky arachnid.
- Draw the Eye Details: Grab a black edible marker and carefully draw a pupil onto the gumball. You can also add a few small lines radiating from the pupil for a more eerie effect. Enjoy your perfectly creepy spider donut!
Monster Donuts: Unleash Your Creativity
These monster donuts are where imagination truly shines! Embrace the slightly messy, wonderfully weird nature of monsters, and let each donut develop its own unique, charmingly grotesque personality. No two monsters need to be alike, making this a fantastic activity for creative expression.
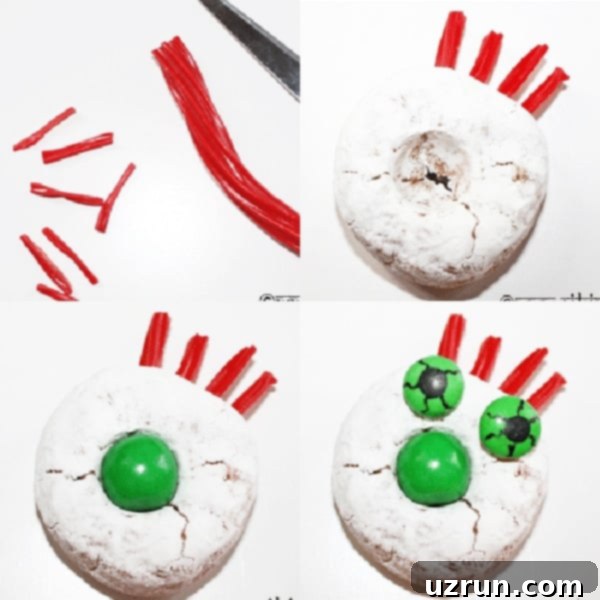
- Prepare Monster “Hair”: Cut red Twizzlers into small, thin pieces. These will become the wild and unruly hair for your friendly monsters.
- Add the Hair: Push about four of these small Twizzler pieces into the top of each donut. You can arrange them in various ways – spiky, floppy, or uneven – to give each monster a distinct hairdo.
- Create the Nose: Squeeze a small dollop of melted chocolate into the center of the donut, then immediately press a larger gumball onto it. This will form the monster’s prominent nose. You can use different colored gumballs for varied monster looks.
- Detail the Eyeballs: Use a black edible marker to draw pupils and other eye details (like squiggly lines or cross-hairs) onto two M&M candies. This is where your monsters really come to life!
- Attach the Eyes: Using a tiny bit more melted chocolate as adhesive, stick these decorated M&M eyes above the gumball nose. Place them close together for a cyclops effect, or further apart for a more traditional look.
- Add the Mouth: Finish your monster’s face by sticking a black sprinkle onto the donut with a small dab of melted chocolate. You can position it straight for a grimace, curved for a smile, or even off-center for a quirky expression. Enjoy creating your monstrous masterpieces!
More Spooky Donut Ideas & Creative Variations for Halloween
Once you’ve mastered the spider and monster designs, the possibilities for transforming simple donuts into spooktacular Halloween treats are endless! Here are even more creative variations to inspire your next decorating session:
Choose the Perfect Donut Base
The type of donut you choose can greatly influence your creation. While mini donuts (like store-bought “Donettes”) are excellent for small hands and quick decorating, don’t limit yourself! Consider using different varieties such as mini chocolate donuts for darker themes, plain glazed ones for a blank canvas, or even red velvet for a subtly sinister hue. Select a donut that not only tastes good but also complements your spooky theme.
Vampire Donut
Sink your teeth into this idea! To create a chilling vampire donut, simply insert a pair of small, fake plastic vampire teeth into the donut’s hole. Add some edible googly eyes above, and for a truly gruesome touch, drizzle a few drops of red gel icing to mimic dripping blood. It’s a quick and fun way to bring a classic Halloween character to life.
Spider Web Donut
This design is surprisingly elegant and incredibly easy. Start with a plain or glazed donut. Then, using melted dark or white chocolate (placed in a piping bag with a tiny hole or a zip-top bag with the corner snipped), pipe concentric circles onto the donut. Immediately drag a toothpick from the center outwards to create a classic cobweb pattern. For a detailed guide on this technique, check out my tutorial on Easy Spider Webs {With Melted Chocolate}.
Eyeball Donut
Simple yet effective, the eyeball donut is a must-have for a creepy dessert spread. Take a plain donut and position a single large gumball (preferably in a white or light color) in the center. Use a black edible marker to draw a pupil, and if you’re feeling ambitious, add thin red lines with a red edible marker to resemble bloodshot veins. These are wonderfully unsettling!
Ghost Donut
Boo! These friendly (or spooky) ghosts are a breeze to make. Dip your donut entirely into a white glaze or melted white chocolate, ensuring it’s fully coated. Once set, use two chocolate chips or mini M&Ms for eyes, or draw them on with a black edible marker. You can even create a simple “wavy” bottom edge by slightly pooling the white glaze.
Frankenstein Donut
It’s alive! Transform your donuts into Frankenstein’s monster. Dip the entire donut into vibrant green icing or green-colored melted white chocolate. Once coated, attach black Twizzler pieces to the top for the monster’s iconic flat hair. Use melted dark chocolate (piped with a fine tip) to draw stitches, a mouth, and even neck bolts for a truly electrifying treat.
Jack-o’-Lantern or Pumpkin Donut
Embrace the spirit of autumn with these festive pumpkin donuts. Dip them into bright orange icing or melted orange-colored white chocolate. Once the base is set, use melted dark chocolate to draw classic jack-o’-lantern faces – triangles for eyes and nose, and a jagged smile. Each face can have a different expression, from friendly to frightening!
Mummy Donut
Unwrap the deliciousness with these mummy donuts. Start with a chocolate or powdered donut. Using melted white chocolate or a white glaze, pipe thin stripes across the entire donut, overlapping them to create the appearance of bandages. Leave a small gap near the top center for the eyes, then add two M&Ms or edible googly eyes to complete your ancient treat.
Werewolf Donut
Howl at the moon for these fierce werewolf donuts! Like the vampire donuts, these can feature small plastic fake teeth for a snarling effect. The real magic comes from piping melted semi-sweet chocolate onto the donut in short, textured strokes to create the look of fur. Finish with M&Ms for glowing eyes to make these beasts truly come alive.
Essential Tips And Techniques for Perfect Halloween Donuts
To ensure your Halloween donut decorating experience is smooth, fun, and successful, keep these handy tips and techniques in mind. These small details can make a big difference in the final look and ease of preparation of your spooky treats.
Dying Chocolate for Vibrant Colors
If you plan to color melted white chocolate for any of your donut variations (like green for Frankenstein or orange for a pumpkin), always use an **oil-based food dye**. Water-based dyes, which are common for frostings, will cause chocolate to seize and become thick, clumpy, and unusable. Oil-based dyes are specifically formulated to blend seamlessly with the fat content in chocolate, ensuring a smooth, vibrant result. You can typically find oil-based food coloring in specialty baking stores or online.
Precision Cutting for Twizzlers
For neatly cut Twizzler pieces, especially for spider legs or monster hair, a good pair of kitchen scissors is your best friend. Ensure your scissors are clean and dedicated for food use to make precise, thin strips. If you don’t have kitchen shears, any clean, sharp pair of scissors will do the trick.
How to Melt Chocolate Perfectly
Melting chocolate can be tricky, but with the right technique, it’s a breeze. Always follow the package directions for the specific chocolate you’re using. If there are no instructions, a common method is to place chocolate chips or chopped chocolate in a microwave-safe bowl. Microwave on high for 30-second intervals, stirring thoroughly after each interval. Continue until the chocolate is smooth and fully melted, but be careful not to overheat it, which can cause it to burn or seize. Alternatively, a double boiler method (placing a heat-safe bowl over a pot of simmering water) works wonderfully for a gentler melt.
Creative Candy Alternatives
While M&Ms, gumballs, and Twizzlers are fantastic for decorating, feel free to get creative with other candies! Skittles, Sixlets, Reese’s Pieces, or even mini chocolate chips can be used for eyes, noses, or other facial features. Small gummy candies can also add a fun, chewy texture and vibrant color. Let your imagination (and your candy stash) guide you.
Using Pull-n-Peel Twizzlers
Absolutely, you can use Pull-n-Peel Twizzlers for your monster hair or spider legs! Just be aware that because they are designed to be easily pulled apart, the strips will be slightly less firm and might appear a bit more “dangly” than those cut from regular Twizzlers. If you prefer a firmer structure, you could try chilling the Pull-n-Peel strips briefly in the refrigerator before attaching them to the donuts. This can help them hold their shape better.
Involving Kids Safely
These no-bake donuts are an excellent activity for children. To keep things fun and (relatively) mess-free, set up a designated decorating station. Pre-cut Twizzlers, portion out candies, and have melted chocolate ready in squeeze bottles or zip-top bags with small holes. Supervise younger children, especially when using scissors or melted chocolate, and encourage them to express their own spooky creativity!
Storage of Decorated Halloween Donuts
Proper storage ensures your delightful Halloween donuts remain fresh and delicious for as long as possible. Here’s how to keep them at their best:
Room Temperature Storage
These decorated donuts are best enjoyed fresh, but they can be stored at room temperature for up to 2 days. Place them in an airtight container, such as a covered box or Tupperware, to prevent them from drying out. If you have multiple layers of donuts, separate them with parchment paper to prevent the decorations from sticking or getting damaged.
Freezing Decorated Donuts (Not Recommended)
While plain donuts can often be frozen, I do not recommend freezing these decorated Halloween donuts. The delicate candy decorations, especially gumballs and Twizzlers, tend to become very hard, brittle, and unpleasantly chewy after freezing and thawing. The texture of the donut itself can also change, becoming dry or stale more quickly. For the best flavor and presentation, it’s always best to make and enjoy these treats within a day or two of decorating.
Explore More Spooky Halloween Desserts
If these fun Halloween donuts have sparked your festive spirit, you’ll love these other easy and creative Halloween dessert ideas:
- Spooky Eyeball Candies
- Halloween Rolo Chocolate Spiders
- Easy Candy Cake (With Halloween Leftovers)
- Easy Ghost Cookies (Halloween Cookies)
- Easy Monster Cupcakes {Halloween Cupcakes}
Recipe: Halloween Donuts – Spider and Monster
Halloween Donuts- Spider and Monster
Abeer Rizvi
Pin Recipe
Want to Save This Recipe?
Enter your email & I’ll send it to your inbox. Plus, get great new recipes from me every week!
By submitting this form, you consent to receive emails from CakeWhiz
Ingredients
- 3 Twizzlers
- 20 Mini donuts Or store-bought “Donettes”
- ¼ cup Melted chocolate Semisweet or milk
- ⅓ cup Gum balls
- ⅓ cup M&M candies
- 1 tablespoon Black sprinkles For the mouth of the monsters
Instructions
Spider donuts
-
Use scissors to cut thin strips of Twizzlers. They should be about 2 inches long.
-
Push 3 strips of Twizzlers on one side of the donuts and 3 on the other side of the donut.
-
Push red gum ball in the center.
-
Use a black edible marker to draw an eye ball and enjoy.
Monster donuts
-
Cut up red Twizzlers into thin little pieces.
-
Push 4 little Twizzler pieces on top of the donut. These will be the monster’s hair.
-
Squeeze some melted chocolate in the center of the donut and stick a big gum ball in the center of the donut. This will be the monster’s nose.
-
Now, use a black edible marker to draw eye details on 2 m&m candies.
-
Stick these eyes above the nose, using some melted chocolate.
-
Stick a black sprinkle for the mouth, using melted chocolate and enjoy.
Notes
- Read all my tips above.
- Leftovers can be stored in a covered box at room temperature for about 2 days.
Nutrition
An automated tool is used to calculate the nutritional information. As such, I cannot guarantee the accuracy of the nutritional information provided for any recipe on this site.
With these easy, no-bake Halloween donuts, you’re not just making a treat; you’re creating delightful memories and adding a personalized touch to your spooky celebrations. Whether you opt for the classic spider, the whimsical monster, or venture into other creative variations, these donuts are guaranteed to bring smiles and maybe a few joyful screams. Gather your ingredients, unleash your creativity, and get ready for a deliciously fun Halloween!
