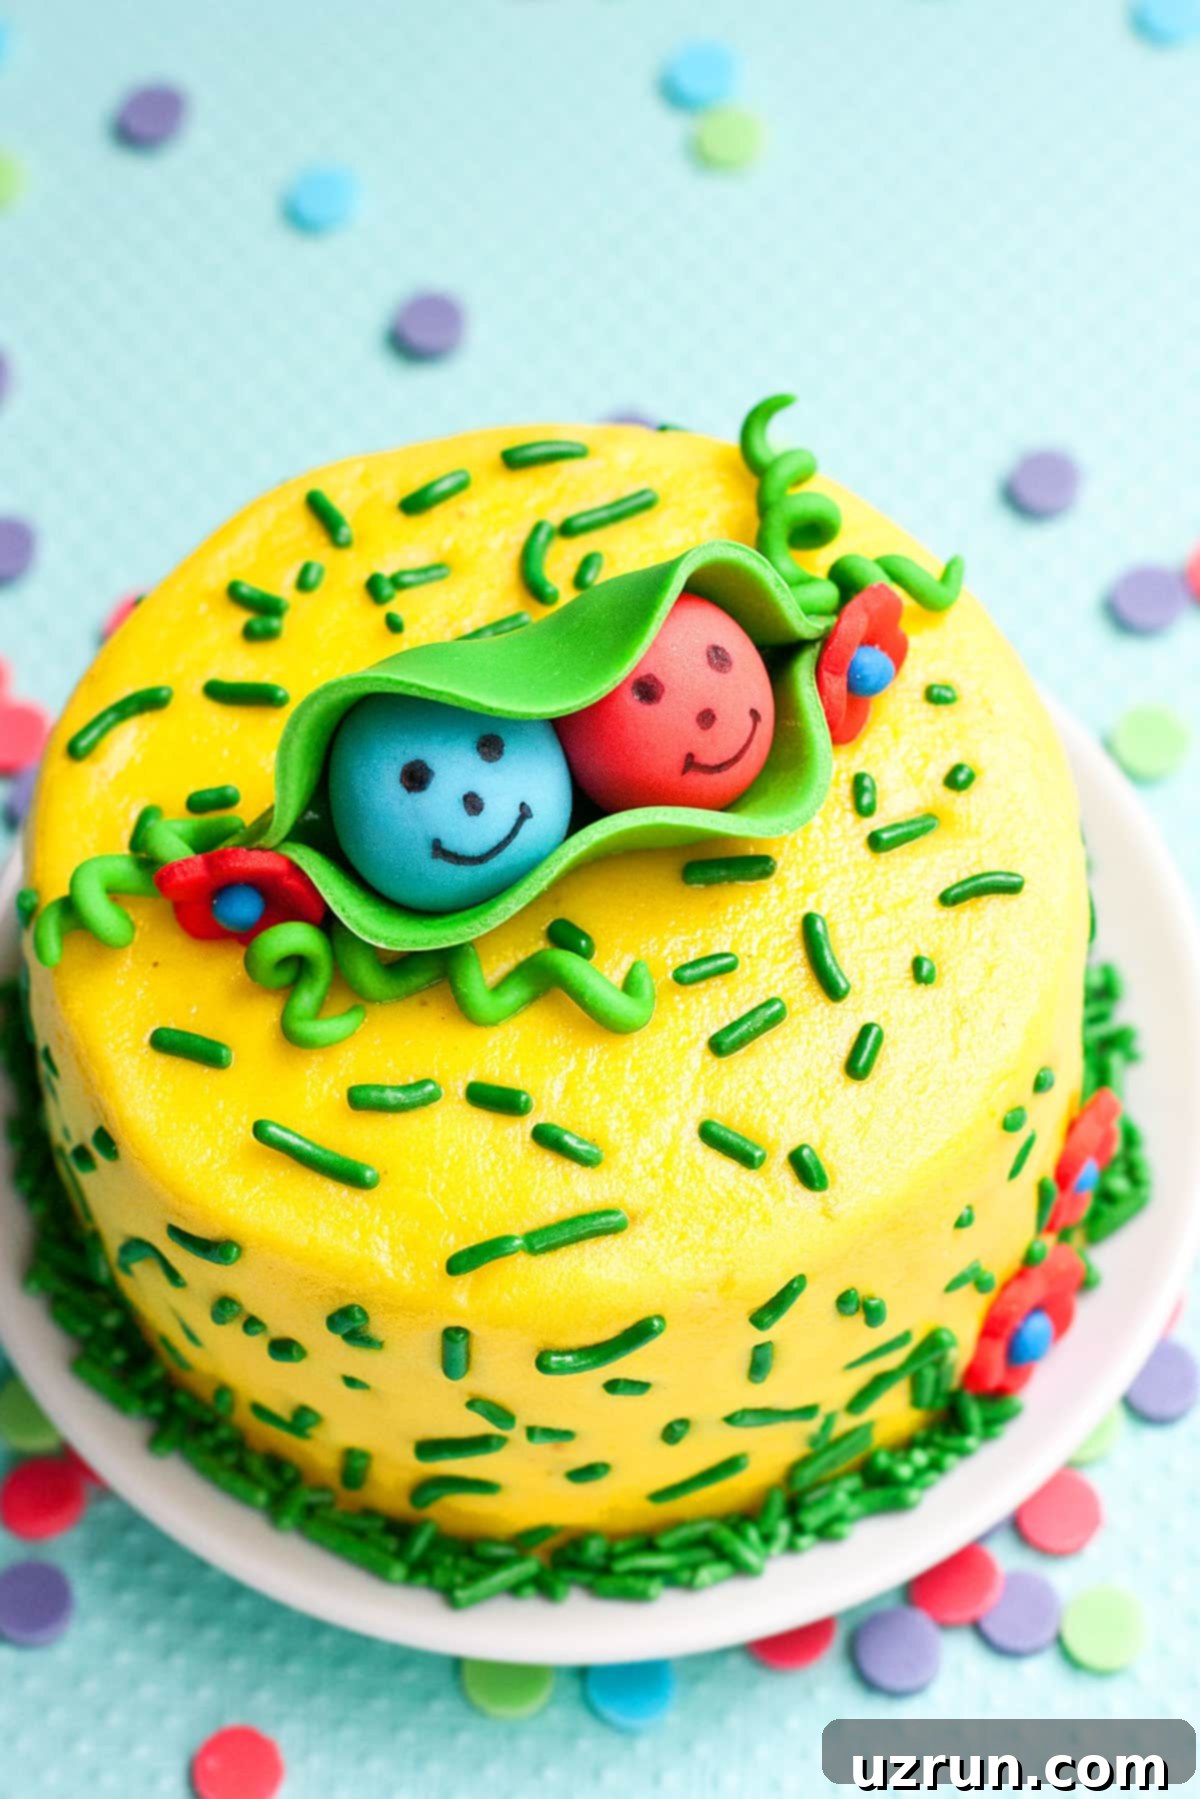
Adorable & Easy Two Peas in a Pod Twins Birthday Cake with Fondant Topper | Perfect for Baby Showers
Celebrate the joy of multiples with this incredibly charming and surprisingly easy-to-make twins birthday cake! Featuring an adorable two peas in a pod fondant topper, this cake is designed for simplicity without sacrificing cuteness. You won’t need any fancy tools, making it perfect for home bakers and even beginners. While ideal for twins’ birthdays, this versatile design is also fantastic for baby showers, gender reveal parties, or announcing the arrival of your precious little ones.
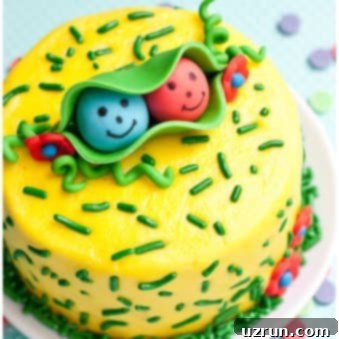
This “Two Peas in a Pod” cake truly amplifies the “aww” factor a million times over! I’ve crafted a sweet boy pea and a girl pea for a mixed-gender celebration, but you can easily customize the colors to match your preferences or the known gender of the babies. Imagine two pink peas, two blue peas, or even two gender-neutral green peas! Many variations of this theme exist, some looking quite complex, but this guide focuses on a straightforward approach. If you’re new to cake decorating, rest assured, you can master this design, much like my Gender Reveal Cake (Baby Shower). It’s truly a versatile centerpiece, perfect for a baby’s half or 1st birthday, baby showers, pregnancy announcements (especially for multiples), or to simply celebrate the babies’ actual arrival. For a touch of humor, you might also consider my Crying Baby Cake!
Table of contents
- How to make easy twins birthday cake?
- Key Ingredients for Your Two Peas in a Pod Cake
- Variations for Happy Birthday Twins Cake
- Tips and Techniques for Perfect Cake Decorating
- Storage Solutions for Your Cake
- More Decorated Birthday Cakes
How to Make an Easy Twins Birthday Cake (Step-by-Step Guide)
Creating this delightful “Two Peas in a Pod” cake is a fun and rewarding process. Follow these straightforward steps to bring your vision to life:
- Bake and Cool Your Cakes: Begin by baking your chosen cake flavor. While the cakes are baking and cooling completely, you can prepare your yellow frosting and start working on the adorable fondant topper. Ensuring your cakes are fully cooled is crucial for smooth icing application.
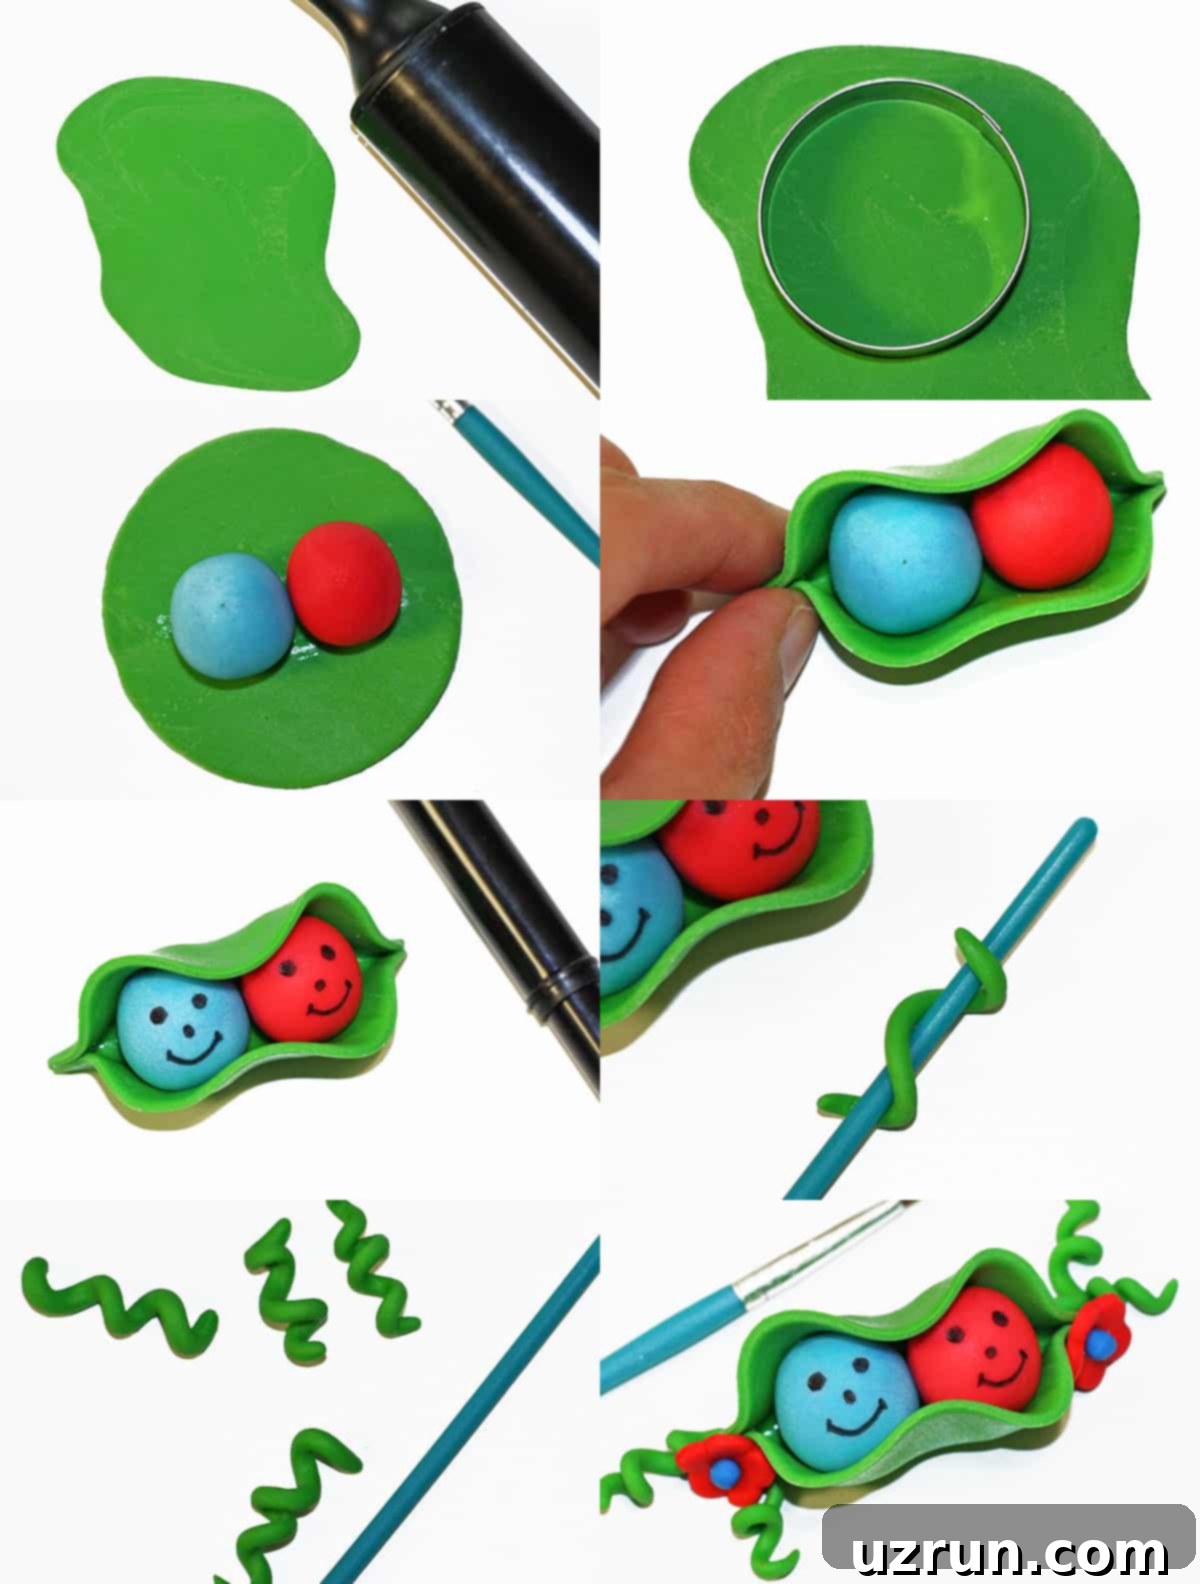
- Roll the Fondant Pod: Take a piece of green fondant and roll it out evenly. Use a circular cookie cutter to create a perfectly round shape for your pea pod. This ensures a consistent and professional look without the hassle of cutting by hand.
- Roll the Fondant Peas: For the “peas,” roll two small balls of fondant. If you’re doing a boy and girl theme, use blue and red fondant respectively. The key here is to make sure both balls are roughly the same size for a balanced and realistic appearance within the pod.
- Combine the Pod and Peas: Lightly brush a tiny amount of water onto the center of your green fondant circle. This acts as a natural adhesive. Carefully place your two fondant “peas” onto the watered area. Then, gently fold one side of the circular green fondant over the “peas” and pinch the sides together to create the distinctive pod shape.
- Draw Adorable Faces: Using a black edible marker, carefully draw cute little faces on your fondant peas. Simple dots for eyes and a small curved line for a smile are all you need to bring these characters to life.
- Air Dry the Topper: Allow your completed pea pod topper to air dry overnight. This step is essential for the fondant to harden and hold its shape, preventing it from collapsing or smudging when placed on the cake. Keep it away from moisture and direct heat.
- Craft Delicate Vines: To add a touch of natural charm, roll thin ropes of green fondant. Gently wrap these ropes around a clean paintbrush or pencil to create different sizes and shapes of curling vines. Carefully remove them and let them air dry on wax paper until hardened.
- Assemble and Ice the Cake: Place your first cooled cake layer on your chosen serving dish. Spread an even layer of your yellow buttercream frosting on top, then carefully place the second cake layer. Press gently to secure. Now, apply a smooth, even layer of frosting over the entire cake – sides and top.
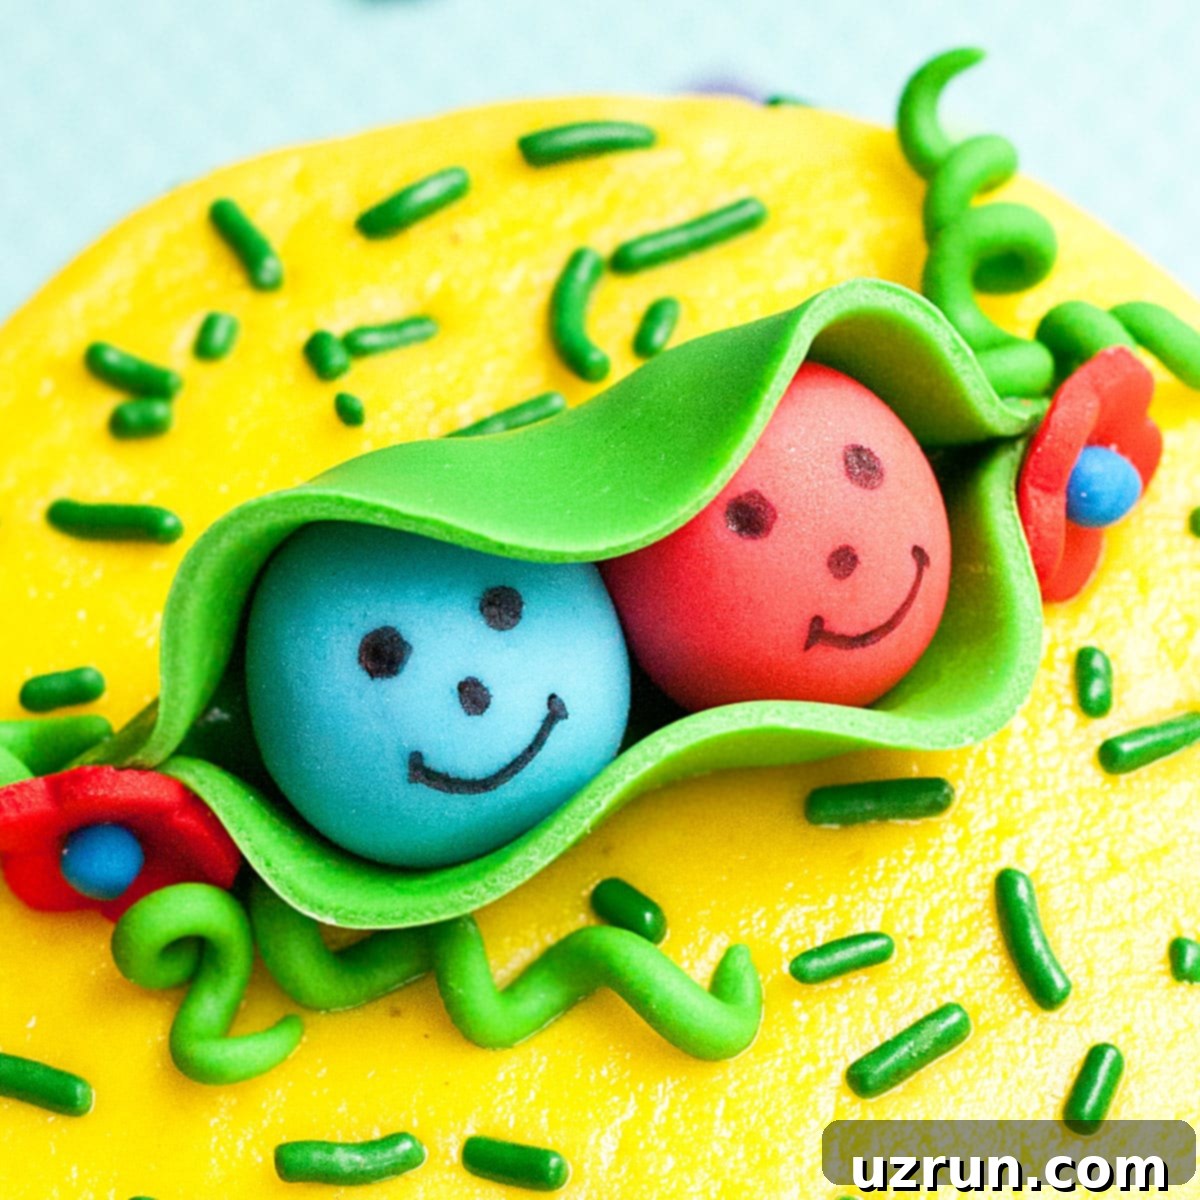
- Add Decorative Elements: Once your cake is smoothly iced, it’s time to add the charming details. Carefully position your hardened “two peas in a pod” topper on top of the cake. Arrange the fondant vines artfully around the topper and down the sides of the cake. For an extra pop of color, consider adding small red fondant flowers (you can find a guide in my 4th of July Cake post).
- Finish with Sprinkles: For a final, whimsical touch, sprinkle green sprinkles around the base of the cake. You can also use tweezers to strategically place a few sprinkles randomly on the cake for a textured, playful look. Now, your beautiful twins birthday cake is ready to be enjoyed!
Key Ingredients for Your Two Peas in a Pod Cake
The success of any beautiful cake starts with quality ingredients. Here’s a breakdown of what you’ll need for this “Two Peas in a Pod” masterpiece:
Cake: For this particular design, I opted for a delightful cherry cake flavor. Its subtle sweetness and vibrant notes make it a wonderful choice for celebrations. However, the beauty of this recipe is its flexibility! Feel free to use your family’s favorite cake flavor. Whether it’s classic vanilla, rich chocolate, or a fruity variation, ensure it’s a stable recipe that can hold up to decoration.
Icing: A smooth and delicious homemade buttercream icing is my go-to for decorating. It provides a stable base for your fondant decorations and holds its shape beautifully. For this “Two Peas in a Pod” theme, I tinted the buttercream a cheerful yellow using high-quality gel food coloring. Gel colors are preferred as they create vibrant hues without adding excess liquid to your frosting, which could alter its consistency.
Fondant Decor: The heart of our “Two Peas in a Pod” theme lies in the fondant decorations. The peas, pod, delicate vines, and any additional flowers are all crafted from fondant. Fondant offers a pliable and smooth canvas for creating intricate shapes. While homemade marshmallow fondant is a fantastic option for taste and texture, store-bought fondant is also perfectly acceptable and often comes pre-colored, saving you time. To add a final flourish, store-bought green sprinkles were used, offering a textural contrast and a playful finish.
Variations for Your Happy Birthday Twins Cake
One of the best parts about baking is the ability to customize! Here are some creative variations to make your twins birthday cake truly unique:
Try Another Cake Flavor: Don’t limit yourself to cherry! The base cake can be any flavor you love. Consider a festive Funfetti Cake / Confetti Cake {From Scratch} for an extra pop of color and celebration, a decadent Moist Triple Chocolate Cake {From Scratch} for the chocolate lovers, an elegant Pink Velvet Cake {With Strawberries} for a touch of sophistication, or the universally loved Best Vanilla Cake Recipe {From Scratch}. Each offers a different taste experience that can perfectly complement the sweet fondant topper.
Experiment with Different Frostings: The frosting provides both flavor and the canvas for your decorations. Instead of buttercream, you could try a light and airy Homemade Stabilized Whipped Cream, a rich and creamy White Chocolate Buttercream Frosting, or a fluffy Marshmallow Frosting Recipe. All of these can be easily dyed with gel food coloring to match your chosen theme colors, adding another layer of personalization.
Get Creative with Sprinkles: Sprinkles are a fantastic way to add texture and visual interest. Beyond green, you could incorporate chocolate sprinkles to create a “dirt” effect around the base for a more garden-like theme, or use pastel-colored sprinkles to enhance a baby shower theme. Gold or silver sprinkles can add a touch of elegance, while rainbow sprinkles can make it even more festive. Match the colors and shapes to your overall celebration vibe.
Opt for Green Peas for Gender Neutrality: If you’re hosting a gender reveal where the gender isn’t known yet, or simply prefer a more classic look, make both “peas” with green fondant. This maintains the adorable “two peas in a pod” theme while keeping it wonderfully gender-neutral and simply sweet. It’s also a great choice if you prefer a uniform color palette.
Enhance with a Delicious Filling: A cake filling can elevate the flavor profile of your cake. Consider adding a layer of homemade Cherry Pie Filling {Fresh or Frozen} for a fruity burst, a silky Homemade Vanilla Pudding {Best} for added creaminess, or an indulgent Easy Chocolate Ganache {2 Ingredients} for a rich surprise. These fillings can beautifully complement your cake and frosting choices.
Create Smaller Toppers for Cupcakes: Don’t limit this adorable design to a single cake! You can scale down the fondant “peas in a pod” toppers to adorn individual cupcakes. This is a fantastic option for larger gatherings, allowing each guest to enjoy their own miniature themed treat. It also makes for an impressive cupcake display.
Tips and Techniques for Perfect Cake Decorating
Achieving a professional-looking cake is easier with these expert tips and techniques. They’ll help you navigate the process like a seasoned decorator:
How to Make the Topper Dry Quickly? For quicker drying and a more durable topper, consider using gum paste instead of pure fondant, or a 50/50 mixture of half fondant and half gum paste. Gum paste hardens significantly faster and provides a stronger structure, which is particularly useful if you need the topper to stand upright or if you’re working in a humid environment. Ensure it dries on a flat surface away from moisture.
What Size Cake Does This Recipe Make? The instructions here are based on an 8×2 inch round cake, which provides a lovely, substantial base for the “peas in a pod” topper. However, you are welcome to adjust the cake size to suit your party needs. Remember that if you alter the size, you’ll need to adjust the quantities of your cake batter, frosting, and fondant accordingly to maintain the desired proportions and servings.
Roll the Peas the Same Size: This might seem like a small detail, but ensuring your two fondant “peas” are roughly the same size is crucial for the aesthetic appeal of your topper. It creates a more realistic and harmonious look within the pod, making the overall design balanced and visually pleasing.
Use a Circular Cookie Cutter to Make the Pod: While you could attempt to freehand a circle, using a circular cookie cutter is by far the easiest and quickest way to create a perfectly round base for your pea pod. This small tool ensures symmetry and a clean edge, which significantly impacts the professional finish of your topper.
Use Just a Little Bit of Water Inside the Pod: When attaching the “peas” to the pod, remember that a little water goes a long way. Brushing just a tiny amount of water (use a small, clean paintbrush) in the center of the green fondant circle provides enough moisture for the peas to adhere without making the fondant soggy or slippery. This gentle adhesive ensures they stick securely inside the pod.
Homemade Fondant vs. Store-Bought Fondant: Both homemade (especially marshmallow fondant) and store-bought fondant have their merits. I personally prefer homemade fondant because I find its taste to be superior, often softer and more vanilla-flavored. The main advantage of store-bought fondant is its incredible convenience: it comes pre-colored in a vast array of shades, saving you the often messy and tedious process of kneading in gel food coloring to achieve your desired hue.
How to Make Vines? To create the delicate curling vines, take small pieces of green fondant and roll them into very thin ropes, similar to spaghetti. Gently wrap these ropes around a clean, thin object like a paintbrush handle or a skewer to give them a natural curve. Carefully slide them off and place them on wax paper to air dry and harden. This drying process is essential for them to maintain their shape when placed on the cake.
Use Tweezers to Add Sprinkles: For precise placement of sprinkles, especially smaller ones or if you want an intentional pattern, a pair of clean kitchen tweezers can be your best friend. This allows you to pick up individual sprinkles and place them exactly where you want them on the cake, offering much more control than simply scattering them by hand. It’s perfect for creating clean lines or intricate details around the base or on top of the cake.
Don’t Decorate a Warm Cake: This is a golden rule in cake decorating! Your cake must be completely cooled to room temperature before you attempt to frost or decorate it with fondant. If the cake is even slightly warm, the icing will begin to melt, the fondant will become sticky and potentially tear, and you’ll end up with a frustrating, sticky mess. Patience is key for a beautifully decorated cake.
Achieving Smooth Buttercream: For a flawlessly smooth finish, ensure your buttercream is at the right consistency – not too stiff, not too runny. You can achieve this by beating it on medium-high speed for several minutes, then switching to low speed to remove air bubbles. Use an offset spatula or a cake scraper for the smoothest application.
Working with Fondant in Humidity: Humidity is fondant’s arch-nemesis! If you live in a humid climate, fondant can become sticky and difficult to work with. Combat this by working in an air-conditioned room. You can also lightly dust your work surface and hands with cornstarch (not powdered sugar, as it can absorb moisture) to prevent sticking.
Storage Solutions for Your Cake
Proper storage is essential to keep your beautiful “Two Peas in a Pod” cake fresh and looking its best for the celebration and beyond:
Refrigerate Decorated Cake: If you have leftovers of your decorated cake, they can be stored in a sealed container in the fridge for up to 3 days. However, it’s important to note that fondant decorations can become slightly sticky and tacky due to the moisture in the refrigerator. To minimize this, you can place a piece of paper towel in the container to absorb some humidity, and allow the cake to come closer to room temperature before serving for the best texture and flavor.
Freeze Unfrosted Cakes: For future planning, unfrosted cake layers can be frozen for up to 1 month. Wrap each cooled cake layer tightly in plastic wrap, then an additional layer of aluminum foil, and store in an airtight container or freezer bag. When you’re ready to use them, simply let them thaw in the fridge overnight. Once thawed, proceed with frosting and decorating as per the instructions.
Make Ahead Instructions: This cake can be baked and fully decorated 1 day in advance of your event. If storing overnight, ensure it’s in a cool, dry place at room temperature, ideally in a cake box or under a cake dome, until you are ready to serve. This allows the flavors to meld beautifully and the fondant to remain firm, ensuring it’s perfect for the celebration.
More Decorated Birthday Cakes
If you enjoyed making this “Two Peas in a Pod” cake and are looking for more creative cake decorating ideas, explore these other fun and unique recipes:
- Easy Emoji Cake (Poop Cake)
- Erupting Volcano Cake (With Dry Ice Smoke)
- Galaxy Cake
- Tie Dye Cake
- Easy Shoe Cake (Sneaker Cake)
- Lord of the Rings Cake (Sauron Eye Cake)
- Flower Basket Cake (Basketweave)
Recipe
Easy Twins Birthday Cake
Abeer Rizvi
Pin Recipe
Want to Save This Recipe?
Enter your email & I’ll send it to your inbox. Plus, get great new recipes from me every week!
By submitting this form, you consent to receive emails from CakeWhiz
Ingredients
- 2 Cherry cake Round, Dimension: 8 x 2 each (or your preferred cake flavor)
- 3 cups Buttercream icing Colored yellow (or color of choice)
- Marshmallow fondant Green, blue, red (or other colors for peas)
- 2-3 tablespoons Green sprinkles
- Black edible marker
- Water (for fondant adhesive)
- Wax paper (for drying fondant)
Instructions
-
Bake your preferred cake layers and allow them to cool completely to room temperature on a wire rack. This is crucial for successful icing.
-
While the cakes are baking and cooling, prepare your buttercream frosting. Tint it a cheerful yellow (or your desired color) using gel food coloring until a consistent shade is achieved. Simultaneously, begin crafting your fondant cake topper.
-
For the pea pod topper, roll out green fondant evenly on a lightly cornstarched surface. Use a circular cookie cutter to cut out a clean, round piece that will form the base of your pod.
-
Take your red and blue fondant (or chosen colors) and roll them into two small, perfectly spherical balls. Ensure they are the same size to create a balanced look for your “peas.”
-
Lightly brush a small amount of water onto the center of the green fondant circle. This will serve as the “glue” for your peas. Carefully place the two fondant balls side-by-side on this moistened spot.
-
Gently fold one side of the green fondant circle over the two balls, creating the characteristic “pea pod” shape. Pinch the sides of the fondant together to seal and secure the peas inside.
-
Using a black edible marker, draw adorable facial details onto your fondant peas. Simple dots for eyes and a small curved line for a smile are often all that’s needed to give them personality.
-
Allow the completed pea pod topper to air dry and harden overnight. Place it on a piece of wax paper in a cool, dry area, away from direct sunlight or moisture, to ensure it holds its shape.
-
To create the charming fondant vines, roll very thin ropes of green fondant. Carefully wrap these ropes around a paintbrush handle or a thin dowel to give them a natural curl. Gently remove them from the paintbrush and lay them on wax paper to air dry and harden.
-
To assemble your cake, place one cooled cake layer on your chosen cake stand or serving dish. Spread an even layer of your yellow buttercream frosting over the top. Carefully place the second cake layer on top, pressing gently to secure. Apply a smooth, even layer of frosting over the entire cake, covering both the top and sides, striving for a polished finish.
-
Carefully place your hardened “two peas in a pod” topper on top of the cake. Arrange the dried fondant vines artfully around the topper and cascading down the sides of the cake, creating a natural, whimsical effect.
-
For an extra burst of color and charm, you can add some simple red fondant flowers around the cake. Instructions on how to make these can be found in my 4th of July Cake post.
-
Complete the decoration by scattering green sprinkles around the base of the cake for a playful touch. For more precise placement, use tweezers to stick some sprinkles randomly onto the iced surface of the cake. Your adorable twins birthday cake is now ready to be proudly displayed and enjoyed!
Notes
- Be sure to read all the detailed tips and techniques provided above for the best results and a smoother decorating experience.
- Leftover cake, once decorated, can be stored in a covered box in the fridge for up to 3 days. Please remember that fondant decorations may become slightly sticky due to the moisture in the refrigerator, but the cake will remain delicious.
- If you need the topper to dry more quickly and harden significantly, consider using gum paste alone or a 50/50 mixture of half fondant and half gum paste. This will provide a firmer and more stable decoration.
Nutrition
An automated tool is used to calculate the nutritional information. As such, I cannot guarantee the accuracy of the nutritional information provided for any recipe on this site.
Creating this “Two Peas in a Pod” twins birthday cake is more than just baking; it’s about crafting a memorable centerpiece for a truly special celebration. The joy of presenting a homemade cake, especially one so perfectly themed for twins, is unmatched. With this easy guide, even those new to cake decorating can achieve a stunning result. Don’t be afraid to experiment with flavors and colors to make it uniquely yours. Happy baking, and enjoy celebrating your sweet little peas!
