Easy Pikachu Donuts: Your Guide to Adorable Pokemon Treats!
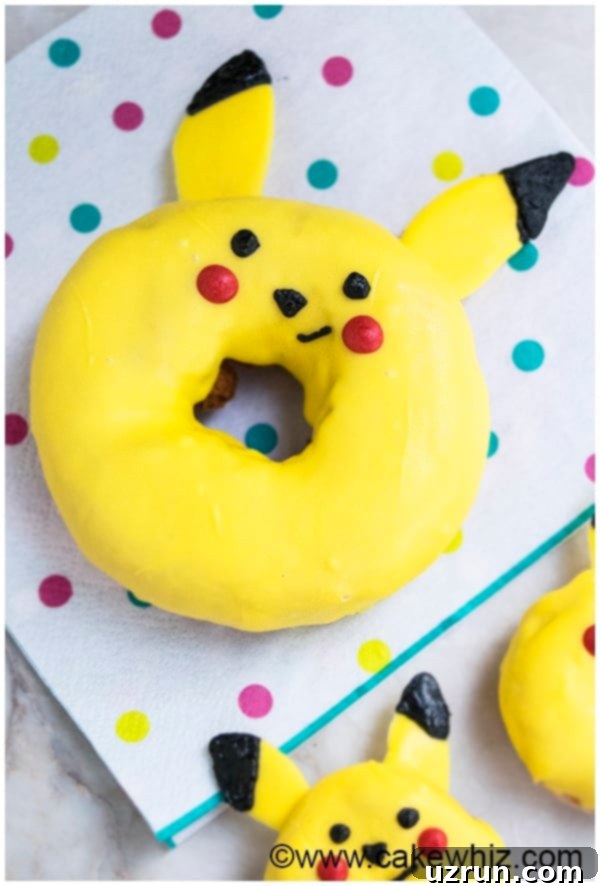
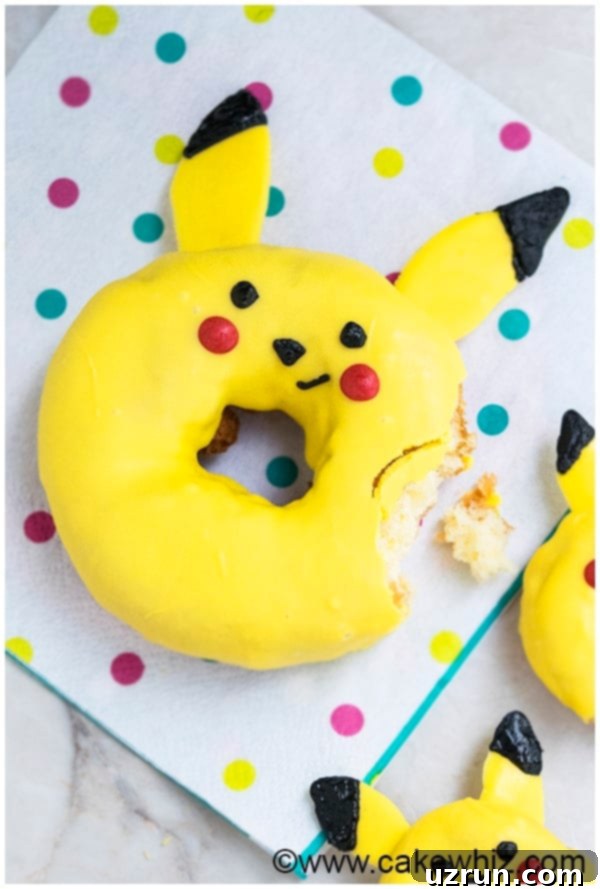
Are you ready to catch ’em all… in donut form? Dive into the delightful world of Pokémon with these incredibly quick and easy Pikachu donuts! Whether you’re a seasoned baker or a complete beginner, this guide will show you how to transform simple homemade or store-bought doughnuts into charming Pikachu characters using just melted black, yellow, and red chocolate or candy melts. These adorable treats are perfect for themed birthday parties, fun kids’ snacks, or simply bringing a smile to any Pokémon fan’s face. Get ready to create a dessert that’s as cute as it is delicious!

The global phenomenon of Pokémon continues to capture hearts, and for good reason! Pikachu, with its iconic yellow fur and rosy cheeks, is undoubtedly one of the most beloved characters. My son, like many others, has been completely captivated by the Pokémon craze, and it shows no sign of slowing down. This made crafting these special treats an absolute joy, seeing his face light up with excitement. While you might find similar designs in bakeries or even popular chains like Krispy Kreme, there’s a unique satisfaction in creating your own. These homemade Pikachu donuts were devoured with as much enthusiasm as my Easy Pokemon Cake (Pokeball Cake), and they’re always a hit for any themed celebration. They add an extra touch of magic and fun to any gathering, making memories that last long after the last bite.
Key Ingredients for Pikachu Donuts
Crafting these adorable Pikachu donuts requires just a few essential ingredients. The beauty of this recipe lies in its simplicity and accessibility, allowing you to use either homemade donuts for that extra personal touch or readily available store-bought ones for convenience.
- Donuts: The foundation of our Pikachu. Plain, unglazed donuts are your best friend here. Their smooth surface provides the perfect canvas for dipping and decorating. You can choose classic yeast donuts for a fluffy texture or cake donuts for a denser bite. Ensure they are completely cooled if making them from scratch.
- Melted Chocolate or Candy Melts: This is where the magic happens! You’ll need specific colors to bring Pikachu to life:
- Yellow Chocolate/Candy Melts: For Pikachu’s signature bright yellow body. Candy melts are fantastic for this as they come pre-colored and melt smoothly.
- Black Chocolate/Candy Melts: Essential for his expressive eyes, nose, mouth, and the tips of his ears.
- Red Chocolate/Candy Melts: To create those iconic rosy cheeks.
Using quality chocolate or candy melts ensures a vibrant finish and an even coating that sets nicely.
Essential Equipment for Donut Decoration
Having the right tools on hand will make the decorating process smooth and enjoyable. You likely have most of these in your kitchen already!
- Microwave-Safe Bowls or Double Boiler: For melting your chocolates or candy melts. Separate bowls for each color are recommended.
- Piping Bags (or Ziploc Bags): Crucial for adding the fine details of Pikachu’s face and creating the ears. If you don’t have piping bags, a small Ziploc bag with a tiny corner snipped off works perfectly.
- Wax Paper or Parchment Paper: To lay out your dipped donuts for setting and to pipe the delicate chocolate ears onto. This prevents sticking and makes transfer easy.
- Small Spoon or Spatula: For stirring melted chocolate and perhaps assisting with dipping.
- Sharp Knife: A small, sharp knife will be useful for making tiny incisions in the donuts to insert Pikachu’s ears.
- Cooling Rack (Optional but Recommended): While wax paper works for setting, a cooling rack can help excess chocolate drip off, if preferred, before transferring to wax paper.
How to Make Easy Pikachu Donuts: Step-by-Step Guide
Creating these charming Pikachu donuts is a straightforward process that’s perfect for a fun afternoon activity. Follow these simple steps to bring your favorite electric-type Pokémon to life!
- Prepare Your Donut Canvas: Start by ensuring your donuts are completely plain, unglazed, and at room temperature. This is essential for the chocolate to adhere properly.
- Dip for Pikachu’s Yellow Body: Melt your yellow chocolate or candy melts in a microwave-safe bowl according to package directions, stirring until smooth. Dip each plain donut face down into the melted yellow chocolate, ensuring it’s evenly coated. Gently lift, allowing any excess chocolate to drip off, then place the dipped donut onto a sheet of wax paper to set. Repeat for all donuts and allow the chocolate to harden completely – this might take 15-20 minutes at room temperature, or a few minutes in the refrigerator if you’re in a hurry.
- Pipe the Facial Details: While the yellow chocolate sets, melt your black and red chocolates separately. Transfer the melted black chocolate to a piping bag (or a small Ziploc bag with a tiny corner snipped). Carefully draw Pikachu’s expressive eyes, small nose, and signature zig-zag mouth onto the front of each yellow-coated donut.
- Add Rosy Cheeks: Next, fill a separate piping bag with the melted red chocolate. Pipe two small, round red cheeks just below Pikachu’s eyes. Allow these details to set slightly so they don’t smudge.
- Craft Pikachu’s Iconic Ears: This is a key step! Using the yellow chocolate in a piping bag, pipe two “leaf-like” or elongated triangular shapes onto a clean piece of wax paper for each donut. Aim for consistency in size. Let these yellow ear shapes set completely. Once firm, take your black chocolate piping bag and carefully draw a small black tip on the end of each yellow ear. Allow these to set again. Remember, these are delicate, so consider making a few extra!
- Attach the Ears: Once all your chocolate elements are firm, use a small, sharp knife to make two shallow, vertical cuts along the top sides of each yellow donut where the ears would naturally sit. Carefully peel the hardened chocolate ears from the wax paper. Gently push the base of each ear into the prepared cuts on the donut. Take your time to ensure they are secure.
- Enjoy Your Creation! And just like that, your adorable Pikachu donuts are complete! They are ready to be admired and, of course, enjoyed.

Creative Variations and Expert Decorating Tips
This recipe offers a fantastic base for creativity. Here are some ideas to customize your Pokémon donuts and ensure your decorating process is a breeze:
- Explore Different Shapes and Sizes: Don’t limit yourself to standard donuts!
- Mini Pikachu Donuts: Use mini donuts or donut holes to create “baby Pikachus” or a whole family of Pokémon. They make adorable bite-sized treats.
- Other Pokémon Characters: With different colored melts and piping skills, you could adapt this technique to create other anime characters or Pokémon like Jigglypuff (pink), Squirtle (blue), or Charmander (orange).
- Try a Different Donut Flavor: While plain donuts are recommended for dipping, the underlying flavor can vary.
- Vanilla or Lemon Donuts: These subtle flavors complement the sweet chocolate coating well.
- Strawberry or Banana Donuts: For a fruity twist that adds an unexpected layer of flavor. Just ensure the donut itself isn’t too dark in color if you want the yellow coating to stand out.
- Transform into Donut Pops: For an easy-to-handle party treat, insert large popsicle sticks or lollipop sticks into the base of each prepared donut. This makes them less messy for little hands and creates a fun presentation.
- Jelly or Cream-Filled Donuts: Yes, you can use filled donuts! However, be aware that they might be a little trickier to handle due to their softer centers. Be gentle when dipping and inserting the ears to avoid squishing the filling out.
- Pokeball Option: Want to expand your Pokémon universe? Use melted white, black, and red chocolate to transform plain donuts into classic Pokeballs.
- Dip half the donut in red and the other half in white.
- Once set, draw a black line across the middle where the two colors meet.
- Add a black circle in the center of the black line, and a smaller white dot in the middle of that circle.
- Donut holes also work wonderfully for miniature Pokeballs!
Tips and Techniques for Perfect Pikachu Donuts
Achieving picture-perfect Pikachu donuts is easier than you think with these helpful tips and techniques:
- Donut Choice is Key: Always opt for plain, unglazed donuts. Glazes can prevent the melted chocolate from adhering properly, leading to a messy finish. Homemade or store-bought, the flatter and less greasy the surface, the better your results will be.
- Coloring White Chocolate: If you can’t find pre-colored candy melts, you can color white chocolate. However, it’s crucial to use oil-based food colors. Water-based food coloring will cause the chocolate to seize and become thick and unusable.
- Candy Melts for Ease: For vibrant colors and hassle-free melting, I highly recommend using candy melts. They are specifically designed for melting and coating, come in a wide array of colors, and save you the extra step of coloring white chocolate. This makes the process significantly simpler and quicker.
- Piping Ears on Wax Paper: Always pipe the delicate chocolate ears onto wax paper or parchment paper. This non-stick surface allows the hardened chocolate shapes to be easily peeled off without breaking, making transfer to the donut a breeze.
- Practice Makes Perfect (and Extra Donuts!): Don’t expect perfection on your first try! Decorating takes a little practice. Have some extra plain donuts on hand for trial runs or if you make a mistake. It’s better to have too many than too few.
- Make Extra Chocolate Ears: The chocolate ears are the most fragile component of these donuts. They can easily break during handling or insertion. To avoid frustration, always pipe a few extra ears, more than you think you’ll need. This way, if one breaks, you have a spare ready to go.

Recipe FAQs
To make Pikachu’s ears, melt yellow chocolate or candy melts and transfer it to a piping bag. On a sheet of wax paper, pipe two “leaf-like” or elongated triangular shapes for each donut. Let the yellow chocolate set completely. Once firm, use melted black chocolate in a separate piping bag to draw small black tips on the ends of these yellow ears. Allow the black chocolate to set again before carefully peeling them off the wax paper for assembly.
While plain, unglazed donuts are the easiest to work with and highly recommended for a smooth finish, you’re certainly not limited. Feel free to use your imagination! You can experiment with different shapes, sizes (like mini donuts or donut holes), and even various plain donut flavors (vanilla, lemon, etc.). Just ensure there’s no sticky glaze that would prevent the chocolate from adhering well.
Yes, you can color white chocolate to achieve your desired shades. However, it’s absolutely crucial to use oil-based food coloring. Standard liquid or gel food colorings (which are water-based) will cause the chocolate to seize, turning it into a thick, crumbly mess. For the utmost ease and best results, I strongly suggest using pre-colored candy melts, as they are formulated for smooth melting and vibrant colors without the need for additional coloring.
The actual hands-on prep time for these donuts is quite quick, usually around 30 minutes. This includes melting the chocolate, dipping, piping details, and making the ears. The total time, however, includes allowing the chocolate coatings and piped ears to set, which can add another 30 minutes to an hour depending on your room temperature or if you opt to briefly chill them in the refrigerator.
Absolutely! These Pikachu donuts can be easily made 1 day in advance. This makes them perfect for party planning or preparing a fun snack without last-minute rush. Store them properly as detailed in the storage section to maintain their freshness and appearance.
Proper Storage for Your Pikachu Donuts
To keep your delightful Pikachu donuts fresh and looking their best, proper storage is essential. Following these guidelines will ensure they remain delicious for enjoyment.
- Room Temperature: The best way to store these chocolate-coated donuts is in an airtight, covered container at room temperature. Keep them away from direct heat and sunlight, which can cause the chocolate to melt or become sticky. When stored this way, they will stay fresh and delicious for up to 2 days. This method helps prevent the chocolate from developing condensation or cracking.
- Refrigeration: I do not recommend refrigerating these donuts. While it might seem like a good idea for preservation, the drastic temperature change can cause the chocolate coating to ‘bloom’ (develop a whitish film) or, more commonly, to crack upon thawing. The condensation that forms can also make the donuts soggy.
- Freezing: Similar to refrigeration, freezing is not recommended for the same reasons. The expansion and contraction during freezing and thawing can cause significant cracking in the chocolate coating, compromising both the appearance and texture.
- Make Ahead: These donuts are ideal for making a day in advance! Simply prepare them as instructed, allow all chocolate to set fully, and then store them in an airtight container at room temperature. They’ll be ready to impress the next day!
More Donut Recipes to Explore
If you enjoyed making these fun Pikachu donuts, you’ll love exploring more of our creative and delicious donut recipes. Perfect for any occasion or craving!
- Homemade Jelly Filled Donuts (Sufganiyot)
- Easy Baked Pumpkin Donuts (With Cake Mix)
- Easy Christmas Donuts (6 Designs)
- Halloween Donuts (Spider and Monster)
- Baked Apple Cider Donuts (Cake)
Recipe Card

Pokemon Donuts (Pikachu Donuts)
Abeer Rizvi
Pin Recipe
Want to Save This Recipe?
Enter your email & I’ll send it to your inbox. Plus, get great new recipes from me every week!
By submitting this form, you consent to receive emails from CakeWhiz
Ingredients
- 10 Donuts Unglazed, Homemade or Store-bought
- 2 cups Yellow chocolate Melted
- ½ cup Red chocolate Melted
- ½ cup Black chocolate Melted
Instructions
-
Melt yellow chocolate or candy melts in a large bowl according to package directions, stirring until smooth. Dip a plain donut face down into the bowl of melted yellow chocolate, ensuring even coverage. Place it on a sheet of wax paper and allow the chocolate to set completely (about 15-20 minutes).
-
Melt black chocolate or candy melts separately. Fill a piping bag with melted black chocolate and carefully draw Pikachu’s eyes, nose, and mouth onto the set yellow donut.
-
Melt red chocolate or candy melts. Fill a separate piping bag with melted red chocolate and draw two round cheeks just below the eyes. Allow all facial details to set.
-
Now, make Pikachu’s ears. Fill a piping bag with yellow chocolate and draw two “leaf-like” or elongated triangular shapes on a clean sheet of wax paper. Make them roughly the same size and create a few extra as they are delicate. Let the yellow chocolate set. Then, fill a piping bag with melted black chocolate and draw the black tips on these yellow ear shapes. Let the black chocolate set again.
-
Use a small, sharp knife to make two shallow vertical cuts along the top sides of each donut, where the ears will be inserted.
-
Carefully remove the hardened yellow and black ears from the wax paper. Gently push the base of each ear into the prepared cuts on the donut. Ensure they are secure and enjoy your adorable Pikachu donuts!
Notes
- Use either homemade or store-bought donuts, but ensure they are plain and completely unglazed for the best chocolate adhesion.
- If coloring white chocolate, always use oil-based food coloring to prevent seizing.
- For ease and vibrant colors, pre-colored candy melts are highly recommended and will save you time.
- Pipe extra chocolate ears, as they are fragile and can break easily during assembly.
- Refer to the “Creative Variations and Expert Decorating Tips” section above for additional ideas and advice.
- These decorated donuts can be stored in a covered, airtight container at room temperature for up to 2 days. Avoid refrigeration or freezing to prevent chocolate cracking.
Nutrition
An automated tool is used to calculate the nutritional information. As such, I cannot guarantee the accuracy of the nutritional information provided for any recipe on this site.
