Easy No-Bake Snowflake Oreo Cookies: Your Perfect Winter Wonderland Treat
Step into a world of winter magic with these absolutely adorable and incredibly easy **Snowflake Oreo Cookies**! Crafted with just a handful of simple, readily available ingredients, this no-bake recipe is a true game-changer for anyone looking to add a touch of sparkle to their seasonal celebrations. Whether you’re planning a festive Christmas party, a cozy winter gathering, or even a magical Frozen-themed birthday bash, these delightful cookies are guaranteed to be a hit with both children and adults alike. Forget about complicated baking processes or lengthy decorating sessions; these Snowflake Oreos are designed for maximum fun and minimal fuss, making them the ideal project for a joyful afternoon with the family.
These charming cookies aren’t just easy to make; they’re also incredibly fun to decorate, turning each treat into a miniature work of art. The shimmering sanding sugar and edible pearls give them that enchanting, frosty look that truly captures the spirit of winter. What makes this recipe even better is that you won’t need any specialized equipment like royal icing bags or intricate cookie cutters. All you require are basic store-bought ingredients and a sprinkle of creativity, making them a fantastic activity to involve the kids. This simplicity mirrors the ease of my other popular creations, such as the delightful Snowflake Cake and the charming Snowflake Cupcakes.
Transforming ordinary Oreos into extraordinary treats is one of my favorite culinary adventures. You might remember the playful Emoji Cookies, the festive Snowman Cookies, the spooky Oreo Spider Cookies, the sporty Oreo Sports Cookies, and the adorable Oreo Turkey Cookies. These Snowflake Oreos join that esteemed list of simple yet impressive creations. Given that we often only make such themed cookies for specific occasions, investing in a unique snowflake cutter that might only see limited use doesn’t always make sense. Instead, we embrace smart solutions; for example, some creative decorators even fashion beautiful snowflakes from simple star cutters, proving that ingenuity can often replace specialized tools. This recipe keeps things wonderfully simple, allowing you to focus on the joy of decorating and the delicious outcome.
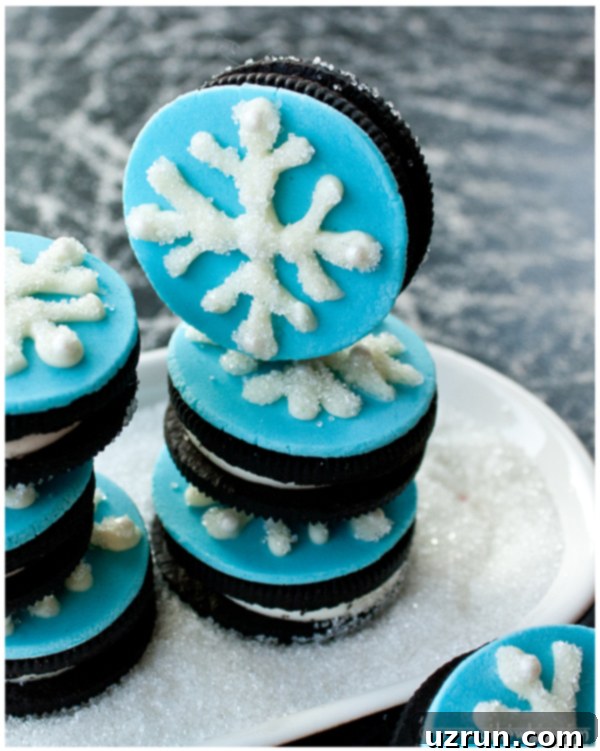
Table of Contents
- The Magic of No-Bake Desserts
- How to Make Easy Snowflake Cookies?
- Gathering Your Simple Ingredients
- Essential Tools for Decorating
- Making it a Family Affair: Decorating Fun for All Ages
- Variations for Snowflake Oreos
- Tips and Techniques for Winter Cookies
- Troubleshooting Tips for Perfect Snowflake Oreos
- Storage of Decorated Cookies
- Presentation Perfect: Serving Your Snowflake Treats
- More Winter Desserts
The Magic of No-Bake Desserts
No-bake desserts hold a special place in the hearts of busy bakers and enthusiastic kids alike. The beauty of these Snowflake Oreo Cookies lies precisely in their no-bake nature. This means you can skip the oven entirely, saving time, energy, and avoiding the heat of a kitchen in full baking swing. It’s an ideal solution for last-minute party preparations or simply when you want a quick, delicious treat without the fuss. No-bake recipes are often more forgiving, perfect for beginner bakers or little hands eager to help without the dangers of a hot oven. Plus, they tend to set up quickly, allowing for almost immediate gratification – a huge bonus when excitement is high!
How to Make Easy Snowflake Cookies?
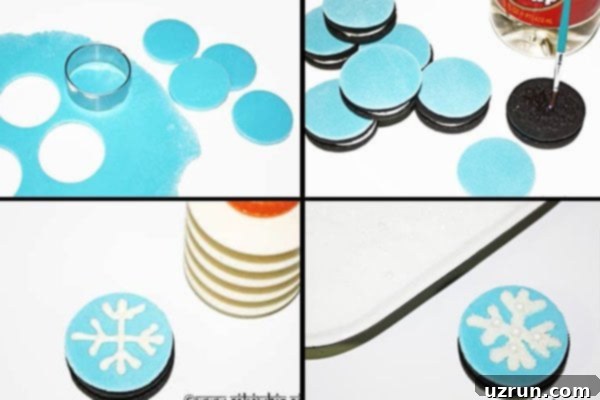
Creating these delightful snowflake treats is a straightforward process that anyone can follow. Here’s a quick overview of the simple steps:
- Prepare Fondant Circles: Roll out your chosen color of store-bought fondant and use a cookie cutter (matching the size of your Oreos) to create perfect circular toppings.
- Attach Fondant to Oreos: Brush a tiny amount of corn syrup or a thin layer of buttercream frosting onto the Oreo to act as an edible “glue.” Gently press a fondant circle onto each cookie.
- Draw Snowflakes: Fill a piping bag or a squeeze bottle with melted white chocolate. Use this to carefully draw intricate snowflake patterns on top of the smooth fondant surface.
- Decorate with Sparkle: Immediately after drawing the snowflake (before the chocolate sets!), generously sprinkle sparkling sanding sugar over the entire cookie and place edible pearls onto the wet chocolate for extra shine.
- Allow to Set: Give the chocolate a few minutes to fully set and harden. Once firm, brush off any excess sanding sugar, and your beautiful, sparkly Snowflake Oreo Cookies are ready to be admired and enjoyed!
Gathering Your Simple Ingredients
The beauty of this recipe lies in its simplicity, requiring just a few key components that are easily found at any grocery store or craft supply shop:
- Oreo Cookies: The classic base for our delicious treats. Standard chocolate Oreos work wonderfully, but feel free to experiment with seasonal or flavored varieties for an extra twist.
- White Chocolate (Melted): This forms the delicate snowflake design. White chocolate chips or melting wafers are excellent choices for their smooth consistency when melted.
- White Edible Pearls: These add a touch of elegant shimmer and texture, mimicking fresh fallen snow or ice crystals.
- Sparkling Sugar: Crucial for that iconic frosty, glittery look. It catches the light beautifully and adds a subtle crunch.
- Marshmallow Fondant (Light Blue): This creates a smooth, colorful canvas for your snowflake designs. Store-bought fondant is a huge time-saver and comes in a variety of vibrant colors. Light blue is perfect for a winter theme, but other colors can be fun too!
- Corn Syrup or Buttercream Frosting: A small amount is needed to adhere the fondant to the Oreos. Both act as a fantastic edible adhesive.
Essential Tools for Decorating
You don’t need a professional pastry kitchen to make these show-stopping cookies. Here’s what you’ll want on hand:
- Rolling Pin: For evenly rolling out the fondant.
- Round Cookie Cutter: Essential for cutting fondant circles that perfectly match the size of your Oreos.
- Small Pastry Brush: For applying the corn syrup or buttercream to the Oreos.
- Piping Bag with a Small Round Tip or Squeeze Bottle: This is key for drawing the intricate snowflake patterns with melted chocolate. A zip-top bag with a tiny corner snipped off can also work in a pinch.
- Microwave-Safe Bowl: For melting the white chocolate.
- Baking Sheet Lined with Parchment Paper: A clean, non-stick surface for placing your decorated cookies while they set.
Making it a Family Affair: Decorating Fun for All Ages
One of the most rewarding aspects of making these Snowflake Oreo Cookies is how perfectly suited they are for a family activity. Kids absolutely love the hands-on fun of decorating! From rolling out the colorful fondant to sprinkling the sparkling sugar and carefully placing edible pearls, there are plenty of tasks for every age group. It’s a wonderful way to encourage creativity, develop fine motor skills, and most importantly, create lasting memories together in the kitchen. Set up a decorating station with all the components, put on some festive music, and watch as each family member designs their unique winter masterpiece. The end result is not just a delicious treat, but also a cherished experience.
Variations for Snowflake Oreos
These Snowflake Oreo Cookies are incredibly versatile! Feel free to get creative and experiment with these delightful variations:
- Use a Different Topping for Snowflakes: While melted white chocolate offers a clean, crisp look, you can certainly experiment with other options. Royal Icing or Glace Icing are fantastic alternatives, as both dry hard with a lovely sheen, providing a slightly different texture and finish to your snowflake designs.
- Snowflake Sugar Cookies: If you prefer a more traditional cookie base, swap out the Oreos for round cut-out sugar cookies. Once baked and cooled, the rest of the decorating steps remain exactly the same – just apply your fondant, draw the snowflakes, and decorate with sprinkles and pearls. This is a great option if you have a favorite sugar cookie recipe!
- Try Different Colors of Fondant: I used a light blue fondant to evoke a classic winter theme, but don’t limit yourself! Imagine a snowy pink, shimmering silver, or even a deep purple background for your snowflakes. Choose colors that match your party theme or simply your personal preference.
- Use Flavored Oreos: The classic Oreo is always a winner, but consider seasonal or flavored varieties for an extra layer of taste. Mint Oreos would add a refreshing touch, while red velvet Oreos could bring a festive color contrast. Pumpkin spice or gingerbread Oreos could also be fun for unique winter flavors.
- Dip the Oreos Entirely: For a different look, skip the fondant circles and instead dip the entire Oreo cookie into colored candy melts. Allow them to set completely, then proceed with adding the white chocolate snowflake decor and sprinkles. This creates a fully coated, vibrant base.
- Add a Drizzle: For even more flair and sweetness, after your main snowflake design is complete and set, add an extra drizzle of melted white or colored chocolate across the cookie. This creates a beautiful, abstract effect.
- Add Colorful Sprinkles Around the Snowflake: Instead of just on the snowflake, scatter a mix of colorful sprinkles around the white snowflake design on the blue fondant. This adds another dimension of festivity and texture.
- Use a Pre-Made Snowflake Topper: To save even more time, especially if you’re making a large batch, consider using pre-made candy or chocolate snowflake toppers. Simply attach them to the fondant with a dab of melted chocolate or corn syrup.

Tips and Techniques for Winter Cookies
Achieving perfectly pretty snowflake cookies is easier with a few helpful tips:
- Embrace Store-Bought Fondant: Don’t feel the need to make fondant from scratch for this recipe. Store-bought fondant is a fantastic time-saver, often more consistent, and widely available at craft stores like Hobby Lobby, Michaels, or even on Amazon and in large supermarkets like Walmart. It makes this quick project even quicker!
- Decorate Swiftly: The key to getting your sprinkles and pearls to stick is to act fast. Sprinkle sanding sugar and apply edible pearls immediately after drawing your chocolate snowflake. If the chocolate starts to set, your decorations won’t adhere properly and will just roll off.
- No Fridge for Fondant: A crucial storage tip: avoid refrigerating or freezing these cookies. Fondant reacts poorly to moisture; it becomes very sticky, gooey, and can even “sweat” or melt when exposed to the humidity and cold of a refrigerator or during thawing. Keep them at room temperature for best results.
- Mastering Melted Chocolate: The easiest way to melt chocolate is in a microwave-safe bowl. Heat in short 20-30 second intervals, stirring thoroughly between each interval. This prevents scorching. Alternatively, a double boiler method (a heatproof bowl over a saucepan of simmering water, ensuring the bowl doesn’t touch the water) offers more gentle, even melting.
- Perfect Fondant Fit: When cutting your fondant circles, ensure the cookie cutter is the exact same size as your Oreo cookies. This ensures the fondant sits perfectly flush on top, creating a neat and professional finish without any overhang.
- Secure Fondant Attachment: To firmly attach the fondant to the Oreo, brush a small amount of corn syrup or spread a thin layer of buttercream frosting on the cookie. Both act as an excellent edible adhesive, ensuring the fondant stays in place. Make sure not to use too much, just a thin, even layer.
- Practice Your Snowflake Design: If you’re new to piping, do a quick practice run on a piece of parchment paper first. Simple asterisk shapes, lines extending from a central point, or a few intersecting lines can create beautiful, abstract snowflake designs without needing intricate detail.
- Clean Up Excess Sugar: Once the chocolate has set and the sprinkles are secure, use a clean, dry pastry brush to gently sweep away any excess sanding sugar that didn’t stick. This gives your cookies a polished, finished look.
Troubleshooting Tips for Perfect Snowflake Oreos
Even with simple recipes, sometimes little hiccups occur. Here are solutions to common issues:
- Chocolate Too Thick/Thin? If your melted chocolate is too thick to pipe smoothly, add a tiny bit of coconut oil or vegetable shortening (1/4 teaspoon at a time) and stir until it reaches the desired consistency. If it’s too thin and runny, it might be overheated; let it cool slightly, stirring frequently, or add a few more chocolate chips to thicken it.
- Fondant Won’t Stick? Ensure you’re using enough corn syrup or buttercream to create a tacky surface on the Oreo. If the Oreo is too crumbly or the fondant too dry, they won’t adhere well. A fresh Oreo and a slightly soft (but not sticky) fondant work best.
- Snowflake Design Not Crisp? This often happens if the chocolate is too warm and runny, or the piping tip/hole is too large. Let the chocolate cool slightly, or use a smaller tip/cut a smaller hole in your piping bag. Practice strokes can help refine your technique.
- Sanding Sugar Falling Off? You need to sprinkle the sugar *immediately* onto the wet chocolate. If the chocolate has already started to harden, the sugar won’t adhere. Work in small batches if necessary.
Storage of Decorated Cookies
Proper storage is essential to keep your beautiful Snowflake Oreo Cookies looking and tasting their best:
- Room Temperature is Best: Leftover cookies should be stored in a loosely covered box or an airtight container at room temperature. They will maintain their quality and decorative integrity for 2-3 days. The “loosely covered” part is important to prevent excessive moisture buildup which can affect the fondant.
- Refrigerate – Not Recommended: As mentioned earlier, placing these cookies in the refrigerator is strongly advised against. The moisture and cold environment of a fridge will cause the fondant to become sticky, tacky, and potentially messy. It can also cause the colors to bleed and the texture to become unpleasant.
- Freeze – Not Recommended: Similarly, freezing is not recommended for these decorated cookies. Upon thawing, the fondant will likely become very sticky and messy due to condensation and moisture, ruining the delicate decorations. It’s best to enjoy them fresh or within a few days of making them.
Presentation Perfect: Serving Your Snowflake Treats
Once your Snowflake Oreo Cookies are set and ready, presenting them beautifully is the final touch. Arrange them artfully on a white platter to highlight their snowy aesthetic, perhaps alongside some pine sprigs or small fairy lights for an extra festive feel. They make wonderful additions to dessert tables, party favors, or simply as a special treat for an afternoon tea. Serve them with a steaming mug of hot cocoa, a glass of cold milk, or even as a garnish for a scoop of vanilla ice cream. These cookies are not just a delight to eat but also a joy to behold, making them perfect for gifting during the holiday season or as a thoughtful gesture for winter birthdays.
More Winter Desserts
If these Snowflake Oreo Cookies have sparked your love for winter-themed treats, you might also enjoy these other delightful recipes:
- Snowman Cupcakes (With Donut Toppers)
- Easy Snowman Cake (Frosting and Fondant)
- Poinsettia Cupcakes (With Buttercream)
- Snow Ice Cream
- Nutter Butter Penguin Cookies
- Penguin Cake
Recipe
Snowflake Cookies (Snowflake Oreos)
Abeer Rizvi
Pin Recipe
Want to Save This Recipe?
Enter your email & I’ll send it to your inbox. Plus, get great new recipes from me every week!
By submitting this form, you consent to receive emails from CakeWhiz
Ingredients
- 20 Oreos
- 1 cup White chocolate Melted
- 2 tablespoon White edible pearls
- ⅓ cup Sparkling sugar
- 1 cup Marshmallow fondant Light blue
- 1 tablespoon Corn syrup Or Buttercream frosting
Instructions
-
Roll out fondant and use a circle cutter to cut out some circular pieces. They should be the same size as the Oreo cookies.
-
Brush corn syrup on or spread some buttercream icing on top of the Oreo .
-
Stick the circle fondant piece on top and press it gently.
-
Fill a piping bag or squeeze bottle with melted white chocolate and draw a snowflake on top of the blue fondant.
-
Sprinkle sanding sugar all over the cookie before the chocolate sets and hardens.
-
Stick some edible pearls wherever you like.
-
Brush away excess sanding sugar and enjoy.
Notes
- Read all my tips above.
- Leftovers can be stored in a loosely covered box at room temperature for 2-3 days.
Nutrition
An automated tool is used to calculate the nutritional information. As such, I cannot guarantee the accuracy of the nutritional information provided for any recipe on this site.
